Growing tulips for March 8 or Valentine's Day in your home is not as difficult as it may seem to inexperienced gardeners. Living in a private house makes the task much easier, however, in an apartment you can also achieve the appearance of spring flowers with delicate buds.
The article contains useful tips and a detailed description of all stages of such an interesting process as forcing tulips at home. Step-by-step instructions indicating the timing, rules for preparing the bulbs and soil, and a description of agrotechnical measures will help to avoid mistakes.
Features of an interesting process
Note to flower growers:
- the process takes more than four months;
- Not all varieties are suitable for forcing;
- planting material must be of high quality, large, heavy;
- It is necessary to disinfect the bulbs and substrate to reduce the risk of fungal infections;
- the soil is nutritious, but with good aeration, loose;
- it is important to adjust the temperature at different periods so that sprouts do not appear prematurely;
- after forcing, you can put the bulbs in storage for further germination, if the base has not lost all its juices and is in acceptable condition.
Planting in the substrate
Step-by-step instructions on how to plant bulbs for forcing:
- The finished soil is slightly compacted.
- The bulbs are placed on top. If planting is done in a pot, 3 pieces are immersed in each container. They shouldn't touch each other.
- The planting material is sprinkled with a substrate so that 1 cm remains to the surface of the container, and the tops are not covered with soil.
- At the end of the work, water with a weak solution of potassium permanganate.
- The containers are brought into a room with a temperature of 5-9 degrees and placed near the windows.
- After five days, the temperature should be increased to 18-19 degrees.
Related article:
How to beautifully plant tulips on a plot + photo
When the plants bloom, the room is cooled again to 15-16 degrees, otherwise the stems of the tulips will begin to stretch and the buds will open too quickly.
For forcing it is not necessary to have a basement. An insulated balcony in an apartment is also suitable for growing tulips in winter, if suitable conditions can be created in it.
Landing dates
Bulbs are planted at different times: the period depends on the date by which it is important to obtain delicate tulips. Growing spectacular flowers takes about 4.5 months, you need to focus on this figure.
Popular holidays and bulb planting periods:
- February 14 (Valentine's Day, Valentine's Day). Early October.
- February 23 (Men's holiday, Defenders of the Fatherland Day). October 10–12.
- March 8 (Spring Festival, International Women's Day). From 15 to 20 October.
The best option is hardening and rooting of planting material in a cool room, then moving it to a windowsill, heated veranda or room. This method, if the rules of cultivation are followed, gives good results.
Forcing in water
Another method of forcing tulips is hydroponics, but the bulbs after this are not suitable for growing. The method is used if there are no containers with substrate. Planting material is placed in glasses with water, after placing a plywood mug with a hole in the bottom on the bottom. The water level should be a couple of centimeters below the bottom. Instead of plywood, you can use expanded clay. There must be an air gap between the water level and the bulbs.
Related article:
Preparing tulips for planting
To prevent the plants from rotting, place an activated carbon tablet at the bottom.
The glasses are transferred to a dark room with a temperature of 4-6 degrees. If the room is light, the containers are covered with caps. Water is regularly added to the initial level by releasing a stream along the wall of the glass.
In a couple of months a sprout will appear. When the stem reaches a length of 10-12 cm, the plants are transferred to a warm, bright place with a temperature of 12-14 degrees. Knowing how long it takes for tulips to emerge, you can calculate the appearance of buds. When planted in October, the flowers will bloom in early March.
Varieties of tulips for forcing
When choosing the ideal planting material, you need to take into account an important nuance: exotic flowers with original petal colors are not suitable for home growing. Capricious hybrids do not take root well, and the bulbs often rot. Inexperienced flower growers should not waste money and time experimenting with unusual species: it is easier to take proven, strong planting material, which has many positive reviews.
At home, the following varieties are suitable for forcing tulips from bulbs:
- Parade.
- Aristocrat.
- Eric Hofsier.
- Negrita.
- Diplomat.
- Oxford.
- Lustig Battle.
- London.
Low-growing varieties are an excellent option for growing on a windowsill. It is advisable for novice flower growers to buy planting material at an agricultural store: in this case, the bulbs are already prepared for forcing. Garden plant lovers who want to prepare their own planting material will have to provide their tulips with quality care. This condition is mandatory for the appearance of heavy, strong bulbs. If you are short of time and experience, it is better to buy a base for tulips at a flower shop: weak bulbs are not suitable for growing spectacular specimens on a windowsill.
Choosing soil for planting tulips
The correct choice of soil for planting is a very important factor in the successful forcing of tulips.
The soil for planting should be loose, well permeable to air and water. This requirement is due to the following fact. Bulbs are extremely susceptible to rot, and poorly ventilated soil tends to retain water, which causes the bulbs to rot.
Thus, clean garden soil is not suitable for planting tulips, since it becomes too compacted during watering, water stagnates in it and thereby prevents air from reaching the bulbs.
At the same time, for bulbous plants, the fertility of the soil does not matter at all, because all the nutrients for successful flowering are contained in the bulb.
Considering the above, river sand, sawdust, peat or a mixture of them, possibly with the addition of garden soil, are excellent for planting tulips.
For information: there are options for growing tulips even in plain water.
However, adding garden soil or peat to the soil for planting carries the risk of worms and harmful insects entering the soil, which can cause irreparable damage to the bulbs.
Thus, I used dried river sand for planting without adding any impurities. This planting option is used in Holland, the birthplace of tulips.
Technology and step-by-step instructions
Stages:
- selection of the optimal variety;
- purchase of substrate;
- clarification of the number of bulbs for planting;
- selection of optimal containers for forcing tulips;
- identifying rooms with low and moderate temperatures to place flowerpots or wooden boxes with bulbs in the first and second stages of flower forcing;
- purchasing fertilizers and fungicides;
- preparing and planting bulbs;
- caring for the foundation in the soil, watering, adjusting lighting and temperature;
- changing the type of fertilizer depending on the stage: green growth and budding;
- moving boxes or flowerpots into a room with the desired temperature;
- cutting tulips for a holiday or for sale;
- storage of cut materials;
- inspection of the remaining bulbs, sorting the base: dispose of or pickle, put in storage for planting in the ground by the beginning of autumn.
Selection of bulbs and their preparation
Requirements for planting material:
- purchasing from agricultural stores with a good reputation, from well-known companies. You can take underground parts of tulips from your site if the base has gone through a period of cooling and dormancy before planting;
- high-quality bulbs of the highest class;
- preferably Dutch varieties intended for forcing tulips. Information about this feature of planting material is always on the packaging;
- large and heavy: diameter – about 4–5 cm, weight of each – about 30 g;
- varieties resistant to fungal and viral diseases. A dangerous disease often appears on tulips - variegation, which is difficult to combat;
- without damage, rotten areas, cracks, stains or other abnormalities.
Preparation stages:
- remove the covering scales. A simple operation allows you to identify signs of disease and rot on the base. The second positive point: “stripped” bulbs produce roots more actively;
- disinfection is a mandatory procedure. The planting material is etched in a solution of Maxima or Fitosporin preparations. Soaking lasts about half an hour.
On a note! A large, healthy bulb is an important nuance for growing luxurious tulips at home. However, improper care of planting material and failure to comply with the timing of agrotechnical measures, even with ideal bulb quality, negatively affects the result. Before starting such an important process as forcing tulips, you need to study information on the topic and draw up a rough work calendar. A mandatory step is preparing the bulbs for germination, choosing a suitable substrate and container.
Soil and planting capacity
High-quality soil mixture is sold in flower shops. The seller will tell you which substrate is suitable for spring flowers. You can prepare the soil yourself from garden soil (50%), humus (35%) and river sand (15%). The soil should be loose and nutritious. You can add a little peat: about 5%.
Soil disinfection is carried out using:
- potassium permanganate solution (watering the substrate);
- the drug Fitosporin (water the soil);
- Glyokladin tablets (tablets are buried in the ground to a depth of 1.5–2 cm).
Before planting tulip bulbs, it is useful not only to disinfect the soil, but also to fertilize it using nitroamophoska or calcium nitrate. Take 1 tsp for a medium-sized pot. mineral composition.
What should a flowerpot be like when growing spring flowers? When forcing tulips, use a flower pot or wooden box. For three to five bulbs, a medium-sized pot (diameter about 15 cm) is suitable. When growing six or more tulips, you will need a large container or wooden box. Calculating the size of the container is easy: maintain an interval of 2 cm between the bulbs.
Other nuances:
- before planting the bulbs, check that there are several drainage holes in the bottom, otherwise the planting material will quickly begin to rot;
- For placement in one container, approximately the same planting material is chosen;
- It is useful to take a base for tulips of the same variety so that the sprouts appear simultaneously in a certain flowerpot or box.
Planting and rooting
How to proceed:
- prepare the bulbs, fill the containers with soil, water a little with the addition of disinfectants;
- planting material should be buried in the soil, but the top should look out from under the substrate;
- place the cut-off lower part of a plastic bottle on top, a plastic cup, or cover with a plastic bag to maintain high humidity in the mini-greenhouse;
- containers with tulip bulbs for forcing are sent to a room where the temperature is kept at +5 C...+9°C.
Substrate preparation
To grow tulips for forcing, a light substrate is required. It can be river sand, vermiculite, a mixture with peat or humus. If the bulbs will be used for growing in the future, the following mixture is suitable:
- 1 part each of peat, sand and humus;
- 2 parts of turf;
- 1 tbsp. ash per 10 kg of mixture;
- mineral fertilizers for flowers.
Plants feel good in a substrate of 2 parts turf and humus and 1 part sand. It is not advisable to use sawdust for tulips. The material does not retain water well and has an overly acidic pH. An additional disadvantage of wood shavings is their ability to trap nitrogen compounds, which is why the flowers have to be fed only with liquid fertilizers.
Before planting, the soil is disinfected with a solution of potassium permanganate, Fitosporin, or a Glyocladin tablet is laid to a depth of 2 cm.
The prepared soil is placed in containers with drainage holes. These can be clay pots with a diameter of 15 cm, wooden or plastic boxes. They are filled two-thirds with substrate.
Rules for care after landing
Only following the recommendations will help you wait until the buds appear. The rules are simple, but scrupulousness is required to maintain optimal conditions when forcing tulips.
Watering
The substrate must always be moist, otherwise rooting is poor. The soil in the flowerpot should not dry out. Watering is carried out every other day, but first check the condition of the soil: water should not stagnate in the substrate. Add liquid from the outside of the plastic container; do not open the onion at an early stage.
Temperature
At the first stage (rooting), minimum temperatures are needed: +5...+9 degrees Celsius. Containers with tulip bulbs are kept in the cellar or on the bottom shelf of the refrigerator. You can take the container out onto a glassed-in balcony or loggia. Indicators cannot be determined by eye: too high or low a temperature disrupts the timing of tulip forcing and can lead to freezing and death of planting material.
After sprouts about 4 cm long appear, the containers are moved to a warmer room: placed on a windowsill or coffee table next to the window. The optimal indicators for germinating tulips during this period are from +15 to +18–19 degrees.
Advice! In the process of growing tulips at home, the temperature is adjusted taking into account the rate of bud formation and green mass gain. If the release and elongation of peduncles is delayed, then the indicators are increased. If growth is too active and there is a high probability of buds forming earlier than the desired date, on the contrary, the temperature is lowered.
Lighting
After germination, flowers need enough light. A window sill on the east side, a balcony or a loggia are suitable areas for placing containers with bulbous plants during the forcing period.
The optimal length of daylight is from 10 to 12 hours. In the autumn-winter period there is no such amount of natural light. What to do? Supplemental illumination of plants compensates for the lack of sunlight.
Humidity
For rooting of bulbs, indicators of 65–70% are needed. A plastic container above the ground retains moisture and allows for less frequent watering. You cannot place boxes and flowerpots with planting material in direct sunlight or near radiators: in such conditions the substrate quickly dries out.
Fertilizers
What type of feeding should I choose? To quickly gain green mass, you need mineral compositions based on nitrogen (ammonium nitrate and urea); when releasing buds, you need potassium sulfate and calcium nitrate.
Many gardeners who force tulips at home believe that fertilizers have less effect on plant development than the size and quality of the bulbs. The reason is simple - it is from the fleshy, large base, and not from the soil, that the young flower takes most of its nutrients.
Preparation, storage and selection of planting material
To get healthy plants with beautiful buds by a given date, you need to properly prepare the bulbs for planting in the soil. Only properly preserved bulbs will produce healthy flowers.
Tulips from which they intend to obtain bulbs for forcing are cared for more carefully than plants that are grown naturally. It is imperative to carry out thorough weeding, loosening the soil and timely watering.
The process of preparing bulbs for the future harvest begins when tulips begin to bloom, when they are still in the ground.
| As soon as the bud begins to acquire its color, i.e. Before it opens, the flower must be cut off, leaving 1-2 healthy leaves. Cutting at the stage of bud formation allows you to avoid the outflow of nutrients for the formation of the flower and seeds and direct all the nutrients to the formation of a strong bulb for the future harvest, i.e. the plant will not waste energy on flowering, but will concentrate on developing the bulb. |
Watering the plants continues for two to three weeks until the remaining leaves wither. It is during this period that the future tulip is formed and allows the bulbs to grow and gain strength.
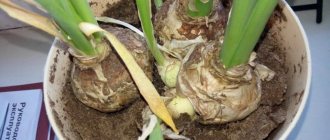
When the leaves begin to turn yellow (usually this happens 15-20 days after cutting the bud), the bulbs are dug up and dried for two weeks in a dry room with good ventilation without direct sunlight. After drying, it is necessary to inspect each bulb, discarding damaged or diseased specimens.
Only healthy large bulbs are suitable for forcing, the diameter of which should not be less than 4 centimeters. Only such bulbs will be able to form a healthy flower in the spring, because... Only a strong and strong (i.e. large) bulb can cope with the process of growing in unnatural conditions in forcing mode.
| > Before digging the bulbs | View of the bulbs in cups immediately after digging |
Removing hard scales from the bulbs immediately after digging can lead to drying out and damage during storage. Therefore, the scales must be removed immediately before planting the bulb. This will allow the bulbs to be re-inspected for damage and disease, and will also help the plant take root as quickly as possible.
When and how to cut buds
The best timing is selected taking into account the length of time the flowers are stored:
- for the holiday (store for three to four days). The buds must have a specific varietal color without a green tint;
- for sale (storage for one to two weeks). Tulips are cut when the buds begin to show the color characteristic of this variety, and the top is still light green.
Cut flowers are wrapped in paper or newspaper and taken to a cellar or basement: storage is carried out only at low temperatures.
It is useful to give flowers water before and after cutting for sale or making a bouquet for a gift. First, cut the bottom of the stem, then place the specimens in a container with cold water and move them to a cool veranda or other cool area for 24 hours.
Cooling period for tulips
Containers with planted bulbs are placed in a room (basement or refrigerator) with a stable temperature of +9 ° C and air humidity of 60-70% for rooting. For different varieties, the rooting period can range from 13-14 to 20 weeks. During the period of cold storage, the plantings are periodically inspected and watered. If temperatures fluctuate, growth can be curbed by covering the plantings with snow instead of watering.
To place them in a household refrigerator, pots of tulips are pre-packed in a plastic bag.
Why don't tulips bloom?
There are several reasons:
- low quality planting material;
- bulbs from your garden are not properly prepared for forcing;
- violation of periods of dormancy (low temperatures) and active growth (increased temperature, increased daylight hours);
- rotting of planting material in the absence of treatment of bulbs and soil with disinfectants;
- the florist dug the base for the bulbous plants at the wrong time;
- planting material was stored at too high or low temperatures.
Prepare the material carefully
If you are growing tulips in your garden and want to stock up on forcing material yourself, do it right. Take a closer look at the flower bed, identify the strongest plants and do not let them bloom by removing elongated flower stalks in advance - this will save potential.
For cultivation in late autumn and winter, healthy, strong bulbs of at least 5 cm in diameter and no lighter than 25 grams are suitable.
Dry the dug up beauties as usual and send them for storage, and when the time comes for forcing, sort them, disinfect them with a fungicide and remove the top scales so as not to interfere with the development of the root system and the free growth of shoots. The main condition for success is confidence in the impeccable health of the planting material.
You can save yourself from the above-mentioned troubles by purchasing bulbs in a flower salon, where they will help you choose a variety, demonstrate the result, guarantee quality, and guide you on the terms and conditions of forcing.
What to do with the bulbs after forcing
First of all, carefully examine the underground part left after cutting the flowers. Most often, the planting material is depleted, devoid of leaves, if the cut was made too low. Such bulbs will have to be disposed of.
Note to flower growers:
- If the base is well preserved and the appearance is quite acceptable, you can use them again, but without proper preparation and storage of new tulips you cannot wait.
- First, the base is soaked in a solution of potassium permanganate (not strong) or etched using fungicides to protect against fungi. The duration of the procedure is from 30 minutes to 1 hour.
- Next, the bulb is dried in air, placed in a box, and put away for storage. The room should be warm enough. The first month the bulbs are kept at a temperature of about +30°C, the second and third - from +22°C to + 23°C, then - at +17°C. The rest of the time (until September) the planting material is kept at a temperature no higher than +5 degrees.
- In a strong onion, a small replacement part is formed inside.
- Planting in the ground is carried out only in September, so that the base of the tulip goes through a dormant period in the cool and the green mass begins to form in the spring. Most often, tulips from preserved bulbs bloom a year later.
Forcing tulips from bulbs requires patience and careful adherence to various aspects of growing spring flowers from the grower. The expenditure of labor and time in most cases is not in vain: for the winter and spring holidays you can please your loved ones with a bouquet of delicate flowers. Not only tulips, but also other bulbous plants are successfully grown on the windowsill: daffodils, hyacinths, snowdrops, crocuses.
How to remove tulips yourself at home? The answer is in the video below:
Which varieties to choose
For the procedure to be successful, you need to choose the right varieties of flowers. Not all of them are suitable for winter growing. In addition, the time by which you want to get flowering plants also plays a role.
For the New Year
Early flowering varieties are suitable for this, as their cooling period is only 16 weeks. These varieties include Apricot Beauty, Christmas Marvel, Diamond Star and others (Figure 2).
Figure 2. Varieties for growing for the New Year: 1 - Apricot Beauty, 2 - Christmas Marvel, 3 - Diamond Star
These same species are also suitable for growing for Christmas, as they have a sufficient flowering time to maintain buds in late December and early January.
By March 8
Crop varieties that can bloom in late February or early March belong to the Darwin hybrid species.
These plants have very diverse petal colors, and the thickness of the stems allows them to be used not only as green decoration, but also for cutting.
Figure 3. Varieties for cultivation by March 8: 1 - Oxford, 2 - Diplomat, 3 - Scarborough, 4 - Vivex
Popular varieties of this type include Oxford, Diplomat, Eric Hofsue, Scarborough, Vivex and others (Figure 3).
By April
Varieties intended for cultivation by April require more care. Firstly, they are exposed to low temperatures longer. And secondly, after this they need to be properly warmed up to activate growth and flowering.
Figure 4. Varieties for cultivation by April: 1 - Ad Rem, 2 - Gordon Cooper, 3 - London, 4 - Parade
The varieties for such cultivation are also quite diverse. Among them are Ad Rem, Gordon Cooper, London, Daydream, Parade and Oxford Elite (Figure 4).
By May
The cultivation of tulips by the beginning of May is carried out mainly using late-flowering varieties. However, subject to certain conditions, other types can be used.
Figure 5. Varieties of tulips for May: 1 - Aristocrat, 2 - Negrita, 3 - Hibernia
The most popular varieties are Aristocrat, Negrita, Parade, Hibernia and others (Figure 5).
Reject illiquid goods
The bulbs from which the flowers were obtained hydroponically, unfortunately, can no longer be dried, stored or further planted in the ground - they have exhausted their life resource. But the material used to force tulips in the ground may be suitable for further cultivation.
Having collected the long-awaited luxurious bouquet, dig up the bulbs, carefully inspect and feel them, dispose of unsightly and suspicious specimens, and prepare promising ones for the next season.
Growing tulips in winter is not at all difficult if you approach the task responsibly. But in this case, the quality of the sources matters too much. If you are unsure of your supplies, contact the professionals.
Follow the forcing regime
If plants are delayed in development during the cycle, they need to carefully add heat and light until they enter the schedule, and also monitor the hydrobalance. Dryness and waterlogging of the soil or air can equally be responsible for failure.
It is neglect of the tulip maintenance regime that most often leads novice gardeners to mission failure.
Adviсe
To be more confident in success, you can follow the following recommendations:
- For irrigation, it is better to use settled water, not colder than room water.
- It is important to apply fertilizer during the growth stage of tulips.
- Young shoots should be protected from direct sun.
- It is better to place pots with plants away from bright light, but not in complete shade.
- A draft can dramatically change the temperature, which leads to plant diseases.
- The proximity of a battery may prevent tulips from blooming on time.
Knowing all the rules, you can safely start growing tulips for the holidays, because the process, although long, is quite simple. Anyone can cope with this task if they have all the necessary materials.
How to feed tulips at home
Despite the fact that the tulips were planted in fertile soil, they will still need to be fed. Nutrients are essential for the plant to grow faster. Do this three times throughout the entire time before flowering.
The first time you need to feed is when you take out the tulips from the “cold” and they have already hatched. Here we need nitrogen fertilizers in the form of ammonium nitrate. This fertilizer contains up to 34% nitrogen, and it is necessary for the growth of greenery and the forcing of strong flower shoots.
Fertilizer is applied in dissolved form. To do this, dilute no more than 2 tbsp in 10 liters of water. l. saltpeter. Water the plant at the root according to the volume of the pot. And it is more correct to do this when the leaves have grown by about 5 cm. At the same time, you can also feed them with calcium nitrate. It is diluted at the rate of 30 g per 10 liters of water, and the solution is poured under the root.
Some novice gardeners ask: can ammonium nitrate be replaced with urea, which contains up to 46% nitrogen. Of course, you can use it too. Moreover, liquid fertilizing with urea can be carried out both at the root and along the leaf in the form of spraying. But you need to keep in mind that urea takes longer to be absorbed by plants, unlike ammonium nitrate. It is applied only at the root and is absorbed faster through the root system.
The second feeding is carried out in the budding phase with ammonium and calcium nitrate; they contribute to the development of strong leaves and a powerful stem. Dilute in the same concentrations as during the first feeding.
The third feeding is carried out before flowering with potassium monophosphate. This is a very good fertilizer that promotes longer flowering. And it also disinfects the soil.