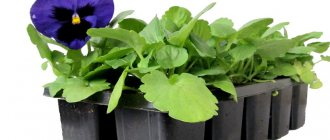
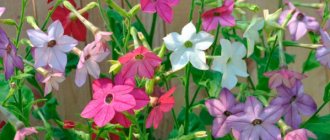
Petunia in peat tablets, the cultivation of seedlings from seeds of which will be described in detail in this article, turns out strong and blooms for a long time.
Petunia is an annual flower crop that can be grown by sowing seeds directly into the ground or through seedlings. Petunia seeds are very small and demanding of temperature, humidity and soil.
Many gardeners encounter problems when growing petunias because they choose the wrong conditions for seed germination. It is best to use peat tablets for planting petunias. In this article we will talk in detail about how to grow petunia seedlings in peat tablets and transplant them to a permanent flowering site.
Why are peat tablets needed?
Peat tablets are flat discs of pressed peat. They come in the following sizes in diameter:
27, 36, 42, 70, 90 mm. Therefore, it is very important to choose the optimal size for each crop. Peat tablets consist of two parts.
- Nutrient composition of peat. Manufacturers add microelements and vitamins to each puck, thanks to which plants and their root systems develop correctly and actively.
- Dense mesh outside. It allows moisture and air to pass through well, but traps peat inside, preventing the tablet from crumbling. The mesh is impregnated with a special composition that protects the roots of the plant from infection by parasites.
When wet, peat increases in size by 6-8 times. The tablet swells and grows in height. At the same time, the mesh protects it from decay and gives it the shape of a barrel.
Which tablets to choose?
On store shelves you can see peat tablets from many manufacturers. The most popular brands are:
- Jiffy , European brand. According to the manufacturer, the tablets guarantee almost 100% seed germination. Most often used for planting demanding plants, including conifers. The tablets contain growth activators and a fungicide to prevent rotting.
Peat tablets Jiffy
- RostOK. The peat composition of the tablet is supplemented with various nutritional components. It has a special outer layer that allows it to maintain its original shape until it is transferred to the ground.
Peat tablets RostOK
- Ellepress (ellepress) . Made from Finnish peat with added minerals. These components are able to fully provide the plant with everything it needs. The outer covering is treated with fungicide. The raw material has an acidity in the pH range of 5.4-6.2, which is suitable for most plants.
Peat tablets Ellepress
Advantages and disadvantages
Peat tablets have many positive qualities, although there are also some minor disadvantages. Let's look at the advantages first:
- There is no need to prepare separate cups or containers with soil for sowing. The tablets are full-fledged barrels for seedlings.
- Save space thanks to compact dimensions.
- The porous structure does not prevent the roots from receiving the necessary amount of oxygen and moisture.
- There is no need to apply additional mineral fertilizers.
- In the middle, each tablet has a depression in which the seeds are placed.
- Excess liquid goes out through the mesh, so the plant cannot be over-watered.
Among the disadvantages are the following:
- Single use.
- It dries out quickly, so regular and frequent watering is needed.
- The acidity in the tablets varies, so you need to select the optimal composition.
- Price. For those who grow petunia in large quantities, you will have to buy a lot of peat tablets, which is expensive. However, when growing rare varieties or coated petunia seeds, it is the tablets that will become a justified purchase.
Important! It is important that the package of tablets is intact. If they are poorly wrapped in plastic film or mesh, it is better not to purchase them.
Pros and cons of the method
The technology of growing petunia seeds for seedlings in peat tablets has a number of competitive advantages:
- a peat washer is a complete system that includes a kind of frame container in the form of a supporting shell and fertile soil. There is no need to prepare cups or other small containers for seedlings;
- you don’t need a lot of space to set up a mini-greenhouse on the windowsill;
- the loose structure of the soil helps provide the root system with a sufficient level of oxygen;
- stagnation of liquid is eliminated, since excess water is removed through the mesh shell of the washer;
- the soil mixture contains the required amount of microelements for the healthy growth and development of seedlings; no additional fertilizer is required;
- The capsule shell is treated with fungicides and is able to protect seedlings from pathogens.
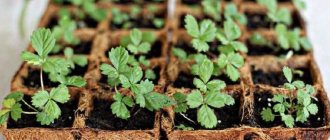
Petunias in tablets for seedlings do not require much space.
An additional plus for the piggy bank is a special recess for planting seeds on the surface of the peat capsule.
Flaws:
- washers in the form of a pressed substrate for seedlings are for one-time use;
- peat tends to dry out quickly; timely moistening of the composition is required. The technology involves frequent watering and monitoring the moisture level of the soil mixture;
- It is necessary to select peat pots with an optimal acidity level, since soil pH values vary depending on the brand.
An important disadvantage in the piggy bank is the cost of production. Moreover, if you plan to cultivate rare varieties of petunias, the costs of setting up a mini-nursery from peat tablets are offset by comfortable living conditions.
Petunia sowing time
You can sow petunia seeds in peat tablets:
- February 20-28. At this time, it is necessary to provide additional lighting so that the seedlings receive daylight for 12 hours in a row.
- March 20-30. At this time, sow if it is not possible to provide additional lighting. In this case, the seedlings will begin to bloom almost at the same time as the February ones.
If favorable conditions for germination of seedlings are created, they will be ready for transplanting into open ground after 3 months.
Recommendations for growing petunia
A few recommendations from experienced gardeners that will help you grow beautiful and healthy petunias:
- Every 7-8 days it is recommended to take the seedlings out onto the balcony. This is done only in good weather to avoid freezing. The balcony also needs to be warm, preferably glazed. The procedure is carried out from the moment the plant reaches 10 days of age.
- For transplanting into open ground, choose a sunny place. The soil needs to be loosened regularly and kept moist.
- Before transplanting into the ground, the mesh on the peat tablet is carefully cut and removed. Otherwise, the root system will spread very widely, the flower will wither and die.
- Flowers in open ground are fertilized with mineral fertilizer from the store every 10-12 days. It is better not to use nitrogen compounds during flowering.
- Before planting, soil with acidic soil must be fertilized with lime at the rate of 200 grams of dry composition per 1 m² of soil. This will equalize the pH level in the area. Rotted grass is also suitable as a top dressing. The plant will respond to its introduction with the active development of roots and leaves.
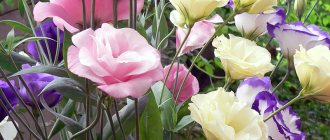
Review of petunia varieties
Growing petunia seeds in peat tablets is the most convenient way. Such plants do not need to be picked or additionally cared for. At the same time, moving seedlings into the ground on the site is as easy as shelling pears. Petunia takes a lot of useful substances from the peat tablet, and the result is a strong, bright green seedling with beautiful flowers.
Petunia in bloom
How to plant petunia seeds in peat tablets
Advice! To grow petunia seedlings at home, it is best to choose peat tablets with a diameter of 4 cm.
- Prepare a transparent container and place the tablets in it. It is best to use plastic cake containers for this. You can also buy a kit for growing seedlings at gardening stores. It includes a plastic tray with cells in which peat tablets are placed and a transparent plastic lid.
- The tablets are placed in the container so that the recesses for the seeds are on top.
- The washers are watered with warm, settled water. Under no circumstances should you use chlorinated or cold water.
Important ! It is necessary to moisten the tablets gradually. You cannot pour out the entire volume of water at once, otherwise it will wash away all the nutrients.
- Wait about 30 minutes for the tablets to gain the required amount of moisture, increasing 6-8 times.
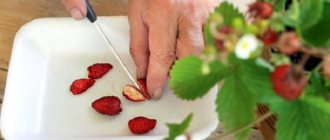
- Petunia seeds are poured into a plate for easy planting. Each seed is picked up on a wet wooden toothpick and placed in a recess in the middle of the tablet.
- Cover the container with a transparent lid or cling film.
- The mini-greenhouse is left in a warm, bright place, where the air temperature is kept between 20-23 degrees. Seeds will not be able to germinate if the room temperature is below the specified degrees.
Important! The seeds should not be sprinkled with soil after planting, since petunia germinates only in the light.
What mistakes are made when diving?
Since petunias grow at a very tender age and look very fragile, the grower will need maximum care and patience in order not to injure the seedlings and avoid mistakes that can lead to the death of the sprouts.
- Diving should be carried out only in a disinfected and loose soil mixture, since weak roots will not be able to master heavy soil, and the lack of preventive soil treatment can lead to diseases and, as a result, the death of sprouts.
- No watering during a dive. Having survived the stress of transplantation and getting into dry soil, the fragile sprout with equally fragile roots dies almost immediately.
- Do not hold a small plant by the stem - the difference in temperature between the person and the sprout has a negative impact on its health.
- Do not plant petunia inside the cup, filling it only halfway with soil. Soon it will begin to produce side shoots, for which there will be no room, and they will stretch upward. This type of planting makes watering difficult and creates increased humidity inside the plant, which can lead to diseases.
Seedling care
- After planting, every day the lid is removed from the container for 2-3 minutes for ventilation. The lid is wiped from condensation. This is necessary in order to prevent the occurrence of fungal diseases such as blackleg.
- Under comfortable conditions, seedlings will appear on the 5th day. However, some seeds can germinate within 2 weeks.
- To grow healthy and strong seedlings, it will be necessary to provide good lighting, regular watering and protection from pests.
- Plants do not like direct sunlight. The lighting should be diffused so that the seedlings do not get burned.
- The lid or film is removed from the containers when 2 true leaves appear on the seedlings.
- The seedlings are watered with settled water at room temperature. Do this gradually to completely moisten the peat tablet. Excess liquid after watering is drained to prevent mold from forming.
Important! It is necessary to ensure that the peat tablet does not dry out, otherwise the plant will die.
- Due to excess moisture or cold, a gray tablet becomes black, green or covered with white mold. Then you need to wipe the affected area with a cotton pad soaked in a solution of potassium permanganate. For the next 14 days, the affected plants are watered with fungicides, for example, Previkur.
Watch the video! Sowing petunias in peat tablets
Possible troubles during growing seedlings
Lack of shoots. The dense coating of the seeds does not allow them to germinate. What to do is to dissolve this shell by dropping water on it with the addition of Epin or Zircon. Old seeds. What to do - buy new seeds that can be used for another two to three years.
Seedlings die. The appearance of black leg fungus. What to do - treat the remaining seedlings with the Previkur fungicide, regularly ventilate the seedlings, and do not allow water to stagnate in the tray. Large intervals between waterings, during which the tablet remains dry for a long time. What to do - adjust watering.
The seedlings stretched out. Insufficient or one-sided lighting of seedlings. What to do - organize additional lighting. And also treat petunia seedlings with Atlet, a drug to inhibit the growth of the above-ground part of seedlings and strengthen the roots.
Diseases and problems of petunia seedlings and ways to eliminate them
No sprouts appear
Causes:
- Seeds of poor quality.
- Low temperature in the greenhouse.
- The seed material is treated with a nutritious glaze.
How to fix:
- Buy new seeds with a good shelf life.
- Before seeds germinate, monitor the air temperature in the greenhouse. It should be between 22-24 degrees Celsius. If the problem is precisely the low temperature, nothing can be fixed and the sprouts will not appear.
- Sometimes seedlings do not appear due to the dense mineral shell applied to the seeds. It can be dissolved by spraying the seeds with warm water from a spray bottle when they are already in the middle of the peat pot.
The seedlings dry out and die
Causes:
- Unsuitable soil acidity.
- Blackleg lesion.
- The tablet has dried out along with the seed.
How to fix:
- Transplant the plant into another substrate. Provide complete care without feeding.
- The fungal disease blackleg appears from waterlogging of the soil. Sprouts damaged by blackleg must be destroyed. Other healthy seedlings are treated with a fungicide, for example, Baktofit.
- The dried peat tablet is placed in a container of water so that it is saturated with moisture. If the seedlings do not recover after this, it means they have died.
Transfer
Petunia can be replanted to a permanent place 90 days after sowing the seeds in peat tablets. Seedlings are transplanted either into open ground or into pots. Each method has its own characteristics. The main thing is to start hardening the seedlings 14 days before transplanting.
- Every day the seedlings are taken outside. The first day, leave it in the fresh air for 5 minutes. The next time, increase this time a little.
- On day 10, petunia seedlings should be outside during the entire daylight hours.
- For the last 3 days before planting in a permanent place, the seedlings are left to spend the night in the fresh air under a canopy so that in case of rain the drops do not fall on it.
When and how to replant
Petunia has a too thin and fragile root system. Therefore, its transplantation must be treated with extreme caution.
When the roots of the flower no longer fit in the peat cup, it must be transplanted into a wider container. If this is not done in time, the roots will quickly dry out and the flower will die.
You need to take any flower pot, larger than a peat cup. Place the flower seedling along with peat in the middle of the pot. Fill all voids with regular purchased soil.
The mesh that wraps the cup cannot be removed. Over time, it itself will dissolve into the ground. If you start to tear it off, the roots of the petunia will certainly be injured. The sprout should be planted so as not to cover the lowest leaves.
After moistening the soil, if it settles, add it to the level of the edges of the cup. Subsequent moistening is carried out as the soil dries.
Now the flowers need to be fertilized three times a month. To feed them, potassium and phosphorus fertilizers are used, which come together.
While petunia flowers are indoors, they are ventilated once every 7 days. You can take it out onto an insulated and glazed loggia, avoiding low temperatures and drafts.
Transplanting into pots
When replanting, it is very important not to damage the root system of the flower. Otherwise, petunia will take a long time to take root in a new place and constantly get sick. Flowers should be replanted in pots in the following cases:
- Flowers in pots will be in a house or apartment.
- The roots have outgrown the peat pot and may dry out or die.
Technology for transplanting petunia into a pot:
- Fertile loose soil is poured into a pot. You can purchase it at a garden store or prepare it yourself by fertilizing it with minerals.
- Place petunia seedlings in tablets in the center of the pot on a layer of soil.
- Cover it with soil so that it completely covers the peat tablet. The main thing is that there is a stem left on the surface, from where the leaves begin to grow.
- The plantings are moistened with a spray bottle or a thin stream from a watering can with warm, settled water.
- When the soil settles, it is filled to the level to cover the peat.
- Watering is carried out as the soil in the pot dries.
- Complex mineral fertilizers are applied every 15 days.
Important! Before transferring the peat tablet with seedlings to the pot, you can remove the outer mesh; it is better to cut it carefully so as not to damage the root system. It will disperse underground on its own after some time.
To remove or not to remove the coating from tablets
Here the opinions of gardeners differ. In fact, the very idea of the tablets was initially to not do any additional manipulations with it. When planted in the ground, the shell (mesh) itself simply dissolves in the ground over time, and the tablet itself becomes part of the fertilizer. Others argue that it is necessary to remove the shell, since it practically does not dissolve either in the soil or in the compost.
In any case, if you have 2 seedlings growing in one tablet, you need to carefully remove the mesh, separate the seedlings and then transplant them into separate pots.
The need for planting a flower
There are a number of factors that determine the need to plant petunia seedlings:
- Providing each seedling with space to grow and form side shoots.
- Preventing petunias from stretching upward, as a result of which thin stems lose strength; as a rule, such plants die after transplanting into the ground.
- Selection of sick and weak seedlings, after which only healthy specimens remain that can take root well in an open area.
Petunias are demanding on the composition of the soil : for their full development, a sufficient amount of minerals and nutrients is necessary. Group planting does not allow young shoots to receive all this in sufficient quantities, and picking helps correct this situation.
Important! Plants grown without picking develop much more slowly and are not of high quality.
When to pluck petunia after germination?
It is recommended to carry out this activity when the seedlings have 1-2 pairs of true leaves. At this stage, the plants have already formed a good root system.
In terms of timing, this occurs approximately 3-4 weeks after sowing. There should be 80 percent of the total number of seedlings with real leaves.
If the seedlings have sprouted very densely and are crowded, you can also pick them at the cotyledon leaf stage.
If you planted granulated seeds or the petunia sprouted rarely, you can plant it later - at the stage of 3-4 true leaves.
When to pick petunia according to the lunar calendar 2022
The optimal time can be selected according to the gardener’s and florist’s calendar:
- March: 6-8, 11-13, 25-27, 29-31
- April: 3-4, 10-12, 13-14, 17-18
- May: 5-7
It is not recommended to pick seedlings on the following days:
- March: 27-28 (Aquarius), 2 (New Moon), 18 (Full Moon)
- April: 23-25 (Aquarius), 1, 30 (New Moon), 16 (Full Moon)
- May: 21-22 (Aquarius), 30 (New Moon), 16 (Full Moon)
Problems of the first days
Often seedlings begin to get sick from the first days, fall down, and stop growing. Let's look at the most common problems.
Rose, but not growing
Such a disaster happens if you grow seedlings in high-moor peat. Peat can only be used in mixtures with various soil components. If you plant seedlings in clean peat, the top layer dries out, water does not stay in it, and the roots are still too small to get moisture from the bottom layer and die. It is necessary to transplant the seedling into fertile soil.
Thin shoots
Sometimes petunia seedlings stretch out, but have not yet produced the first leaves. Here you need to pay attention to whether this whim is being cared for correctly. Does it have enough humidity, heat, light?
You can help her if you create suitable conditions, such as:
- Reducing the temperature to 20°C;
- Increasing the photoperiod, up to around the clock;
- Fertilizing with complex fertilizer;
- Pick up the seedlings.
Not only small seedlings can stretch, but larger ones too. The reasons are the same - little light, too much heat and unregulated watering.
Rose up and started to fall
Seedlings may begin to fall at an early stage of development. This happens because the air humidity has been reduced. That is, they removed the lid of the container or the film with which the seedlings were covered.
Often seedlings fall due to blackleg damage. This disease is caused by mold fungi. They are present in any soil. As soon as an environment favorable for them arrives, they will quickly grow. To prevent this from happening, you should not thicken the plantings, use acidic soil or overheat the soil.