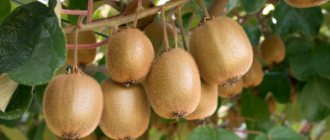
Kiwi is a herbaceous vine whose fruits have juicy green flesh and brown skin with fine hairs. This amazing exotic fruit is called Chinese gooseberry, which today can be found not only on supermarket shelves, but also in pots on windowsills and in the garden of ordinary summer residents.
Kiwi is native to Italy and New Zealand, but it also grows and bears fruit well in Russia.
Kiwi varieties suitable for home cultivation
Actinidia sinensis, as kiwi is scientifically called, has many different varieties. All of them are divided according to the type of pollination. But they all have one thing in common - they are relatively tall vines that need to be provided with enough space for development. With the right approach, you can grow any of them on the balcony.
Important! Some varieties require planting the “mother” and “father” next to each other; individually they will not produce fruit, at least not in the quantity in which we would like.
In Russia you can find seedlings of various varieties. They will be discussed below.
Self-pollinating
Self-pollinating varieties include those that do not require searching for and planting a pollinating pair nearby in order to get a harvest. These include the following varieties of kiwi:
- Solo
. These vines, entwining any structures and trees that happen to be nearby, grow up to 6 meters. The fruits of this variety are quite large: they reach a weight of up to 90 g. The fruits are juicy and sweet, with a little sourness. Harvest occurs at the end of September. One bush produces up to 35 kg of harvest. - Henry
. This is a frost-resistant species, but a little capricious. It loves sunlight, but at the same time it does not tolerate dry soil near the trunk. Henrih needs regular feeding for the first two years. It begins to bear fruit in the third or fourth year. Ripening occurs in mid-September to early October. You can collect from 20 to 35 kg from one shoot. - Bemol.
It is a brown large-fruited kiwi with emerald sweet flesh. Curly shoots can grow over 6 meters long. The yield averages about 35 kg per bush. The berries ripen in the second half of September. - Issai
. This is another frost-resistant self-pollinating variety, the shoots of which reach 9 meters or more. It easily tolerates cold temperatures down to -30ºC without requiring shelter. The fruits are small, their diameter is only 3–4 cm. At the same time, this variety produces soft and sweet kiwis that are enjoyed by many. You can collect up to 15 kg of berries from a bush. Fruiting begins 2–3 years after planting.
Note! Self-pollinating varieties bear fruit well on their own, but if higher yields are required, it is advisable to plant kiwi pollinators next to them.
From these varieties, you can also grow homemade kiwi from seeds, the only thing is that the vine will need to pin a varietal cutting so that the fruits do not grow wild.
Women's
Without a pair, such kiwi does not grow. Growing at home, and even in the garden, requires mandatory crossing with pollinating varieties. Without them, it is difficult to wait for the harvest, especially if these are not self-fertile species of actinidia. Kiwi “girls” include:
- Hayward
. Due to the large and tasty fruits, as well as their excellent presentation, this variety is popular in many countries. It is characterized by high productivity. The fruits themselves ripen by October, the weight of one berry is about 100–150 g. The taste is sweet, with a slight sourness. Hayward is a self-fertile variety, but for best results and increased yield it is recommended to plant it near kiwi pollinators.
Kiwi Abbott
. This is a late-ripening frost-resistant species that produces medium-sized fruits weighing up to 60 g. The taste of the berries is sweet with a slight sourness, they ripen towards the end of October. For normal growth, shoots need supports for braiding: an arch, a gazebo, trellises. The collected berries can be stored until almost February.
- Mr.
Mike. It is an early premium kiwi with juicy dessert fruits, weighing up to 100 g. This is a high-yielding variety, ready for harvest in the first month of autumn. It can withstand frosts down to -15ºC. - Monty.
This is another frost-resistant variety that is not afraid of low temperatures down to -25ºС. It produces fruits of medium size, weighing up to 65 g. They are distinguished by a light pineapple aroma, which is their key feature. The harvest takes place in the second half of October.
Bruno.
It is a late-ripening frost-resistant variety. Storing its fruits is permissible until the end of winter. It produces large berries, weighing up to 90 g, juicy, and tastes sweet and sour. Larger yields should be expected starting from the fifth year of growth, as the kiwi gains strength over time.
Colchis.
This
is
a self-fertile vine, capable of bearing fruit without additional pollination, but there will be few of them. To obtain high yields, pollination by the male type of actinidia is required. The variety is not afraid of frosts down to -30ºC, it is resistant to diseases. The pulp is juicy, with the flavor of a mixture of pineapple and lemon.
Men's
The most common male-type varieties include the following:
Malbeck
. This kiwi pollinator is quite effective: one seedling is enough to pollinate up to 6 female vines, provided that they are located within a radius of up to 6 meters. The variety is resistant to pests and diseases. It tolerates frost easily.
Banafia
. is a vine with shoots up to 6 meters. The qualities of this pollinator variety are similar to Actinidia Malbec.
Matua
. This is a pollinating vine, which is more recommended to be combined with the Bruno variety. She doesn't like direct sunlight. One shoot is enough to pollinate 8 female bushes.
Tomuri
. It is a frost-resistant variety and can withstand temperatures down to -20º without wrapping. He loves shady places and moist soil. Suitable for pollinating Hayward and Bruno varieties.
On a note! Separately, you can consider the Weiki variety. This is a type of kiwi that is divided into female and male seedlings. They fit each other perfectly, so it is better to buy them in pairs at once, since separately they will only become a beautiful addition to the garden or on the balcony.
Rules for choosing planting material
In order not to be disappointed in growing kiwi at home on a windowsill or balcony, you need to consider some points:
- The size of an adult vine and its future location
. The length of the shoot can grow from 3–4 to 9 meters or more. If it is a variety that likes to stretch well, then you and it will become cramped in the same area. Even pruning won't help. Therefore, it is important to focus on the size of the balcony and the room where your new “pet” will grow. - Lighting
. Most actinidia vines love sun, and only a few prefer partial shade. Based on this, they either choose the right variety or think through the issue of lighting in advance. - The number of plants you can place
. Some varieties assume that two shoots will be used during cultivation - female and male. If the parameters of the zone where the exotic fruit is supposed to be grown are small, then it is better to choose self-pollinating or self-fertile varieties. But be prepared for the fact that you may never see a bountiful harvest. - Frost resistance
. Kiwi is a heat-loving plant, but now you can find varieties that can safely survive our -30 even without additional wrapping.
Saplings or seeds
To be sure of choosing the right variety, it is better to buy ready-made seedlings. This way you will receive not only a healthy shoot for growth, but also detailed instructions for growing and caring for that particular plant.
If you want to go through the entire process yourself, from sowing seeds to harvesting, then you will have to tinker, since it is difficult to find ready-made material for sowing in agricultural stores. In this case, seeds collected from ripe kiwi purchased in a store are often used. To do this, select a beautiful ripe fruit, without signs of rot or wilting. It is important to know that an unripe berry will not produce healthy seeds.
But there is a problem! It's hard to predict what will grow from the seeds of a store-bought fruit. It will definitely be kiwi, but how fruitful it will be will only be known in a few years. After all, on supermarket shelves there are simply kiwis “from Greece”, “China”, but without indicating the exact variety and type of plant (including whether it is self-pollinating or not).
Preparing for landing
In fact, this is a standard set of activities that are carried out when planting any plant. But we decided to talk about this in as much detail as possible for those who know nothing at all about home growing.
Soil selection
Actinidia vines prefer light, loose and nutritious soil. There are three options for landing:
- Purchase of ready-made substrate for tropical plants.
- Making a mixture of three parts black soil, two sand and one peat.
- Mixing equal parts of vermiculite (perlite), peat and humus.
Choosing the optimal pot
The kiwi root is developed, but superficial: it grows wide and does not go deep. Therefore, a flat, wide pot is more suitable for it, but always with drainage holes. It is preferable to choose ceramic containers, because they allow better air circulation and do not allow moisture to stagnate. But all this is already relevant for a strong seedling. For planting seeds, you can use ordinary seedling cassettes or peat cups.
Pre-sowing seed preparation
The kiwi fruit chosen in the store should be left to ripen for several days. When the fruit becomes well soft, you can begin preparing the seeds for planting. What needs to be done?
- The kiwi should be cut, the pulp extracted and mashed into a puree.
- Pour slightly warm water over the pulp and stir until the seeds are separated from the pulp. The water needs to be changed several times until only seeds remain in the container.
- Then the seeds need to be dried for several hours, spread out on a napkin. After this procedure they will lighten a little.
- Gauze or cotton pads placed in a plate should be moistened with hot water with the addition of potassium permanganate for disinfection or drugs to stimulate growth. In the latter case, you can use regular aloe juice. Everyone puts seeds on this.
- You need to complete the “pie” with a piece of damp thin cloth or gauze, which is covered with film or glass on top. At night, the top layer is removed, in the morning, the gauze is sprinkled with water and covered again. After about a week, the seeds sprout, after which they are ready for planting.
It will come in handy! To improve germination and hardening of seeds, stratification can be carried out. How? Place the grains in the refrigerator for 14–20 days. After this, wrap the seeds in damp gauze and leave them in a warm place for germination.
Kumquat
Kumquat
Kumquat
Belongs to the citrus species. Its other name is fortunella. It is similar in taste and aroma to lime or tangerine.
The fruit size is small (up to 2.5 cm). Their peel is sweet, so kumquats are eaten whole. This is an exotic fruit and those who are lucky enough to try it have a great opportunity to grow a miniature kumquat. Fruiting of the tree can occur in approximately 10 years.
Nuclei from fruits that are mature and undamaged are suitable as planting material. The bones are washed, dried and left for 20 minutes. placed in a solution of potassium permanganate. This will ensure disinfection of the material. The landing container should be small in size.
Suitable soil composition:
- garden soil
- sand
It is necessary to sow to a depth of no more than 2 cm. For better germination, a mini-greenhouse is organized, which is placed in a place with good lighting. To do this, a bag, glass, or plastic bottle is used to cover the pot.
The covering material can be removed after 1-1.5 months, when the first shoots appear. When several seedlings germinate, they are picked.
Drying out of the earthen composition is not acceptable. It is necessary to water only with warm, settled water. The plant is extremely sensitive to dry air, so it needs to be sprayed.
The small size of the pot will prevent the citrus tree from developing quickly and will make it more compact.
Sowing kiwi
Kiwi is sown in the ground 5–10 days after the seeds have hatched well. To make them feel comfortable in a new place, several important nuances should be taken into account, which will be discussed below.
Basic rules and stages of planting
Before you start planting seeds, you need to process the materials: wash the pot, spray it with a disinfectant, fry the drainage and substrate in the oven or spray it with steam. Simple instructions on how to grow kiwi at home from seeds look like this:
- The pot should be filled 3–4 cm with drainage, and planting soil should be poured on top.
- The soil needs to be moistened and leveled, the seeds should be placed on top, sprinkled with a small amount of fine sand so as to only slightly cover the grains.
- Then you should moisten the entire “pie” again. At the same time, water should not be allowed to stand in the pot. To create a light greenhouse, the pot can be covered with glass or film. After which it should be placed in a well-lit and warm place where the temperature will be stably maintained within 24–26 ºC.
- To prevent seedlings from rotting, you need to remove the greenhouse cover at night.
- It is recommended to spray the soil daily with a spray bottle so that the soil is always moist, but not very wet.
- After about three weeks, when all the shoots have sprouted well, it is necessary to thin out the planting, removing weak seedlings so that there is enough space left for healthy shoots to develop.
Important! Although kiwi loves a lot of light, young shoots need to be shaded a little. This is done so that the rays do not burn the growing seedlings.
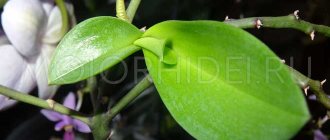
How do kiwi seeds germinate at home in the photo? This can be seen in the image below.
When the seedlings produce 2-3 pairs of leaves, excluding the cotyledons, you can start planting them in separate pots. To do this, do the following:
- Fill the seedlings with water so that it is easier to remove them from the common container. After adding the liquid, leave it for 20 minutes.
- Prepare suitable flat pots, but not very large ones yet. Fill them with a layer of drainage and substrate, moisten them moderately. Make a small hole in the center for the seedling and, a little further from it, insert a support that will support the growing vine.
- Carefully separate the sprouts from each other so as not to damage the roots, and place them in new pots, digging in a little soil. Finally, water your future kiwis with clean water at room temperature.
For your information! Actinidia vines grow quickly, but this does not mean that they need to be planted in large pots. The containers must correspond to the “age” of the plant. When a berry is given too much space for roots to develop, they will develop first, not the shoot. Everything should be in moderation!
Kiwi changes, increasing in size literally before our eyes, so each subsequent transplant will need to be carried out approximately once every six months. Pots for the next “move” should be 3–4 centimeters in diameter wider than the previous one.
Adult vines are replanted no more than once every two years. The procedure is carried out using the transshipment method in order not to damage the roots.
Common mistakes to avoid
Understanding the question of how kiwi grows at home is not a problem. This is not the most fastidious plant, but some mistakes in caring for it can lead to later fruiting or even death of the shoot. What could cause this result?
- Irregular, weak watering. Tropical vines require constant moisture so that the roots do not dry out.
- Excessive watering. Stagnation of water in the soil will lead to root rot.
- Soils too heavy for planting.
- Fertilizer or attempts to disinfect the soil with alkaline mixtures, such as ash or lime. The same applies to alkaline preparations for treating plant leaves and shoots.
- Excessive loosening of the soil above the root, which can injure it.
- Pruning after the plant has fully awakened in the spring.
- Placement in a draft. Kiwi is afraid of constant wind.
- Pets that like to attack potted plants.
Technology of planting seedlings
Each gardener, when planting alyssum seedlings in the ground, must take into account that the flower quickly fills the area. Therefore, the conditions for growing alyssum require a large area. Seedlings should be placed at a distance of forty centimeters from each other. However, the chosen variety and type of plant should also be taken into account. It is necessary to prepare holes for seedlings in advance. Their size should be slightly larger than the size of the rhizome. You should not plant alyssum too deeply, and immediately after planting you need to water it abundantly. If the bushes have grown greatly in the pot, then they can be divided into several holes. The first flowering from seedlings grown from seeds can be expected within six weeks after sowing.
Features of caring for kiwi indoors
Since kiwi is an alien from warm countries, it needs to be provided with appropriate conditions. If you ignore this advice, then the vine will grow, but it will be difficult to wait for the harvest. To make it easier for you to achieve a positive result, we have compiled a comprehensive list of tips on the proper maintenance and care of kiwi.
Maintaining optimal light and temperature
Kiwi is a heat-loving and light-loving plant. For its comfortable growth, you need to provide it with the following conditions:
- The room temperature should be maintained between 24–27 degrees. In winter, if the vine is located on a windowsill, additional heating will be needed. Moreover, preferably one that will not dry out the air.
- Daylight hours should last 12–14 hours. It is better to place a pot of kiwi on the windowsill on the south side. But, at the same time, during periods of strong sunshine, tender leaves should be protected from burns. For this purpose, ordinary, but not very transparent curtains or gauze are suitable.
- When the days get shorter, to maintain a “tropical” climate, it is worth using additional lighting and remembering to turn the lights on and off on a schedule.
Care during flowering and fruiting
No special conditions are required during flowering and fruit ripening, the main thing is timely watering. The only thing that can be done is additional fertilizing with mineral fertilizers in the spring, and around mid-summer add some organic matter. But you don’t need to get carried away either. Anything too much is evil.
Remember! The main condition for obtaining a harvest is not fertilizing, but the presence of male flowers next to female ones. If the vine that you have grown is self-pollinating, then there is no need to worry, it will have a harvest. If not, then you definitely need to plant a male seedling nearby.
Fertilizing the plant
Feeding is carried out during the period of active growth - once every two weeks. For these purposes, complex mineral fertilizers or organic matter are used. An alternative and a way to make your work easier can be vermicompost. It is introduced into a groove, which is dug around the trunk closer to the walls of the pot, after which everything is covered with earth. As a result, further, after each watering, the seedling will receive the necessary microelements.
Watering
The “guest” from the tropics loves abundant watering, but not standing water around it. The plant is watered frequently, and the excess water that flows into the tray under the pot is drained so that only the soil remains moist.
In summer, watering is carried out 2-3 times a week, in winter it is reduced to twice a month. If there is additional heating in the room in which the berries grow, then you need to make sure that the soil does not dry out. Otherwise, you need to irrigate it more often.
Note! Deciduous varieties that are not afraid of frost do not require additional heating and watering. To get a good harvest next year, it is better to give them a rest in the winter.
Trimming
Thinning vines is the only way to fully answer the question of how to grow kiwi in your home space and prevent it from branching out over the entire balcony or windowsill. Therefore, pruning is a mandatory procedure. It begins to be carried out already in the first year of growth.
The order and rules of pruning:
- Young shoots that have grown to 30–40 cm are pinched at the ends, cutting off the last 2–3 buds.
- As new branches appear, you should make sure that there are not too many of them per main stem. It is necessary to leave no more than 7 shoots.
- During the growing season, the remaining shoots should be pruned so that they do not take over everything useful. There is no need to leave them, because only the first 6 buds on the branch produce a harvest.
- Old branches are completely cut off after harvesting, giving room for new ones to develop.
Important! Timely pruning, removing weak branches and reducing the density of foliage leaves space for free air circulation, which reduces the risk of disease and pest invasion.
Reproduction methods
Kiwi reproduces quite easily in several ways.
Cuttings
Kiwi can be propagated from cuttings only if they are hardened. To do this, a hard shoot with 3 buds is cut obliquely and, after being kept in the root formation stimulator, it is planted in the same way as any other cutting.
When pruning in summer, you can get green cuttings. They are rooted similarly to lignified ones. However, the possibility of growing new plants from green cuttings is lower.
Seeds
A simple method that requires growing seedlings from seeds obtained from a ripened fruit. If kiwi ripens already removed from the vine, then the quality of the planting material will be quite low. It will also be possible to grow a liana from it, but many of the sprouts will be too weak. If desired, seeds can be purchased at the store.
Dividing the bush
Kiwi can be propagated by division only if the vine has many young shoots. Since the root of the plant is delicate, this method is traumatic and can cause the death of the vine. It should only be used as a last resort.
If you wish, you can try to make layering from the bush by rooting young kiwi shoots without separating them from the parent plant. When roots form on the shoots pressed to the ground, in the spring it will be possible to separate new kiwis from the parent vine without harm to it or themselves.
Graft
You can graft kiwi in spring or summer. For this purpose, a rootstock is selected, which most often serves as an extra male vine. All shoots and leaves are cut off from it at a distance of 40 cm down from the grafting site and then buds are replanted from another plant. When a shoot is grafted immediately, it is important that it already has fully developed buds. The entire grafting process is no different from what happens with other plants.
The optimal air temperature during the period when vaccination is done is +10 degrees. At this time, metabolic processes in plants are somewhat slower, and the likelihood that a planted bud or shoot will be rejected is reduced to a minimum.
Expert opinion
Stanislav Pavlovich
Gardener with 17 years of experience and our expert
Ask a Question
Important! The bandage can be removed from the grafting site only after it has completely taken root.
Diseases and pests of kiwi: treatment and prevention
Actinidia are quite strong plants that rarely suffer from diseases and pest attacks. Bark beetles, leaf beetles and caterpillars can become a serious danger to them. Prevention from them can be treated with Bordeaux mixture: a one percent solution is sprayed on the plant in spring and autumn after harvesting the fruits. The same remedy is used to detect powdery mildew, phyllosticosis, and ramulariasis.
But more often, problems with loss of a healthy appearance appear if kiwi is not properly cared for at home.
Table 1. The main problems that arise when growing kiwi at home and the reasons for their occurrence.
| Problem | Causes and solutions |
| Drooping foliage that begins to fall over time. | This is a clear sign of lack of moisture. After watering everything returns to normal. |
| Brown spots on the plant. | This is the result of exposure to direct sunlight, burning the leaves and stems. Additional shading is required to correct the problem. |
| Wet dark spots at the base. | They appear mainly at low temperatures and excessive watering, as a result of which rot appears, leading to the death of the plant. To eliminate stains, reduce watering and increase the temperature of the plant to the optimal temperature. |
| The leaves become small, turn yellow, and the petioles acquire a reddish tint, the tone of the vine weakens. | In this case, the plant does not have enough nitrogen and requires additional feeding. A solution of carbamide will help: 2 g per 1 liter of water. |
| The leaves become dull and acquire a dark green color. Productivity is falling. | This is a sign that the plant needs to be fed with superphosphate. |
| The leaves become brick-colored, dry out and fall off. | This symptom indicates a lack of potassium. For feeding, additives without chlorine are used; kiwis do not like it. Potassium sulfate can also be used. |
| The leaves take on a lime color with brown spots. | The plant needs to be fed with magnesium sulfate or potassium magnesium. |
How can you propagate kiwi?
There are three ways to propagate kiwi at home:
- Seeds
. You can propagate kiwi from seeds at home from well-ripe fruits. To do this, you just need to repeat step by step the instructions described earlier in the article. - By cuttings
. Cuttings should be separated from woody branches so that each has 3 to 5 buds. From below they must be cut obliquely immediately below the lower bud and at the top 1–2 cm above the outermost bud. Next, you need to place the planting material in water with roots for 12 hours. Afterwards, the bottom of the seedling boxes should be lined with drainage, and the substrate should be on top. Plant the cuttings in the ground, water moderately, cover with glass, film or jars. Send it to germinate in a warm, moderately lit place, but not in direct sunlight. Next, you need to ventilate and spray the seedlings daily, and water as needed. After the roots appear, the cuttings are transplanted into separate pots. - Saplings
. They sprout on their own from the root of the parent plant. They are carefully separated and planted in separate pots, using the usual scheme for transplanting actinidia.
Mandarin
Mandarin
Mandarin
Tangerine seeds are suitable as planting material only from ripe, soft fruits. The nucleoli must be sorted out. Only the largest and healthiest ones are selected. There should also be no damage to them.
The prepared bones are laid out on moistened gauze and placed in a container with water to swell. Soil for seedlings can be purchased ready-made (“For citrus plants”).
When compiled independently, it should consist of:
- leaf soil - 1 part
- turf soil – 1 part
- humus - 1 part
Good drainage (for example, expanded clay) at the bottom of the planting pot is required. The depth of planting the seed is up to 3 cm. The first shoots should appear within 2 weeks.
Young seedlings must be fed periodically. For this purpose, complex fertilizers for citrus crops are used. It is also necessary to ensure that the plant receives sufficient sunlight. To increase air humidity, a container of water installed next to the planting pot will help.
Every year, as the roots grow, the seedling will need to be replanted.
Tangerine seeds have the slowest germination rate among all citrus species.