Author of the article: Olga Viktorovna | Updated: 01/17/2022
Office chair Bureaucrat CH-296NX, Mesh, Fabric, black
3290 ₽ More details
Gaming keyboard Defender Metal Hunter, silver
790 ₽ More details
Fissman grill pans
A greenhouse for an orchid in some cases becomes a necessary measure for the continued existence of the flower. In this article we will look at why it is needed and how to make it yourself.
How to make a greenhouse for an orchid at home?
Orchidists keep the most demanding varieties in home florariums or orchidariums . mini-greenhouses in their homes to resuscitate damaged orchids.
This is done for the simple reason that most orchids come from the tropics, where they live in moist evergreen forests.
And the atmosphere of a human home is aggressive for them. Building a small greenhouse is quite simple, even from scrap materials.
With your own hands
The operation of a greenhouse is based on simple principles - heat radiation and heat exchange . Electromagnetic radiation, for example, from the sun or a lamp enters the greenhouse, where it is converted into heat, which is accumulated and retained by its walls. Due to the fact that the greenhouse is a closed structure , it maintains the required temperature and humidity.
The arrangement and size of the greenhouse depend on the goal you are pursuing and the result that is needed. So, you can build a greenhouse for resuscitation of one orchid from an ordinary plastic bottle . If you plan to keep a small collection of orchids in a greenhouse, you will need a larger structure: an aquarium or a terrarium cabinet.
A greenhouse can be made from a plastic bottle.
At home, greenhouses are built from scrap materials and even garbage. Any transparent container will do:
- plastic bottles;
- transparent confectionery boxes;
- transparent boxes;
- packages;
- oilcloth or stretch film.
The frame can be made of wire or wooden rods.
When is a greenhouse needed?
A greenhouse for an orchid is needed in rooms with high humidity levels. Frequent drafts and cold are also enemies of fragile plants. Since phalaenopsis comes from tropical forests, you need to take care of the availability of identical conditions for the existence of the flower. The plant will delight you with bright inflorescences, provided that you place it in a greenhouse, greenhouse or orchidarium.
It is difficult for the orchid to cope with the conditions we are accustomed to in apartments. For this reason, gardeners create a suitable microclimate for them. You may wonder why build a greenhouse if you can put a flower on the windowsill and enjoy regular flowering. In most cases, phalaenopsis gets used to the conditions of city apartments, but you may receive a plant without roots. This flower needs urgent resuscitation and further stay in the greenhouse.
Design options
From a plastic bottle
5-6 or 10 liter water bottle is suitable . If you don't find one, you need to find one. 2 liter bottle may be suitable .
You need to make a hole in the bottle or cut off the top or bottom to place the orchid inside . You can secure the plant with wooden twigs, thick threads or women's tights.
From transparent plastic boxes
Having such a box with a lid (or without) in your household will greatly simplify your life. As a last resort, you can buy it. Then you won’t need to cut anything, just secure one or more plants inside and close with a lid.
Polycarbonate box
If you have a pair of straight hands and material, you can make a transparent box yourself. Polycarbonate is notable for the fact that it transmits light well, is easily cut into fragments , and, unlike glass, is lighter, warmer and stronger . In addition, such a greenhouse will completely suit you with its size and shape.
From a glass, volumetric container
If you have an old aquarium or terrarium lying around at home or in the garage, you can use it as a greenhouse. It would be great if the aquarium was illuminated, but more on that later.
Greenhouse from an aquarium.
Frame covered with film
A film or oilcloth is stretched over a solid wire skeleton . A simple design that can be easily assembled and disassembled as needed.
Plastic bag
The most extreme option is to place the potted plant in a transparent bag. Such a device will not require investment or time, and is fundamentally no worse than others.
Possible reasons
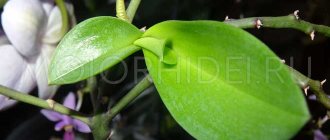
The structure of the Phalaenopsis root system is characteristic of all epiphytes.
This group of plants does not have small and thin roots, which, like other crops, absorb nutritional components. This role is assigned to the ribbed surface of large roots. It consists of dead hollow cells; they absorb moisture and nourish the culture. If the absorption process is disrupted, the plant begins to hurt and, if no measures are taken, dies. There are many reasons why an orchid’s roots rot and yellowed leaves form.
- The substrate in the pot gradually compacts, becomes compacted and heavy. This leads to moisture accumulation and lack of oxygen supply. It is important to change the substrate and prevent the formation of small particles.
- With a lack of light, some of the moisture remains on the roots. Too wet soil contributes to the onset of rotting processes. Lack of light and moisture are detrimental to orchids.
- Incorrect application of fertilizers. The roots are very thin and tender. If you use the wrong ratio of potassium, phosphorus and nitrogen components when feeding, then there is a high probability that the roots will suffer from a chemical burn.
- Damage can be easily caused during replanting. Any untreated cut can become infected, which leads to rotting and the plant dies.
- Damage from pests (eg click beetles) and fungal diseases.
Most of the reasons are associated with improper care, namely nutrition, hydration and watering.
On a note! Problems often appear in autumn or winter when Phalaenopsis is dormant. During this period, it is necessary to reduce watering.
Landing
Priming. Layer structure organization
As a rule, sterilized coarse bark and sphagnum moss are placed in the greenhouse. If the design allows and there is sufficient volume, then you can put several layers of different materials.
A thin layer of small expanded clay or pebbles is placed on the bottom as drainage, then bark and sphagnum on top.
It is better to use dry moss , since you do not have to worry about maintaining its vital activity.
Important! All soil components must be disinfected. Calcine the expanded clay in the oven, the bark and sphagnum can be boiled or taken out in severe frost overnight.
Technology
When the base is prepared, you can start planting the plant. Since the reanimated orchid has no roots, there is no point in making a significant deepening:
- Make a small funnel in the moss to place the orchid in;
- Before this, soak the plant for 2 hours in epin, then powder the stump, where the roots once were, with heteroauxin or root ;
- Cover with moss. The moss should be moist but not wet;
- If necessary, the plant can be secured with wire, bamboo rods or other means.
If the design of the greenhouse does not allow you to put substrate in it, use perforated orchid pots. Periodically inspect the plant for rot or mold . The greenhouse should be located in a warm, well-lit place.
The greenhouse should be located in a well-lit place.
Saving a flower without roots
It is also possible to save an orchid without roots. There is hope for salvation only if the grower acts immediately and according to a certain algorithm. If only one stem remains from the pet, its resuscitation is carried out in water. Before immersing the flower in warm, settled water, trim damaged tissues and treat open wounds with antiseptic agents.
After immersing the remaining stem with leaves in warm water, place the container in a well-lit place. It is better to avoid exposure to direct sunlight. As the liquid level evaporates, it is topped up. Caring for an orchid that has lost all its roots can be supplemented by wiping the leaves with a solution of succinic acid prepared in the proportion of 1 tablet per 250 ml of water. To avoid hypothermia of the pet, when the air temperature drops at night, cover the container with plastic wrap or do this using a regular bag.
Under properly created conditions, the flower rarely dies. After 2-4 weeks, root growth brings the first results - new young roots appear. When the orchid has produced several of these shoots, it will have to be cut off, leaving the baby behind and transplanting it into a pot. The best soil for further rehabilitation is sphagnum moss. It absorbs moisture well, is breathable and is rarely subject to infection by various infections.
Reanimation
It is necessary to understand that since the orchid, for some reason, was left without roots , then resuscitation in a greenhouse is not suitable for it due to similar conditions.
Usually, orchids' roots rot from excess moisture. As a rule, this is due to insufficient light and is most often observed in the autumn-winter period. In order for a plant to carry out photosynthesis normally, it needs a certain amount of light.
This amount is different for all plants and may differ from one type of orchid to another. When even the minimum amount of light necessary for the photosynthesis process is received, the orchid absorbs moisture, carbon dioxide, and simply grows.
If there is not enough light, the plant goes into suspended animation , that is, it temporarily slows down its life processes, while the roots absorb a minimal amount of moisture. In the event that water continues to flow to the roots (you constantly water the plant), then the roots do not have time to absorb all the moisture , just as it does not have time to evaporate.
It turns out that the water stagnates, the walls of the root cells begin to collapse, the tissues are affected by microorganisms, and the process of rotting begins. The plant cannot neutralize this by the growth of new cells, as it simply sleeps.
Therefore, in order for the roots to start working, the plant needs a signal - bright diffused light for 12-14 hours a day.
As already mentioned, the greenhouse should be located next to a bright source of light. In this case, the temperature in the greenhouse should be maintained in the range of 22-28 °C.
Under such conditions, an optimal microclimate will be formed, similar to that in which orchids grow in the tropics. If all conditions coincide simultaneously, new root sprouts can be observed literally in the first 10-14 days.
Important! Ventilate the greenhouse daily. This must be done in order to saturate the atmosphere with carbon dioxide and prevent the appearance of mold. It is best to carry out the procedure in the evening. In summer, the greenhouse can be left open all night.
Try not to overheat or overcool the greenhouse. The temperature inside should not exceed 34 °C and fall below 22 °C. At higher temperatures, the plant overheats, experiences shock and, in an attempt to cool itself, begins to actively evaporate moisture, which is contraindicated for it. Since there are no roots, the orchid may simply wither. Hypothermia is fraught with the appearance of mold, rot, rotting of wounds and all parts of the plant.
Inspect your orchid periodically. If the slightest signs of rot appear, the plant must be dried and returned to the greenhouse, placed in such a way as to prevent a repetition of the mistake.
Be sure to inspect the orchid for rot.
When roots appear, begin spraying the plant with fertilizers at a concentration of ¼ of the concentration indicated on the package. The frequency of fertilizer application is once every 2-3 weeks. You can support the orchid with frequent (once every 3-4 days) iron supplements, as well as epin and zircon according to the instructions.
The resuscitation process can take quite a long time. On average, it is approximately 6 months . During this period, the plant grows roots (at least 4-5 cm in length) and is ready to be planted in a substrate for adult plants.
Use small, perforated pots . To prevent the orchid from falling out of the pot, it will need to be secured with wire, twigs, or tied to the pot with women's tights. Once the plant is secure in the pot, the garters can be removed.
Advice! If possible, leave the orchid in the greenhouse until it has gained a decent mass of roots.
Preventive measures
Having decided to grow Phalaenopsis at home, it is important to consider all the subtleties of caring for it. In general, Orchids are capricious plants. But with proper care, they will grow and develop well, delighting their owner with abundant flowering.
Such indoor flowers react poorly to any deviations from comfortable living conditions. And the roots are the first to suffer from this. To avoid problems with rotting or drying of the roots, we grow the orchid correctly:
- It is necessary to organize a comfortable microclimate for the flower. The air temperature should not fall below 15°C in winter and 21°C in summer. Favorable humidity level is 50-60%.
- Organize a high-quality watering regime. Monitoring the condition of the soil will help to avoid problems with drying out and waterlogging of the substrate. Water the plant when it looks dry. Another option is to immerse the flower pot in warm water for 20-30 minutes.
- It is important to shade the flower from direct rays of the sun and protect it from the heat of heating devices in winter. The plant dies from their action.
- Regular fertilizing with nitrogen-containing compounds should be carried out, which can stimulate the root system to develop, especially if the young phalaenopsis is without roots. Fertilizers are applied along with watering no more than 2 times a month.
As the pet grows and develops at home, it should be transplanted every 3 years into a larger container.
When Phalaenopsis roots grow, they require space and a lot of air. Therefore, they will perceive the new place of detention favorably. It is also important that with replanting the air permeability of the soil also improves. And this is an important condition for the growth of a healthy orchid.
Symptoms of the disease
One of the reasons to use transparent containers for planting orchids is the ability to monitor the health of the root system. With regular inspection of the condition of the roots, you will be able to deal with the problem in time. Healthy roots are gray-green in color, they are elastic, hard, and have a smooth surface. If they become pink, brown, yellow, this is a sign that the plant is gradually disappearing.
Signs of cultural malaise:
- a greenish coating consisting of spores and algae begins to appear on the walls of the pot;
- diseased roots do not hold in the substrate, the flower moves;
- the root system does not seem airy and light, it has become shrunken and darkened;
- leaves wither and turn yellow.
If even one of the signs is present, the plant is pulled out of the pot and each root is carefully examined.
The following points confirm that the roots have rotted:
- slimy and wet areas are observed;
- the root tissues disintegrate into separate threads;
- when pressed, the roots release liquid;
- the root system has become dark in color.
Root rot is irreparable, so it will not be possible to restore these areas, but it is possible to save the untouched parts. The orchid will need to gradually grow new roots.