If you need to organize delivery of goods across Russia, you can always contact https://drnord.ru/.
Homemade mycelium in a box is intended for permanent cultivation of mushrooms in artificial conditions. This planting material is used by beginning mushroom pickers. Cultivation is carried out in greenhouses or basements.
For rapid growth, it is necessary to maintain a microclimate. It includes humidity, lighting and temperature conditions.
How to make mycelium at home? What needs to be taken into account when choosing planting material? You will find all the answers to these questions in our detailed guide.
Introduction
Currently existing techniques make it possible to simplify the process of growing mushrooms as much as possible, making it not only extremely simple, but also economically profitable. In addition, new cultivation techniques appear every year, making it possible to both increase its efficiency and expand the range of cultivated crops. Theoretically, you can grow almost any mushroom at home, however, currently the lion's share of mushrooms grown privately are oyster mushrooms and champignons.
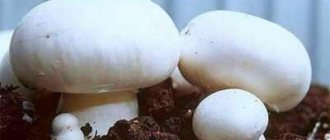
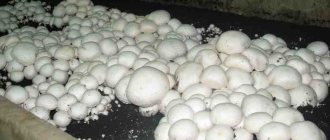
Champignons grown in the basement
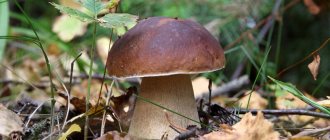
But the list of mushrooms grown at home does not end there. Methods for home cultivation of honey mushrooms, porcini mushrooms, shiitake, chanterelles, and so on have been mastered for a long time. Let's look at the technologies for growing them at home in more detail.
Harvesting
About 20 days after the last stage (gobting), it is time to harvest. It lasts from 1 month to two. Mushrooms appear in “waves,” and the compost must be watered after each one. Champignons are collected without the help of a knife, by hand. To do this, you need to carefully unscrew the mushroom. Harvest the entire crop, without any leftovers. This will quickly cause a new “wave” of growth and protect new mushrooms from attack by pests.
Once the harvest is complete, the compost should be removed and the racks and bins disinfected. In addition, throughout the entire stage of growing mushrooms, periodically treat the room with bleach or potassium permanganate solution. Pests and diseases love a humid environment and tend to multiply in it with a vengeance, and this will be detrimental to future champignons.
Growing oyster mushrooms
There are two main ways to grow oyster mushrooms. One of them involves the use of natural habitat conditions. Although it allows you to harvest only 1 crop per year, in terms of investment, it is considered the most profitable.
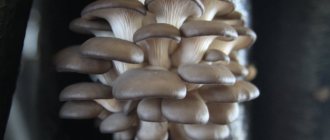
Oyster mushrooms
The second method, called intensive, involves creating an artificial habitat for oyster mushrooms. Almost all grown oyster mushrooms are obtained using this method, since it is not only universal, but also the most profitable based on the ratio of profit to unit of mass.
Growing conditions
In the room that is planned to be used for growing mushrooms, the following conditions must be met:
- Temperature ranges from +8°C to +20°C.
- Humidity 80-90%.
- Ventilation system.
- Absence of parasites in the form of pests and mold.
- Relative cleanliness.
The room must be sealed, however, if necessary, it will need to be ventilated. The room must have a heating system to maintain the required temperature. For small rooms, for example, the basement of a private house, a conventional heater will be sufficient.
Preparation of substrate and mycelium blocks
Oyster mushrooms are grown in special bags, which are a mixture of mycelium and substrate. These bags can be either purchased or made yourself. In terms of cost, in the case of small volumes of mushrooms grown (up to 1 ton of substrate), there is not much difference.
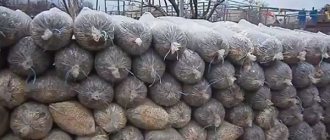
Bags for growing oyster mushrooms
If you decide to fill such bags yourself, then you need to purchase oyster mushroom mycelium and prepare to make the substrate yourself. It is recommended not to use a lot of mycelium for the first experiments. For the first experiment, 2-3 kg is enough; from them you can get from 10 to 15 kg of mushrooms. The mycelium is stored in the refrigerator at a temperature of 2 to 4°C.
The substrate may include:
- wheat straw
- barley straw
- buckwheat or sunflower husk
- crushed corn stalks and sheds
- other similar materials
Sawdust and shavings are not the best options, since, in addition to oyster mushrooms, mold will also grow on them.
Substrate for oyster mushrooms
For 2-3 kg of mycelium you will need from 20 to 30 kg of substrate. At the same time, it should be crushed to a particle size of 3-5 cm.
In some cases, heat treatment of the substrate is recommended to disinfect it from fungus and mold. It can consist of either boiling the substrate in boiling water or heating it to 100°C in some installation that maintains a constant temperature for 1-1.5 hours.
Mushroom blocks are formed in plastic bags, which are pre-disinfected in 2% bleach solutions. Usually up to 10 kg per bag is used, sometimes 5 kg bags are used for convenience.
The bags are filled as follows: every 5 cm of substrate alternately with 0.5 cm of mycelium. Moreover, the first and last layers must be filled with substrate. After which the bags are tied and perforated (checkerboard pattern, step from 10 to 15 cm), holes 10-20 mm.
Pre-ripening
Mushroom blocks are placed in a room where they undergo an incubation period (up to 2 weeks). The temperature at this time should be relatively high (not lower than +20°C). However, you should not be zealous; temperatures above +28°C are detrimental to oyster mushroom mycelium. If cultivation occurs in the summer, then the temperature in the room can be reduced using a simple fan, the air stream from which is directed directly to the bags with the substrate.
Oyster mushroom mycelium
The room is ventilated twice a day, but care should be taken to ensure that insects, especially flies, do not enter it. At this stage, no lighting is needed for mushrooms. The mycelium threads become noticeable on the 4th-5th day of the incubation period. After about 1.5 weeks, the mycelium completely fills the bag and its color will become a uniform light gray; At the same time, a characteristic mushroom smell will appear in the room.
Fruiting
As soon as incubation ends, it is necessary to change the life mode of the fungus in order for it to bear fruit; the following is done:
- the temperature drops to 12-15°C
- mushrooms are provided with at least 8 hours of daylight using fluorescent lamps
- humidity increases to 95%
- the room is ventilated up to 3-4 times a day
To ensure the necessary humidity, you need to spray the walls and floor of the room with water; the mushroom bags should not be wetted, since water should not get into the substrate.
If everything is done correctly and the conditions are met, after a few days the first fruiting bodies of the mushrooms appear. The fruiting time itself ranges from 1.5 to 2 weeks.
Optimal condition of oyster mushrooms for harvesting
In the last 2-3 days, the rate of fasting of mushroom caps is maximum. This time is considered the optimal collection time. In this case, it is better not to cut the mushrooms, but to break them off from the bag.
Second harvest
The first wave of the harvest will be completely over in 3 weeks. Ventilation and moistening of the floor and walls continue in the room. After two weeks, the second wave of fruiting comes. The sequence of actions is exactly the same as in the case of the first.
There can be from 4 to 6 such waves in total, however, the first two are the largest in terms of the number of mushrooms collected. In total, the first two harvests contain from 60% to 80% of the total oyster mushroom harvest.
Examples of late harvests (4th wave)
Usually, after the 2nd wave, blocks of oyster mushrooms are replaced with new ones. The old ones can be used as excellent fertilizers.
Equipment and materials
First you need to decide on the choice of premises. This could be a greenhouse, a special room, a barn, or a basement. The area must be dry and clean. It is recommended to treat the walls and floor with a bleach solution. This is necessary to disinfect the space. After this, ventilate the room well. One room will be needed for the germination of the mycelium, the other for the growth stage of the mushrooms.
After preparing the room, you need to make a substrate. Straw, sunflower husks, sawdust from non-coniferous trees, or mixtures of any of the above materials are perfect for this. They need to be well crushed (into dust) and pasteurized (that is, steamed with hot water and cooled).
Now the substrate needs to be placed in layers of bags (polyethylene). Between them is laid the mycelium of the fungus, which is purchased in specialized stores. Make holes in the bags, the diameter of which will be approximately 1.5-2 cm. Place them every 15-20 cm.
Growing champignons
Champignon
Growing these mushrooms is a little more difficult than oyster mushrooms, however, if agricultural practices are followed correctly, it also does not pose any particular problems. The most labor-intensive period in growing champignons occurs during the preparation of the substrate. Let's look at it:
Preparation of substrate for champignons
Its main component is compost. It consists of the following components:
- wheat or rye straw - 1 part
- horse manure – 3 parts
In addition, the substrate also contains additional ingredients (the norms are indicated per 100 kg of straw):
- urea – 2 kg
- superphosphate – 2kg
- gypsum – 10 kg
- chalk – 6 kg
If horse manure is not available, cow manure or poultry manure can be used, but the yield will be slightly lower.
The substrate is prepared outdoors or in a well-ventilated area, protected from the sun. Ventilation is necessary, since fermentation of the components releases ammonia and carbon dioxide. Thus, if you take 100 kg of straw, you will get about 400-450 kg of substrate; it is enough for a mycelium occupying an area of up to 3 square meters. m.
Substrate for champignons after cooking
When using chicken manure, the composition of the substrate will be slightly different:
- 100 kg straw
- 100 kg litter
- 250 l water
- 7 kg gypsum
- 6 kg alabaster
In any case, the mixture is prepared as follows: the straw is soaked for a day, then the straw and manure/litter are stacked (3-5 layers of one and the other mixed). Each layer of straw is moistened and gradually half a kilo of superphosphate and urea are added evenly.
After which the whole heap is mixed 4 times, and the remaining components are added to each of the stirrings:
- after the first - plaster
- after the second - superphosphate
- after the third - chalk
When everything is mixed, the fermentation process will begin. In this case, the temperature can rise to +70°C; The compost is ready for use in about 3 weeks. During the preparation process, the volume of the substrate may decrease slightly (up to 10-15%).
Planting mycelium
In order for champignons to grow without problems, it is advisable to use only sterile mycelium grown in laboratory conditions as seed material. There are two options for mycelium for champignons: compost and grain.
The first is produced in glass jars. Its shelf life is about a year at zero temperature. It is less susceptible to negative environmental influences, however, its yield is slightly lower. Grain mycelium is traditionally packaged in bags; Its shelf life is six months at a temperature not exceeding +4°C.
Grain mycelium
At 1 km. m (which corresponds to approximately 100 kg of substrate) requires about 300 g of grain or 500 g of compost mycelium. As in the case of oyster mushrooms, pasteurization of the substrate by heating it to 100°C is mandatory.
At the end of this procedure, the cooled substrate is poured into boxes no more than 30 cm deep. After which the mycelium is planted in them. Approximately a handful of grain or compost mycelium is laid to a depth of about 4-5 cm. The arrangement of the holes is checkerboard; step 25 - 30 cm. The grain mycelium can generally be distributed evenly over the surface and sprinkled with a layer of substrate to the same depth.
Air humidity during planting of mycelium should be about 80%, and the temperature should be about 20-25°C. Control of these parameters is important for the normal growth of mycelium. Also, as in the case of oyster mushrooms, it is permissible to moisten the walls and floor of the room, but moisture should not fall on the mycelium.
Incubation
After about 1-2 weeks, the mycelium grows and the substrate requires covering with a special covering soil to a depth of no more than 3 cm. The composition of such soil can be as follows:
- 9 parts peat
- 1 part calcium carbonate
Or this:
- peat – 5 parts
- limestone – 1 part
- deciduous soil - 1 part
Approximately 1 sq. m will require from 30 to 30 kg of cover soil.
3-5 days after covering the substrate with cover soil, it is necessary to reduce the temperature in the room to 12-15°C and begin watering it (always with a small amount of water, preventing it from getting into the substrate). The room needs to be ventilated 2-3 times a day, but the rest of the time it should be sealed.
Harvesting
Approximately 2 weeks after incubation, the first mushrooms appear. Recommendations for collecting them are very simple: mushrooms are collected while they have a thin, unbroken film connecting the skin and the edge of the cap.
It is also not advisable to cut mushrooms; they need to be broken off or twisted.
The remaining holes are sprinkled with covering soil and watered with a small amount of water.
Commercial cultivation of champignons
Fruiting itself lasts from 8 to 14 weeks, with the number of harvest waves exceeding 6. The waves come one after another at intervals of 1 week or less. From 1 sq. m (100 kg of compost) up to 10 kg of mushrooms are removed. Three quarters of the total harvest is harvested from waves 1-3.
Components
There are many formulas for preparing nutritious soil. But there are components whose presence in compost is mandatory. All mixtures are made from manure. Horse manure is considered the best, but manure from pigs, cows, birds and sheep will also be effective. The second required component is straw or hay. They must be fresh and unrotted.
In addition to the above materials, various fertilizers are added to the compost: beet or potato tops, sunflower husks, beer grains or other organic waste. In addition, a good mixture requires the presence of nitrogen-containing components. For example, urea or ammonium sulfate.
Additives such as bone meal, cotton processing waste, and bran would also be useful. The presence of mineral elements - gypsum, chalk or superphosphate - is mandatory. Here is one of the most common formulas: for 100 kg of horse manure you will need 2.5 kg of gypsum, 50 kg of winter straw (chopped) and 15 kg of dried manure.
Growing mushrooms on rotten wood
This growing method is suitable for most forest mushrooms, which include honey mushrooms, chanterelles, shiitake and others. In terms of agricultural technology, all mushrooms are approximately the same, the differences are only in some minor nuances. This type of cultivation is extensive because it lasts quite a long time and replicates the conditions natural for mushrooms in their environment.
Growing mushrooms on felled wood
You can use felled oak, chestnut or hornbeam as wood. In this case, it is desirable that the wood is not contaminated with spores of any other fungi. Before placing the mycelium in the wood, holes are drilled in it in a checkerboard pattern (usually 2 rows with a step of 20-25 cm and 10-12 cm between rows). The depth of the holes is 4-5 cm, the diameter of the drill is 10 mm.
The mycelium is placed in the holes and immediately plugged with wooden plugs, sometimes also sealing the holes with paraffin. After which, all the stumps are placed in a woodpile, which is placed in a shaded area, allowing the mycelium to germinate normally.
Incubation can occur quickly, or it can (as in shiitake) last quite a long time - about a year. The next stage is stimulation of the mycelium to grow fruiting bodies. In nature, this function is performed by rain; in our case, it is necessary to start removing the stumps from the woodpile and start watering them with water.
This can be done for all pieces of wood at once, approximately calculating the incubation time of the planted mushrooms, or you can start doing it in parts at a time close to the end of incubation. In any case, it is necessary to control the growth of the mycelium and its readiness to bear fruit.
Shiitake mushroom on a felled log
This method of cultivation does not produce such a quantity of harvests from one mycelium in 3-4 months, however, mushrooms grown with its help are as close in composition as possible to natural ones grown in the forest. In addition, harvesting from such artificial mushroom farms can last up to 5 years or more.
How to grow chanterelles at home?
Breeding chanterelles, like other mushrooms, is based on the basic rules of mushroom cultivation. Planting a mushroom next to a tree is done using a spore infusion, pieces of mycelium or seed material, with the assistance of a layer of forest soil. The composition of forest soil is rich and nutritious, and the upper humus layer is responsible for the development of mycelium. The bulk of the soil is rich in microelements and organic compounds; it also contains fungal spores, from which fruits then grow. Therefore, when growing chanterelles on your site and preparing myceliums for planting, choose a place where their main population is concentrated, cut off the mushrooms, carefully remove the mycelium and, together with the soil, transfer it to your site.
The removal of forest soil should be carried out near trees; the optimal time for harvesting is considered to be the beginning of autumn or early spring. Layers of soil at least 20 centimeters thick are dug out. In the area where the soil is infested with chanterelles, the bottom layer of forest soil is used. The organization of a mushroom mini-farm should take place in a cool, shaded place, among trees. We bury the mycelium in the ground and sprinkle it with chopped straw. Maintain proper humidity.
If you previously noticed a place where a lot of chanterelles grow, mark this place. However, the absence of mushrooms cannot guarantee that the mycelium is dead, it is simply possible that the season was less fruitful; the main criterion should be that the mushrooms were previously noticed in this place. Fungal spores remain in the soil for a long time and are not afraid of bad weather and suppression of fruiting. They continue to exist remarkably well, using a minimum of nutrients, taking advantage of their protection.
In order for forest soil to serve as good soil for a future mushroom farm, it must undergo a certain stage of preliminary preparation. This preparation method will improve the quality of forest soil. To properly prepare forest soil, it is packaged in plastic bags and dried in a cold room, the main thing is to leave oxygen access to the soil. The soil can be stored in such conditions for up to a year, without harming fungal spores, but pathogenic microorganisms will die without moisture. As a result of this kind of training, the mushroom spores will get used to drought conditions and become more resilient.
It is better to plant chanterelles on the site in early spring; increased humidity and warm weather will contribute to better implantation of the mycelium into the soil and its further development. Previously harvested forest soil must be mixed with garden soil in a 1:1 ratio, pour the soil mixture into the prepared depressions, add mycelium or a prepared chanterelle solution there, and cover it with fine straw or rotted leaves on top to protect the mushroom bed from drying out.
Watering must be organized in such a way as not to harm the mycelium; it is better to water in small portions, slightly moistening the soil, because water stagnation should not be allowed. The mycelium can simply die from excess moisture as a result of rotting.
Chanterelle has not yet become widespread, although it has an excellent taste and contains quite a few useful substances. Only a few mushroom gardeners grow chanterelles on their plots. However, it is quite possible that chanterelles will soon prove themselves and the mushroom industry will turn its attention to these mushrooms. And we can all be content with tasty and healthy mushrooms that can even treat gastrointestinal diseases.
Tea mushroom
Description
This organism is a so-called medusomycete - a symbiotic structure that includes yeast and acetic bacteria. The former are mushrooms without mycelium, so the name “kombucha”, although partially, justifies itself.
At home, kombuchas are kept in three-liter jars, less often in other containers. When grown industrially, the weight of this organism reaches several centners. From a zoological point of view, kombucha is a film of these microorganisms located on the surface of the water and consisting of several layers.
Kombucha in a jar
The growth of the fungus occurs when it is fed with sugar. Yeast ferments this sugar, breaking it down into less complex components: ethanol and carbon dioxide. Bacteria convert some of the ethanol into vinegar, and the resulting substances are used to form new generations of yeast and acetic acid bacteria. The organism grows from the bottom layer, the topmost is the oldest. The layers located between them are where sugar is converted.
Growing New Kombucha
You need to start with the future habitat of the organism.
For this we need the following components:
- 3 liter glass jar
- gauze or bandage
- fungal membrane
- high concentration tea solution
- granulated sugar
First, the jar is washed and steamed to sterilize. At the same time, strong tea is prepared.
The concentration of tea must be high, so the following composition is recommended:
- 2 heaped teaspoons of tea
- 5 tablespoons sugar
- 1 liter of boiling water
It is best to brew tea from boiled, cooled and brought to a boil again. This is necessary to increase its softness and ensure that it gets rid of microorganisms.
Be sure to remember that pouring sugar directly onto the mushroom is strictly prohibited!
The tea is poured into a three-liter jar and cooled to room temperature. At the same time, there should be no tea leaves or undissolved pieces of sugar in it. After this, a mushroom membrane is placed in the jar and the neck of the jar is closed with gauze or a bandage. Sometimes it is recommended to add 2-3 teaspoons of mother tea solution along with the membrane.
Adding mushroom membrane to tea
The jar is placed in a warm place, protected from direct sunlight and drafts. Recommended temperature range: from +22°C to +25°C. After about 1-2 weeks, the mushroom will have grown enough and will be ready to produce the drink.
Sometimes during this period the mushroom will settle to the bottom; this is normal, since the first few days there is not enough carbon dioxide in the mushroom to hold it on the surface.
Care
The care technique is simple:
- Once every 15-20 days, the mushroom needs periodic washing.
- And once every 2-6 days you need to drain the liquid from it, adding tea to the jar (the recipe for which was given earlier) to the required level.
- The frequency of fluid renewal depends on the air temperature; the higher it is, the faster the fluid is renewed.
- When the bottom layer is separated from the mushroom, it can be replanted.
In an old mushroom, this layer appears again within 5-10 days. The top crust must be removed as it becomes coarser. Once every two months, the mushroom should be washed especially thoroughly, completely changing the liquid in the jar, sterilizing it.
In this case, the upper and lower layers of the mushroom are removed.
Care
Moisture is important for mushrooms
Growing cultivated mushrooms in a personal plot requires a special approach. The first nuance is the temperature regime - within 25-29℃. If the optimal regime is maintained, the development of the spores will take place in 2-3 weeks.
The determining factor for the successful development of mycelium is humidity. It is permissible to water the beds immediately after planting, but in the future it is necessary to maintain moisture in other ways. The watered compost is covered with straw and damp rags.
After 10-15 days, a thin silvery coating will appear on the surface of the compost. This is a sure sign that the mycelium is coming out. At this point, the substrate is covered with damp loam or sand mixed with peat.
Truffle cultivation
Given the high cost of mushrooms, attempts have long been made to grow them artificially. The so-called Australian method is considered the most successful. It requires quite a large area and is quite expensive, however, due to the high cost of truffles, it is completely justified.
Truffles after the first year of cultivation
Truffles are grown in large areas, 1 hectare or more, and the number of plants infected with truffle mycorrhiza can reach up to 500. In just a year, the truffle harvest will be about 4 kg per hectare, and after 5-6 years it will be about 20 kg per hectare.
Preparation for cultivation
It is best to infect oak or hazel seedlings with mycorrhiza. It is the seedlings that need to be used, and not young (and especially not old) plants. In order for mycorrhiza to form without problems, the seedlings are kept in greenhouse conditions for some time.
Some breeders even recommend quarantining the seedlings for 40-60 days, even with air insulation.
When the seedlings reach a length of up to 20 cm, it is believed that the mycorrhiza has formed enough to tolerate transplantation. The soil where young trees with mycorrhiza will be transplanted should be neutral or slightly acidic. It must be fertile and must contain calcium compounds.
Truffle farm in the field
The soil is carefully dug up and processed before planting. No fertilizers are applied to avoid the death of mycorrhizae. Given the large growing areas, seedlings are planted at intervals of 4x5 or 5x5 meters.
Such distances are due to the fact that the overgrown mycorrhiza of one truffle already after a year occupies an area of about 20 square meters. m. Planting is best done in the spring, when there is no threat of frost. There should be no coniferous trees, poplars or willows nearby. The planting depth of young infected plants is up to 75 cm.
Care
900 gram white truffle
Each seedling is mulched with a diameter of 40-50 cm and covered with plastic film. During the first two years, it is necessary to remove weeds around all planted plants.
Fertilizing is carried out with a small amount of complex fertilizer containing nitrogen, phosphorus and potassium. Frequency – 2 times a year, at the end of autumn and beginning of spring.
The site should be protected from rabbits and pigs, which are capable of finding and destroying the entire crop on the site in less than a couple of days. You should remove any other mushrooms from the area and ensure that there is no infestation of weevils or cockroaches. In case of insect attacks, it is recommended to use insecticides.
Harvesting
When the spores in a truffle mature, it is ready to be harvested
Typically, tubers are located at a depth of about 20-30 cm from the surface level. An indicator that there are mushrooms is the presence of truffle flies in the area.
When digging a truffle from the ground, you can use ordinary garden spatulas for small plants.
From a business point of view
Let's try to evaluate a business based on growing mushrooms. For this purpose, we will use the data of an average estimate of the cost of raw materials and finished products using the example of oyster mushrooms. Oyster mushrooms are the cheapest mushrooms, so their profit per unit of mass sold will be minimal; for other mushrooms (for example, champignons) it will be slightly higher.
Farm for growing oyster mushrooms in several tiers
Let's evaluate the income part. The yield of oyster mushroom is on average 30% of the mass of the substrate with mycelium. The substrate is capable of producing two harvests before losing its effectiveness. Consequently, up to 600 kg of oyster mushrooms can be collected from one ton of substrate. The average price of these mushrooms is:
- wholesale sales – from 1 to 1.5 dollars per kilogram
- retail sales – from 1.7 to 2.5 dollars/kg
Even in the most minimal scenario, with wholesale sales of goods from one ton of substrate, a gross profit of $600/t is obtained.
Now the costs:
- The average cost of a ton of substrate for growing oyster mushrooms is about $50/t
- The amount of mycelium per ton of substrate can be several kilograms
- Its cost will be approximately $25/t
Additional costs must also be taken into account in the cost of mushrooms. They can be either related to production (humidification, fertilizers, lighting, etc.) or overhead (transport, advertising, other contract-forming expenses). If we make an average estimate, then about $40/t can be allocated for the former, and $25/t for the latter.
Thus, the total cost of growing mushrooms from one ton of substrate is about 130-140 dollars. Taking into account taxation and possible costs to personnel, we find that the net profit from oyster mushrooms is about 250-270 dollars per ton.
To generate income from oyster mushrooms of $1,000 or more, the business should start with at least four tons of substrate. On average, one bag of substrate weighing 10 kg requires 1.2 m in height and about 0.35 sq.m of area to be placed. Four tons of substrate will require an area of about 125 sq.m. for its placement.
It is best to place bags of substrate in several levels. If the room is of sufficient height, their number can be three; in ordinary, so to speak, home conditions, two levels are usually used. Thus, the profitability of oyster mushrooms per unit area is $4 per square meter. meter with two-tier arrangement of bags with substrate and 6 dollars/sq. m. with three tiers.
Similar costs for champignons give figures of about $350 per ton of substrate.
The high profitability of mushroom farms makes them very attractive for private businesses. But that’s not all: in countries with problems with food production or with a poor range of products, mushroom cultivation is the main source of protein products for the market.
Oyster mushroom farm in North Korea
Anyone can start a mushroom business. The main thing is to agree in advance on the channels for selling finished products, or to engage in this sale yourself. As in any business, there are small nuances here: for example, in the spring (during Lent) the consumption of mushrooms increases, and their prices rise slightly, and so on.
Manufacturing process
During the production of nutrient soil, it is necessary to pasteurize it. First, the manure should be mixed with ground straw and left to ferment. During this process the mixture will warm up to 50-60 degrees. As soon as the desired temperature is reached, and this will take 4-6 days, it is necessary to interrupt. This involves thoroughly mixing the mixture and adding nutrients to it.
Approximately 5-6 interruptions are required with a break between them of 2-5 days. All stages take approximately 20-25 days, after which a ready-made substrate for champignons is obtained. After the last mixing, the compost should be allowed to warm up to 60 degrees, and after the ammonia smell ceases to emanate from it, spread out in specially prepared boxes for mushrooms. As soon as the temperature of the compost drops to 24-25 degrees, mycelium is placed in it. The depth of its sowing should not be more than 10 cm.