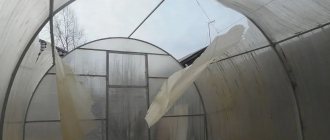
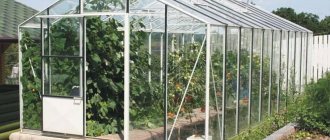
If you have an old greenhouse and are already tired of changing plastic film from year to year, it is worth covering the greenhouse with polycarbonate sheets. How to cover a greenhouse with polycarbonate and not make mistakes?
There can be two options for old greenhouses:
- Metal greenhouses;
- Wooden greenhouses;
The geometry of greenhouses for polycarbonate sheets does not matter. They fit perfectly on curved surfaces.
Polycarbonate sheets are much stronger than glass, and cannot be compared with polyethylene film. Having a protective coating against ultraviolet radiation, they do not lose their consumer qualities for a long time. The sheets remain durable and transparent for about 10 years.
Covering a greenhouse with polycarbonate is not a problem if you remember about the thermal expansion of bodies: Any body increases in size when heated, and shrinks when cooled. Except for one thing - water.
A unique physical body that increases in volume when heated and when frozen. Accordingly, when installing polycarbonate sheets, you should remember this fact.
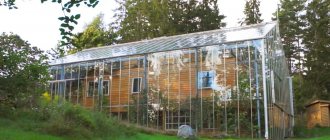
Examples of using polycarbonate sheets
If the greenhouse is wooden, then you should remember that when moistened, wood swells and changes its size upward. Thus, we can conclude that water is the main enemy of polycarbonate. Polycarbonate sheets are hollow inside.
Accordingly, condensation may accumulate in the internal cavities. During installation, special attention must be paid to the diameter of the holes for fastening polycarbonate sheets. Here's how to properly cover a greenhouse with polycarbonate and drill holes without making mistakes.
The holes should be 2.2.5 mm larger than the diameter of the self-tapping screws intended for fastening sheets. In addition, do not press the sheets too hard with screws. The greenhouse frame (especially if it is wooden) can change its dimensions in the vertical direction.
You should remember the sizes of polycarbonate sheets. They are available in sizes 2100mm*6000mm and 2100mm*12000mm . How to properly lay polycarbonate on a greenhouse, and in what direction should the honeycombs be oriented?
Polycarbonate sheets are always placed vertically and never horizontally. This is necessary so that condensate can flow down. Video footage of the installation of polycarbonate sheets will help you understand all the nuances.
To cover the greenhouse, it is recommended to use sheets 4mm thick. Is it possible to take them in greater thickness? Polycarbonate sheets of any thickness can be used.
But considering that polycarbonate with a thickness of both 4mm and 20mm will last the same time, and the price differs significantly, polycarbonate with a thickness of 4mm is more economically profitable. In addition, the thicker the sheet, the greater its permissible radius of curvature.
Adviсe:
- When purchasing polycarbonate sheets, be sure to measure their thickness with a caliper. The thickness of the sheets must be at least 4 mm;
- Require a quality certificate;
Which polycarbonate sheets should I buy?
Polycarbonate covering for greenhouses can be:
- Single chamber;
- Two-chamber;
- Multi-chamber;
- Strengthened;
All polycarbonate sheets are marked with the letter R. If the marking is 2R, it means that two solid sheets are connected by partitions. Accordingly, this honeycomb polycarbonate sheet is single-chamber.
If cellular polycarbonate sheets have a reinforced structure, the letter X is added to the marking.
Accordingly, 2RX is a single-chamber, polycarbonate sheet of reinforced construction.
Sealing the edges
To avoid moisture and dirt getting into the intercostal spaces of polycarbonate sheets, the edges of the sheets are closed after cutting. Only parts that are protected by frame elements remain open. To cover the edges, use a U or L-shaped profile and self-adhesive aluminum tape. Both can be solid or perforated. The first type is intended to protect the material from moisture, the second (used for the lower edges) so that condensation can escape from it.
For pitched greenhouses, a solid profile or tape is used on top, and perforated on the bottom. For arched ones, perforated devices are used on both sides.
In the absence of perforated devices, you can use solid ones and then equip them with holes.
Before attaching the tape or film, you need to remove 80-100 millimeters of the protective film from the polycarbonate plate.
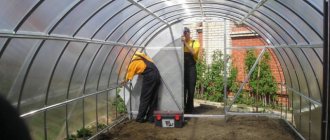
Installation of polycarbonate sheets
It is necessary to check the spacing of the rafters on the existing greenhouse. It should be a multiple of 700mm based on the fact that the sheet width is 2100mm. If there is no such multiplicity, the greenhouse should be redone.
If this is not done, the amount of waste will be very large. The next step is to calculate the number of polycarbonate sheets and the number of connecting profiles. Most manufacturers provide instructions on how to properly cover a greenhouse with polycarbonate and what the distance between the rafters should be.
The connecting profile for polycarbonate sheets is:
- Aluminum;
- Polycarbonate;
The difference between them is that aluminum connecting profiles are more durable than polycarbonate ones. Their service life reaches 20 years
Angular profile
Used to seal corners of greenhouses. When connecting corner profiles and sheets, compaction is achieved due to the elasticity of polycarbonate. If desired, the joints between the corner profile and the sheets can be sealed with silicone.
In this case, a diagram of the installation of polycarbonate plates on aluminum profiles is shown. Each sheet is pressed against the greenhouse frame through a seal. The profiles are connected with a fastening screw. For the mounting screw, it is necessary not only to drill a hole in the frame, but also to cut a thread.
Example of joining polycarbonate sheets
The threads are cut with taps in place in the metal frame of the greenhouse.
This case shows how to properly cover a greenhouse with polycarbonate using special polycarbonate compounds. They are designed in such a way that they “snap” themselves and connect the sheets. Thanks to small teeth with a fine pitch, you can adjust the pressing force of profiles to sheets through rubber seals.
Joining sheets with polycarbonate profiles
Here's how to properly cover a metal greenhouse with polycarbonate
In this case, the connection of polycarbonate sheets using screws 6 and strip 2 is closed with a decorative strip 1. This type of connection of cellular polycarbonate can be considered as a special case for metal greenhouses.
One-piece connecting profile
Polycarbonate connecting profile. Can be used to connect sheets in greenhouses of any shape. Silicone is used to seal joints .
Detachable connecting profile
This profile has recesses for rubber seals.
Detachable connection profile HCP
A special split profile designed to cover the ridge of a greenhouse. Has recesses for rubber seals. Retained in the joint due to the elasticity of polycarbonate. It is used to install a ridge in arched greenhouses.
End profile UP
Used for sealing the ends of polycarbonate sheets.
This profile seals the ends of the sheets to prevent dust and moisture from entering the internal cavities of polycarbonate boards. The seal between the profile and the sheets can be made with silicone sealants. Holes are made in the end profile to drain condensate.
Ridge profile RP
Another option for a ridge profile
The application is the same as for other ridge profiles. This profile connects polycarbonate sheets (see How to cover a greenhouse with polycarbonate - expert advice) and seals the joints.
What is the difference between a greenhouse and a greenhouse
To begin with, let us note what are the features of such covering structures. In the greenhouse, positive temperatures are maintained mainly by sunlight. It is permissible to use additional heat sources, for example, coal, wood, gas or fuel oil. This design is larger than a greenhouse. An adult can walk inside the greenhouse at full height.
You can walk upright in the greenhouse
The greenhouse belongs to the category of self-sufficient energy systems. Heating of the interior space is provided by the biological breakdown of organic materials and the greenhouse effect created by sunlight. Such buildings, as a rule, are made without doors. For access to plants, a folding or removable top part is provided. The greenhouse is actively used for growing seedlings. There is not enough space for grown plants.
Greenhouses have an opening part
What a greenhouse and a greenhouse have in common is the conservation of thermal energy inside the structure. Based on this, it is worth carefully considering the design of each shelter and the materials used in construction.
What to remember
- The density of 4mm thick polycarbonate must be at least 800 grams per square meter. Both density and thickness can be found in the quality certificate. When purchasing, ask for a certificate, don’t take their word for it.
- Installation of polycarbonate sheets must be carried out with the protective layer facing up (towards the sun). It is usually sealed with plastic film with the manufacturer's logo.
- Polycarbonate is afraid of technical solvents: ethylene chloride, methacrysol, tetrachloroethane, pyridine.
- When reconstructing a greenhouse, it is necessary to use a galvanized profile with a thickness of at least 0.75 mm.
- It is necessary to place spacers under the clamping screws to reduce the force of pressing the sheets to the greenhouse frame. The sheets must be secured with self-tapping screws. It is necessary to place polyurethane or rubber seals under the screws.
- Polycarbonate sheets can be cut with a sharp knife, a fine-toothed hand saw blade, an electric jigsaw, or a fine-toothed circular saw.
- Holes for fastening sheets must be drilled at a distance of at least 50mm from the edge to prevent splitting. Use ordinary drills for metal.
- The upper edge of the end of the slab is sealed with self-adhesive vapor barrier tape. The tape is designated by the abbreviation HDPE.
- The polycarbonate sheet must fit into the profile by at least 20mm.
- Manufacturers of polycarbonate sheets indicate the recommended distance between the rafters of the sheathing. It is different for each type of polycarbonate.
- The presence of cracks, swellings, scratches, and inclusions of foreign materials on the polycarbonate surface is not allowed. As well as air bubbles, surface unevenness, chips, sagging, uneven coloring, waviness of sheets.
Material properties
Working with polycarbonate with your own hands requires taking into account the characteristic qualities that are inherent in this material.
These include:
Plastic has a significant coefficient of thermal expansion. With significant temperature changes it can reach up to 5 cm/m. Panels of material can be bent, but only in the direction of the stiffeners. Each type of plastic has its own minimum bending radius. Reducing it may cause the panel to break. Polycarbonate retains its working qualities at temperatures from - 40º C to +120º C. Therefore, it cannot be overheated during processing or used welding for fastening
Working with polycarbonate in winter requires great care, as it becomes brittle. Many plates are equipped with a protective layer against ultraviolet radiation. This layer should be on top
Incorrect orientation of the slab can lead to rapid clouding and destruction. Sheets of plastic can only be placed on the supporting structure in the vertical direction of the cellular channels. This is necessary for unimpeded drainage of condensate. The exception is structures installed indoors. Polycarbonate is a fairly durable material. To process it you need sharp and durable tools and devices. Poor quality drills, knives and saws can overheat the material or cause it to crack. For fastening, only specialized products can be used. The use of rivets, nails or other similar products is not permitted.
A video on how to properly work with polycarbonate will help you understand many of the subtleties of the various stages and processes.
Analysis of polycarbonate manufacturers
Due to its increased popularity, polycarbonate is produced by various manufacturers. In principle, the polycarbonate formula is the same for all manufacturers, be it the Butterfly greenhouse or the Kremlin greenhouse. The question is what raw materials the sheets are made from.
There are several companies from China known on the market (Sunnex and Plastilux) that produce polycarbonate sheets. They are cheaper than the French "DHaze", Israeli "Polygal", English "SUNLITE", German "Makralon".
Polycarbonate can be cheaper for only one reason. These sheets are made from recycled materials. There is good and relatively cheap Russian-made polycarbonate on the market.
Uncover
It is very important to take accurate measurements and mark the sheets before cutting polycarbonate. When cutting, the protective film is not removed. If necessary, you can prepare patterns from cardboard.
It is important to plan cutting in such a way that the sheet of material is used rationally. This is especially important in structures with curved lines (arched).
It is recommended to do the cutting with a jigsaw at a blade speed of no more than 3000 meters per minute to avoid melting of the material. A circular saw with fine-toothed blades also works well. The material should be cut on a flat surface.
Advantages of cellular polycarbonate
As a rule, three material options are offered for covering a greenhouse: glass, polycarbonate and film. The film may be suitable for a small greenhouse; glass and polycarbonate remain.
Therefore, here are the differences between this material and glass:
- Quite high thermal insulation, which, according to manufacturers, is three times higher than glass. The thermal conductivity of a polycarbonate sheet is 8 mm. higher than glass and comparable to double glazing;
- All gardeners know what greenhouse lighting is. The light transmittance of the double panel is 80% ;
- A special coating prevents the penetration of ultraviolet rays. In the greenhouse you can simply sunbathe without any risk of getting sunburned;
- This material is quite shock-resistant and will withstand hail and falling stones;
- The big advantage of this material is its elasticity. It is possible to give the structure any shape.
Polycarbonate has many advantages, but it must be installed correctly and selected correctly.
Here are several tables for choosing the right material.
| Thickness in cm | Light transmittance in % | ||
| Transparent | Bronze | White opal | Lactic |
| 0,4 | 82 | 35 | 30 |
| 0,6 | 80 | 35 | 20 |
| 0,8 | 80 | 35 | 35 |
| 0,10 | 79 | 35 | 30 |
| 0,16 | 76 | 35 | 48-38 |
| 0,25 | 55 | 35 | 20 |
| 0,32 | 50 | 35 | 20 |
Light transmission of cellular polycarbonate depending on sheet thickness and color
Also, to select the right sheet, you should also know the physical capabilities of the material, which will help distribute the load on the structure.
| Name | Cellular Polycarbonate Sheet | |||||
| Sheet thickness in mm. | 4 | 6 | 8 | 10 | 16 | |
| The gap between the stiffener in mm. | 5,7 | 11 | 20 | |||
| Minimum bending radius | 700 | 1050 | 1400 | 1700 | 2800 | |
The table shows how to properly cover a greenhouse with polycarbonate using the physical characteristics of cellular polycarbonate.
It is also necessary to determine the level of load on the racks and the plane of the sheet. This is determined by each owner individually, but this indicator is quite clear
| Load kg/m2 | Allowable gap between rafters m | Sheet thickness in mm | |||||
| 6 | 8 | 10 | 16 | 25 | 32 | ||
| 150 kg/m2 | 0,700 1,050 2,100 | 1300 800 400 | 1600 1100 550 | 1800 1200 600 | 6000 2500 1250 | 6000 4500 2250 | 6000 5000 2500 |
| 175 kg/m2 | 0,700 1,050 2,100 | 800 — — | 1300 800 400 | 1600 1100 550 | 5000 2000 1000 | 6000 3500 1750 | 6000 4000 2000 |
| 200 kg/m2 | 0,700 1,050 2,100 | — — — | 800 — — | 1300 800 400 | 5000 1800 900 | 6000 3000 1500 | 6000 3500 1750 |
It is allowed to install the length of the sheet with the distance between the supports and the permissible load (kg/m2).
After studying the tables above, you have the opportunity to weigh all the structural parameters and select the material for growing the required crops. Now let's start describing how to properly cover a greenhouse with polycarbonate.
Comments
Ivan, 41 years old
Last year we built a polycarbonate greenhouse at our dacha. One sheet of polycarbonate was damaged. Firstly, they marked it incorrectly and cut it in the wrong place, and secondly, they immediately removed all the protection and when they started to attach the plate, a crack appeared along it. As a result, they spent more time, effort and money due to the fact that they did not properly prepare and study the information.
Stepan, 50 years old
I covered the greenhouse taking into account all the rules given in this article. Only my frame is not metal, but made of wood. The greenhouse is in its second year. True, a couple of rafters on the roof had to be replaced after the winter, but otherwise everything is fine.
Roman, 31 years old
I am very glad that I chose polycarbonate to cover the greenhouse. Initially, it was planned to make the heifer in the form of a house and cover it with glass, but a friend recommended this material. I was pleasantly surprised by its flexibility and ease of installation.
What is needed to install cellular polycarbonate
When the frame of the structure is installed. The jays are placed at the required distance, the material is selected and purchased. You can start installing the sheets.
Now we will consider all the nuances that will be required when installing the structure.
Preparing panels for installation
Before installing the sheets, they should be properly prepared.
This will ensure that the connections are made correctly and will make the work easier.
- To ensure sealing of the channels, remove the protective film from both ends of the sheet by 8-10 cm. This is done to attach perforated, aluminum or sealing tape;
- Before installing the tape, remove the temporary adhesive on the open ends of the sheet. A sealing tape is glued along the upper edge of the sheet, and perforated tape along the bottom. Both sides of the panel should be treated. It is possible to seal panels using only end profiles;
Attention: With an arched structure and both ends located at the bottom, both edges are processed with profile tape.
- The protection should be removed by 10 cm from the ends of the sheet. This prepares the panel for installation in the connecting profiles and frame;
- For better connection of panels, experts recommend using F-shaped and U-shaped profiles. Holes with a diameter of up to 3 mm should be drilled in the lower part of the panel. They will promote better water drainage.
Specifics of fastening and cutting
Greenhouses have different configurations and often they differ from each other. Therefore, we give advice not on a specific type, but those that will help get the job done in any design. Now tips will be given on how to cover a greenhouse with polycarbonate and at the same time avoid problems and extend the service life of the structure.
We will describe how to correctly lay polycarbonate on a greenhouse and technologically fasten all elements.
- Before doing the work, cover with grout and paint the frame in a light color. Give preference to an anti-corrosion primer. Light painting will prevent additional heating of the bottom of the polycarbonate sheet. When using a dark color, the lower part of the material heats up from contact with the dark part of the metal and partially loses its strength;
- When bending the material, take into account the data given in the table. Increased bending puts more stress on the material and can lead to cracks in the outer layer. This may not even happen immediately, but after some time;
- When installed, the ribs of the sheet should facilitate the drainage of condensate and precipitation;
- When joining elements, use special protective profiles;
Attention: Today there are designs of arched greenhouses where the joining is done overlapping, without the use of a joining profile. After some time, this will still lead to water leakage, and ice will lens in the overlapping areas.
This will stretch and expand the structural elements at the fastening points. Use sealing tape, which will protect the polycarbonate sheets from leaking..
- When fastening sheets to the frame, you should use special thermal washers or use rubber seals. For fastening, the element has a special type of leg, which corresponds to the length of the sheet. It provides reliable fastening and does not damage the plane of the material and does not press through it;
Correct fastening of polycarbonate
- Make the diameter of the hole for the leg 5-6 mm larger than the diameter of the pin itself. After this, you should put on a polyurethane ring, which acts as a seal between the sheet and the cap; it does not allow moisture and dust to penetrate into the connection point. Gives the necessary tightness to the fastening. When the screw passes through the thermal washer, it flares the inner cup (this happens in a similar way to lapping valves), this guarantees reliable protection against water leakage through the washer;
- Use special plugs at the fastening points;
- The distance between the attachment points of polycarbonate with a thickness of 4 mm should be no less than 400-500 mm . Sheet with a thickness of 6 mm. , fastened with a distance of at least 600-700 mm . These dimensions should also be used for vertical fastening;
- When installing, pay special attention to the mounting side. In order to protect the material during transportation, manufacturers apply a layer of film on both sides of each element, such as in the Orange greenhouse. On one side, the film has a transparent or white color, and on the other, the film is usually blue in color, or a pattern is applied to its surface; this side protects the room from the penetration of ultraviolet rays. Before starting installation, remove the light-colored film, that is, from the bottom of the material. The protective part of the film, that is, the top, can be removed after installing the elements;
- Covering the greenhouse with polycarbonate should be done with the correct installation of bolts. Excessive twisting may cause material deformation. The perpendicularity of the fastening should be observed to avoid damage to the sheet;
- When installing a panel wider than one meter, additional fastening should be used along the entire length of the material. In this case, conventional fastening is not enough to avoid straightening the sheet; it can also shift under pressure.
Rules for caring for polycarbonate
A good covering for greenhouses is polycarbonate, but it also requires maintenance; this will preserve the properties of the material and extend the service life of the structure.
- You should not light a fire near the greenhouse. In this case, ignition is unlikely, but melting of the material is possible;
- The surface should be washed with a mild detergent or just water. We should not forget about the protective layer against ultraviolet rays that covers the panels. When processing, do not use abrasive cleaning agents or aromatic solvents;
- Do not use garden tools to remove snow from the surface of the material.
We told you how to properly cover a greenhouse with polycarbonate. If you follow the suggested recommendations when working, the structure will serve you for many years.
Working with material
When winter comes, the question arises: what to do if you need to do work on installing a polycarbonate structure? The solution is simple - do the work in compliance with technology. Working with polycarbonate in winter conditions is carried out in stages:
Design
It is better to entrust this work to a specialized organization. In winter, there are few orders, so design will take less time than in summer. Often the project has to be adjusted, and this requires additional time.
Any errors make installation difficult and reduce operating time. When designing, errors may be made in the choice of material when winter installation and operating conditions are not taken into account.
Mistakes can be avoided if you work according to the rules:
- The bending radius is calculated so that there is no overstressing of the material. If this requirement is violated, cracks appear on the bends. In addition, a small bend radius requires a smaller sheathing pitch.
- Depending on the load of the structure, the thickness of the material and the pitch of the sheathing are selected. Thicker material requires a larger lathing pitch, which means there will be savings on the purchase of supports.
- Profiles are selected depending on the thickness of the polycarbonate. Thanks to the right choice, the required reliability and tightness is achieved.
- For various structures, their purposes are taken into account: thermal insulation qualities are required when installing greenhouses. Heat savings depend on the selected material thickness; good light transmission is required for winter gardens and sheds. The material must not only transmit light, but also dissipate ultraviolet radiation.
Selection, transportation, storage
The main thing is not to skimp when choosing. As a rule, savings lead to deviation from the project, and as a result, destruction of the structure in cold weather due to icing. When purchasing, in any case, you need to check the quality of the material according to the certificate, and also not buy cheap fakes.
Proper transportation will ensure the safety of the material. When transporting, sheets cannot be rolled into rolls with a small radius, as this will cause breaks and cracks. Polycarbonate delivered in winter must be stored unrolled. It is stored rolled up when there is no room of suitable size. In this case, the roll is loosened and placed in a vertical position.
When storing polycarbonate in winter, you should not make the following mistakes:
- store material outdoors. This will not only lead to deterioration in performance characteristics, but will also damage the protective film on the slabs;
- do not protect the ends of the slabs. Moisture and dust will get into the honeycombs of the material. When water freezes, it destroys honeycombs and reduces the performance characteristics of the material.
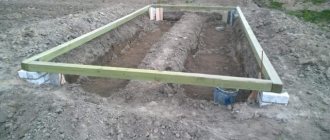
Recessed option
Recessed columnar foundation for a winter greenhouse
A greenhouse or greenhouse is built on a wooden foundation even if it is necessary to grow vegetables and seedlings in the winter. It is usually buried 1 meter. This makes it possible to save on resources, taking advantage of the warmth of the earth. Despite the fact that the area of the walls transmitting light is reduced, this option allows you to save fuel.
The technology of the polycarbonate surface version differs not only in the design of the frame, but as for the base, it is created much more powerful. Using logs or semi-tips, semi-logs. Having removed the bark and carried out pre-treatment.
In these basics, the work goes like this:
- They excavate the soil to a given depth and level the walls. Lay a waterproofing layer of roofing felt on the outer wall.
- Drive the pointed end of the log into the ground around the perimeter. Pre-treating them with bitumen or mastic.
- Along the lower and upper parts of the finished log walls, staples 40-50 cm long are driven in and tightened.
- Level the top edge using a chainsaw. Then they place the top beam, screwing it to the ends of the logs.
- They compact the base near the pillars.
Every 5th log should be 50-60 cm longer than ordinary logs. For example, the burial height is 1000 mm. The row post is 1400 mm long, and the corner and intermediate post is 1800 mm long.
To build greenhouses made of wood or polycarbonate, you can use any of these technologies. The main thing is to determine the direction and purpose of the greenhouse. And to build a base from wood means choosing the optimal ratio of price and service life.
If a grillage is constructed from timber
In the case of using timber as a grillage, the layout of the site is carried out taking into account the installation of supports, which can be:
- low posts made of timber dug around the perimeter, the size of which is similar or larger than the lumber used to construct the frame;
- screw supports with disks whose diameter is equal to the diagonal of the beam;
- point concrete supports, for pouring which it is not necessary to make formwork. Concrete is poured in two steps into a miniature pit with sides 25 cm, 30-40 cm deep. First, the hole is filled to about half, then a piece of metal mesh is placed on the set mortar and the pit is filled with concrete flush with the ground;
- brick pillars, in front of which a 5cm concrete base is poured. Its area should be larger than the area of the brick support. The bricks are laid two in a row, in two or three rows.
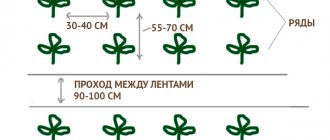
The frequency of support placement depends on the weight and dimensions of the greenhouse being constructed. For a light, small-sized structure, only corner posts are often sufficient; row posts are installed at a distance of 1.2-1.5 m from each other.
In the process of preliminary calculations, it is necessary to take into account that the timber is laid exactly in the middle of the support column. Between wood, brick, metal or concrete, a roofing material is required. The timber frame is attached to the supports with anchor bolts and washers, and a greenhouse frame can be erected on it without any difficulty.
These are all the subtleties of constructing a wooden foundation for a personal greenhouse, the construction of which the owner will devote a minimum of time, money and effort.