Proper preservation of a greenhouse for the winter is the key to its long service life and good harvests. What and when should be done with this building so that it does not turn into a breeding ground for diseases and does not fall apart ahead of time?
First, you need to understand that you have to maintain the greenhouse every year, and it doesn’t matter what model you have. Both wooden, film-coated, and polycarbonate and heated greenhouses expect similar work from you, which you should not skip.
Before you begin seasonal cleaning of the greenhouse, remove all plant debris from the greenhouse. At low temperatures, plants will still not produce new flowers and ovaries, but they will interfere with you. In addition, repair everything that was assembled, remove supports, bush holders and laid paths or bed limiters.
Rinse and dry the irrigation system
When water freezes, it can break pipes and connections, which means that the irrigation system, if you have one, needs to be dried out for the winter. However, before you start blowing out the pipes, clean and disinfect them. This can be done using a solution of orthophosphoric acid or the drug Pekacid and its analogues. Fill the system with it and leave for 2-3 hours, then rinse with strong pressure with clean water and dry.
If there are barrels of water in the greenhouse in the summer, empty them and disinfect them with a similar product, and leave them empty for the winter. It is also advisable to remove and remove drip tapes from drip irrigation systems.
How to get rid of diseases?
What to do if all summer you have been suffering with sick and dying tomatoes? Most likely, they were affected by some pathogenic microorganisms or fungus. This means that all measures should be taken to ensure that history does not repeat itself next year.
Step 1. Similar to the standard procedure for preparing the soil and greenhouse, remove all dead plants along with the roots in the fall.
Step 2. Remove the top layer of soil - approximately 10-20 cm - and replace it with fresh one. It is advisable not to take replacement soil from your garden.
On a note! The removed layer can be thoroughly steamed or calcined - this will destroy all pests and parasites. But if the greenhouse is large, this procedure will be extremely difficult to carry out.
Step 3. Remove all ropes and garters, especially those made of natural fabrics, as well as wooden sticks - pathogens can settle on them.
Step 4. Sow the soil with white mustard - the substances that this plant secretes are destructive to most pathogens of fungal diseases. You can also spray the soil thoroughly with fungicides.
On a note! Many people advise using smoke bombs with sulfur to destroy pathogenic organisms. The method is somewhat extreme, but fail-safe.
Step 5. Don't forget to thoroughly treat the walls of the greenhouse and its frame with soap or lime, as in the previous guide.
Step 6. After completing all work, leave the greenhouse open for the winter so that the soil freezes well.
On a note! If the tomatoes were very sick throughout the summer, then it is best not to plant them there again even after treating the greenhouse and soil in the fall. Plant other plants in this place, and move the tomatoes to another place for a couple of years.
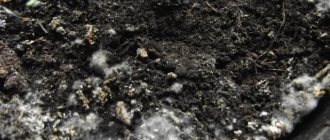
Change or disinfect the soil
The soil in the greenhouse is actively exploited, accumulating the remains of fungicides, insecticides, fertilizers and salts. Because of this, within a few years it becomes unsuitable for growing plants and turns into a breeding ground for diseases and pests. The best solution would be to change the soil every 2-3 years. It is necessary to remove a layer 25-30 cm thick (on the bayonet of a shovel), and before this you need to remove the mulch, if any.
If it is impossible to replace the greenhouse soil, it will have to be revived. To begin, disinfect the soil with biological products that, in addition to suppressing microorganisms, heal the soil, for example, Fitosporin-M, Fitocid®-r, Baikal EM-5, Baktofit, Trichoderma Veride 471, etc. They are introduced into the ground two weeks before autumn frosts to a depth of 5-10 cm. In the spring, the treatment can be repeated. Then add 40-50 kg of compost or rotted manure to each square meter and carry out a deep two-level digging. Then water the soil with preparations that accelerate the decomposition and humification of plant residues.
For those who are not afraid to put in extra effort, building warm compost beds in the greenhouse is a good option. To do this, a layer of fresh manure 15-25 cm thick is added to the dug trenches, a layer of plant residues 25-30 cm thick is added on top, and at the end 20 cm of soil or ready-made compost is added. During the fall and early spring, the contents of the trenches will begin to decompose, and in the spring you will receive a ready-made warm ridge with fertile soil.
- Do-it-yourself warm beds - step-by-step instructions with video
Detailed and visual recommendations for creating warm beds in your garden.
If you cleared the greenhouse from planting at the beginning of September, you can improve the soil in it with the help of green manure. Plant oilseed radish, oats, mustard or other fast-growing, cold-resistant green manure, and just before the cold weather, mow the green mass and incorporate it into the soil.
- What green manures can be sown in the fall after harvesting?
We'll tell you how to improve the soil by planting green manure plants in the fall.
Preparing for winter
It is no secret that the soil of any greenhouse is depleted throughout the year, and harmful insects and diseases actively multiply in the top layer. The soil should be changed every 5 years. And throughout this period, the land needs annual cultivation.
Autumn disinfection of a greenhouse helps solve many problems, the main ones of which are:
- eliminating sources of disease;
- destruction of eggs and larvae of many pests;
- increased fertility;
- soil remediation.
The top (fertile) layer of soil is removed with a shovel. Then the soil is dug up, removing the pest larvae. An excellent method of combating soil depletion and the proliferation of harmful insects is sowing green manure. They can be legumes or cereals, mustard. Shortly before the onset of cold weather, the greens are mowed and the soil is dug up. Some gardeners embed the green mass into the soil, others do not.
If new soil has been brought in, it should be treated with chemicals or biological products before spreading.
Fertilize
It is worth adding not only organic matter to the soil in the fall, but also complex mineral fertilizers. If your greenhouse remains covered all year round and is not exposed to rain and snow, you can apply potash and phosphorus fertilizers as early as September-October. They will gradually dissolve in moist soil, but will not be washed out of it and will be available to plants in the spring. On average, 40-60 g of superphosphate and 25-30 g of potassium salt or potassium sulfate are added per 1 sq.m of soil.
- What fertilizers to apply in the fall - types and dosage
Is it necessary to fertilize the soil with the onset of autumn and after the end of fruiting of country crops? Find out now!
What kind of soil do tomatoes need?
Before you learn how to properly prepare the soil for planting seedlings, you should also become familiar with what the soil for tomatoes should be like. What is the ideal land for tomatoes?
She must be:
- loose;
- rich in organic matter;
- well drained;
- free from various pests;
- easy to heat up;
- rich in minerals (calcium, magnesium, potassium, phosphorus);
- its optimal temperature is 18-20 degrees;
- with pH = 6.0-6.5, but can also be from 5.5 to 6.8.
Table. Basic characteristics of soil for tomatoes.
The most important soil parameters for tomatoes are water permeability and looseness. These plants have a strong, branched root, sometimes going into the soil to a depth of 1 m. Its main part is located in the first 50 cm of the soil. The plant needs a lot of moisture. Lack of water will negatively affect the condition of flowers, ovaries, the size of fruits, and may even lead to the death of the plant. Therefore, the soil must hold and pass moisture well.
On a note! The higher the size of the bush the variety, the less it feels the lack of moisture. But short tomatoes do not tolerate drought very well.
However, overwatering can have a bad effect on the tomato - it can rot and die.
Precursor plants for tomato are not of great importance. But it will still be good if you decide to grow tomatoes where cucumbers or cabbage or other cruciferous plants previously grew. The hero of our article does not like the soil where nightshades, for example, eggplants and potatoes, were fruited and grown before him. Tomatoes grow well where legumes and onions were previously grown. You can also grow radishes and lettuce in front of tomatoes.
On a note! Tomato is an excellent predecessor for almost any vegetable; it leaves behind very clean and high-quality soil without weeds.
In general, the tomato is not picky about the soil, but the better conditions are created for its growth, the greater the harvest it will produce. So you should not neglect either autumn or pre-planting soil preparation.
Wash and disinfect frame and walls
To get rid of fungi, bacteria and wintering pests, the walls of the greenhouse must be thoroughly washed with a soapy solution, both inside and outside. It is worth adding copper or iron sulfate to the solution to make it even more effective.
Then you need to close the greenhouse and light a sulfur bomb inside, placed on a brick or other flat, hard, non-flammable surface. Although the bomb burns for several hours, you cannot enter the greenhouse for three days, so as not to inhale sulfur dioxide. After using the checker, the greenhouse must be thoroughly ventilated, washed again to remove soot, and then add preparations that help restore soil fertility (for example, Baikal EM1, Biocomplex BTU Soil Improver, etc.), because As a result of fumigation, many beneficial fungi and bacteria die along with diseases.
In greenhouses, the frame of which is made of unpainted metal profiles, sulfur bombs cannot be used, because this will lead to corrosion.
Wooden frame parts should be sprayed or painted with a 3% solution of copper or iron sulfate to protect them from rotting and pathogenic fungi. Particularly carefully, with the same solution, it is worth treating joints, crevices, cracks and other secluded places where pests willingly settle down for the winter.
Useful tips
And finally, a few tips on how to make the soil for tomatoes in a greenhouse ideal for growing these crops.
- Unfortunately, the soil is capable of retaining various infections that are dangerous to tomatoes. That is why experienced gardeners recommend periodically changing the place where these plants are grown. Every few years, plant tomatoes in a different greenhouse on different soil.
- Spring preparation of the beds should be carried out no later than 10-14 days before planting the seedlings in the greenhouse.
- If the soil is poor in calcium, then it is necessary to add fertilizers containing this element. A lack of calcium contributes to the occurrence of petal rot.
Remember that the better you prepare the soil for winter, the better the harvest you will get for next fall.
Ventilate the greenhouse
After disinfection, the greenhouse must be ventilated by opening the doors and vents wide. To prevent moisture from stagnating inside, it is advisable to leave the door open throughout the winter, and to prevent the frame from becoming warped, it can be removed completely.
You can completely remove the polycarbonate from the greenhouse and put it in a dry place for the winter.
By the way, some gardeners dismantle the ends of polycarbonate greenhouses for the cold season, and put them back together at the end of February or beginning of March, i.e. 3-4 weeks before the start of work in the greenhouse.
Processing of greenhouse structures and covering material
Disinfection of a structure can be carried out in different ways, depending on what materials the greenhouse is made of. In all cases, except for pre-treatment with sulfur, it is necessary to separately disinfect the frame and all covering material. Any stationary covering that remains overwintered on the frame, as well as any removable covering that is removed for storage in order to be reused in the spring, is subject to mandatory disinfection.
Greenhouse disinfection
Frame processing
There are three types of frames:
- metal;
- wooden;
- polyvinyl chloride.
Do not forget that a metal frame cannot be treated with sulfur - sulfur can “eat” the metal, rendering the frame unusable.
Table No. 3. How to treat the greenhouse frame.
| Frame material | Processing methods |
| Metal | Wash with boiling water and vinegar. For one liter of boiling water, at least 50 ml of vinegar is consumed. |
| PVC | It can be treated with the same concentration of vinegar solution as metal, but the water temperature should not exceed +60°C. |
| Tree | It is best to use copper sulfate. The maximum concentration of the solution is 10%. |
Coating processing
Here, too, it all depends on what kind of material is used.
Film and glass
If the greenhouse is covered with film or glazed, the coating is treated with a hot (at least +40°C) solution of laundry soap. A piece of soap without impurities and with a high alkali content weighing 100 g dissolves completely in boiling water (can be grated). The solution is cooled, stirring, to the desired temperature. All coatings are thoroughly treated with a brush, first from the inside and then from the outside.
Cleaning a glass greenhouse
Polycarbonate
A polycarbonate greenhouse is treated not with active alkali, but with a solution of potassium permanganate. It should be intense and hot. It is not enough to simply pour over the entire coating, trying not to miss a centimeter. It is important to wash the polycarbonate well from the inside. Particular attention should be paid to the corners, lower and upper (there may be wasp nests under the ceiling). The outside of the structure can simply be doused with solution. After disinfection, all doors are opened, a draft is provided and the greenhouse is quickly dried.
Washing a polycarbonate greenhouse before treating with disinfectant solutions
Potassium permangantsovka
Removable film covering
Removable reusable film should also be treated with potassium permanganate, dried and sent for storage packed in a large sealed bag.
Prices for potassium permanganate
potassium permanganate
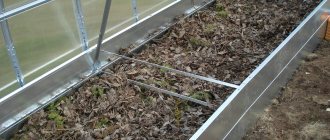
Strengthening the frame
If snowy winters are likely in your region, before disinfecting a stationary greenhouse, one more important work must be done - strengthening the frame. For this purpose, temporary supports and arches are used, which are installed inside. You can make them yourself or purchase ready-made ones.
Greenhouse supports
The emphasis is on the upper part (ridge) of the structure. In order to protect a six-meter greenhouse from collapse, you will need at least four T-shaped supports. They are attached to the upper crossbars of the structure and serve as additional insurance against collapse and breakage.
T-shaped support
Advice! If the greenhouse is located in an area blown by the wind, and the amount of snow cover may increase critically, then double the number of supports.
The supports are placed on a solid foundation. This could be plywood, metal sheet or other sealant. If you install supports on the ground, under the weight of snow they can sink into the soil.
Roof spacers
For a polycarbonate greenhouse, there are standards for maximum loads on the frame. On average they are as follows: 70 cm of dry, light snow and no more than 30 cm of wet, compacted snow. Glass can withstand the load half as much, and the film, even the densest, can withstand a maximum of 20 cm of dry snow cover.
Snow from the greenhouse must be removed regularly
That is why it is important to promptly remove snow from the roof and walls of the greenhouse. Even if the greenhouse design provides for independent snow melting (most modern polycarbonate greenhouses have this function), it won’t hurt to monitor the process from time to time.
Cleaning the greenhouse from snow
After installing the supports, disinfection procedures are carried out, the greenhouse is thoroughly ventilated (especially from the sulfur bomb), dried and new soil is laid in it.
How to make beds in a polycarbonate greenhouse
In this article you will find detailed instructions for arranging beds in a polycarbonate greenhouse! We also recommend reading the article on how to make drip irrigation from plastic bottles with your own hands.