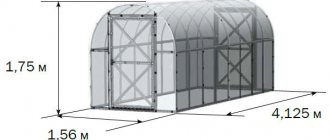
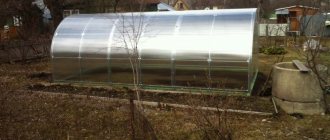
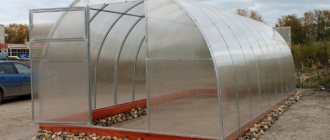
Can a greenhouse be compact, lightweight, and easy to assemble? Now it can, because very interesting designs have appeared on the market for gardening products relatively recently - these are tent greenhouses or “greenhouses in a box”, which are easily assembled/disassembled, which is what attracts gardeners. In order to install this structure, you do not need any special tools, and disassembling it and packing it back into a small box is also not difficult.
Tent greenhouses
Design features of an awning greenhouse
A greenhouse with a tent cover is a structure for those gardeners who love simplicity, mobility, are not fussy about the appearance of a temporary structure, and also grow vegetables in the summer.
Such designs have already become popular among summer residents, and many admit that they have felt the benefits of purchasing them. The greenhouse contains a frame covered with an awning, constructed using fastening components.
- The raw material for making a greenhouse awning is a special light-diffusing fabric made of 3 layers. This fabric will not stretch, is very durable, and does not allow water to seep through.
- The openings of doors and windows in the awning, required for good ventilation in the greenhouse, have valves for closing with zippers.
- A canvas awning provides an excellent opportunity to create in a greenhouse the climate necessary for growing plants that love warmth, protects from winds, cold, the burning sun and other negative factors, but conducts light from the sun for plants.
The frame is made up of many steel elements coated with substances that prevent the metal from rusting. Thanks to this, the service life of the greenhouse is long. Some models include shelves.
The fastening kit includes elements that provide structural rigidity and reliable fastening of the awning. They include horizontal slats, ratchet tensioners and stabilizers.
Reliable design and durability
The reliability of the structure is ensured by its rigidity, which is achieved with the help of additional frame fastening elements. They are: Shelter Lock stabilizers, Cross Rail transverse rails. Ratchet tite ratchet tensioners provide the ClearView material used as the structure's awning with excellent tension, and the fabric's special resistance to tearing and deformation becomes a unique addition to its reliability. In addition, the especially durable DuPont™ Premium thermal spraying, which is used to treat the steel frame profile, prevents damage to the metal by corrosion and ensures long service life of the garden greenhouse.
.
Pros of a tent greenhouse
- Easy to assemble by hand, mobile, durable design.
- The ability of the covering material to protect against the harmful effects of sun rays that cause burns. However, the awning transmits the necessary amount of heat and light required for photosynthesis to occur.
- The canvas has low thermal conductivity, which well maintains the required temperature in the greenhouse, beneficial for plants, even during cold weather around.
- Created vents for ventilation, doors that close tightly with zippers, make it possible to arrange temperature and humidity conditions, and provide timely ventilation. This maintains the necessary microclimate in the greenhouse.
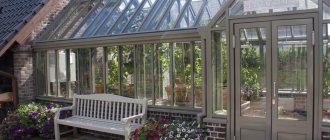
- The advantage is easy access in the interior space. The size, shape and design of the greenhouse can be selected depending on personal preferences.
There is only one drawback: the use of such a design is only possible when it is warm outside. It will not be possible to grow anything in such a greenhouse in winter.
Mobility of the greenhouse, quick installation and ease of maintenance
Tent greenhouse
Shelterlogic does not require preliminary preparation of the base and construction of the foundation according to the design. Assembly time takes an average of two hours, which is done without the use of special tools and equipment. Dismantling the structure during the off-season also does not take much time. Maintenance of the tent greenhouse is simple, ClearView fabric is easy to clean.
Tent greenhouse for a summer residence - Shelterlogic design, is a worthy competitor in the modern market among products in this segment, thanks to its design and operational features. Perfect greenhouse, price
which, unlike analogue greenhouses from other manufacturers, is more than affordable and meets a high level of reliability and quality.
Construction of a tent greenhouse with your own hands (instructions)
To build a greenhouse, you don’t need to get a lot of tools; all you need is a tape measure, a screwdriver, a wrench for nuts, and a level. There are products on sale from different manufacturers, but the method of creating all structures copies each other, there are small differences in details.
The work is performed in the following order:
- In a pre-selected area for finding a greenhouse, objects are removed from the box and plastic ties are removed. All numbered components are obtained;
- Guided by the regulations, all parts intended for the roof are taken out of the total number; they must be placed in front of you. The roofing structure contains slats, frames, fittings in the form of tees and crosses. Lay out on the surface according to the instructions. The assembly diagram is simple and conveys this process in detail;
- In accordance with the instructions, the slats are combined with fittings, they are secured using bolts and wing nuts. At all levels of assembly, you need to ensure that the nut is inside the structure, otherwise the awning can be damaged during the service of the product. When the bolts are inserted in all the holes and the nuts are tightened, then the roof will be ready;
- Next you need to deal with the support posts. According to the instructions, all racks are found by numbers, 2 sets of racks and 1 support lamb are combined with each other. The result will be 6 support posts;
- Of the 6 assembled racks, 3 are connected to the loose edges of the fittings and secured with bolts and nuts. During this period, the second side of the roof should be level on the ground;
- The previous procedure is done on the back side of the roof, using the remaining 3 racks. The frame can be considered assembled;
4 pieces of slats are found for the spacers, secured between the support posts of the frame, secured with awning clamps, at a distance of 20 cm from the ground.
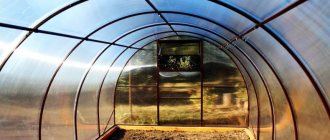
Spaciousness and sufficient illumination of the room
Light-transmitting ClearView fabric, created using a special technology, reliably protects plants from the negative effects of UV rays of the A and B spectrum, which can result in burns, and at the same time transmits into the room a sufficient amount of sunlight necessary for the synthesis of plants. Internal space of a country greenhouse
, thanks to its design features, it allows you to place boxes and pots with plants in the most rational way, using every square meter to your advantage, without cluttering the room.
Read more:
- Greenhouses for summer cottages: how easy are they to build?
- Where to buy a greenhouse in Moscow?
- Frame greenhouses: gardening of the future
Installation of a tent greenhouse frame
On-site installation is carried out as follows:
- Using a tape measure, the length of the structure is measured diagonally. The maximum deviation in elongation between the diagonals is allowed to be 2.5 cm. The width of the two sides, top and bottom should look equivalent;
- The awning must be strengthened onto the installed frame. To do this, it is unfolded and put on the frame so that the ends hang down freely. For easier installation of the awning, you can close the zippers 1/3;
- Shock-absorbing cables are threaded through holes in the awning located inside the plot of the structure. A loop is made near the roofing profile by wrapping the cable around the ball;
- The slats of the awning are threaded into the sleeves on a separate stand, then the slats are secured with clamps. Before the final tightening of the clamps, the rail is laid at the very bottom to fully tension the canvas;
- The cable encircles the side post, in the area of contact with the spacer, and the cable is connected, for this it is squeezed into the anchor loop;
- The anchor elements are strengthened in the soil so that its eye is located no more than 5 cm above the soil. The anchor cable is secured by a clamp. For permanent fastening, special hooks are used;
- Openings for ventilation are created. First, the frames of the openings are connected - this is done without the participation of bolts and nuts. Connected slats, consisting of 3 parts, are inserted into the sleeves located on the bottom strip of valves for ventilation.
The greenhouse is now completely constructed.
Characteristics of CoverIT greenhouses
- A 3.5 cm steel frame coated with DuPont Premium polymer coating reliably protects against corrosion.
- Three-layer woven high density polyethylene.
- Increased light transmission. Protection from ultraviolet rays, transmitting the spectrum of rays only necessary for plants.
- Opening end windows to control air exchange and provide ventilation.
- The door with a zipper ensures complete tightness.
- The ratchet tensioner system ensures rigid stabilization of the structure.
- Screw auger anchors for fixing into the ground are included.
- Convenient packaging for transportation and storage: greenhouse in a box.
- Assembly time is no more than 2.5 hours.
Service life more than 10 years.
CoverIT greenhouses are a new generation of greenhouses that are far superior to polycarbonate and film ones in terms of durability, strength, reliability and functionality.
Recommendations for maintaining a tent greenhouse
Following some recommendations will allow the greenhouse with an awning to serve for a longer time and with greater efficiency:
- It is advisable to arrange the greenhouse in the direction: east - west;
- Every month the tension of the awning is checked; the canvas should be closely adjacent to the frame so that it does not wear out too quickly;
- It will be faster for two people to pull up the awning and the risk of damage to the canvas will be minimized;
- The awning is not designed to withstand the loads of snow and ice in winter, so it needs to be rolled up for the winter period, but the frame can remain;
- Periodically it is necessary to wash and clean the awning, but for this it is not allowed to use detergents with abrasives or containing alkali and acid;
It is not recommended to leave the structure with an unsecured awning, because the wind can blow away the fabric.
Tips for use
Tent greenhouses are easy to operate - it’s very difficult to do anything wrong here. But we will still give some tips that will help extend the service life of this structure as much as possible.
- Every month check how tightly the awning is stretched on the slats. The material must be tightly fixed to the frame. Folds always lead to rapid deterioration of the material.
- When pulling the awning, invite a second person to help. Installation will go faster and the risk of material damage will be reduced.
- A tent greenhouse is not suitable for use as a winter greenhouse. You should not use it as a permanent structure.
- The awning cannot withstand snow and strong wind loads - be sure to remove and put it away in the winter. The frame can be left on the site, but it is better to remove it too.
- Clean the greenhouse regularly from dirt. The awning is easy to clean on both sides. But do not use aggressive detergents or abrasives.
- Do not install a tent greenhouse under power lines - it is dangerous.
- The greenhouse should not be located under tree branches or close to houses.
- Do not leave a greenhouse with an unattached cover unattended. A sharp gust of wind can blow down a structure and damage it.
- Never store liquids that could catch fire near the greenhouse, do not smoke near it, or light fires.
- If snow or ice somehow ends up on the greenhouse, remove it immediately with a brush. Do not use rough or hard objects.
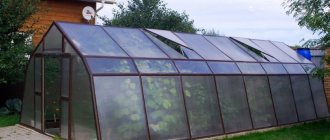
Tent greenhouse in winter
Photos of all types of tent greenhouse
Assembly and disassembly of greenhouses and storage
| If desired, this greenhouse can be disassembled (although not necessary). Such dismountable frame film greenhouses CoverIT are easy to store in the off-season, since when disassembled they take up surprisingly little space and can be easily hidden in a country house, barn, or transported for storage to another place. And in conclusion, we can say that this greenhouse will fit perfectly into the modern stylish exterior of the site and in the presence of outdoor furniture made of artificial rattan, offered by our company. The video on the right shows an example of assembling a greenhouse 1.8 * 2.4 * 2 m |
Where to buy?
The CoverIt tent greenhouse is being sold on the official website of the Eurogarod company. You can also purchase new generation products from Shelterlogic on the Eurogorod website. And also select all the necessary gardening equipment for your site.
Tent greenhouse CoverIt
In addition to the equipment itself, the official website also contains delivery conditions and contact information for the Euroogorod company. The huge variety of quality products will pleasantly surprise you.
How to choose covering material for greenhouses or greenhouses
As the above characteristics of covering materials show, they have many common parameters. When deciding which covering material is best to choose, you should be guided not by the name and manufacturer of the fabric, but by its purpose. It is also worth considering climatic conditions, the duration of the warm period, the frequency of sudden frosts, wind, etc.
When using any type of agrofibre, first of all you need to pay attention to its density and color. For frame structures, white fabric is used. Some manufacturers have modifications of it in terms of colors and increased strength - reinforcement. These preferences are purely individual.
The optimal density of the covering material is determined by the following parameters:
- time of planting plants in the ground;
- height of growth of garden crops;
- climate conditions;
- height and type of structure of the shelter being constructed.
The density of the covering material depends on the height of the structure and the plants themselves.
What covering material is better for a greenhouse or greenhouse? First of all, one whose density is more than 30 g/m², and also has a UV stabilizer. For greenhouse structures, the densest agrofibre is always chosen - 50 g/m² and higher. For greenhouses with low arc structures, a fabric marked with a density of 30-40 will be sufficient.
The UV stabilizer affects the durability of the covering material and the preservation of its original properties over several seasons. It is impossible to visually determine the presence of a stabilizer in agrofibre, so it is worth purchasing products that are packaged at the factory and have the appropriate manufacturer’s markings and protective marks.
Note! If you purchase agrofibre in rolls, you can save on covering a greenhouse or greenhouse. The remaining unused part of the roll is stored for an unlimited amount of time.
Buy Agrocover for greenhouse Eco, Standard or Reinforced at an affordable price
This can be a greenhouse made of arcs with covering material with a density of 100, 200, 250 microns, standard or reinforced with a tunnel, 3x4 or 3x6 in size. A cover with protection from UV, wind, and frost, designed for growing flowers, seedlings, and vegetables in closed ground. Often used by farmers to grow plants until an acceptable balance of summer temperatures is established outside. You can buy a greenhouse in a standard size on the website or by phone. It is possible to order a non-standard option to suit your parameters, as well as purchase covering material in rolls.
Choosing a location for a greenhouse
Scheme of optimal greenhouse placement.
Its effectiveness depends on the location of the greenhouse. Recommendations when choosing a location:
- The greenhouse should be well lit. For additional lighting, reflective screens coated with white paint can be placed on the north side at a distance of 1 m. In order for sunlight to spread evenly over the surface of the greenhouse, the end wall of the greenhouse should be shorter than the rest (it should slope towards the west).
- The place where the greenhouse is supposed to be built must be protected from gusts of the north wind (it is better to install the greenhouse from west to east).
- A country greenhouse should be clearly visible, so it is better to place the greenhouse next to a residential building (the proximity of other buildings will also protect the greenhouse from the wind).
- If your dacha already has a place where garden tools are stored, it is better to place the greenhouse next to it.
- To improve the heating of the greenhouse, you can deepen it 0.7-0.8 m into the ground. But not deep, otherwise low-growing plants will be in the shade.
- The proximity of trees creates shade, so the greenhouse should be placed away from tall plantings.
- If the plot is small (no more than 6 acres), there is no need to build a large greenhouse. You can also attach it to other premises (a residential building, a summer veranda, a utility block).
- To function properly, the greenhouse requires electricity and water, so the electricity and water supply systems must be nearby.