The longer a plot of land is used for growing crops, the less fertile it becomes.
Harvests fall, no matter how much effort is put into them, and what can be grown is not pleasing in either quality or quantity. Igor Lyadov, who lives in the Far East of the country, faced the same problem, and like many gardeners, he spends his few weekends at his summer cottage. Lyadov, who was accustomed to dealing with a drop in productivity at the aircraft factory where he works, did not put up with the most advanced technologies, but decided to make every effort to restore fertility to the land and achieve high productivity with the least amount of labor. This is understandable - after all, a summer resident could only devote time to his favorite beds on weekends.
While others are weeding and hilling, you are relaxing
We must admit that gardening is not always a pleasant activity.
Rather, it’s hard daily work. Either the wireworm or the Colorado potato beetle has attacked the potatoes, or the spider mite is eating up the cucumbers in the greenhouse. Then the carrot tops suddenly turned yellow and weakened. And the harvest is sometimes generous, sometimes meager. Sometimes you put in so much effort! And as a result... It didn’t work out... If you look at Igor Lyadov’s method from the point of view of the average farmer, then a “smart garden” is not a job, but a resort.
Igor Lyadov and his eggplant harvest
Igor Lyadov himself noted in one of his videos that there is no need to weed plants using his technology at all. There is no need to dig either. Only loosen the top layer of soil slightly. There are no pests or parasites in high beds. And even on the paths between the beds there should be no grass, so as not to weed it. Why not a resort? You just need to figure out how to build a “smart garden” and strictly follow the technology.
Advice. In one of his lectures, Igor Lyadov voices his favorite method for constructing paths: “The ground should be covered tightly with newspapers, and a layer of sand should be poured on top. Then you won’t have to weed here either.”
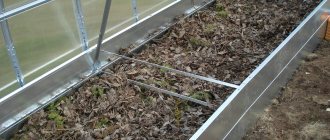
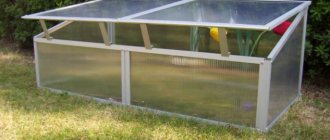
We construct a greenhouse
If you need to build a greenhouse for early planting, then this task will not be difficult to complete. Just follow the instructions:
- Pegs are installed along the sides of the bed (the distance between them is 60-90 cm);
- We connect the opposite pegs with plastic arcs;
- The resulting frame is covered with film or any other material for insulation.
Using this simple method, you can organize early planting of crops.
You should definitely use the author's method to get maximum yield without much effort. We are sure that you will appreciate this innovative technology!
Who is Igor Lyadov?
Igor Lyadov, who became famous throughout the country, lives in the Khabarovsk Territory. He says about his area: “We can get to our dacha plot in early May at best. Our climate is comparable to that of the Far North. I personally start planting on May 10, unless, of course, there are night frosts.” And in this region, during a short hot summer, an amateur summer resident grows such crops that southerners would envy!
Igor Lyadov
It turns out that Igor Lyadov worked at an aircraft factory and visited his dacha only on Saturday and Sunday. There he worked, like everyone else, in ordinary beds, and noticed that the outer plants were much stronger than those growing in the middle. Having studied the technology of John Mittleider, the summer resident began to experiment. He developed the technology of a high narrow bed, a little similar to the famous “warm bed”, but with significant differences.
Processing of planting material
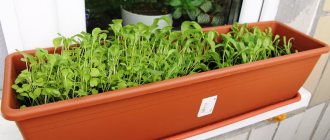
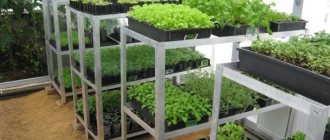
Growing cucumber seedlings in rolling papers without soil
Despite the simplicity of the method, gardeners must pay special attention to preparing potatoes for planting. Tubers can only be planted with strong sprouts. Otherwise, there will be no harvest. March is the right time to start working with seed. From March to May, the potatoes will germinate and be ready for planting. First, planting material is selected. The tubers should be healthy, not too large. They are washed. Place in hot water, the temperature of which is about 40 degrees. After the water has cooled, it is lightly tinted with potassium permanganate. Manganese is necessary for disinfection. After 15 minutes, the tubers are taken out and blotted with a towel.
Potassium permanganate for processing potatoes
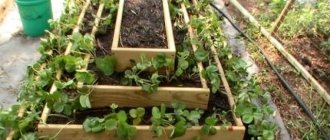
How to make a raised bed with your own hands?
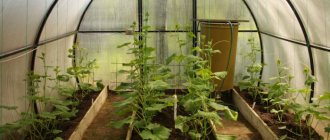
Mini-greenhouse from Igor Lyadov:
- you need to dig two pegs on both sides of a narrow ridge about a meter from each other;
- put arcs on them;
- cover with film or covering material.
Mini greenhouse over a warm bed
As the innovator explains, “we must feed our microorganisms” with compost and organic fertilizers. The essence of the idea is to grow plants without chemical additives thanks to composting without compost heaps. Igor Lyadov believes that natural farming “reveals all the capabilities of plants” and has a wide range of advantages:
- Rapid growth of any crops, abundant harvest.
- The fencing of the garden bed can be made of boards or timber. This structure is strong and will last for more than a dozen years.
- The water inside the bed does not stagnate and does not go wastefully into the ground.
- This rational garden is easy to water.
- No need to dig. Just loosen at a distance of 7-10 cm.
- Thanks to the cardboard placed at the bottom of the box, perennial weeds do not get inside. No weeding is required at all.
- The box and cardboard protect against parasites and pests.
- Each vegetable or berry has enough light to develop. After all, the author advises planting plants only in a checkerboard pattern. If the crops are large, for example potatoes, in 2 rows. If radishes or onions - in 4 rows.
- The plantings are well ventilated.
- Slowly rotting compost gives the seedlings all the necessary minerals, and the fence prevents them from being washed away.
- The height of the beds makes it possible to plant seedlings as soon as it gets warmer, even if the soil below has not yet warmed up.
- It is easy to make mini-greenhouses over narrow areas.
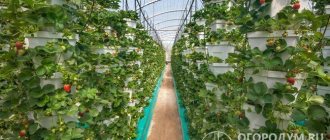
- The garden becomes clean and tidy. Everything is planted in ideal geometry, like in parks.
- The principle can also be used in greenhouses.
- When using the technology, there is no need to use mineral fertilizers, anti-disease drugs, growth stimulants, or purchased microorganisms.
With high beds, the garden looks neat and well-groomed
Disadvantages noticed by Lyadov’s followers:
- Pests cannot get through cardboard, but rodents can. Some gardeners say that mice happily live in warm beds. “But not in the house,” they add.
- Practitioners have not yet figured out the question about earthworms. They, like pests, cannot get through cardboard.
Landing rules
In order for the yield to be maximum, it is necessary to adhere to several important rules:
- Large plants (beets, cabbage, tomatoes, watermelons) are planted in two rows; a checkerboard order must be observed. Lyadov believes that this is how maximum growth can be achieved;
- It is better to plant onions, garlic, potatoes, strawberries in 3-4 rows;
- It is advisable to trim the leaves of tomatoes and other vegetables so that the plant receives more light.
Igor Lyadov with his garlic harvest
Construction of a “vegetable container” in 10 steps
Technical features of the “smart bed”: bed width from 60 to 100 cm, depending on the crop (cabbage requires more space). Length is arbitrary. The location is strictly north to south. The passage between fertile areas is from 60 to 80 cm. The entire contents of the box need to be changed after 5-7 years. For the Northern regions of Russia it is better to make the beds higher, for the South – lower, and even deeper into the ground.
The smart ridge is constructed using the following technology:
- If the area is overgrown, you need to mow the grass, but do not burn it, but fold it.
- Choose a flat area. There is no need to dig up the ground.
- Put together a tall box from boards or other available materials. Fasten with nails or self-tapping screws.
- Cover the bottom completely with open cardboard boxes in one layer.
- Sprinkle a thin layer of sand.
- Then - a layer of coarse plant residues.
- It is better to paint the box with water-based paint.
- When the fence is dry, the bed is filled with smaller greens. Any tops, grass clippings and leaves will do except perennial weeds with roots.
- The next step is humus, manure and compost. Igor Lyadov advises to water it all with a nutrient solution according to his recipe.
- The last layer is 10 cm of good soil.
The bottom of the box is covered with cardboard
What is the ring cut for?
Kerbovka potatoes is a rather labor-intensive process. It takes a lot of time to cut the peel over each eye of the planting material. You can get away with this by making a ring cut. Why do you need to make a ring cut? It is also performed to deliver nutrition to sleeping eyes. This is the same kerbovka, only less labor-intensive. A circular cut is made in the middle of the tuber to a depth of about 0.8 cm. However, it is not continuous. Several untouched places are left so that nutrients can reach the upper buds. Kerbovka and banding are performed before vernalization.
Circular cut
Author's fertilizers
Advice from Igor Lyadov: If you make a distance of 40 cm between the potato holes, the tubers will be large. If 30 cm, then it is of medium size.
Recipe No. 1 In a 200 liter container. need to put:
- a shovel of ash;
- about half a bucket of litter or manure;
- a full bucket of rotted straw or fallen leaves;
- a shovel of humus or garden soil;
- a shovel of sand;
- yogurt or whey – 1 l;
- mash - 3 l.
In order to prepare the mash, you need 3 liters. water add 5 tbsp. l. sugar and about a pinch of yeast. After 2-3 days, when it has fermented, add to the other ingredients. Infuse for 7 days. When watering, dilute twice.
Recipe No. 2
- approximately two-thirds of a 200 liter capacity. cover with weed grass;
- add 2 shovels of ash;
- fill completely with water;
- cover with film;
- leave for 14 days. When watering, dilute 1 to 10.
Recipe No. 3
- one third of a 200 liter capacity. fill with fresh manure;
- add water to cover the contents;
- leave for 14 days. When feeding, dilute 1 to 10.
Recipe No. 4
- in a capacity of 200 l. place chicken manure, about one third;
- to fill with water;
- after 2 weeks you can use it. When watering, dilute 1 to 20.
The author's set of measures to provide plants with all nutrients leads to the expected result. This was proven not only by Igor Lyadov, but also by his many followers. It remains to test this method on your own land ownership.
What is Kerbovka
Tomato Miracle of the Earth
Kerbovka is a technique for cutting planting material. It is necessary to stimulate uniform distribution of nutrition throughout the tuber. It is known that a tuber is a mini-stem that is very thick. Real buds are hidden in the eyes of potatoes. Shoots develop from the buds. However, not all kidneys receive nutrients in the required quantities. The upper kidneys receive the most nutrition. Accordingly, it is from them that the stems will come out. The lower ocelli are usually dormant. Nutrients reach them through the peel in small quantities. To change the situation, to awaken the lower buds, kerbovka is necessary.
Helpful information! Kerbovka is shallow cuts of the peel above the lower buds so that the nutrients stop in these places. This is done using a sharp knife, the blade of which is disinfected in a solution of potassium permanganate. The incision is made shallowly, approximately 0.6 cm. This way, uniform distribution of nutrition to all eyes will be stimulated. In this case, the stems will grow not only from the upper buds, but also from the lower and lateral ones.
High beds by Igor Lyadov - photo
Is it possible to plant green potatoes?
Before you can start sprouting potatoes, they need vernalization. This process consists of greening planting material. Green potatoes contain a lot of solanine. This is a poison that will protect the tubers from diseases, insects and common field rodents.
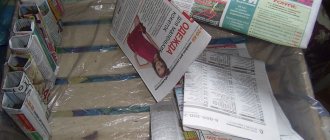
The duration of vernalization is about three weeks. The tubers are placed on newspapers in a place where it is cool enough (about +2 degrees), but not dark. The potatoes should turn green in 25 days. It will produce green pigment. The answer to the question “can I plant green potatoes?” unambiguous. Before planting potatoes without digging the soil, the tubers must turn green.
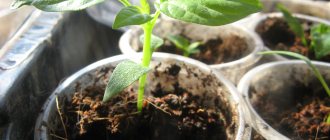
After vernalization, tuber germination begins. To do this, take a net or box. Planting material is placed there. Next, the potatoes are put away in a dark place for 7-10 days. The temperature there should be about +15 degrees.
Germination of tubers
Folk signs
To the question “when to plant potatoes according to folk signs?” there may be many answers. You can look at the folk calendar, which contains various forecasts and phenomena, including agricultural ones. However, the most common sign is based on birch. As soon as the leaves of the tree reach the size of a ruble, you can begin planting. According to agronomists, such a sign did not appear out of nowhere. By the time the birch leaf reaches a size of 1-2 cm, the earth warms up to +8...+10 degrees.
Organic farming
Planting potatoes without digging the ground has many advantages, including not only simplicity, but also a beneficial effect on the soil. Organic farming has been found to increase natural fertility.