Polycarbonate beds have become popular among summer residents and gardeners. They are easy to install even without construction skills. Good fencing protects crops from animals, the environment and poor climate. To make such a design for your site, you need to know about the properties of the material, and also consider all types of polycarbonate beds and choose the right one.
Is it possible to make beds from polycarbonate?
Polycarbonate is used to decorate greenhouses, and fencing for garden beds is also made from this material. The main reason for its widespread use in dacha farming is its positive qualities:
- keeps warm;
- transmits light well;
- has a long service life;
- looks aesthetically pleasing.
Wooden borders for garden beds rot over time and look less attractive. They shade neighboring beds and are difficult to install. Polycarbonate sides will last much longer. They are easy to install and do not need to be treated with special environmental protection agents. Based on this, we can conclude that polycarbonate beds will be the most profitable and effective way to design plantings. This will save money and time, and will also make the garden visually neater.
Preparatory stage for installation
Fences for garden beds made of polycarbonate are good because you can install them yourself, saving money. It is important to properly prepare for the installation process itself. The preparatory stage includes taking into account the following points:
- The foundation is placed, focusing on several points of location of the vertical columns.
- There is no need to cement the fence. A trench-type depression is dug along the perimeter of the fenced area. Lay at least 40 cm in depth.
- The pit is filled halfway with a mixture made of sand and crushed stone.
- Then the layers are carefully compacted, turning them into a kind of pillow.
- Metal corners ensure the reliability of the constructed structure. They fix racks made of aluminum. Self-tapping screws are also used as fasteners.
- For the strength of future greenhouses built on polycarbonate, novice craftsmen are additionally advised to immerse the products in the soil by 5-10 cm.
Advantages and disadvantages of fencing beds made of polycarbonate
Polycarbonate fencing has a number of advantages and some disadvantages:
| pros | |
| Flexibility | Allows you to create designs of different shapes |
| Does not allow moisture to pass through | When watering, water will remain in the ridge and nourish the seedlings, and not spread over the sides |
| A large assortment | It is possible to choose the color and desired sheet thickness |
| High temperature resistance | Polycarbonate does not deform in the heat |
Attention! The advantages also include strength. The sheets support the weight of the earth, preventing the beds from collapsing. If you dig the fence 10-20 cm into the ground, it will not rot and will protect the bed from weeds sprouting from the paths.
The disadvantages of this site design option are presented in the table:
| Minuses | |
| UV influence | Colored sheets fade and fade over time, transparent polycarbonate becomes cloudy and turns yellow |
| Fear of low temperatures | The sheets crack due to severe frost. |
| Scratches | A smooth surface is easy to scratch, and it is impossible to hide defects |
To solve the problem of color sheets fading, as well as scratches, manufacturers offer polycarbonate coated with a protective layer. But it costs much more than regular sheets, which is why they are not popular.
Materials
Polycarbonate is a plastic made from a polymer mixture. It has a number of characteristics that make it an excellent option for arranging plantings and building greenhouses.
Polycarbonate is a transparent and lightweight material with sufficient strength for such a design.
One of the main advantages of the material is its flexibility, which is maintained even at low temperatures.
For arrangement, it is enough to use only small polycarbonate sheets.
But setting up a greenhouse takes longer and requires the use of more materials. Polycarbonate sheets are fastened together using special fasteners, which may include:
- self-tapping screws;
- bolts;
- screws;
- nuts;
- washers.
Since earth and water together create a very aggressive environment, it is necessary that all metal elements have a special protective coating that will help resist metal corrosion.
Types of polycarbonate beds
Structures for polycarbonate beds are divided into three main types, which summer residents most often build on their plots with their own hands. The types differ from each other in appearance and also have different functionality.
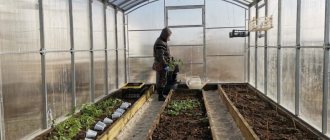
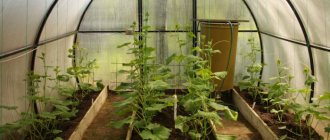
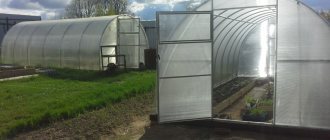
Vertical raised beds made of polycarbonate
Such structures are built for planting plants that require tying and support as they grow. Externally, the structures resemble small greenhouses. They are needed to protect plants from strong winds, overwhelming rain and scorching sun. Pests, cats or rats do not penetrate into such beds.
Vertical beds have doors for ventilation. Ropes for climbing plants, such as cucumbers, come down from top to bottom. For tomatoes, plastic pipes are installed from the ground to the ceiling, which serve as support stakes. Tall bushes must be tied up in several places so that their branches do not sag or break under the weight of the fruit.
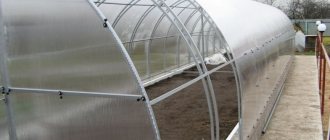
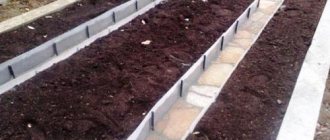
Horizontal beds made of polycarbonate
This is a fence for ordinary beds, which prevents the soil from shedding and water from spreading when watering. The standard size of such borders is considered to be from 15 cm to 70 cm in height. The most convenient option is a 40 cm fence, which is dug into the ground 10-20 cm.
Calculation of curb height depends on weather conditions. If the dacha plot is located in a climate zone where it constantly rains, high beds are needed. This will allow excess water not to stagnate, thereby saving the plant roots from rotting. Where the climate is drier and hotter, low beds are needed. Crops planted in this way will not dry out and will require watering less often.
Comment! For the strength of a polycarbonate border, a frame is needed. It is assembled from wooden, galvanized or plastic slats.
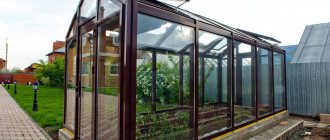
Opening beds made of polycarbonate
Another name is a mini-greenhouse. Such structures are much stronger and more reliable than their glass or film counterparts. Beds with covers are designed for growing seedlings, heat-loving crops and plants that require hopefully protection from the environment. Seedlings in closed ground are not afraid of wind, heavy rain or low temperatures.
Opening doors are needed for ventilation. They are made so that when opened there is free access to the plants for weeding and watering.
Opening beds are divided into 3 main types:
- Greenhouse-bread bin. The lid slides back, completely opening one wall of the ridge. Such structures are good for growing tomatoes, cucumbers, and peppers. Access for harvesting and loosening the soil will be free.
- Butterfly greenhouse. The lid of these beds is raised and fixed on additional supports. Butterfly beds are not suitable for areas where strong winds constantly blow.
- Belgian greenhouse. Outwardly it resembles a casket and has a single-pitched lid that opens upward. Such beds are suitable for growing seedlings, berries and flowers.
Experienced summer residents come up with their own versions of beds with doors. They can be gable, sliding, or with solid covers that are completely removable from the greenhouse frame.
Location
Often gardeners first build a greenhouse and only after that they begin to think through the location of all the plantings of the crops for which it was actually built. This approach is wrong from the start.
Option for location of beds
The location of plantings should be considered at the stage of greenhouse construction. First you need to decide on the crops that will be grown there. Using this, you can determine what types of beds will be needed, as well as what height they should be. Parameters such as the length and width of future plantings are determined by the size of the greenhouse itself.
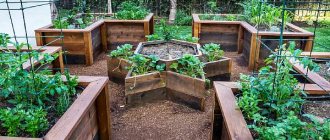
There are the following options for placing beds, which are equally suitable for a vegetable garden and a greenhouse:
- 2 beds with a criss-cross aisle;
- a couple of beds with a passage in the middle;
- 3 landings located parallel to each other. One of them should be wide, up to 3 m, and the other 2 narrow, up to 1 m wide.
The width of the passage is determined by how the crop will be harvested. If a wheelbarrow will be used, the passage must be wide enough for its free passage. If you do not plan to use a wheelbarrow, then you need to leave a space sufficient for one person to pass through.
How to make polycarbonate beds with your own hands
In order to start working with polycarbonate fencing for beds, you will need a tape measure for measurements, a screwdriver for fixing the sheets to the frame, and an aluminum profile for constructing the frame itself. Cut the material using a jigsaw or a fine-toothed hacksaw.
When constructing borders for garden beds, reinforcement will be required; without it, a long fence may collapse. To do this, the polycarbonate along the perimeter is supported with pegs from the outside or screwed to the profile from the inside. You can dig the profile into the ground, insert a sheet inside and cover it with soil. Then the support will not be visible. The upper part of the polycarbonate can also be covered with a profile. This will protect your hands from scratches on the curb if small burrs remain after cutting.
Comment! The cut edges of the sheet do not need to be covered with a profile if they are treated with sandpaper.
Assembling a vertical bed made of polycarbonate or a mini-greenhouse with doors is more difficult than making a border with your own hands. To work with complex structures, you will need a drawing. You need to mark all the dimensions on it in advance and think about the fastenings.
Before work, you need to clear the area. Weeds and stones are removed, and the fertile layer is removed from the soil. For borders, dig a narrow trench 10-20 cm deep. Lay the cut profile down, insert a sheet and bury it, then compact it. The main thing is to ensure that the sheet stands strictly vertically. Some gardeners advise immediately assembling the structure, fastening the sheets at the corners with a profile, and digging a trench under the entire area.
For vertical beds, a frame is assembled and polycarbonate sheets are carefully screwed on. If you are planning a structure with a semicircular roof, then the flexibility of the sheet should be taken into account. The thicker the material, the less elastic it is. If strongly bent, it may break or burst.
Sometimes the base of greenhouses with opening lids is made of timber. The tree should be treated with solutions against pests, as well as moisture-repellent agents. Then the base will last a long time. There are options where there is no need for wood. The greenhouse is installed on the ground and secured with stakes that are driven deep into the ground.
Comment! For vertical beds, you should make a wooden base and secure it firmly if the wind blows often.
Conclusion
If you not only need a fence for your garden beds, but also need to build a temporary fence for your site, then it is better to use inexpensive materials. For example, plastic mesh is perfect for fencing sports fields, which can be purchased at any hardware store (see also the article Plastic mesh for fencing). There is also a service - renting fencing for construction sites, an inexpensive pleasure for private developers.
In the video presented in this article you will find additional information on this topic.
Technology of planting on polycarbonate beds
In beds with borders, the planting technology does not differ from the usual one. Plants that require protection from environmental influences and pests are planted in closed vertical beds and mini-greenhouses.
Experienced gardeners say that polycarbonate fences can be used to make partitions that will divide the land into 2 parts. They help to plant 2 varieties of plants on one ridge that do not pollinate, but do not like being next to each other. The partition will be dug deep into the ground, and the plants will be able to grow without providing their neighbor with unhealthy substances.
In vertical greenhouses, columns for support are installed in advance. Seedlings are planted close to the supports. The distance between the stakes should be at least 30 cm. For cucumbers, you can lower the ropes along which the plant will curl. In this case, the seedlings can be placed closer to each other.
Positive traits
Builders and summer residents call increased fire resistance the first advantage of polycarbonate. The sheets can only melt, but this only happens when directly exposed to flame. The material can withstand mechanical shocks, but if cracked with a hammer, it will be damaged.
Accidental contact with foreign objects will simply scratch the plate.
The advantages of polycarbonate also include flexibility. This quality allows the material to be transformed into different forms. However, the owner must take into account the load falling on the curved sheet.
The rich color palette of the material will appeal to picky consumers who are not satisfied with standard shades. For them, manufacturers have provided interesting color variations in the metallic style.
Other advantages of polycarbonate as a material for fencing beds are:
- Possibility of preserving the territory from land sprawl.
- Effective in weed control. The fence sinks into the subsoil, blocking the access of harmful vegetation to dacha plantings.
- High aesthetics. Areas with small hedges look much nicer than unfenced flower beds. DIY fencing for tree seedlings? In addition, outdoor lighting lamps, hoses, and pipes can be easily hidden under the structures.
- Pest control. Mice, rats and other living creatures will not be able to spoil the harvest thanks to the protective sheets.
- Saving water. When watering the garden, water spreads to unnecessary areas. Polycarbonate fences will prevent overuse of water resources.
- Ease of creating a greenhouse. The film on the fence is easier to stretch.
A neatly fenced area is much more convenient to process: fertilize, weed, dig. The rest of the garden can “walk” if necessary.
Advice from experienced gardeners
Gardeners who have made polycarbonate fences and mini-greenhouses for their summer cottages advise the following:
- When joining polycarbonate sheets, you need to leave a gap of about 2-3 mm. The material expands slightly in the heat and contracts in the cold. If the connection is made incorrectly, the walls of the greenhouses and beds will be deformed and become uneven.
- It is better to fasten the sheets to the profile with screws with a rubberized head. The likelihood of damaging the material during installation is reduced to zero. In addition, such connections last longer.
- The height of the ridge should correspond to the height of adult plants. If the side is high and the bush is small, then harvesting will not be easy.
- If cracks or chips are found, it is better to replace the sheet with another one, because water will leak through the defect and soil will fall out.
- The material should be cut in sunny weather. In the cold, it loses its elasticity and chips may form.
- In winter, it is necessary to sweep away snow from the lids of mini-greenhouses so that it does not press down the structure with its weight.
For more precise work with borders, summer residents recommend not to be lazy and complete the drawing in the same way as for more complex structures. This will help you think through the structure in detail and reduce the likelihood of error.
Smart use of verticals
Making a drawing of a polycarbonate greenhouse
It is not at all necessary to place the beds exclusively in one plane. You have an excellent opportunity to organize a shelving structure in the greenhouse. It is the vertical layout of the beds that allows you to very efficiently use all the free space. However, there are also difficulties here.
It is extremely important to distribute all plants and containers with soil in such a way that the lower tiers do not end up in the shadow of the upper ones.
Greenhouse shelving
Here are three simple rules for shelving.
- Directly under the shelving, you can make a warehouse-type niche to store the necessary equipment.
- The lower and middle tiers are ideal for adult plants. You can also place containers with fertile soil in which young bushes are planted. For example, this is a good solution when growing strawberries using the Dutch method.
- Containers with seedlings most need warmth and light. That is why they should be placed on the uppermost tiers when placing beds in racks. In accordance with growth and development, they can be gradually moved lower.
Shelving and pots for plants in the arrangement of a greenhouse
The vertical can also be used for terraced arrangement of beds. This is also a good option for those who want to gradually switch to shelving. In the greenhouse, on one side the beds are left traditional. The southeast or south side is more suitable for this. But a terrace can be made on the opposite side of the greenhouse.
An example of creating terraced beds
It is worth noting that such experimental designs are appropriate in cases where the combined cultivation of different crops is carried out within the same greenhouse. If one crop is grown, it is necessary to create uniform conditions throughout the entire area.
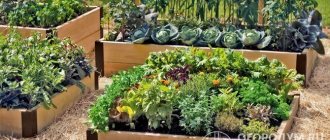
Is it worth it to “fence the garden”?
In recent years, the so-called “new summer residents” have appeared, promoting modern trends in dacha science. Some people form their beds not with a mound, but, on the contrary, with a small depression, while others plant garden crops according to a complex pattern - combining certain plants in one bed. And someone has already blocked off their plot with neat rectangles - garden borders made of modern materials.
I must say that this was not invented yesterday. Even in the last century, gardeners made borders for their beds, but mostly from boards. DIY wicker willow trees? What's wrong with this method? Firstly, the boards for edging are not taken new, they are not bought in construction stores, but used ones are used: from old buildings, slabs, sleepers. Accordingly, these boards very soon become unusable.
They rot, crumble, and bugs live in them. Frequent watering quickly deteriorates wooden sides. If you want to edge your beds, use another material that is resistant to constant dampness.
Important:
Wooden boards are completely unsuitable for edging beds. Plant pests live in them: aphids, mites, as well as fungus and mold.
Tree
Since wooden borders are still popular, let's take a look at them. Wooden sides in a dacha are good because they naturally and harmoniously blend into the surrounding nature. The most durable are square thick bars laid in two rows on top of each other (photo below right).
This simple design is easy to build with your own hands. You can sit on the top edge of the block when weeding. To make such a fence last longer, be sure to impregnate it with a protective compound.
garden board
Initially, this product was intended for fencing flower beds and flower beds, but vegetable growers also appreciated the garden board. Its bright summer colors, ease of installation, and durability of the plastic from which it is made are attracting more and more fans of country aesthetics, as you can see by looking at the photo below.