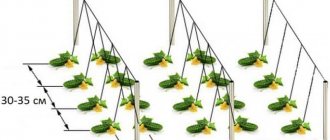
As a rule, on a bag of seeds, the manufacturer indicates some features of the variety: planting pattern, that is, the number of plants per 1 m2, and it is recommended to grow this variety in one or two stems. However, there are general rules for the formation of certain varieties of tomatoes.
- Pinching is the first stage in the formation of a tomato bush
- Formation of indeterminate varieties of tomatoes in a greenhouse Formation in 7 brushes for greenhouses
- Forming tomatoes in 5 brushes for open ground
- First method of formation: in 1 stem
Pinching is the first stage in the formation of a tomato bush
A side shoot, the so-called stepson, is formed in the axil of each leaf. With the rapid development of lateral shoots, the setting of new fruits is suspended, and those already set are stunted in growth. So that the plant is not distracted by growing green mass, but devotes all its energy to forming a crop, all stepsons, starting from the lowest one, must be removed.
Formation of a tomato bush - pinching
The exception is when tomatoes are recommended to be grown in two stems. To form the second stem, leave a stepson located directly under the first brush or above it.
Brush regularly, once a week. Trim the stepsons, leaving a small stump, otherwise the stepson may grow back.
The formation of tomato bushes depends on the type of their growth. Typically, two types of tomatoes are grown in a greenhouse:
- determinant
- indeterminate.
Determinate are ordinary tall varieties and hybrids that, having formed a certain number of brushes, end their growth with an inflorescence.
Indeterminate varieties and hybrids grow continuously, forming cluster after cluster.
How to properly remove stepchildren?
In greenhouses, vegetable growers try to use space economically. Therefore, tomatoes are planted quite closely and it is important to carry out pinching in a timely manner. An inexperienced gardener may not be able to distinguish a shoot from a leaf or fruitful shoot. It is important to remember that the stepson always grows from the axil of the leaf. The photo below clearly shows what the stepson is.
Pruning for tomatoes is painless if done correctly. Below are instructions on how to do stepsoning step by step.
- First we need to determine how we will form the bush: in 1, 2 or 3 shoots. Tomatoes in a polycarbonate greenhouse usually form one shoot. The choice of formation method depends on the planting pattern and characteristics of the variety.
- Then we should plan with what frequency we will perform pinching for greenhouses. It is believed that this work should be done weekly. The length of the removed shoots should not exceed 5 cm.
The stepson is already very big - stepsoning is not carried out at the optimal time - To pinch the shoots and remove leaves, you need to choose a warm, sunny day and not water or fertilize 3 days before.
- It is better to remove stepsons in a greenhouse in the morning so that the wounds heal before evening.
- It is advisable to sprinkle the wound surface with wood ash.
- When processing a bush, no more than 3 shoots are removed in one pass, leaving a small stump 3-4 mm long.
- After the operation is completed, the tomatoes are watered abundantly.
When removing stepsons, no tools are required; the work should be done with clean hands. The shoot is grabbed with two fingers and pinched.
Attention! If any pruning tools are used, such as pruning shears or scissors, they should be disinfected. Pruning wounds are an excellent route for pathogens. It is worth wearing gloves before trimming tomatoes; touching the hairs on the shoots can irritate the skin of your hands.
Formation of indeterminate varieties of tomatoes in a greenhouse
These varieties were created for heated greenhouses, where they were grown all year round. In an unheated greenhouse, of course, it is difficult to use the full potential of indeterminate varieties, but growing 5-6 racemes is quite possible. To do this, towards the end of the growing season (in the middle zone this is August 10-15), remove the top and all unset inflorescences from indeterminate varieties, let the plant “focus” on the already set fruits.
Stopping the growth of tomato bushes of indeterminate varieties
These tomatoes have unlimited growth - if it were summer all year round, they would continue to grow indefinitely.
They are formed into one stem and nothing else. There is no point in leaving the side shoots - by the time they grow and bloom (and they lay flower clusters very high), summer will already be over. You still won’t get fruit from them, and they will take a lot of energy from the plant.
The main difference in the formation of such varieties is the number of fruit clusters.
Conclusion
Forming a tomato bush in a greenhouse is a creative process. The skill of trimming shoots and leaves develops over the years, through trial and error. Regular work requires some effort and care. Dirty hands and tools will cause severe damage to plants if pathogenic viruses or microbes get into the wound.
Therefore, it is necessary to prepare for pinching or pinching in advance, and not do this after accidentally noticing an overgrown side shoot. And then the plants will be able to bring you tasty fruits in the quantities you planned, and maybe more.
Formation of indeterminate tomatoes
Formation of indeterminate tomatoes
Formation in 7 brushes for greenhouses
Greenhouse option. In this case, 7 inflorescences are left on the main shoot. There is no point anymore - they will not have time to ripen. And one more important detail: above the seventh inflorescence you need to leave 1 leaf, above which you need to cut off the top so that the bush stops growing and directs all its strength to ripening the crop.
Forming tomatoes in 5 brushes for open ground
Option for open ground. Here summer is shorter and cooler, so we leave only 5 tomato inflorescences. Above the last one is 1 sheet, then cut off the top.
Pinching the tops
When the required number of clusters with flowers has grown on each stem, it is necessary to cut off the top of the bush. This stage of bush formation is necessary in order to stop the growth of the bush upward and direct all the nutrients directly to the fruits that have already formed. New ovaries will not have time to ripen anyway, so there is no point in wasting energy on them.
Pinching the top of the bush
Each tomato stem is cut off, leaving two leaves on top of the bunches.
Formation of determinate tomatoes
Plants in this group are formed, as a rule, in three ways.
Formation of determinate tomatoes
First method of formation: in 1 stem
Option for open ground. Again the same meaning - the summer is short, cool, the fruits on the side shoots do not have time to ripen, so we remove the stepsons. Only the main stem is left. We do not cut off the top, since the growth of such tomatoes is limited. We don’t remove the fruit clusters, we leave them all – there are never more than 6 of them anyway, and they all have time to ripen.
The second way to form tomatoes: in 3 stems
Varinate is suitable for greenhouses. For mid-late tomato varieties. It is similar to the option for forming super-determinant tomatoes, but with its own nuances. At first everything is the same: the main stem and the 2 lowest stepsons. But the side shoots need to be shortened, leaving 1 flower cluster on each, plus one leaf above it. As a result, we will get 8 tomato inflorescences, instead of 6 (the maximum that one shoot gives) - the greenhouse allows them to ripen. But you shouldn’t leave more fruit clusters of tomatoes - the tomatoes won’t ripen on them anyway.
The third method of forming tomatoes: with the transfer of the growth point to a side shoot
The option is suitable for greenhouses, but for mid-early varieties and hybrids of tomatoes. Its essence is this: we leave the main shoot, one lowest stepson, and then we leave another stepson, but not on the main stem, but on the side one. Why is that? Yes, because the growth of determinate tomatoes is limited - 6 bunches and that’s it. And the characteristics of mid-early varieties allow you to get more yield.
Therefore, we use a trick - the side shoot will give us a couple more tassels (we cut it higher, leaving the leaf above the inflorescence), and the shoot from it will give us two more (we also cut it, like the first). So instead of 6 we have 10.
And here the question may arise: why do we need a second stepson from the first? Is it possible to leave one side shoot - after all, it will also have 6 tassels? And then the total will be 12! But it's not that simple. The third cluster on the stepsons produces low quality fruit. That's why we leave only 2. To get 2 more high-quality inflorescences, you need a stepson from a stepson.
Formation procedure and when to start it
The process of forming tomatoes consists of the following steps:
- removal of stepsons;
- cutting off “extra” foliage;
- pinching growth points on the crown;
- limiting the number of inflorescences.
If you carry out the manipulations correctly, you can get a large harvest from any variety.
The procedure for forming tomatoes in a greenhouse begins 2.5 - 3 weeks after planting the seedlings. At this time, shoots begin to form on the bushes in the axils of the leaves - stepsons. They should not be allowed to grow to a height of more than 5 cm.
Young shoots are easily broken off by hand. But you can use garden shears or pruning shears to remove them. It is important that they are as sharp as possible so that when cutting the shoot does not become macerated.
New stepsons grow within 2 – 2.5 weeks. Therefore, inspect the plants regularly at this frequency. During inspection, remove damaged, rotten and dried shoots.
Expert opinion
Istomina Karina Bogdanovna
Agronomist with knowledge and skills in growing vegetables
When cutting stepsons, constantly disinfect the tool in alcohol or another disinfectant. This way you will prevent the transfer of possible fungi or bacteria from one bush to another and the penetration of harmful bacteria into wounds on the trunk.
Removing leaves when forming a tomato bush: why should this be done?
Another very important point for obtaining a good and high-quality harvest is removing leaves. Regularly, at the same time as pruning, thin out the bushes and remove leaves that thicken the plants. This will serve as a preventive measure against late blight. The regularity of this operation is important, because removing more than 3 leaves from one bush at once causes stress for the plant. Also remove all leaves located below the clusters, the fruits of which are already fully formed. Provide ripening fruits with as much sunlight as possible.
Removing leaves when forming a tomato bush
With proper and timely pruning, the plantings are well ventilated and illuminated, they are easy to inspect, which makes it possible to notice the first signs of disease or pest damage in time and take appropriate measures. After all, it is important not only to grow a good harvest, but also to preserve it.
When the bushes have already formed a crop, treatments are possible only with biological preparations
Why shaping tomatoes is a must
For growing in a greenhouse, experts advise choosing determinate varieties, that is, independently limiting the growth of tomato varieties. However, even they need control from the vegetable grower.
In closed ground conditions, plants feel comfortable and form an unlimited number of shoots. If you do not interfere with this process, the plant will spend all its energy on growing leaf mass. Flowering will be delayed indefinitely, which will naturally reduce the number of fruits produced.
But even formed ovaries in such conditions form small fruits. An excessive number of shoots and foliage leads to thickening of plantings. Even if you initially planted the plants at the recommended distance, there will be no gaps between the bushes. In such tomato “jungles,” the sun’s rays practically do not reach, so the plants slow down the processes of photosynthesis and do not have enough strength to form large, tasty fruits.
Thickened plantings create favorable conditions for the development of diseases and the proliferation of insect pests. After all, poor ventilation contributes to increased humidity.
What is meant by pinching tomatoes and why is it done?
When pinching, the gardener plucks from the bush the side shoots growing from the axils of the leaves.
If you leave these sprouts, they will form new branches with leaves and peduncles, but most of the fruits that they set will not have time to ripen before the cold snap, even in a greenhouse.
Removing these vines saves nutrition, which goes entirely to the fruit.
PICKING TOMATO WHEN TO START HOW AND WHY IS IT NEEDED?
Wild tomatoes are perennial plants from the tropics, the flowering of which begins no earlier than 3-4 months after germination.
During this time, a powerful root system and a strong bush with many lateral branches develop. This is necessary to ensure good nutrition for the fruit.
But in temperate climates, the warm period is too short for cultivating tomatoes naturally.
Varietal tomatoes have a shorter growing season, but retain the ability for intensive tillering.
Cultivated plants do not require a highly developed above-ground part if they are provided with regular fertilizing and watering.
Pinching establishes an optimal balance between fruit and green mass, increasing the yield of bushes.
Benefits of pinching:
- flowering and ripening of tomatoes occurs 12-16 days earlier;
- more fruits will have time to reach ripeness by the end of the season;
- tomatoes grow larger;
- the bush does not thicken, the likelihood of diseases is reduced;
- The fruits get more light, and a lot of sugars accumulate in the pulp.
This result can be achieved if the procedure is carried out systematically and correctly.
Below are step-by-step instructions for planting tomatoes, bush formation schemes, features of working with different varieties, approaches to the operation in shelter and in open ground.
Rules and features of garter bushes
The garter plays an important role in the proper formation of tomatoes. The main stem is tied to a support and raised. Reducing the area of contact with the ground helps to avoid the occurrence of fungal diseases.
If the garter is not done, some of the fruit will lie on the ground and become easy prey for pests, including slugs. The risk of late blight also increases.
The garter is made using a special garter (tapener)
How a garter makes care easier
You need to water tomatoes at the root, since water getting on the leaves and brushes is extremely undesirable. When the plants lie on the ground, it is very difficult to fulfill this condition. That is, it is much easier to care for tied plants.
It also makes picking ripe tomatoes easier. Thus, garter is a prerequisite for obtaining a good harvest and productive work in the greenhouse. The only exception is low-growing varieties that do not need this measure, but, with rare exceptions, they are not grown in greenhouses.
What you need to prepare for garter
If you approach the issue rationally, you can purchase reusable devices that are available for sale in specialized stores. For large areas, you can purchase a mechanical stapler that acts like a stapler. With its help, you can easily and quickly wrap a special ribbon around the stem and support. Traditionally, the following are used as supports and garter material:
- long stakes;
- wooden slats;
- thin plastic pipes;
- metal rods;
- leg-split;
- twine;
- strips of fabric;
- special tapes.
It is necessary to take into account that the garter material is in contact with the plant, so it must be wide enough so as not to cut into the shoot and not to pull it as it grows. For example, wire is absolutely not suitable for such a purpose.
Each bush is tied to an individual support
A good and inexpensive option is strips of durable fabric with a smooth structure and a width of about 3 cm.
The “raw material” for them can be, for example, old bed linen. Many summer residents and farmers use nylon tights for garters. They do not harm plants and retain their properties for several years.
Attention! If used repeatedly, the garter material must be disinfected before each new season. To do this, just wash it with laundry soap. If it is cotton fabric, you can simply pour boiling water over it.
What garter methods can be used
Several methods of tying agricultural bushes have been developed and are successfully used. The choice of one method or another depends on the variety, height and power of the plant.
For small areas, separate supports for each bush are most often used for gartering. Since the support is driven deep enough into the ground, it should be approximately 25 cm higher than the plant. After the support is installed, the stem is wrapped with twine or other garter material. The ends of the twine are crossed in a figure eight and tied to a support. Heavy brushes are tied up in the same way, preventing them from breaking under the weight of the tomatoes.
During the season, the activity is repeated several times, moving the twine higher up the stem or using additional material.
This method is most often used for medium-sized varieties. If the bushes are tall, the support may fall and drag the plant along with it.
One of the most convenient and reliable ways to garter tall tomatoes is trellises.
For gartering many crops, vertical or horizontal trellises are used. There are several methods for constructing them. One of them:
- Plastic pipes are dug along the bed, with a PVC mesh stretched between them.
- The pitch between the pipes is 1-2 meters, the optimal mesh size is 10 by 10 cm.
- You can supplement the design with horizontal jumpers also made of plastic pipes.
Basic rules of stepsoning
To ensure that the bushes receive enough light and are easier to care for, you should choose a planting pattern of 30*40 or 50*50 cm, based on the type of tomato. Typically, these recommendations are indicated on the packaging, since each variety has a different degree of branching. A smaller distance will contribute to moisture retention, which causes a number of diseases, and a larger distance will lead to a decrease in yield.
Stepson on a tomato bush
After the tomatoes have “accepted” (after 14 days), it is necessary to inspect the bushes. At this time, the first stepsons may already begin to form - shoots growing from the axils of the leaves. It is better to remove them when the size reaches 3-5 cm.
Attention! It is impossible to start pinching so that the shoots do not take away the nutrients that are so necessary for the formation of ovaries. It is better to carry out the procedure every 10-14 days.
Stepchildren can only be removed with sharp, sterile garden tools.
When stepsoning, you should adhere to the following recommendations:
- pinch off small stepson with your hands;
- if the shoot exceeds 5 cm, it is better to use pruners. In this case, there is less chance of damaging the stem. Germs and pathogenic bacteria can enter through such wounds;
- The stepson should not be plucked off at the base, but leaving a stump of a few millimeters. This will slow down the growth of subsequent shoots;
- It is better to carry out pinching in the morning so that the wounds heal by the evening;
- It is impossible to water immediately after pruning the shoots, so that excess moisture or bacteria in the water do not get into the wounds.
