What kind of land should there be for growing tomatoes?
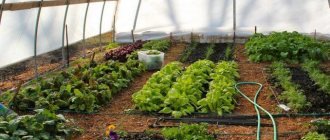
The peculiarity of soil for tomatoes in a greenhouse is that it wears out very quickly and becomes unusable. The soil for tomatoes in a greenhouse should be loose and moisture-retaining.
The soil for planting tomatoes in open ground should be warmed up (approximately mid-April). The beds are made wide and humus is added. To stretch the film in case of frost, arcs are installed. Sufficient space should be left between rows.
How to pour and how much to put: rules for applying fertilizers
The main requirement when adding fertilizers directly when planting tomatoes in a hole is their correct placement in the hole.
Firstly, all added substances must be mixed with soil inside the planting hole with a garden spatula, and then spilled . A layer of soil of several cm is applied to the mixture so that the roots of the tomato seedlings do not come into direct contact with the fertilizer.
The addition of various fertilizers to planting holes when planting seedlings should be done in strictly limited quantities. Their excess will qualitatively affect the health and productivity of tomatoes.
For example, the application of nitrogen-containing types of fertilizers should be strictly controlled by the summer resident - an increased level of nitrogen in the soil provokes the development of green mass of bushes. At first glance, strong tomato plants that are bursting with health will end up producing no fruit at all.
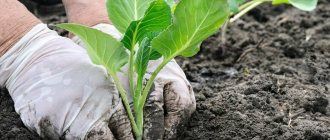
Since little fertilizer is added directly when planting tomatoes, there is no point in digging deep and wide holes. If you make holes 30x30 cm, then this will be enough to lay organic and mineral fertilizers , a small layer of soil and place an earthen ball of the seedling.
Requirements
The soil must contain all the necessary components for growing tomatoes.
Soil for tomatoes for their proper growth must contain the following elements:
- nitrogen;
- phosphorus;
- potassium.
It is necessary that these minerals be in an easily digestible form. In a certain part, the greenhouse soil should consist of sand, as this is necessary for the development of the skeletal part of the plant.
The soil must be loose, since the roots located on the surface cannot tolerate waterlogging and grow only in the loose substance, extracting nutrients from a larger area. If there are such characteristics as water permeability and moisture capacity, the soil retains moisture well, but does not become swampy. Also, for comfortable growth of tomatoes, heat capacity is required .
In addition, when preparing the soil, it should be as neutralized as possible from infections and free from pest larvae.
The soil should not contain weed seeds.
What acidity should it be?
Tomatoes love soil with an acidity of 6.2 to 6.8 pH . To determine soil acidity, use a set of indicator tests (litmus tests), which are sold in gardening stores.
Read about what acidity the soil for tomatoes should be and how to ensure their high yield.
Foliar feeding
Microelements are mainly added through the leaves. Calcium and boron have already been mentioned above. Tomatoes also need: manganese, iodine, iron, copper, etc. All this is in complex mixtures for tomatoes (Red Giant, BioHumus, Bio Master, Clean Leaf, etc.). The instructions for each tell you how to do foliar feeding. But in the case of tomatoes, it is better not to overuse spraying. Carry them out only when absolutely necessary, for example, in bad weather, when the ground cools down to +10... +13 °C, and the roots are not able to absorb nutrition from the ground. By wetting the leaves, we create a favorable environment for the development of fungal diseases. In addition, foliar feeding will never replace full-fledged root feeding.
Homemade mixtures
If it is not possible to use purchased mixtures, you can prepare the soil for the greenhouse yourself.
In the fall, after harvesting, you should remove the remaining greenery and carefully dig up the soil, freeing it from the roots of previous plants. The prepared soil needs to be checked for moisture: make a lump, and if it crumbles, then everything is in order. The soil made for the greenhouse should smell like earth (without third-party odors).
Benefits of homemade soil:
- You can prepare it according to the exact recipe and maintain the exact amount of microelements you need.
- Saving money.
Flaws:
- Long cooking time.
- You need to follow the recipe exactly.
- The soil may be contaminated.
- Finding and purchasing the right sweeping components can take a lot of time and money.
We invite you to watch a video on how to prepare soil for a greenhouse with your own hands:
Manure storage
Three stacking methods are used to store manure in agriculture:
- cold. The most correct from the point of view of agronomists. A layer of earth 20 cm high is formed on the concrete screed. It is necessary to absorb slurry. Animal waste, mixed with the remains of feed and bedding, is laid in layers of 20 cm, sprinkled with superphosphate or peat. For 1 ton of substance, 10 kg of fertilizer is sufficient. When using peat, the thickness of its layer is also 20 cm. This will help reduce nitrogen loss. A covering material (soil, leaves, reeds) up to 40-50 cm thick is placed on top, which will prevent its contact with air. This will protect the manure from freezing, overheating of the mass and loss of valuable substances. In winter, it is covered with snow;
- loose. In this case, the raw materials must be placed in a similar way, but without compaction. On the 5th day the temperature will rise to 70 °C. At this stage, the stack is heavily compacted and covered for storage. This method allows high temperatures to destroy grass seeds and pathogenic microflora;
- hot. This method involves uncompacted storage of organic matter in a stack. In this case, nitrogen, valuable slurry and organic components are lost.
The width of the formed stack is 2 m and the height is 1.5 m.
Ready-made formulations
When purchasing ready-made primer, it is impossible to know how correctly it was made and what it came into contact with. Therefore, it should be treated with a solution called “Fitolavin”, 2 ml per liter of water. The basis of purchased soil is most often peat.
Advantages of purchased soil for tomatoes:
- It is ready for use without additional processing.
- Rich in microelements and other components.
- This is a light and moisture-absorbing type of soil.
- You can choose bags of different capacities - from 1 to 50 liters.
Flaws:
- Nutrient contents are inaccurate (they are given as a range).
- Approximate pH level.
- Sometimes peat dust is added instead of peat.
- There is a risk of purchasing low-quality material.
Required Components
The main components of the earth mixture:
- turf or garden soil;
- non-acidic peat (pH 6.5);
- sand (washed or river);
- humus or sifted mature compost;
- sifted wood ash (you can use dolomite flour).
The simplest and optimal composition of the soil mixture for tomatoes will be obtained if you mix:
- 2 parts peat;
- 1 part of garden land;
- 1 part humus (or compost);
- 0.5 parts sand.
Peat usually has a higher acidity, so add the following to a bucket of the resulting mixture:
- 1 cup wood ash;
- 3 - 4 tablespoons of dolomite flour;
- 10 g urea;
- 30 - 40 g superphosphate;
- 10 - 15 g of potassium fertilizer.
Fertilizers can be replaced with a complex fertilizer containing more phosphorus and potassium, and less nitrogen.
Unacceptable additives
Do not use organic fertilizers that are in the process of decomposition . This releases a large amount of heat, which can burn the seeds (and even if they manage to sprout, they will still die from the high temperature).
Clay admixtures are not used, as they make the soil denser and heavier. Heavy metals quickly accumulate in the soil, so you should not use soil located near a busy highway or on the territory of a chemical plant. It is necessary to ensure that the soil in which tomatoes will grow is as clean as possible.
How to prepare a substrate for planting at home
In order for the seedlings to develop well, the soil mixture must be prepared before planting.
Actions:
- Sift the soil . This removes large particles, enriches the soil with oxygen, and makes it light, which is good for the roots of the seedlings.
- Treat with cold . This treatment kills insect larvae and reduces the likelihood of further diseases to a minimum. It is best to stock up on soil in the fall, and freeze it outdoors and thaw it indoors several times during the winter.
- Before planting, add urea, rotted manure or compost to the warmed soil . If desired, wood ash and superphosphate are added. You can also add lime (15 grams per 1 kg of soil).
The treatment involves soil purchased in a store and prepared independently.
Checking the acidity level
You need to check the soil for acidity! How well the seedlings will feel depends on this. There are several ways to determine acidity:
Testing with litmus paper
A set of litmus strips with a color scale can be purchased at a specialty store.
You need to take some soil from several areas of the garden, from different depths. Wrap it in gauze and place in a vessel with distilled water for 5 minutes. There should be 4-5 times more water than the amount of soil.
Remove the gauze with soil from the container and place a litmus indicator there for 2-3 seconds. Compare the color of the strip with the pH values on the color scale.
Using vinegar
You need to dig a hole 20-25 cm deep, from below which take the required amount of soil. Roll the soil into a ball and place it on a plate. Pour vinegar onto the earth ball.
If there is lime in the soil, whitish bubbles will appear on the ball and a hissing sound will be heard. If the reaction is weak, then the soil has neutral pH values. If the reaction is strong, then the acidity of the soil is weak. A complete lack of reaction indicates that the soil is acidic.
Using grape juice
To determine the acidity of the soil, only natural grape juice is suitable.
Pour 50 mg of juice into a transparent container. Add some soil taken from the depths there. Monitor the reaction. If there is no reaction, then the soil is acidic. If the sap changes color slightly, bubbles slightly, and has a little foam on the surface, then the soil has a neutral pH value. A violent reaction indicates a low acidity level.
With chalk
Pour 2 tbsp of soil, 5 tbsp of water and 1 tsp of chalk into the bottle. Wrap the bottle in paper so that heat from your hands does not transfer to the water and the experiment is more accurate.
Attach a medical latex fingertip to the neck of the bottle. If the soil is acidic, the fingertip will fill with carbon dioxide and straighten out. With neutral acidity, it will not straighten completely. If the soil is slightly acidic, then the fingertip will remain in its original position.
Disinfection
By disinfecting the soil, gardeners destroy various pathogens. There are several ways to disinfect soil:
- Potassium permanganate . Prepare a weak solution of potassium permanganate (3 grams per 10 liters of water) and treat the soil with it.
- Steaming . Cover the top of the pan with water with a thick cloth and tie it so that it does not sag. Soil is poured onto the fabric. The pan is placed on a heating surface. When water boils, the soil begins to be treated with steam. This procedure must be carried out within half an hour.
- Calcination . Add boiling water to the soil and mix. Place a layer 5 cm thick on a baking sheet. Preheat the oven to 90-100 degrees. Place a baking tray with soil in it for half an hour.
Expert opinion
Ulanin Konstantin Grigorievich
Agronomist, work experience in the specialty - 12 years
Before planting, it is necessary to add bacterial fertilizer to the soil treated by calcination, since heat treatment kills not only harmful, but also beneficial microorganisms.
Which is better to use?
For high yields in greenhouse soil there must be:
- Optimal heat exchange.
- Air permeability.
- The ability to become saturated with moisture during watering.
- The ability to absorb all the necessary substances and minerals.
Greenhouse soil contains:
- humus;
- compost;
- turf soil;
- sand;
- peat;
- calcareous rocks.
Humus is used as natural fuel.
Composition of humus:
- Phosphoric acid.
- Calcium oxide.
- Nitrogen.
- Potassium oxide.
All of the above elements are beneficial for the plant.
Properties of humus:
- Nourishes with minerals.
- Provides nutrients for microorganisms to enter the soil.
- Earth mixed with humus conducts air well.
- Turf is also important for tomato growth.
Sod soil:
- Formulated with plant root residues.
- Increases moisture absorption of the environment in which the plant develops.
Rules for feeding in a polycarbonate greenhouse
The soil needs to be warmed, and to do this, straw or tops are buried in the ground. You also need to add manure to the soil, which will help create a thermal effect. On top of the layer of manure, lay a layer of earth enriched with mineral preparations and ash. This is followed by a hot “shower”. And then the beds are covered with polyethylene. Thanks to the greenhouse effect, the earth will warm up and be ready for planting seedlings.
Useful video
We invite you to watch a video about the rules for preparing soil for planting tomatoes in a greenhouse:
If you want to grow healthy tomatoes, then you need to take care of the soil for seedlings, which you can prepare yourself, thanks to the articles on our website.
Soil disinfection
Disinfection of soil for seedlings significantly improves plant health. During treatment, pathogenic organisms (fungi, bacteria, pests) and weed seeds overwintering in the soil are destroyed.
There are several ways to disinfect soil.
Chemical disinfection
For chemical disinfection of the substrate, you can use preparations containing propamocarb and aluminum fosetyl - Previcur Energy, which protect plants from blackleg caused by fungal-like organisms. Treatment should be carried out 2-3 days before using the substrate for sowing or picking.
Biological preparations (“Glyokladin”, “Fitosporin”) are also used to treat soil for tomatoes and peppers.
The soil is often treated with a solution of potassium permanganate, but this method does not give reliable results, disinfecting only the upper layers of the soil.
Thermal decontamination
This method of soil disinfection involves heating it with steam or heat. The soil is heated with steam at a temperature of 90-100 °C for 20-30 minutes to a depth of 25-30 cm. During treatment, the soil must be covered with a heat-resistant film to prevent heat loss. This treatment effectively removes fungi, bacteria and pests (wireworms, nematodes) from the soil.
You can pour it into an old baking tray and bake the soil in the oven at 90°C for 20 minutes.
Soil for sowing seedlings is a special mixture of substrates designed specifically for generative propagation of plants, i.e. sowing seeds of vegetable crops, garden and potted plants. You can easily prepare such soil yourself or buy a ready-made substrate in the store. It is very important to prepare high-quality, fresh soil, of the correct composition, uncontaminated with pathogens, otherwise the seedlings will not be able to develop normally and will quickly get sick.
Optimal soil moisture for tomatoes
Tomatoes do not tolerate wetlands. If the site is swampy or groundwater is close to the surface for most of the summer and autumn seasons - at a distance of 70-80 cm for tomatoes up to 1 m high and at a distance of 1 m for giant tomatoes, then the site must be drained.
If a high groundwater level is observed after the snow melts in the spring (while the seedlings are growing on the windowsill or in the greenhouse) or briefly after rainstorms, drainage of the site is not necessary.
- Characteristics of tomato varieties
- The most delicious varieties of tomatoes
- Caring for tomatoes during flowering - proper planting, feeding and fertilizing tomatoes (105 photos)
Drainage is a troublesome, expensive, labor-intensive and not always feasible task (there is not always a reservoir or drainage collector nearby where wastewater can be discharged). Therefore, in some cases it is worth considering the possibility of creating bulk beds 20-30 cm high or stationary raised beds fenced with boards, slate, polycarbonate or any available materials.
Cleaning the premises
First, let's put things in order in the greenhouse and remove weeds and debris, remnants of last year's supports, ropes for tying plants, and temporary pegs. All this must be disinfected.
Sulfur checkers
For a greenhouse per 1 cubic meter of area, 50 grams of sulfur is enough, but this is only if there were not too many pests last year. If there were a lot of them, then the dosage is tripled. This method should be used carefully and only if safe methods do not help. All the poison can accumulate in the soil and vegetables.
Slaked lime
You can prepare the following solution: take 3 kg of slaked lime and 500 grams of copper sulfate and dilute it in 10 liters of water. The resulting composition is used to prepare the surface of the greenhouse for planting, treating the walls and ceiling.
Biological products
You can use the drug “Fitop-Flora-S”, which is not only guaranteed to destroy carriers of fungal infections, but also suppresses the growth of harmful microflora. To treat the greenhouse, you need to prepare a working solution from one hundred grams of the drug diluted in a ten-liter bucket of water.
Please note that the water must not contain chlorine!
Thirty sq. m of room you will need ten liters of working solution. After a couple of weeks, the treatment will need to be repeated.