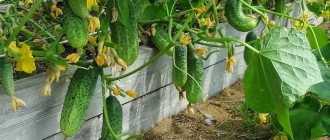
A standard summer cottage plot is rarely large. That's why gardeners are always concerned about how to best use their available space to grow as many different crops as possible. The less space the buildings erected on the site take up, the more structures can be built in the future. But at the same time, each building, be it a greenhouse or a greenhouse, must be as functional as possible.
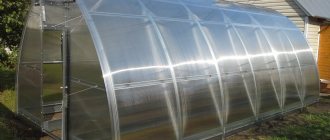
One of these structures is the “Butterfly” greenhouse, so named because of its special design. Why is this type of structure so interesting and why do gardeners often buy it or make it themselves?
Greenhouse "Butterfly"
What is the design of a butterfly greenhouse?
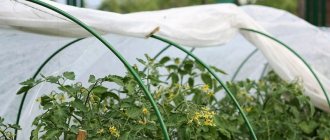
This type of greenhouse got its name due to its special appearance. As you can see in the photo, a butterfly greenhouse when open resembles an insect with its wings spread. When folded, the structure looks like a semicircular cocoon.
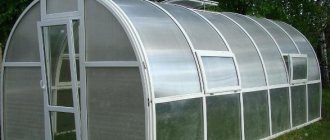
Butterfly provides perfect ventilation from all sides
The main design feature is the lifting side walls. They allow you to completely regulate the flow of air and light, creating ideal conditions for plants. Since butterfly wings, with the small size of the greenhouse, allow almost complete use of the internal space, there is no need to make a separate entrance. There are several main types of DIY greenhouses.
Gable straight - the roof resembles an attic. Each wing is raised and fixed using stops. Suitable for growing seedlings, melons and nightshade crops. A single slope straight line has only one lifting wing. Most often, the greenhouse is presented in small sizes. Suitable for low-growing flowers and frost-resistant seedlings.
There is a gable type “Seagull”. The shape of the greenhouse when opened resembles the wings of a bird. Given the difficulty of creating identical bent parts, it is recommended to purchase ready-made solutions. Like the traditional butterfly gable, it is ideal for most garden crops.
Depending on the desired goals, the butterfly greenhouse is installed either on open ground or on a prepared foundation. To create a structure with your own hands, you can use a profile pipe, wood or PVC. It is permissible to purchase ready-made structures and assemble them according to the instructions supplied by the manufacturer.
Cellular polycarbonate is most often used as a covering material for a DIY butterfly greenhouse. This material effectively transmits sunlight. Many summer residents use ordinary glass or PVC film the old fashioned way.
Better models: characteristics and prices
The most popular are the standard and shortened versions of the “Butterfly”:
| Model | Dimensions, m | Characteristic | price, rub. |
| "Zucchini" gray | 4,0*1,6*1,1 | The frame is made of galvanized metal profile 25 mm * 25 mm. There are lifting covers with stops on both sides. Cellular polycarbonate with a thickness of 4 mm was used as a coating material. | 11 346,00 |
| 2,0*1,6*1,1 | 6 556,50 |
Polycarbonate butterfly greenhouse dimensions
When creating garden structures with your own hands, you can choose the ideal dimensions. Limiting the size of a butterfly greenhouse depends only on the reliability of the materials used. However, a greenhouse 2 m high and 3 m wide will be inconvenient to use - it will be difficult to reach the central area.
Important! The maximum width of the butterfly greenhouse must be calculated based on individual characteristics, so that it is easy to get to all the beds.
Since the main purpose of the structure is to grow seedlings and low-growing crops, it is recommended to make small greenhouses. A mini-greenhouse made of polycarbonate butterfly measuring 2x4 m is the most successful option for small summer cottages and garden plots.
It is recommended to adjust the size of the butterfly to the width of the polycarbonate sheets
The most popular way to cover a frame with your own hands is to use polycarbonate. It is recommended to calculate the choice of greenhouse width in advance to avoid excessive waste of building materials. Most polycarbonate manufacturers produce their product with a width of 2.1 m and a length of 6 m or 12 m, so it is recommended to make the size of the future greenhouse a multiple of 2 m.
Lightweight but durable butterfly
If your summer season lasts from April to October, there is not much space on your plot, and you only need greens for salads, then installing a greenhouse is not the best idea. For seasonal use, a small but practical polycarbonate greenhouse is quite suitable.
Types of greenhouses differ in functionality and ventilation method. Let's look at the butterfly greenhouse, which was named so for its resemblance to the insect of the same name. The fact is that two valves, open at the same time, resemble the wings of a butterfly and in common parlance the valves are called wings.
Greenhouse Butterfly
Advantages of a butterfly greenhouse:
- Structural strength. Their polycarbonate greenhouse can withstand hurricane wind gusts of up to 20 microns/s. It is not afraid of winter frosts and a layer of snow up to 10 cm. Manufacturers claim that the service life of industrial production structures is more than 10 years.
- Factory-assembled greenhouses weigh only 26 kg. If desired, it can be moved to another part of the site.
- Easy to assemble for a purchased greenhouse. It is also quite possible to build a “butterfly” with your own hands. The structure does not require a foundation.
- A sealed greenhouse retains heat perfectly.
- Thanks to two flaps, the greenhouse area is used as efficiently as possible. Access to plants is convenient. Good ventilation is provided.
- Polycarbonate coating provides plants with comfortable lighting and protection from ultraviolet rays.
Greenhouse Butterfly with two flaps Disadvantages of the “butterfly”
- Among small-sized greenhouses, it is considered one of the most functional. A relative disadvantage is the high cost. A butterfly greenhouse 4 m long can be bought without casing for 6-7 tr. With polycarbonate, the price varies from 7 to 11 thousand rubles.
- The design of the sashes requires certain skills and knowledge in the case of manual construction.
Drawings for making a butterfly greenhouse
Before you start creating a dacha structure with your own hands, you need to make a preliminary drawing of the future project on paper. It indicates the materials used, the dimensions of individual parts, as well as instructions for assembling the butterfly greenhouse. It is worth strictly observing the scale in order to have a good idea of the finished product.
A drawing of a butterfly greenhouse, regardless of the type of structure, must include several required components. It is worth marking the base, the place for pins or fastenings for mounting on the foundation. The drawing also includes half-arcs or slopes, beams for their connections. Each intersection of parts must include holes and fasteners recommended for installation.
We do it ourselves: materials and tools
This type of greenhouse can be built using a variety of materials. The choice may be affected by their cost, ease of processing, durability and much more.
Table. Materials that can be used to create a “Butterfly” greenhouse
| Material | Description and possibility of use |
| Tree | One of the best materials for making your own sides and frame. Easy to process and readily available material. Disadvantages - susceptible to rotting, can be attacked by wood borers. |
| Metal | Strong, reliable, durable material. Difficult to work independently. Sometimes used to make frames. Disadvantages – without painting it quickly rusts. |
| Glass | A good material for covering a greenhouse, easily accessible (you can use glass from old windows). Disadvantages: fragile and difficult to process independently. Durable if cared for. |
| Cellular polycarbonate | An excellent covering material that is not afraid of light impacts and does not break as easily as glass. Easily accessible and easy to process - can be cut with a regular knife. Durable. |
| Polyethylene film | The cheapest, but also short-lived covering material. It easily becomes unusable, and therefore it is better not to use it for the “Butterfly”. It only lasts for a couple of seasons, while previous options can last for 10 years. |
| Nails, screws | These and other small fasteners are necessary to connect individual parts during the creation of the Butterfly greenhouse. |
| Metal corners | They fasten all the corner parts of the structure - this will make the greenhouse more reliable. |
| Door awnings, handles | This and other fittings are necessary to make the doors easy to open. |
A frame greenhouse is very convenient for seedlings
The tools to create a greenhouse will require:
- hacksaw (for wood or metal, depending on the type of material for the frame);
- hammer;
- roulette;
- screwdriver;
- glass cutter, scissors.
Experienced gardeners recommend using wood to create a frame. Yes, it is less durable than metal, but it is easy to process, and it will be easier to obtain it in the required quantity.
This is interesting: Aviary for dogs - photos and drawings of successful designs
How to collect a greenhouse butterfly
Creating dacha structures with your own hands is a fairly simple task if you have competent drawings. After preparation, they begin to select material for the butterfly greenhouse. The most popular raw materials for this are polypropylene pipes, wood or metal structures. Each material has its own advantages and disadvantages that must be taken into account during manufacturing.
How to make a butterfly greenhouse from polypropylene pipes with your own hands
Creating plastic structures is a fairly simple and most economical way for unheated greenhouses. A feature of PVC pipes is their low cost, wide range of products in stores and durability in service. Polypropylene is ideal for a gull butterfly greenhouse. Pipes are easily bent with the simplest available tools.
Plastic parts are easy to change shape
Before you start creating a design for a butterfly greenhouse with your own hands, you should decide on the diameter of the material used. The thicker the pipe, the more reliable the structure, but it is more difficult to process. The optimal solution would be a diameter of 25 mm. The procedure for assembling a butterfly greenhouse is as follows:
- polypropylene pipes are cut to the intended dimensions and connected into a rigid base using a soldering iron;
- two large pieces of PVC are used to make two arcs and mount them to the prepared part;
- a pipe with a diameter of 3 or 4 cm is mounted on top, on which the butterfly wings will later be installed;
- equal pieces of plastic are bent and half-arcs are created from them;
- bent pipes are connected in straight parts to create two identical wings;
- finished products are mounted to the frame using hinged joints.
Installing polycarbonate or polyethylene film on a butterfly greenhouse structure made of PVC pipes is a rather problematic task. To simplify things, special fasteners for plastic are most often used. It consists of arcs that cover the pipe and are then connected to a solid polycarbonate base using self-tapping screws.
How to make a butterfly greenhouse from wood
One of the most popular building materials for country houses is pine bars. As soon as the drawings with dimensions are ready, you can begin assembling the butterfly greenhouse with your own hands. It is important to decide on the cross-section of the bars. It is worth remembering that too thick boards will significantly make the structure heavier, thereby complicating its further installation.
Choosing wood to create a greenhouse with your own hands is not the easiest task. By coming to the store and sorting through several dozen boards, everyone can be convinced that there are practically no perfectly straight pieces. Bars with the correct geometry are only needed to create butterfly wings. For the frame, you can use boards slightly curved in one plane.
Important! The ideal solution for building a greenhouse made of wood would be pine bars measuring 40 by 40 mm.
Most hardware stores offer a maximum board length of 3 m. Considering the width of polycarbonate sheets is 2 m, it would be logical to create small greenhouses from wood. The difficulty of bending beams with your own hands forces you to make greenhouses with straight gable roofs. Ordinary furniture hinges for doors and cabinets will be used as connections to the visor.
The assembly diagram for a 2 m butterfly greenhouse made of wood and polycarbonate with your own hands will not pose a problem even for inexperienced gardeners. The only tools you will need are a screwdriver and a miter saw for correct angles. First of all, a frame is made from the beams in the form of a rectangle with sides 2x1.5 m and a height of 1 m. Then they retreat 4 cm from the edge and install the beams, trimmed on both sides at an angle of 45 degrees so that they connect at the top point under an angle of 45 degrees. A crossbar is installed between the upper centers. All connections are securely fastened with self-tapping screws.
Butterflies made of wood are most often made with a gable roof
The next step is to assemble the butterfly wings and further attach polycarbonate sheets to them. The beams are used to form boards with a crossbar in the middle. The material is cut to the required size and mounted on the wings of the butterfly. The greenhouse doors are attached to the frame using furniture hinges.
Butterfly greenhouse from a profile pipe
As with wood, metal beams should not be too thick so as not to increase the final mass of the product. At the same time, small profile pipes are not suitable for a greenhouse with polycarbonate, because they cannot provide reliable stability. It is best to opt for an aspect ratio of 20x40 mm. The size of the finished greenhouse may vary based on your own preferences, but do not forget that the width of the polycarbonate sheet is 2.1 m.
Important! Without a special manual or automatic profile bender, you can only create a butterfly greenhouse with a straight gable or pitched roof.
As in the case of a wooden greenhouse made of wood and polycarbonate, the metal frame is made by hand. Small garage hinges are welded onto the top crossbar. They are put on each other and the accuracy of fitting of the butterfly greenhouse parts is checked. Using metal screws, cut polycarbonate sheets are screwed to the frame.
Assembly of a finished factory greenhouse
The easiest way to make a greenhouse with polycarbonate with your own hands is to purchase a ready-made metal structure. To help you assemble the butterfly greenhouse, the manufacturer issues instructions and publishes videos.
The process of assembling a finished greenhouse with your own hands is as follows:
- Installation of the main foundation. The parts are rigidly connected using metal fasteners. For this step you will need a screwdriver, a tape measure for checking parallels and a water level.
- Mounting the base of a butterfly greenhouse. 4 parts are connected into a rectangle and placed in the middle of the foundation.
- Installation of arc parts. At the bottom they are attached to the foundation with screws. It is important that the mounting holes line up completely.
- Lining the end parts of the greenhouse with polycarbonate. The film is removed from the material and attached to metal arches using self-tapping screws.
- Using ties, the frame is strengthened so that there are no unnecessary backlashes.
- Assembling semi-arches in the shape of butterfly wings and lining them with polycarbonate.
The finished half-arches are mounted to the main frame. Using an electric jigsaw, cut off excess polycarbonate so that it does not cling to metal parts. A distinctive feature of ready-made greenhouses is their demands on the selected area. The ground at the installation site must be perfectly level. Landscape imperfections can be smoothed out by additionally filling the area to fit the size of the greenhouse.
How to do it?
It is not surprising that summer residents like the simple and convenient butterfly design. As a result, many people want to create it themselves. This option allows you to avoid many of the disadvantages that are found in purchased models.
Preparation
The creation of a greenhouse should begin with preparation. It's best to make drawings first. Then you should take care of the necessary materials and tools. You should have a hacksaw, tape measure, hammer, screwdriver, scissors or construction knife on hand, as well as nails, self-tapping screws, metal corners, handles, and canopies. When all of the above is ready, you can choose a place and prepare it for installing a greenhouse.
The place where the structure is planned to be located should be well illuminated by sunlight. Therefore, you should not opt for low-lying areas. Places where groundwater or precipitation accumulates are also not suitable. Otherwise, the plants in the greenhouse will rot and rot. It is desirable that the length of the structure be located in the north-south direction. If it is planned to create a buried structure, then it will be necessary to make a pit in the form of a trapezoid. The depth of the hole should be approximately 30-90 cm. This parameter should be selected based on the local climate and what the “butterfly” will be used for.
To strengthen the walls, it is best to use boards, and put a mixture of manure, rotten leaves and peat on the bottom. You can also use other mixtures that will be loose and generate heat. Soil 20-30 cm high is placed on top of the layer. Large logs are placed on it, which are recommended to be knocked down. The result should be a contour that, in all its parameters, should correspond to the dimensions of the future greenhouse structure.
Frame
Upon completion of all preparatory work, you should proceed to the assembly of the frame structure. The simplest option is an arched frame. To make it, take beams with a diameter of 0.5 cm; if they are not long enough, they are knocked down. The result should be two slats with a length equal to the length of the structure. The coating will be attached to them. The frame can also be assembled from metal-plastic pipes, which are easily bent into the desired shape. However, it is more difficult to assemble a frame from them at the stage when it will be necessary to form the opening doors. According to experts, it is better to choose wood or a galvanized metal profile for the frame.
Installation of sheets
When the frame is ready, you can begin preparing the coating. The simplest option is to make the doors from polycarbonate. To do this, you need to take a regular sheet measuring 210 by 600 cm. Then cut it with a slender knife into 4 parts, 3 of which will be the same size. Now the canvases can be laid out on the frame so that their wide side runs along the bar. Polycarbonate should be secured with screws. It is best to lay the canvases overlapping. To glue the top sheet after fastening, you should use tape
When laying the sheets, it is important that the solar control film on them faces outwards
How to cut polycarbonate into a butterfly greenhouse
Making garden structures with your own hands most often occurs based on individual preferences, so their size cannot be standard. The biggest problem for summer residents is most often the correct cutting of polycarbonate. It often happens that an inexperienced master discovers a large amount of waste. To avoid this, it is important to follow a few simple tips:
- make the butterfly greenhouse dimensions multiples of 2.1 m;
- if the width of the greenhouse is not proportional to the polycarbonate, it is mounted with the long side;
- It is worth cutting off the excess using an electric jigsaw with a special attachment for plastic.
To avoid waste of material, the size of greenhouses should be a multiple of 2 m
Considering the original size of the polycarbonate sheet is 2.1x12 m, you need to try to ensure that one unit of the product is enough. To save budget, at the planning stage you need to calculate the required amount of material.
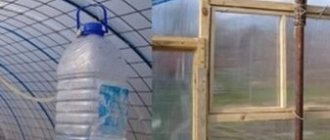
AUTOMATIC OPENING OF THE GREENHOUSE WITH HYDROCYLINDER UFOPAR-M
The temperature inside the greenhouse is adjusted automatically without human intervention or power supply. For the device, you can set any lower temperature threshold, upon reaching which the shock absorber rod begins to extend and the greenhouse flaps open slightly. The higher the temperature, the longer the rod extends. Accordingly, when the temperature drops, the rod returns to its original position and the shutters close. The opening start temperature is adjusted using the nuts on the adjusting pin.
The body of the hydraulic cylinder mechanism is made of steel. The manufacturer provides a 2-year warranty on it.
How to install a butterfly greenhouse
After the frame has been assembled and sheathed with polycarbonate, you can begin its direct installation on your summer cottage or garden plot. To get the most out of a butterfly greenhouse, you need to take care of two things - choosing the right location and preparing the foundation for the assembled structure. A well-installed greenhouse will not only last a long time, but will also contribute to abundant harvests.
Selecting a location
The goal of any greenhouse or polycarbonate greenhouse is to accumulate the maximum amount of heat and sunlight. Elevated temperatures promote accelerated growth of most plants. It is not recommended to install even on the south side of houses and outbuildings.
Important! Large trees and fences can cast a shadow on the greenhouse, thereby reducing the temperature inside.
The main criterion for choosing a location for a greenhouse is quite simple - maximum openness to sunlight throughout the day. Greenhouses should be 6-8 m away from large trees, outbuildings and residential buildings. It is advisable to place them on the southern and southwestern sides of the site.
Making the foundation
In order for the polycarbonate greenhouse to stand level in the chosen place, it is necessary to carry out a little soil preparation. The frame of the structure must be on a flat surface. There are several ways to achieve the ideal ground level. The most popular is pouring a strip foundation.
A flat concrete base is an ideal support for a greenhouse
The foundation for pouring should not be too deep. Only 30 cm and rare reinforcement with reinforcement are enough. After pouring, the foundation is leveled using a spatula. The finished structure needs time to dry. 14-21 days after pouring, you can begin installing the finished greenhouse.
Butterfly greenhouse installation
A prepared, level foundation is an ideal place to install the finished structure. A polycarbonate-lined greenhouse is installed on it. For fixation, arc loops, large dowels and screws are used. Using a hammer drill, a hole is drilled in the foundation.
Dowels are inserted. Then the butterflies place loops on top of the base of the greenhouse and drill them with screws. For closer contact between the greenhouse and the foundation in the places where the fasteners are installed, you can cut off a little polycarbonate using a jigsaw.
Tips for use
How to properly take care of a purchased or homemade Butterfly greenhouse so that it serves you for many years? It's simple - consider the recommendations below.
- Always close the wings carefully, do not slam them, so as not to break the structure.
- If the greenhouse is not removed for the winter, then make supports inside that will allow it to survive the snow load.
- Install the greenhouse on a level area so that it does not move.
- Don’t forget about autumn disinfection, which will destroy pests and pathogens that have settled within the walls of the greenhouse.
- Always deal with chips and damage to the frame in a timely manner; it is especially important to take care of the metal ones - rust spares no one. In this case, tint the frame.
- It is better to provide a small foundation for the greenhouse - this way the structure will last longer.
It is advisable to take care of a small foundation for the greenhouse
Now you are ready not only to purchase, but also to build a “Butterfly” greenhouse with your own hands. We still recommend the second option and are confident that you will succeed. And “Butterfly” will definitely please you with an excellent harvest in the new summer season.
Advantages and disadvantages of a greenhouse
No product can confidently be called ideal. According to reviews about the butterfly, many gardeners consider the greenhouse convenient and say that there is simply no real alternative for that kind of money. The main advantages of the design include:
- ease of creation with your own hands;
- low cost of manufacturing from wood or PVC pipes;
- long service life;
- ideal ventilation;
- ease of assembly and disassembly of the purchased structure;
- ability to withstand strong gusts of wind;
- the possibility of using not only polycarbonate, but also ordinary film.
The most important disadvantages of a butterfly greenhouse are its small size compared to larger greenhouses. The compact design does not allow growing tall crops with abundant fruiting.
Advantages and disadvantages
The Butterfly greenhouse, like any other structure, has its pros and cons. And you need to know them before you decide to purchase this structure or choose to build it yourself.
Unusual design option
The main advantages of the Butterfly greenhouse.
- For its parameters, it copes well with adverse weather conditions. The Butterfly greenhouse will perfectly withstand quite strong winds - up to 20 m/s.
- “Butterfly” is not afraid of snowfalls - a 10-centimeter layer of snow is not at all scary for a greenhouse.
- A greenhouse does not take up much space on a summer cottage, and its low height is its advantage, because it does not shade the space around it.
- Plants in a greenhouse are very easy to care for. And in general, any work in the “Butterfly” is very simple - the small width and raised doors provide excellent access even to the farthest corners.
- Widely folding slopes allow for excellent air exchange for plants.
Widely folding slopes allow for excellent air exchange
- The “butterfly” quickly warms up in the sun.
- It is easy to transport or move the factory greenhouse to another place - it is lightweight and quickly disassembled. It can be transported in any passenger car.
- The factory greenhouse is durable: the service life declared by the manufacturers is 10 years, and the metal profile of the frame is painted with powder paint, which protects against corrosion.
- There is no need to build a foundation for the “Butterfly” on a summer cottage - the greenhouse is lightweight and does not need it.
Butterfly design
But during the operation of the factory “Butterflies”, summer residents also identified the main disadvantages of this design. As it turns out, not everything is as rosy regarding the greenhouse as the manufacturer writes, and you can’t always believe the advertising.
Definitely, the use of rising wing wings is very convenient in a small summer cottage, but the disadvantage of this design is that it will often have to be opened/closed. And in places where there are any friction, fastenings or screws, the paint peels off very quickly. Without this protective material, rust will quickly reach the frame. It is important to immediately touch up all those places where the paint has fallen off. Of course, I don’t want to modify the greenhouse after purchase, but what can you do?
The greenhouse has to be opened/closed frequently
By the way, the hinges on the doors of a factory greenhouse are quite fragile - they do not always withstand the declared service life. Very often the hinges and canopies on the wings quickly break off.
Also, one of the disadvantages (not of the design itself, but of its configuration) is that the instructions are not always clearly printed. Some gardeners were unlucky enough to buy a “Butterfly” greenhouse and had to suffer with it during assembly.
Most likely, this is why many people build the “Butterfly” on their own. This is not difficult to do, but this design will be many times more reliable.
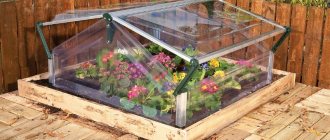
Open greenhouse made of window frames with seedlings
Prices for greenhouse Butterfly
greenhouse Butterfly
The best DIY butterfly greenhouse projects
Whatever the initial purpose of creating a miniature greenhouse, simple rules should be taken into account.
Compliance with these requirements allows you to obtain an ideal design that meets the modern requirements of gardeners
For a project to be truly the best, it must combine the reliability of the frame and ease of installation
Which greenhouse is better for a summer residence: “Butterfly” or “Breadbox” - choose the option for yourself
The “Breadbox” differs from the “Butterfly” model in that only one half of it opens. If you don’t need a wide greenhouse, you can get by with just one flap. But for proper care of plantings, the “Butterfly” is still more convenient, because you can approach the garden bed from both sides.
In terms of construction cost, the Bread Box wins because it has fewer moving parts, which means it will cost you a little less
Another reason for comparison is the assessment of tightness. The “bread box” retains heat better due to its design. But in the warm season, “Butterfly” is better ventilated. Which of these models to choose is up to you to decide. It all depends on the tasks you set for this greenhouse.
Bread bin + warm bed
The “breadbox” greenhouse is a good helper, but its qualities can be improved. One option is to use the warm bed method, which will allow you to harvest even earlier and enhance the taste of the crop.
Procedure:
- Before assembly, dig a hole measuring 50*70 cm.
- Along its border we lay out a base made of suitable materials that do not allow the edges to crumble.
- We put cardboard on the bottom, this will protect against weeds and pests. You can add leaves, plant remains, and manure. You cannot use uprooted weeds, especially perennial ones.
- We fill the top with soil.
- We begin assembling the “bread box”.
A properly assembled greenhouse will allow you to retain heat, which will be released by the compost during rotting, which will allow the seedlings to feel comfortable.
Greenhouse modifications
The size of the greenhouse depends on the area of the site on which it needs to be placed and the location of the beds. The Butterfly greenhouse was designed specifically for small areas. When purchasing a standard-sized greenhouse, gardeners should focus on these dimensions when choosing varieties of vegetables: tall crops will not fit at a height of 89 cm. This limitation can be circumvented by designing your greenhouse according to individual dimensions.
Let's look at some examples:
First option
For a greenhouse measuring 4.0 x 1.5 x 1.1 m, a polycarbonate sheet 7 m long is required. Please note the presence of transverse lines: they create additional rigidity of the structure. The distance between the stiffening ribs is not less than 0.5 m on the arc covers and 45 cm on the end parts. An additional detail that holds the base together is strips (0.3 x 4 m). The greenhouse has an additional arched support in the center. Three arcs are attached to the ground.
Second option
If the Butterfly greenhouse is necessary for growing taller crops, then you need to focus on the option where the ridge is located in the center - an additional detail that allows you to expand the area and increase its height. The ridge can be purchased complete with polycarbonate and other additional elements. Alternatively, it can be made from a different material so that lighting or an irrigation system or loops for gartering plants can be placed in the center.
Third option
The next greenhouse model, the Butterfly, is convenient because it has separate “butterfly wings.” That is, if you need to care for plants in cool weather, you do not need to open the lid completely, and this allows you to save heat and minimally expose the plants to cooling.
Fourth option
Some modifications have a height of 1.3 m (pitched type). The end walls of such models have the shape of a triangle, which is not very convenient for placing plants in beds inside, but allows the home craftsman to do without the help of metal specialists (no need to make arcs).
Choosing material for a “breadbox” greenhouse
Supporting elements are made from the following materials:
- metal pipes - the best option is 1.5-3 mm thick;
- polypropylene - choose the correct diameter: thin ones do not give rigidity, and thick ones are difficult to bend;
- wooden blocks - the resulting structure will be heavy, bulky, and will need to be constantly maintained.
It is necessary to purchase additional tools for construction, the set of which determines the frame material:
- metal - hacksaw, welding machine, etc.;
- wood - saw, screwdriver, etc.
Choose a covering material - thick PVC film, spunbond (or other covering material) or polycarbonate. Purchase additional materials: hinges, bolts, nuts, self-tapping screws (with thermal washers for polycarbonate).
Plants that can be grown in breadbox greenhouses
The following people feel most comfortable in such a greenhouse:
- any types of greens - lettuce, green onions, dill, parsley, etc.;
- low crops - carrots, beets and others;
- garden strawberry (this is the correct name of the plant we all know as strawberry);
- tomatoes are low-growing or they are transplanted as they grow, .
Heating can be installed, then crops can be grown and harvested in cold weather.
Comparison of greenhouses from different manufacturers
In general, the number of advantages exceeds the number of disadvantages of a greenhouse-breadbox, and therefore more and more gardeners are purchasing structures of this particular type. Let's compare several popular models produced by different companies.
Table. Greenhouses-bread bins from various manufacturers.
| Name | Characteristic |
| Greenhouse "Novator-Mini" from TPF Innovation LLC | A greenhouse with one hinged “breadbox” type lid. Ideal for use in small garden areas. Ergonomic and convenient, suitable for growing melons and seedlings. Its height is 80 cm, depth – 1 m, width – 2 m. Since the greenhouse retains heat well, you can grow two crops in it per season. |
| Greenhouse "Novator-Maxi" from TPF Innovation LLC | The greenhouse has two covers and a “basement part”, due to which it becomes higher than the previous version. The frame is painted, the polycarbonate coating is purchased separately. This is a very durable and reliable, and also an inexpensive option for a greenhouse-breadbox. Its height is 1.2 m, length – 2 m, depth – 1 m. |
| Greenhouse "Snail" from LLC "ROiS" | This design has the ability to open on both sides. Length - from 2 m, width varies from 1 to 2 m, height - from 50 cm to 1 m. The frame is made of a square profile pipe with a cross-section of 20 * 20 mm and a metal thickness of 1.5 mm. Inexpensive and quickly assembled model. |
| Greenhouse "Breadbox" from | The frame is made of a metal profile with a cross-section of 20*20 mm. The dimensions of the structure are as follows: length 2 m, width 1.5 m, height 90 cm. The company also produces custom-made greenhouses according to the wishes of the customer. Covering – cellular polycarbonate. It is recommended to install the greenhouse on a timber foundation. |