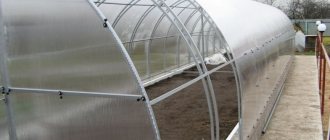
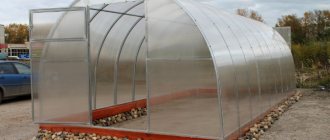
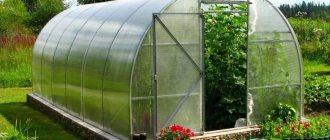
Greenhouses made of polycarbonate have long replaced their glass counterparts. They are in demand among buyers due to their strength and lightness, and quick installation. After all, the installation of a polycarbonate greenhouse can be carried out not only on the foundation, but also on ordinary soil.
Polycarbonate greenhouse - durable and lightweight Source light-sovet.ru
Pros and cons of the material
Other advantages of polycarbonate: there is no need to remove the greenhouse for the winter; the endurance period of polycarbonate is more than 10 years. In addition, it perfectly withstands mechanical loads and can even be repaired. The material is flexible, does not break, and is resistant to temperature changes and fertilizers. Due to the multilayer nature of the material, it has increased thermal insulation.
Polycarbonate is one of the best materials for making greenhouses Source 2gis.ru
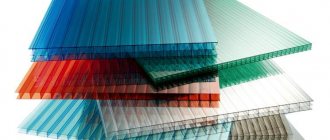
Polycarbonate also has disadvantages: it is expensive, requires forced ventilation, and has low light transmittance. However, in any case, a polycarbonate greenhouse will cost less than a glass structure. If the client decides to choose this particular greenhouse, then he needs to contact installation specialists.
Which foundation is better to choose?
When choosing a base for a greenhouse, you need to take into account the price of building materials and the following important factors:
- Features of your land plot. If it is uneven, then you need to choose a foundation designed for such terrain. For example, you can choose a slab foundation.
- If you live in a region where strong winds often blow and there are powerful hurricanes, then it is better to choose a pile foundation. A structure on stilts is more difficult to destroy by hurricane winds.
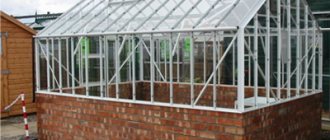
- If you plan to grow crops in winter, then you should pay attention to a brick or stone foundation. The advantage of this foundation is that it is mounted in a pit. These building materials retain heat well.
- In addition, when choosing a foundation, you need to take into account the humidity level in your area. If you live in an area with high humidity levels, it is better not to build a foundation made of wood (sleepers or beams). When wood gets wet, it will quickly swell and begin to rot. As a result, the remaining structural parts of the greenhouse will quickly become unusable. This also applies to iron angles and pipes, which are also sometimes used to make the base of greenhouses. They are susceptible to corrosion, so they will rust in the ground.
The choice of material for the manufacture of the foundation must be approached responsibly, because the reliability and service life of the structure you have erected will directly depend on this. It will also depend on how accurately you follow the installation technology of the type of foundation you have chosen.
Correct installation of a polycarbonate greenhouse
What you need to know and how to install a polycarbonate greenhouse:
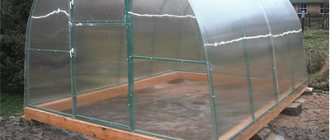
- Typically the greenhouse is located on a flat and sunny area. If there is no such place, then the choice will have to be made in favor of illumination of the site in the first half of the day, and if the soil is sloping, a foundation is definitely needed.
- A cushion of gravel and sand is created, then fertile soil is laid on top. In this case, the installation of the greenhouse will be carried out correctly. The structure cannot be placed on clay.
- It checks how deep the groundwater goes. They must be at a depth of at least 1.3 meters, otherwise there will be constant water in the greenhouse during watering and rain. If groundwater is close, drainage ditches will be made.
- It is necessary to protect the greenhouse from drafts. For this purpose, the frame is placed tightly in relation to the ground or the structure is protected by buildings and trees. A sheet of metal profile will also help, the main thing is that it does not cast a shadow.
The place for the future greenhouse should be level and well-lit Source profelement.com.ua
So, having figured out how to install a polycarbonate greenhouse, we begin the actual installation.
Greenhouse covering
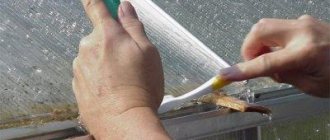
After assembling the frame and installing it on the foundation or fixing it to the ground, they begin to cover the greenhouse with polycarbonate. The material is cleaned of the protective film, placed on the structure with the front side (protected from UV rays) facing up and attached to the arches using roofing screws and washers (usually at a distance of no more than 40-60 cm from each other). Sometimes galvanized tape can be additionally used.
Covering the greenhouse with polycarbonate
On a note! The ends of the greenhouse are usually sheathed before installation on the frame.
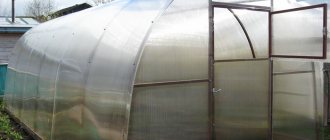
It is best to cover the greenhouse with polycarbonate in calm weather. This material is very light and “sails” well, so any gust of wind can damage it or simply prevent you from thoroughly fastening it.
Polycarbonate must be installed in calm weather
Scheme of fastening polycarbonate to a metal frame
Foundation for a polycarbonate greenhouse: selection and installation
First of all, we choose the type of foundation. There are several options for installing a polycarbonate greenhouse:
- Spot.
- Tape.
- Timber.
- Blocky.
- Concrete.
Each of them can be used in this case for a greenhouse, it’s just that one of the options turns out to be temporary, for one season, the other is permanent.
See also: Catalog of companies that specialize in the installation of metal structures.
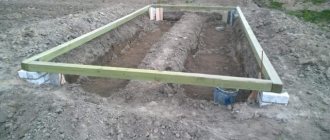
Strip foundation for a greenhouse Source o-remonte.com
To choose a foundation for a polycarbonate greenhouse, which one will be better in your case depends on many factors: the structure of the site, groundwater deposits, natural factors. That is why it is recommended to install a greenhouse temporarily for the first year, and then, having chosen the optimal placement option, simply move it.
Design features and materials
If the greenhouse is to be moved around the site and its location is temporary, then you can choose a point foundation, which is made from the stumps of a wooden beam. The greenhouse and the foundation are connected by metal corners.
Point foundation for a greenhouse Source kakpostroit.su
The strip foundation is very simple to make and lasts for many years. Block is also a good option, especially for areas with marshy soil. The timber option is short-lived, since the wood in the soil quickly begins to rot and requires replacement. Which foundation to choose is up to the customer.
Preparing the site for placing a greenhouse
Before installing the greenhouse and a small foundation, it is necessary to prepare the space allocated for it. This procedure will protect against possible distortions during the construction of the main structure and will increase the service life and normal operation.
First you need to clear the area and level it.
- It is best to use a building level attached to a long block or board.
- After this, mark the overall dimensions of the future structure and drive in pegs.
- Carefully measure all sides and, to check accuracy, find out the size of the diagonals of the rectangle.
- They must be equal. Only then can you begin to build the foundation.
How to install a polycarbonate greenhouse on a concrete foundation
Let's consider one of the options for a greenhouse on a concrete foundation. Concrete is the most durable material, therefore, if a place for a greenhouse is chosen, you can make a foundation for permanent use.
- A pit is created and a cushion of gravel and sand is made at a distance of 15 cm from the soil.
- The formwork is erected at a distance of 20 cm from the top soil level.
- The reinforcement is laid on top of the sand.
- The solution is poured into the box.
- A day later, the frame is installed.
Greenhouse on a concrete foundation Source tr.decorexpro.com
When choosing a brick, the technology is almost the same; the greenhouse is attached using hinges. It is quite easy to install a point foundation. Holes are simply dug, filled with concrete, and the legs of the greenhouse are installed inside. However, this method is not very practical, so it is better to entrust the installation of the foundation and greenhouse to specialists who will do it efficiently and quickly.
What material to choose for the foundation and whether it is needed at all is up to the owner of the site to decide. Generally, a greenhouse won't go anywhere without one, but having a foundation can reduce the intrusion of insects and plants.
Construction of a greenhouse: preparatory work
Of course, before installation, some details are clarified and the ground is prepared. Most often, the sunniest place on the site is selected for the greenhouse. In addition, it should be located away from buildings and large trees so that they do not cast a shadow.
Do not forget that the greenhouse must be installed in a place where there are no drafts, or it must stand with its end facing the winds. For example, an east-west orientation might be a good location. After the location is chosen, the dimensions of the greenhouse are selected and installation is carried out.
Assembling a greenhouse using an example of an industrial model
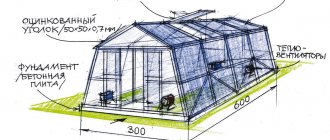
As an example, let us consider in detail the assembly process of the “Usadba KU” greenhouse produced by .
Greenhouses "Usadba KU"
Step 1. The assembly of this greenhouse begins with cutting out the covering material. We cut one of the sheets lengthwise into two identical pieces using a knife.
The polycarbonate sheet is cut lengthwise
Step 2. Place the resulting segments on top of each other face to face and align them. We mark with a marker according to the dimensions indicated in the instructions and cut the folded pieces. We will get six pieces of material with which we will cover the end parts of the greenhouse.
Folded pieces of material are cut
Advice! For convenience and in order not to damage other sheets that will be needed intact, you can use a board, placing it along the cut line under the material.
Recommended cutting pattern for polycarbonate
Step 3. Place the solid welded end parts of the greenhouse on a flat surface. We place small wooden blocks under their upper part and drill holes for the handles and their fastenings.
The ends are laid on a flat surface
Drilling holes for handles
Step 4. Then we drill holes around the perimeter of the door and the end to attach the covering material. A 4 mm drill is suitable for this.
Drilling holes for attaching polycarbonate
Step 5. Remove the protective film from the material and evenly lay rectangular pieces of polycarbonate on the door. We secure them with washers and roofing screws in the lower and middle parts of the sheet, leaving the upper part alone for now.
Polycarbonate is attached to the bottom of the door
Step 6. Cut the polycarbonate at the junction of the window and the door.
Cutting polycarbonate at the junction of a window and a door
Step 7. Place the upper part of the polycarbonate (window) directly on the door (by 1 cm) so that the window overlaps, and fasten it to it with self-tapping screws.
Attaching polycarbonate to the top of the door
Step 8. Separate the upper part of the polycarbonate from the window. We place part of it (1 cm) under the polycarbonate screwed to the window and attach it to the upper part of the end.
Polycarbonate is placed under a piece screwed to the window
Step 9. Cut out the polycarbonate on the protruding parts of the hinges on the doors and vents.
Polycarbonate is cut out on the protruding parts of hinges on door and window leaves
Step 10. Cut the material with a knife along the edge of the post on which the door hinges are attached. We also trim off the excess material at the top of the end.
Trimming material along the edge of the rack
Step 11. Take the pieces remaining for the side ends of the structure, clear them of the film, place them on the ends and align them with the bottom of the base. We attach it to the end part of the greenhouse. We cut off the excess around the edges.
Attaching the remaining pieces to the end part
Step 12. Screw on the handles and locking mechanisms.
The door handle is screwed on
Lock installation
Step 13. Let's unpack the base parts. Please note: this set comes with both finger and fingerless bases. There are also two ties.
Base elements (with fingers)
Step 14. We arrange the parts so that the holes on the ties coincide with the places where the arcs are attached to the base.
Correct placement of base parts
Step 15. We connect the ties and the bases and fasten them with self-tapping screws.
Connection point
Connecting bases
Step 16. We place the bases on the foundation, level it, and strengthen it.
Location of longitudinal elements of the base
Attaching the base to a timber foundation
Step 17. Install solid arcs.
Arc installation diagram
Installation of arches
Step 18. We fasten the arcs with ties to each other.
The arches are fastened with a tie
Step 19. We install the end parts of the greenhouse, connect them with ties and fasten them to the foundation with self-tapping screws.
End installation diagram
Installation of the end part
Step 20. We measure the diagonals of the greenhouse to make sure that the structure is level. They must be equal.
Measuring the diagonals of a structure
Step 21. Cover the greenhouse with polycarbonate, cleared of film. We fasten with self-tapping screws.
Covering the greenhouse with polycarbonate
Installation of sheets on the roof and fastening with self-tapping screws in increments of 50 cm, 4 self-tapping screws per arc on each side
Fastening polycarbonate with a self-tapping screw
On a note! Don't forget to leave a small polycarbonate canopy over the end parts of the greenhouse.
Step 22. Install an additional window anywhere. We select it and press the window against the polycarbonate from the inside. An assistant secures it to the polycarbonate with self-tapping screws from the outside.
Window installation
Attaching the window from the outside
Step 23. We cut the joints around the perimeter of the window with a knife. We cut out pieces of material on the hinges so that they do not interfere with opening the sash. We attach the window opening system from the inside.
Cutting polycarbonate around the perimeter of the window
Installing a thermal drive
Instructions for assembling greenhouses “Usadba U” and “Usadba KU”. Downloadable file (click the link to open the PDF in a new window).
Assembly instructions
Interesting information about the vegetable garden
Typically, polycarbonate greenhouses are chosen in sizes 3x6 or 4x8. It all depends on the area of the plot and the desires of the owner. However, with large footage of the building, some difficulties may arise. Therefore, in some cases it is better to choose two small greenhouses to separate crops than to make one structure, but a large one.
Most often, gardeners think that installing a polycarbonate greenhouse without a foundation is also not the worst option; it is inexpensive, and ordinary holes in the soil with concrete, where the tails of the frame of the assembled greenhouse are placed, will do well as a support. However, it is better to secure the structure thoroughly, because the greenhouse can simply be stolen by being pulled out of the ground. That is why the creation of a foundation and installation of a greenhouse by specialists will not only make the greenhouse strong and warm, but will also prevent it from being stolen from the site.
Option for fixing the greenhouse Source sadov0d.ru
When installing on uneven soil, building a foundation is simply necessary, otherwise the structure will change shape over time and collapse.
Do not forget to locate the greenhouse away from bushes and trees, as large plants will take water and nutrients from the soil.
The time to install a polycarbonate greenhouse is early spring at above-zero temperatures, but late autumn, after harvesting, is better.
A trench around the greenhouse will protect plants from pests Source pobudova.in.ua
To prevent weeds from getting inside the greenhouse, you can dig a trench around the perimeter, which is laid with old slate or roofing felt.
Selecting a location
Plants can receive a sufficient amount of natural light if the greenhouse is positioned lengthwise from west to east, with its side facing south or southeast. Thanks to this, the process of photosynthesis is activated, the seedlings will receive the maximum amount of vitamins and substances necessary for growth.
If almost the entire area is in the shade, then it is better to install the greenhouse in an area that is well lit by the sun in the morning. This will allow the greenhouse to warm up well and maintain comfortable conditions even at night.
In the hottest months, an excess of ultraviolet radiation can lead to the formation of burns on the leaves. Greenhouses "Zavod Garant" have double UV protection, so you do not have to install an additional canopy.
The greenhouse should not be placed near:
- tall buildings;
- fences;
- old trees with spreading crowns.
The latter will constantly shield the structure from light, so you will have to use phytolamps more often. Branches of large trees, in addition to acting as a shield from light, will hit the structure's surface in windy weather and can damage it. Overgrown bushes are best uprooted or moved to another location.
Also, you should not attach a greenhouse to your house. In addition to the fact that housing can shade the building, snow will fall from the roof in winter, which will create a load on the structure and block the plants from the sun.
Direction of the wind
Gardeners in cold regions and those who want to harvest crops all year round should pay special attention to the compass rose. It is important to reduce energy costs for heating the greenhouse during the cold season. The wind can carry away the lion's share of the heat intended for plants. In addition, strong gusts can break or tilt the structure.
How to fight the wind?
- At a distance of about 7 meters from the greenhouse, you need to install a fence in the path of the wind. Gusts of wind that break against it do not pose a danger to the greenhouse.
- Plant a hedge at a distance of 12-25 meters. Powerful streams will become entangled in leaves and branches and break up into small streams.
How to save money
The construction of a greenhouse itself will require decent amounts of money. And if you also buy building materials for the foundation, then the construction will cost a tidy sum. We hope that the advice of experienced gardeners will help beginning gardeners:
- When choosing a foundation option, give preference to those building materials that are most suitable for your place of residence, take into account weather conditions and landscape.
- For a greenhouse, choose a small perimeter. Then you can lay the foundation yourself and you won’t need to involve workers. Accordingly, you will save money.
- When building a greenhouse building on a foundation, consider how often the foundation will need to be replaced. The base does not last forever; naturally, it will need to be replaced. Especially when the foundation is made of wood beams.
- If you are building a greenhouse and at the same time an outbuilding or a house, then think about the option of installing the greenhouse structure to the wall of the building.
Firstly, you can save on materials for the structure: one wall will be erected and it will relate to the wall of the house.
Secondly, the base for the house is slightly extended, leaving room for a greenhouse structure. This will not greatly affect the final price of the foundation for a residential or commercial building, but additional surface area will appear for the construction of a greenhouse.
What do you need for work?
To erect a supporting structure, depending on the type chosen, you may need:
hammer drill, construction mixer (concrete mixer or mixing attachment), drill (manual or automated), drill, screwdriver, grinder;- anchor and U-shaped fastenings, screws, metal corners, thread or rope;
- wooden boards and timber, concrete mixture (sand, water, cement), expanded clay or crushed stone, fittings, bricks or blocks;
- building level, tape measure, wood saw, shovel, marker, spatula, trowel;
- pillars made of asbestos, metal, wood or concrete (depending on the type of base).
Convenience of placement
It is important to position the greenhouse according to the cardinal directions. The optimal location is from north to south or from east to west. But it is much more important to consider the accessibility of the greenhouse. That is, it should be easy to access, because you will have to open and close it every day. It is better to install the greenhouse close to the house and communications - the plants need frequent watering.
It is necessary to take into account the location of the greenhouse, because providing autonomous maintenance can be quite expensive.
In fact, even a novice gardener can install a greenhouse correctly and achieve a good harvest in it. You just need to follow these rules, approach the process wisely and first plan everything correctly, and only then build it.
Do-it-yourself dacha
In this article we will try to learn how to install a polycarbonate greenhouse with your own hands. Here we will provide useful recommendations and show a video.
So, a very labor-intensive job when assembling a greenhouse is the preparation and installation of the main frame. Manufacturers were able to create steel structures that can be found commercially. At the factory, the frame is necessarily supplied with special fasteners. And the frame itself can be bought disassembled. Those companies that sell these greenhouses offer their clients assembly of the structure for money. But here it should be noted that transporting the assembled greenhouse is quite problematic. To do this you will need quite large equipment. The product may also be damaged during transportation. Based on this, you first need to figure out how you can install a greenhouse on your own plot of land yourself.
Place for a greenhouse
If you first fail to correctly determine the location for the future greenhouse, you may lose your entire harvest, as drafts may occur and the soil may be waterlogged.
We choose the soil.
First you need to decide on the choice of good soil on the site. The surface in this case must be moderately moist and smooth. At the selected location, you need to dig a small hole to check the soil layer under the ground. If you find clay in this place, then this place, unfortunately, is not suitable for setting up a greenhouse. During watering, this soil will not absorb excess moisture. Thus, water stagnation will occur in the greenhouse. This microclimate will negatively affect your harvest. You should choose a place where there will be a layer of sand under the ground.
If there is no sand on your site, to build a greenhouse you first need to dig a pit. Then fill its bottom with a small layer of gravel and make a sand cushion. Only after this will it be possible to lay fertile soil. For plants to grow in a greenhouse, it is necessary that the groundwater be located slightly above 1.3 m of the main surface of the site. In this case, during heavy rains, the root system of your plants will not rot. But if groundwater comes very close to your site, you need to dig drainage ditches near the greenhouse.
We are choosing a lighted place.
One of the most common uses of greenhouses is the spring-summer period, without installing a heating system. In this case, the sun will heat the greenhouse. To do this, you should choose the sunniest area in your garden to install the greenhouse. You need to think about its location in such a way that the sun can enter it throughout the day. The best option is to install the frame from east to west. If you do not have this opportunity, you need to position the greenhouse so that the sun's rays can enter it at the beginning of the day. Dawn is a very unfavorable time for plants. During this time period the air temperature is minimal. If during this period the greenhouse cannot fully warm up, then the growth of plants will slow down and their ovaries will be damaged. If you focus on the afternoon for lighting, the air will not be able to warm up to the required degree and will not have time to accumulate enough heat for the whole night. A very sharp change in sun activity during the day can damage plants and cause burns to them.
We take into account the location of trees and various buildings.
The worst enemy for plants is drafts. If you installed the cellular polycarbonate sheets correctly, then the wind will not be able to pass inside your greenhouse, and the frame, in turn, will not be able to come off the soil. But the walls of the greenhouse can be regularly cooled. Greenhouses, as a rule, do not provide a thermal insulation system; therefore, its cooling walls will absorb some of the heat. According to some observations of experts, a wind with a force of 5 m/s absorbs 5 degrees of heat from polycarbonate sheets. The greenhouse can be protected from drafts and wind by some buildings or trees. Also for these purposes, it is advisable to use fences made of metal profiles or concrete slabs. The frame should not be installed closely, as they will create a shadow for the greenhouse. It is unrealistic to protect greenhouses from each side, so you should choose the strongest wind direction.
Foundation type
It is worth saying that installing a polycarbonate greenhouse is a serious matter. And here, in order to create a reliable design, you need competent instructions. In addition, it is important to watch the video, which will allow you to learn the details of this process. Should a foundation be made for the greenhouse, or should it be installed on the ground itself? If there are no special T-shaped holders on the greenhouse frame that go deep into the ground, the frame will not be stable in strong gusts of wind. Direct contact with the soil will lead to a greenhouse heat loss of up to 10%. In addition, this design will be within easy reach of shrews and moles, as well as frost and fog.
The instructions that come with the greenhouse contain information that it is not at all necessary to lay out the foundation, since the greenhouse itself will hold another frame ending with a special pin and is dug into the ground 15 cm. There are models of greenhouses that are sold in complete with fastenings - pennies, or special plates, which are fixed to the base of the foundation using anchor bolts. Whether it is worth constructing the foundation or not is up to you to decide. But you should carefully study all its possibilities.
What type of foundation should be installed?
Spot. For one season, a point base will suit you. It is made of stumps, wooden beams, blocks and is dug in in those places where pillars for support will be installed. The foundation and the greenhouse are connected using metal corners. This type of foundation can perfectly strengthen the frame, but, unfortunately, it is not able to completely protect the structure from various rodents.
Tape. This type of foundation is used for perennial greenhouses. You can easily make it yourself. For arrangement you can use various materials:
Timber. This is a very convenient design. At the end of the summer season, the greenhouse can be easily disassembled and moved to another place. But there is one drawback. The timber, which is the base of the frame, will very quickly begin to collapse in the soil. For this type of foundation you will need:
- First you need to dig a pit around the perimeter of the entire greenhouse, 20 cm wide.
- The bottom of the pit should be covered with roofing felt.
- The base of the timber must be treated with special antiseptics.
- The foundation is laid out in a pit on roofing felt, turning closer to the base of the tree.
- The remaining space is covered with a layer of earth and compacted.
- Then the corners are tied.
Blocky. This type of foundation will be an excellent option for a low-lying area, as it can provide good waterproofing. It is constructed from hollow blocks.
Construction instructions:
- First, you should dig a pit according to the size of the greenhouse: the width of the trench should be 25 cm, and the depth should reach the freezing level - approximately 1.2 m.
- Place a 10 cm layer of gravel cushion.
- Concrete solution is poured onto the gravel, and blocks are immediately installed in it.
- Horizontal and all vertical corners from above must be reinforced with concrete, and earth must be added to the sides.
- The concrete is leveled using a level.
- It is necessary to let the foundation harden for 24 hours, then install the greenhouse frame on it.
Concrete. Step-by-step instructions for creating a foundation:
- It is necessary to dig a pit according to the same principle as described above.
- Spread sand on a bed of gravel in a layer up to 15 cm from the soil surface.
- The sand layer is compacted very tightly.
- It is necessary to make formwork from wooden boards at a height of 20 cm from the top level.
- It is necessary to lay the reinforcement on top of the sand.
- Concrete mortar should be poured into the resulting formwork box.
- After a day, the formwork should be removed and the frame installed.
Assembling a greenhouse frame made of cellular polycarbonate
After the location for the greenhouse and arrangement of the foundation has been chosen, it is necessary to proceed to the third stage - installation of the frame. All necessary fasteners can be found on sale complete with the frame. You just need to prepare a screwdriver and a wrench in order to carry out all the work efficiently.
Frame assembly sequence:
- At the initial stage, you should start assembling the ends. The landmark should be taken from doors and windows. The upper arc must be secured to the door frame with bolts, and then spacers. It will be connected to the door frame with special screws. The end posts must be attached to the spacers.
- The next stage is fixing the intermediate struts.
- It is necessary to attach intermediate arches and racks to the longitudinal struts.
- The finished end is leaned against the wall so that it can stand in a vertical position; the second one is installed using the same principle. These two ends are fixed to the foundation.
- The remaining arcs are connected in turn to the second end, securing them at the same time to longitudinal struts. The side arches are installed in the spacer located below.
- All arches must be secured with longitudinal struts. Our frame is ready. You should once again carefully check the reliability of the frame using a wrench.
- A stable and well-fixed frame on the foundation can be safely covered with film or polycarbonate sheets. Polycarbonate sheets must be installed so that the protective layer is on the outside. Channels designed to remove excess moisture must be in the most vertical position, the edges of the sheets must be sealed with a special film equipped with vapor-permeable inserts. In this case, the surface that has become foggy will quickly restore its transparency.
- It is necessary to choose a diameter of screws that will be slightly smaller than the size of the holes themselves. This is necessary so that the sheet cannot be deformed. When glazing a greenhouse with polycarbonate, the best option is to use special fittings for plastic.
We recommend reading the site article: Caring for tomatoes in polycarbonate greenhouses
Helpful hints for proper installation
Now, with the help of our article, you could learn how to install a polycarbonate greenhouse with your own hands without a foundation. Now we will give some useful recommendations. It is advisable to build a greenhouse from polycarbonate in the autumn, before the first frosts begin, since the plastic will bend during installation. During summer and winter temperature fluctuations, the greenhouse's airtightness will be excellent if it is mounted at 10-15 degrees Celsius.
The area for the greenhouse should be prepared. To do this, you need to remove the soil from the surface using the bayonet of a shovel. You also need to remove all plants from the fertile soil layer and put it in a special place before the next summer season. Using slate sheets, it is necessary to form sides to protect the plants in the greenhouse from various weeds.
The main advantage of greenhouses made of cellular polycarbonate, unlike other types, is the ability to install them without a foundation using holders.
Greenhouses, with a collapsible frame, which consists of separated parts of small pipes, are very light during transportation (they can easily fit into the trunk of a car), but they are quite difficult to assemble. If the design of the frame itself consists of welded parts, then the assembly of such a greenhouse will be quick.
When starting to choose a greenhouse, you should pay attention to the factory-welded gables and frame arches, consisting of solid-bent pipes, which must be installed and tightened in the selected area. In addition to simple assembly, this model will be very reliable in its further operation.
When installing a greenhouse in the autumn, there is no point in dismantling it for the winter, since the polycarbonate will not be exposed to various external factors. It does not break, is not fragile and does not pollute the soil with fragments. Only the irrigation system needs to be removed. The reliability of fastening the greenhouse structure directly depends on the choice of fasteners. The best option would be to choose a design that has a strap around the base of the frame on which the welded hinges are located. Using these loops, you can secure the structure to the ground or to the foundation.
If the greenhouse is fixed using pipe piles, it is not worth driving them into the ground until the very end, since it will continue to float, and this fastening system will not provide the necessary fixation.
Polycarbonate sheets should be chosen at least 4 mm thick. If when choosing this material you see the prefix “economy” in the name, then this indicates its low quality. It is generally not used for street use. The warranty period for high-quality polycarbonate is more than 10 years.
It is possible to install transoms on both sides of the greenhouse to allow ventilation. You can also buy plastic partitions (to avoid cross-pollination of plants), as well as an automatic drip irrigation system and ventilation vents. In order to prevent the greenhouse from being affected by seasonal ground precipitation, the following should be provided:
A solution consisting of bitumen or a special anti-corrosion paint, which should be used to treat the bottom of the frame before installing the greenhouse.
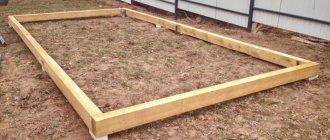
Before installing the greenhouse, its frame should be installed on a corner, taking into account its entire perimeter. This will help in the future to avoid various defects in the product when increasing its size.
In winter, the surface of a seasonal greenhouse that is not reinforced with supports must be constantly cleared of snow. If this is not done, the polycarbonate will become covered with many cracks, which will lead to its deformation.
For the winter period, supports should be installed, consisting of wooden blocks measuring 40*40cm.
In order for a greenhouse in central Russia to survive the winter well, while withstanding the load of snow cover, the thickness of its metal frame must be at least 1.5 mm. The cross-section of the pipe should be 40*20mm.
The door to the greenhouse must be kept open in winter so that the soil can freeze well. This procedure makes it possible to destroy all pests present on the soil.
Each arch in the greenhouse must be secured with special reinforcements.
Greenhouses made of polycarbonate tend to get very hot in hot weather. This can lead to gaps in the structure. In order to avoid this defect, it is necessary to install polycarbonate in the areas where the side walls come into contact with the roof. To do this, take a small polycarbonate strip of 10 cm.
The air temperature in April can be from 15 to 20 degrees at night. Based on this, before you start planting plants, it is necessary to warm up the greenhouse.
In summer, the greenhouse will reach its maximum temperature. Therefore, you need to ventilate it regularly. In addition to opening the transoms and doors of the greenhouse, you need to constantly water the polycarbonate and install automatic windows.
Now you know how to properly install a polycarbonate greenhouse with your own hands. We hope our tips will help you do everything right.
We recommend reading:
- Frame panel houses - choose a contractor
- MTD snow removal equipment - safe operation
- Drip irrigation: benefits of automation and savings
- How to choose a plastic tank for a summer shower
- Bath comfort, bath idyll or how to make the bath of your dreams
- Rubber tracks for the garden
Useful tips
- To ensure that the greenhouse covering lasts as long as possible, it is recommended to choose polycarbonate sheets with a thickness of more than 4 mm. The best option is polycarbonate sheets 6-8 mm thick, with UF protection (protection from ultraviolet radiation) and a warranty period of at least 10 years.
- Treating the lower part of the frame with anti-corrosion paint or bitumen solution will extend the life of the greenhouse structure.
- Experts do not recommend using polycarbonate sheets marked Eco or Economy to create greenhouses, as crushed recycled raw materials were used in their manufacture, and not primary polymer. And this affects the strength and quality of the resulting product.
- When installing the frame, it is recommended to secure each arch with reinforcements. The stability of the greenhouse as a whole depends on the amount of the latter.
- In summer, the polycarbonate covering of the greenhouse gets very hot, which causes gaps to appear. To prevent their occurrence, 10 cm strips of polycarbonate should be implanted at the points of contact between the walls and the roof.
Installing a greenhouse with your own hands is not an easy task. Exactly following the instructions for installing a polycarbonate greenhouse, taking into account the recommendations presented in this article, will allow you to correctly and without errors install a strong and reliable structure that can last a long time.
Assembly: order or do it yourself?
Here is the question that most often worries puzzled buyers of modern greenhouses: why are the included assembly instructions so complicated? Why is it so difficult to make out something from them, and some models have to be assembled by a whole team for two or three days in a row? The thing is that such drawings are always drawn up by those engineers who only see the greenhouse itself in their workshop. Their main task is to accurately indicate the dimensions and availability of parts, i.e. provide certain technical information, and secondary information - explain with documentation to an inexperienced person how and what needs to be screwed. And they explain it as best they can...
But a professional team can complete the assembly in literally an hour - that’s true. After all, when installing a certain model for the hundredth time, they literally know every detail “by sight.” That's why they want good pay. Those. Here a dilemma as old as the world arises - either money or time. You decide!