The vine can bear fruit for up to 40 years. This requires proper care and proper pruning. Over time, the bushes age and the yield decreases - they have to be replaced. Industrial plantings older than 10-12 years are extremely rare - it is not economically profitable to invest in an aging vineyard.
Summer residents are showing no less interest in purchasing grape seedlings. High-quality planting material from agricultural companies and breeding stations is not a cheap pleasure.
Buying seedlings on the market from random sellers is a game of roulette: it is not always possible to determine not only the variety, but even the type of grape by appearance. It’s not very pleasant - instead of a dessert variety, buy a decorative one with inedible fruits.
What are the advantages of propagating grapes from cuttings?
An error or outright deception will not be discovered immediately: at best, after a couple of months, at worst, after a year. In order not to reproach yourself for being gullible and not to waste time and money in vain, you need to master the technology of growing seedlings and grapevine cuttings - winegrowers call them “cuttings” and “chubuks”.
Saving money
Anyone who has ever seen grape seedlings for sale has noticed that they all look alike - a rooted section of a vine with a blossoming bud or an already grown shoot. It is not difficult to grow the same seedling yourself. Summer residents and winegrowers will be happy to give the vine for rooting - when pruning a bush, up to 90% of the vine is cut off.
Cuttings for rooting are also sold by breeding stations at a price several times lower than that of a grown seedling. The advantage of such a purchase is a guarantee of compliance with the variety stated in the catalog.
Error eliminated
When purchasing a cutting, even in a specialized center, there is a certain risk of mismatching the variety. Endowed with a friendly neighbor in a summer cottage, the vine does not raise any doubts.
Sometimes even the name of the variety is unknown, but the taste of the berries from the mother bush is well known. Details of proper care are usually included with the vine piece.
Renewal and expansion of the vineyard
The vineyard is aging - the grapes and berries are getting smaller. Sooner or later, you have to replace very old bushes, replenish dead ones, or plant new plantings. When pruning, a huge number of vines are formed, which can be used for rooting and producing seedlings.
Preparation of pipes - methods and timing
Winegrowers will confirm that at least 90% of all vines have to be removed from the bush during pruning and summer green operations. From all these trimmings you can always select a sufficient number of cuttings for rooting.
- During autumn pruning, lignified cuttings are cut. To do this, select fully mature annual vines without damage to the outer cover by diseases or pests. The top 1/3 of the vine is unsuitable for cuttings. For winter storage, cut stems with 3-4 internodes.
- Green cuttings of spring harvesting are obtained by breaking off unnecessary grape shoots. The thin tops of the vine are unsuitable for propagation. The diameter of the green shoot must be at least 8 mm.
Lignified cuttings harvested in autumn contain a significant supply of nutrients - if the technology is followed, their rooting rate approaches 100%.
Propagation of grapes - what else you need to know about cuttings
Inexperienced gardeners often complain that attempts to grow seedlings at home do not give the desired result. Most failures are rooted in ignorance of the basic rules.
Preparing cuttings in the fall - step-by-step instructions
For cutting into cuttings, take vines pruned in the fall. In preparation for winter, grapes deposit a supply of sugars and water in the wood. The presence of own reserves contributes to the survival of cuttings and a high percentage of viable seedlings. Not every cut vine is suitable for cuttings:
- Choose a vine with a diameter of 8-12 mm. Oddly enough, vines that are too thick are unsuitable for germination: just as they “fattened” on the mother bush, so they will behave in the future.
- The wood must be mature. In practice, this is very easy to check - when bending, a characteristic crunch is clearly heard.
- If the vine has a tendril, it is advisable to cut the vine in such a way that the internode with the tendril is at the very bottom of the stem. The explanation is simple: the presence of a tendril indicates the presence of a special membrane in the structure of the internode, which favors the formation of roots.
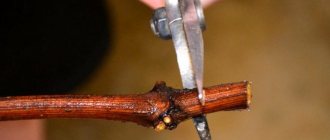
- After storage in winter, the cuts are not only renewed, checking for the presence of living, healthy wood. The lower cut immediately below the lower internode is made straight, the upper cut is made a few cm above the upper bud, oblique (exclusively so as not to confuse the top and bottom of the shank).
- Before germination, the bark is stratified - scratches are made just above the lower node. If the cutting has 2-3 nodes, carefully pluck out the lower bud.
The author of the video explains how and in what period grape cuttings should be harvested.
Chubuki are ready for germination using any of the selected methods.
Harvesting and preparing green cuttings in spring
Material for rooting green cuttings is formed in large quantities when excess thickening shoots are cut out in the spring.
The shoots grow very quickly and, with a length of 30-40 cm, have a diameter at the base of 7-8 mm. This is the optimal thickness of the shank for green cuttings.
The tissues of the cuttings are very delicate and quickly lose water, so it is necessary to take measures to preserve the properties of the cuttings:
- Remove the overgrowth in the evening.
- A bucket of water and a damp cloth should be ready to put the cuttings in water and cover them from drying out.
- Most likely, you will have to plant the cuttings in the morning - put the bucket with the vines in a cool place (cellar) overnight.
- The upper 1/3 of the vine is not suitable for rooting - only the lower ⅔ of the length is used.
- Before germination, the cuttings are cut into pieces of 2-3 internodes, the lower straight cut is immediately below the node, the upper, oblique cut is slightly above the upper node.
Green cuttings take root much worse than lignified autumn ones - before planting in the soil, it is recommended to treat the lower part with heteroauxin (or another root-forming preparation) according to the instructions.
The right time
Many gardeners are confident that grapes can be planted or transplanted all year round, except winter. Some amateurs cope with this task even in winter. Properly planting grapes with cuttings in the fall is a rather labor-intensive task.
To plant plants, you must first select the desired variety and understand all its features. If this species loves warmth too much, then the autumn procedure will not give any result.
Wild grapes are adapted to any conditions, so they can be planted at a time convenient for the gardener. You just need to choose a place for it. Then it will develop independently. But the wild grapes in the garden are intended only to decorate the gazebo.
To plant grapes with vines in the fall, it is advisable to choose a frost-resistant variety. It will be much calmer this way in winter, when there are serious frosts outside.
When choosing a disembarkation time, you need to consider several factors :
- Autumn planting should be done only before the first frosts appear and the soil temperature drops. If this is not taken into account, the plant will die and all efforts will be in vain.
- The best period is considered to be mid-September or early October.
- Most vineyard lovers believe that cuttings are best done on the growing moon. But, most likely, this is just superstition.
- All working tools that will be used during planting should be treated with a solution of potassium permanganate. This will allow it to be disinfected and will prevent various pathogenic fungi from infecting the future vine.
- Cuttings should be planted only in the morning and in dry, windless weather.
Advice!
For everything to go well, you must strictly follow the instructions. Then you can get excellent small bushes next year. Therefore, it is advisable not to experiment.
Methods for rooting grape cuttings at home
Lignified cuttings harvested in autumn are the most reliable material for growing grape seedlings. During the summer season, the vine accumulates a supply of nutrients, which become a significant aid for the regenerative processes of cuttings.
There are many ways to root grape cuttings: the principle is general, the conditions vary.
In a jar of water according to Radchevsky
The method is extremely simple:
- The chibouks prepared for germination are placed in a three-liter jar.
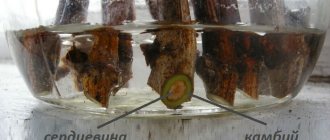
- There should be 2-3 cm of water in the jar - just enough to cover the lower cuts and nodes on the cuttings.
- To speed up root formation, add a little honey to the water (1 teaspoon per 1 liter of water).
- The jar is placed on a light windowsill. Access to sunlight is very important - it is recommended to begin germination of cuttings no earlier than the end of February.
- The main thing is to ensure that the water does not dry out. Do not add more than 2-3 cm of water - the newly formed roots should reach towards the water.
- When the buds swell, only the top 1-2 are left (depending on the length of the cutting). The rest are carefully removed; the vine will not need them.
- Twin buds may grow (each bud has a “double” in case the main one is damaged) - this sprout should be removed.
- During the germination process, the water in the jar is changed to clean, settled water 2-3 times a week.
- An important point is to pinch the regrown shoot above the 3rd leaf. This will save the nutrient reserves of the vine and redirect the process to growing roots.
- Chubuki are ready for planting in the ground when the root buds are approximately 3-5 mm. At this stage, the risk of damaging young roots is minimized.
When planting in a shrub or seedling box, inexperienced summer residents make a common mistake - they water the seedling heavily. Abundant watering must be compensated by spraying the leaves or covering the planting with film. A lack of water will only benefit the seedlings - the roots will develop faster.
Rooting according to Pusenko
A slightly different approach to choosing a medium for rooting chibouks is inherent in the Pusenko method:
- To germinate, the cuttings are soaked for several days, replacing the water with clean water daily.
- The lower internode is processed to improve root formation - a bud is plucked and shallow incisions and scratches are made in the bark (several pieces, for example, with a fork). At the site of damage to the integument and cambial layer, roots develop.
- Lay the cuttings at intervals of up to 10 cm on a strip of cotton fabric so that the lower part of the vine, where roots are expected to form, is wrapped in the fabric. The fabric is slightly moistened with water.
- The fabric with the shanks is rolled into a “snail” shape and placed in a plastic bag.
- To germinate roots, warmth is necessary - in a warm place, cuttings form roots within 2-3 weeks. You should periodically check to see if the cloth is dry.
As a variation of the method, some gardeners practice germinating cuttings in wet sawdust: the bottom of the treated cuttings is placed in wet hardwood sawdust. The rest of the technique is no different. The main thing is to prevent drying out in the root formation area.
Rooting according to Lykov’s method
The accelerated method of growing seedlings from chibouks is reminiscent of previous methods:
- The peculiarity of the Lykov cutting technique is the use of root formation stimulants at the germination stage - heteroauxin, the drug "Kornevin" or analogues according to the instructions.
- The prepared cuttings are placed in a stimulant solution poured into a glass container (jar) no more than 3-4 cm deep.
- As water evaporates and is absorbed, fresh water must be added to prevent the level from dropping.
- When the rudiments of roots appear (1-2 mm), the cuttings are planted in a schoolhouse or seedling box filled with a nutrient substrate.
How to propagate grapes from green cuttings
To form a bush that is “transparent” to the sun’s rays, you have to break out many shoots. The fragmentation is carried out in the evening. Selected cuttings with a diameter of 8 mm or more are placed in water, sprayed and covered with a damp cloth.
If possible, planting should be done immediately. In extreme cases, chibouks can “survive” until the morning in the basement.
A necessary condition is that a pre-prepared seedling box or greenhouse-school is required.
- To cut cuttings, only the lower 2/3 of the broken vine is used - the weak thin top (1/3 of the length) is thrown away.
- The remaining vines are cut into cuttings consisting of 2 nodes: the lower straight cut immediately below the node (the leaf is broken), the upper oblique cut is at a distance of 1-2 cm from the node (the leaf plate is cut in half).
- After cutting, the cuttings are placed in a container of water as quickly as possible before they wilt.
- Everything is planted in a seedling box or school at a distance of 10 cm from each other, deepening the cuttings by 2-3 cm.
- The first 2 weeks after planting must be sprayed with warm water at least 4-5 times a day.
- After 2 weeks, when root buds begin to appear, the number of sprayings is reduced to 3 times a day. This stimulates the development of the root system.
- After another 2 weeks, the seedlings are transferred to root watering.
A prerequisite is that the schoolhouse (seedling box) must be covered throughout the entire rooting period. Direct sunlight should be avoided on immature seedlings until the cuttings become lignified.
If necessary, rooted chibouks are transplanted to a permanent place in September. For a quality winter, the preferable option is for the plants to remain in the school until spring.
Preparation of planting material
Seedlings are harvested either in autumn or spring. During the spring thaw, there comes a time when the vine can be opened after wintering, and then the cuttings are cut for their further rooting.
In this case, seedlings are planted in open ground in the fall, which provides some advantages: the opportunity for young plants to undergo winter acclimatization and adaptation. In the next season (after the plants survive the winter), such grapes begin to develop earlier, and the bushes become strong.
Most often, winegrowers prepare planting material during autumn pruning events. This is done for several reasons.
- Firstly, throughout the season it was possible to observe the growth and fruiting of the bush from which the source material would be taken.
- Secondly, the processes of annual pruning of bushes and procurement of planting material are combined.
To harvest planting material, the strongest, most fruit-bearing and exceptionally healthy bushes are selected:
- The presence of signs of disease or parasitic infection of grapes is not allowed;
- the bush should bring a good harvest this season;
- Damage is not allowed;
- for cutting cuttings, a bush more than one year old is selected, that is, the plant must already be adapted and acclimatized.
Accelerated propagation of grapes from shortened cuttings
For many, the story of rooting cuttings in a jar, growing them in a schoolhouse, and then replanting may seem too complicated and long.
For too busy summer residents, there is a method that combines all 3 operations. For planting using the accelerated method, you will need stems from mature vines with a diameter of 8-10 mm.
The number of internodes is not of fundamental importance - after winter storage the cuttings must be soaked for 2 days and stratified.
Stratification is nothing more than keeping the chibouks in a damp, cool, dark place. The corresponding conditions arise if you wrap the pipes with a damp rag and place them in a black bag with ventilation holes for 2 weeks. Periodically, it is necessary to unwrap the bag and moisten the rag.
After stratification, the chubuk tree with root buds is planted in a shrub - this can be a greenhouse or greenhouse.
- The bed is prepared with a supply of nutrients for 2 years.
- Chubuki are planted at a distance of 10 cm from each other, at least 30 cm between rows.
- The chubuks are immersed in the soil up to the upper eye vertically or with a slight inclination.
- The planted cuttings are well watered and covered with glass or film.
Further care of the plantings does not differ from the usual method.
Selecting a location
To get the best results when growing vineyards, you need to choose a good planting site. This plant is very light-loving. Therefore, you should choose a place with as much light as possible. It is also advisable to take care that the grapes are not exposed to cold winds, but there is enough space for good air circulation.
It should be remembered that vineyards need a lot of area so that they can grow and develop normally. You can't place bushes too close.
Before planting cuttings, it is necessary to till the soil. You need to remove all the weeds, dig up and loosen the soil. Then, you need to add organic, phosphorus and potassium fertilizers to the soil. After a few days, it is advisable to dig up the ground again.
Only after this can you begin to create special holes or trenches that will be used for planting cuttings. This must be done to ensure that the grapes take root.
Features of rooting virgin grapes
Parthenocissus - the so-called virgin grape - is most easily propagated by layering and cuttings. Due to the extraordinary vitality of the ornamental plant, cuttings can be cut and rooted from early spring to late autumn.
Those parts of the stems that take root most quickly are the ones where the nodes already have rudiments of roots; they look like small growths on the vine. The rooting rate of parthenocissus is almost 100% without the use of root formation stimulants.
There is no point in putting cuttings of virgin grapes in water - “water” roots will develop quickly, but they die in the ground. The survival rate of the cutting depends on permanent roots.
It is preferable to plant cuttings not in a schoolhouse, but in separate containers. The roots of virgin grapes grow slowly at first, but in the 2nd year of life, a powerful root system is already formed before transplantation. The plant is planted next year in a permanent place along with a lump of earth.
Dessert, technical (wine) or decorative varieties of grapes are at the peak of popularity among gardeners. For many summer residents, it was a discovery that wine berries grow not only in the south. To start a vineyard, you need seedlings of zoned varieties that are accustomed to the climate. These requirements are fully met by self-rooted cuttings from a proven mother bush, harvested in autumn or spring.
Mr. Summer Resident warns: mistakes when planting grapes in autumn
During the autumn planting of grapes, novice gardeners make many mistakes, which then lead not only to a decrease in yield, but also to the death of seedlings. The most common of them are listed below.
- A low-quality seedling was selected. It may not be suitable for a particular region or may have immature vines or dead root systems.
- Improper preparation of the planting hole.
- Planting too early, when there are more than 30-40 days left before the first frost.
- Strong deepening or, conversely, superficial location of the seedling.
- Incorrect winter shelter or lack thereof.
Read more about grapes and caring for them on our website.
