Carrying out pre-landing activities
To implement plans to obtain a watermelon harvest in a greenhouse, it is worth preparing responsibly. The possibility of the growing process itself depends on the choice of greenhouse, its equipment and the preparedness of the soil in it.
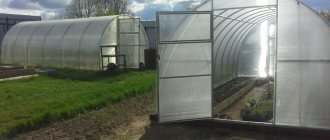
Choosing a greenhouse
The size of the shelter space and design option depend on the gardener. It is better to give preference to polycarbonate structures, as they are easy to assemble and operate and can withstand weather disasters. Their high cost pays off quickly.
Film greenhouses, although they are an order of magnitude cheaper, are suitable for testing the method of obtaining a watermelon harvest, but on a serious scale they will require the investment of additional expenses and effort.
Since watermelon is a crop that requires an increased amount of space, the size of the greenhouse for growing 10 plant roots must be at least 10 square meters. m. Consider a height of 2 m to ensure convenience for carrying out agricultural technology and not limit the growth of the watermelon. Place trellises and garter material indoors.
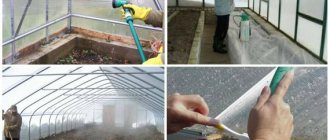
When the greenhouse is installed, check it for any cracks in the frame or in the joints of the polycarbonate sheets. If any are found, eliminate them. This will save the seedlings from drafts and inevitable death.
To avoid the occurrence of fungal diseases, treat the interior with a solution of copper sulfate, diluting it in water in a ratio of 1:100, or with Bordeaux mixture.
Install additional sources of heat and light. You can lay heating pipes under the beds so that the soil also has the opportunity to warm up.
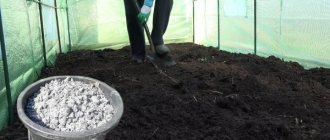
Soil preparation
Soil quality is of great importance for growing watermelons. There are several options for preparing the soil:
- Remove 20 cm thick soil from the greenhouse. In its place, lay a layer of straw and humus, and sprinkle nitrate fertilizers on top. Water well so that the straw is saturated with water and the fertilizer is dissolved. Fill the removed soil on top and cover it with a dark film. It is recommended to carry out planting work on this soil after 7-10 days.
- Dig up the soil, adding organic matter to it. Humus is suitable if you plan to plant watermelons in the near future, or manure if you will be planting seedlings in 2-3 months.
- Form artificial beds with a height of at least 30 cm. To do this, make fences from boards and pour inside a mixture of garden soil and river sand (10 kg per 1 sq. m), adding nitrogen and phosphorus mineral fertilizers (10 g per 1 sq. m) . m).
Please note that watermelons prefer soils with a pH level between 6-7. If the soil is highly acidic, it is recommended to add limestone, chalk, and wood ash at the rate of 300-700 g per 1 sq. m. m of land. For alkaline soils, they need to be acidified with humus - 5-7 kg per square meter. m or manure - 2-3 kg per sq. m.
Organic matter also increases the soil’s ability to allow air and water to pass through, making the soil looser and lighter. Sand is added for the same purposes.
How to prepare the soil?
Melon and watermelon love fertile soil with weak or neutral acidity. It should be loose and breathable. Do not allow water to stagnate . It’s good to start preparing the soil for the future harvest in the fall. Place tops, cut grass, and rotted manure in the beds.
What layer of manure should be in a greenhouse for watermelons and melons? About 30 centimeters will be enough. Important! Discard fallen leaves.
Dangerous garden pests like to spend the winter in them. In spring, you can add straw manure or humus with mineral fertilizers.
To improve the soil structure, pour a bucket of river sand onto each square meter of area and dig up the beds. To reduce soil acidity, calcium and magnesium compounds are added . They nourish plants and improve their growth.
Sulfur or ammonium sulfate will help increase the acid balance. The soil must be warmed by the time the seedlings are planted. To do this, remove a layer of soil to the depth of a shovel, put in a mixture of herbal material and humus, and pour in plenty of hot water. Place soil on top and cover with film .
Advantages and disadvantages of growing watermelons in a greenhouse
The technology for growing watermelons in a greenhouse has its positive and negative components.
The advantages of this method include:
- No influence of external climate on plants. Regardless of the temperature outside the shelter, the microclimate in the greenhouse has its own stable indicators. You should not be afraid of any manifestations of the weather and worry about their negative impact on the melon crop.
- Mechanical damage to the plant and fruit is practically reduced to zero. In a closed greenhouse, the wind does not overturn the watermelon vines, and animals and other pests do not have access to the plant.
- Quality of watermelon pulp. The constancy of the microclimate allows watermelons to ripen and gain sweetness, so their flesh is juicy and sweet.
The only drawback of growing watermelons in a greenhouse is the pointlessness of this process in the southern regions, where plants have enough heat and other weather and climatic conditions to ripen without shelter. The profitability of such a process may become negative.
Choosing a watermelon variety for growing in a greenhouse
For growing in shelters, it is advisable to choose varieties and hybrids with a short ripening period. We invite you to get acquainted with some of the most popular watermelon varieties suitable for cultivation in mid-latitudes:
- Siberian . A variety specially bred for cultivation in the regions of Siberia. The fruits are sweet, medium in size, their weight is up to 5 kg. The crust is not thick, the flesh is rich scarlet in color, and contains a lot of sugar. The variety is not afraid of fluctuations in air temperatures and produces high-quality ovaries even at low temperatures.
- Crimson . An early ripening variety, ripening is observed at 70-75 days. The peel is matte with green stripes of dark and light green. The pulp is juicy and red. The weight of the fetus can range from 5 to 12 kg. Moderately resistant to anthracnose.
- Ogonyok . Early ripening variety. The growing season ranges from 70 to 80 days. The weight of the small spherical fruit reaches 2.5 kg. The juicy sweet core of a fiery color is covered with a thin dark peel of a dark green hue with virtually no pattern. The seeds are not large. The variety is unpretentious in cultivation, but does not last long. Characterized by an average degree of resistance to powdery mildew and anthracnose.
- Sugar . Ultra early variety. The fruits appear on the 65-75th day. The peel is thin, green with a barely noticeable pattern. The pulp is rich red, representing a mass of large grains, sweet, juicy. The weight of the fruit is about 3 kg, rarely growing up to 5 kg. The variety is unpretentious, cold-resistant, and can be transported and stored.
- Florida . Mid-season hybrid with a growing season of up to 100 days. The fruits are elongated. The pulp is juicy and aromatic. The crust is hard, colored with blurry stripes. Suitable for transportation, can be stored for up to 3.5 months.
watermelon variety “Sibiryak”
watermelon variety “Crimson”
watermelon variety “Ogonyok”
watermelon variety “Sugar”
watermelon variety “Florida”
Problems and diseases of greenhouse melons
A greenhouse can provide watermelons and melons with the necessary temperature, but these southern plants are also accustomed to dry air. In the closed space of a greenhouse it is very humid, and this leads to a number of problems and diseases.
Diseases
Most often, watermelons and melons in a greenhouse suffer from powdery mildew and anthracnose. In the first case, the leaves become covered with a white, gradually darkening coating, and in the second, brown or pink spots form on them, and the fruits wrinkle and rot.
Anthracnose spots on watermelon leaves
Diseases are caused by high humidity, lack of sun and low temperatures. Prevention can be treated with a 1% solution of Bordeaux mixture or copper oxychloride.
If signs of powdery mildew or anthracnose appear on melons, you must immediately remove the affected areas of the plants. Twice (with an interval of 7-10 days) treatment of plantings with Bordeaux mixture and regular ventilation will help preserve the harvest.
Growing difficulties
Even the most diligent and experienced gardener may encounter a number of problems when growing these crops. Fortunately, everyone has their own solution.
The absence of ovaries is associated with a lack of pollination and is often found in greenhouse crops. In order for insects to get inside, you need to leave the windows and doors open, sprinkle the bushes with sweet water or plant honey plants next to them. If all measures do not help, you will have to pollinate the flowers manually.
Fruit rotting occurs due to high humidity and accumulating condensation. The greenhouse must be ventilated at least twice a day and wiped from the inside, preventing cold drops from falling on the watermelons and melons.
Unsweetened fruits are another consequence of high humidity. Even if you minimize watering during the period of fruit ripening, the plants will still be able to receive water through the leaves, and the sugar level in melons will decrease as a result. To cope with this problem, it is worth keeping the greenhouse in ventilation mode whenever the temperature allows it, and closing it only at night.
Is it difficult to grow a watermelon or melon in a greenhouse in the country? Let’s face it, it’s not as simple as, say, zucchini. But you will also get a lot of joy from harvesting a sweet harvest, which means it’s worth the risk.
Preparing seedlings
To obtain good harvests, you cannot do without proper preparation of seeds and growing healthy seedlings from them.
Sowing seeds
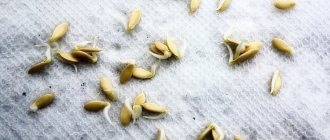
Before sowing seeds, it is recommended to prepare them. For this:
- Dissolve 1 tsp in 100 g of running water. table salt. Dip the seeds into the liquid. Remove all seeds remaining on the surface - this seed material will be of no use, they are empty. Rinse the remaining seeds with clean water.
- Prepare a slightly pink solution of manganese and soak the seeds in it for 20-30 minutes. This procedure will disinfect the seed material and protect against the development of fungal diseases.
- Place a cotton cloth in the saucer. Wet it well with warm water and spread the watermelon seeds over it in an even layer. Cover the top with the same moistened piece of cloth or plastic bag. Place in a warm place for swelling and germination. Make sure that the fabric is always damp and spray it with water.
Soaking the seeds in a growth stimulant before sowing will speed up the appearance of the first shoots.
When the seed material germinates, you can begin planting it in separate containers. For this, it is recommended to use peat glasses, but any other container of suitable size will do. Fill the glasses with prepared soil and place the seeds in it to a depth of 3-4 cm, placing them horizontally in the ground. Place the container in a warm place with an air temperature of at least 25 °C.
Growing seedlings
When the first leaves appear, create the necessary conditions for the seedlings to keep them healthy and strong:
- Use additional lighting with phyto- or fluorescent lamps so that the total daylight hours for the plant are at least 12-14 hours a day.
- Water the plant so that moisture does not fall on the leaves.
- As the seedlings grow, the distance between the pots should be increased so that the plants do not shade each other.
- Rotate the containers periodically so that the plants do not stretch to one side, but grow evenly.
- Feed the seedlings every 10-14 days. To do this, dilute 250 g of wood ash in 10 liters of water and use the solution for watering. Nitrogen fertilizers have a good effect. For example, 20 g of urea per bucket of water.
Planting watermelon seedlings in a greenhouse: step-by-step diagram
When 3-4 main leaves are formed on the plants, you can proceed to transplanting it into the greenhouse:
- Divide the area for planting into beds. For single-line planting, it is enough to make a ditch 10-12 cm deep and distribute the seedlings in it at a distance of 70 cm from each other.
- For a two-line planting, it is preferable to make holes 30x30 cm in size and 10 cm deep, placing them at a distance of 50 cm from each other.
- Water the ruts or holes well with water.
- Dip a peat pot with seedlings into it and sprinkle with earth, lightly tamping. It is allowed to place 2 seedlings into the hole along the edges, planting them at an angle in opposite directions from each other.
- If the seedlings were grown in reusable containers, then water them well the day before planting so that when the seedlings are removed, the earthen ball does not crumble and damage the root system of the seedling.
- After planting, the seedling substrate should protrude slightly above the soil surface. This will reduce the likelihood of the seedling stems turning black and rotting.
In the presented video you can see the process of planting watermelon seedlings in a greenhouse:
Formation of melons
After the first two or three fruits appear on the watermelon shoot, the central lash is pinched. The lateral ones are also subjected to this procedure over the fifth or sixth sheet. All other ovaries will draw resources onto themselves, interfering with development, so they should be removed.
Scheme of watermelon formation
Melon formation diagram
The central strand of the melon also needs to be pinched. This is usually done over 3-4 sheets. Side shoots should be carefully examined and the two strongest ones should be preserved. They also need to be pinched, doing this over 5-6 sheets.
After the ovary has formed, another pinching is carried out over 3-4 leaves above the ovary. Weak shoots are removed. The optimal number of fruits on one shoot is no more than 5-6 pieces.
You can organize the formation on a trellis. The lash needs constant tightening, because watermelons quickly gain weight. The fruits must be hung in a convenient net to reduce the load on the plant.
Agricultural technology of watermelons in a greenhouse
Agrotechnical measures for caring for watermelons are not difficult, but they should not be neglected.
Temperature and humidity conditions
The optimal temperature for the growth and development of watermelons is 24-26 degrees. It is very important to avoid sudden fluctuations. In cold climates, the use of heating in a greenhouse is mandatory.
The formation of condensation in a greenhouse and excessive air humidity lead to the spread of diseases. Ventilate the room daily. On hot days, you can leave the greenhouse open all day.
Watering
Properly organized watering is necessary for the growth and development of plants. With a lack of moisture, the leaves and vines of watermelons wither. It is enough to carry it out 1-2 times a week, but generously. Or water the beds with moderate amounts of water every other day. Do not overdo it with the amount of moisture when watering, otherwise the fruits will begin to crack. Keep in mind that watermelon is a drought-resistant crop.
When watermelons ripen, sharply reduce the amount of watering. This will allow the berries to grow fragrant and sweet.
Water at room temperature is considered optimal for moistening beds. When watering, make sure that it does not fall on the green parts of the plant, but is directed towards the root system. As the soil dries out after watering, make sure that a dry crust does not form on the surface of the soil. Loosen the soil in a timely manner.
Forming watermelons
An important step on the path to harvest is the formation of watermelon bushes. 10-15 days after planting the seedlings in the greenhouse, after adaptation to new conditions, it must be tied up, indicating the growth guide and preparing the bush for further activities.
Side vines empty of inflorescences are immediately removed. Pinch shoots with ovaries, leaving 3-4 leaves above the inflorescence. As the fruits grow to the size of a walnut, leave 3-4 of them on one plant and pick off the rest. If you do not remove the excess ones, the watermelons will grow small and may not ripen due to nutritional deficiency.
Diseases and pests
Most often, watermelons are affected by fungal infections - anthracnose, powdery mildew, and also suffer from black, white, and gray rot. Various spots appear on the leaves and vines, and the plant itself begins to wither. If this situation is left unattended, the culture may die.
When you detect the first signs of disease, remove damaged leaves and treat the healthy part of the plant with fungicidal solutions. The drugs are purchased in specialized stores and diluted according to the instructions.
Preventive measures, such as tilling the soil and seeds, killing weeds and loosening the soil, moderate watering, ventilation and maintaining optimal air temperature, reduce the chances of watermelon infection. If the disease spreads, the main measure to combat it will be the destruction of the crop, followed by burning. The greenhouse and soil are then sanitized.
The main pest of watermelon plantings is the melon aphid, the larvae of which feed on the sap of the plant, thereby depriving it of nutrition. Watermelons wither and dry out. To combat it, plants are sprayed with an ash solution with the addition of laundry soap. When processing, keep in mind that the main concentration of insects is concentrated on the underside of the leaf blade.
A good drug aimed at combating aphids is Intavir. Dissolve 2-3 tablets in a bucket of water and spray the crop.
Fertilizers
The main feeding of plants in the shelter is carried out 3 times:
- When the lashes grow to 25 cm in length, on the 30th day after placing the seedlings in the greenhouse.
- Before flowering begins.
- When the first ovaries appear on the lashes.
If there is insufficient application of fertilizers during soil preparation, additional nutrition may be required for watermelons. In this case, alternate the types of fertilizing, taking into account the total application doses.
Fertilizing the soil can be done with various fertilizers:
- Ammonium nitrate. Dilute 15-20 g of granules in 10 liters of water. Liquid consumption is approximately 1.5-2 liters for each plant.
- Chicken droppings. Dissolve 800 g of organic matter in a bucket of water. Let it brew for a day in a warm place, stirring occasionally. Fertilizer consumption - 500 ml per bush.
- Ash infusion. Use 700 g of ash per bucket of water, leaving the solution to steep for 12-14 hours. Feeding consumption is 0.5 liters for each plant.
- Potassium-phosphorus fertilizers. Apply superphosphate 40-50 g per bucket of water and potassium chloride 25-30 g per 10 liters of water.
- Use special fertilizers for melons, for example, “Giant Vegetable”, according to the instructions.
Pollination
Pollination by insects is only possible if the greenhouse remains open all day. If this is not possible, then you need to pollinate the flowers yourself. To do this, pick a male flower and transfer its pollen to the female inflorescences. This manipulation can be carried out using a cotton swab.
It is advisable to carry out the procedure in the morning at 10-11 o’clock, and repeat as necessary.
Tying watermelons
Tying watermelons is a measure to prevent damage to the vines due to the weight of the fruit. When watermelons reach the size of a large apple, they are placed in nets and tied at the required level to trellises or other fastenings. Another option for preserving fruits is to build special fruit stands. Watermelons are on them constantly until harvest.
There are many methods for tying and placing watermelons in a greenhouse. Each gardener performs work from available materials, using imagination and skills. They use old stockings, mesh bags, wooden shelves and fabric swings, and much more.
Pollination
In good weather, bees and bumblebees fly into the open doors of the greenhouse and carry out pollination. But it is better not to rely on insects and carry out pollination manually.
- You need to find out which flowers are female and which are male. It is not difficult to distinguish them. In female flowers there is a slight thickening immediately after the inflorescence, while in male flowers the petiole is smooth and thin. Male flowers appear earlier than female ones.
- The male flower is picked and the petals are carefully folded back.
- They bring it to the female flower, lean it against the inside and lightly tap them against each other.
To consolidate the result, this procedure can be carried out several times with one female flower. The best results occur when pollination is carried out in the first half of the day.
Harvesting
You can understand that it is time to harvest by several points:
- the watermelon skin becomes smooth and elastic;
- the stripes of the pattern become yellowish;
- when you tap the fruit, a ringing sound is produced;
- The tail of the watermelon becomes thinner and dries out.
When deciding to harvest, stop watering. After 3-4 minutes, you can start cutting, leaving a small stalk. Dried fruits are stored much longer than moistened watermelons.
You can store the fruits in a cardboard box, sprinkle them with sand and ash, or in a suspended state. It is important that the watermelons do not touch each other. Choose a storage location in the basement or another dark, cool room without fluctuations in air temperature.
Any gardener can grow juicy, sweet watermelons in a small greenhouse area. It is important to observe agrotechnical measures for crop care and special measures to preserve the integrity of fruits and plants. If these conditions are met, the yield from each watermelon seed can reach from 10 to 20 kg!
0
0
Copy link
Planting material
In order for the harvest to be sufficient, it is necessary to choose the seed correctly.
Tip: Seeds taken from a purchased watermelon may not germinate at all. It is better to make a choice in favor of fast-ripening seeds.
Before you start growing watermelons in your dacha, you need to decide whether the local climate is suitable for this crop. The varieties are selected according to the climatic conditions. Before planting in the ground, the seeds are calibrated. Dry and empty ones are removed from the seed lot. To make the process faster, the seeds are placed in a bowl of salt water, in which unsuitable specimens will float to the surface.
The seeds are selected large, with a pointed end. After the salty liquid, the seeds are rinsed. To prevent seedling disease in the early stages, the seeds are sprayed with a manganese solution.