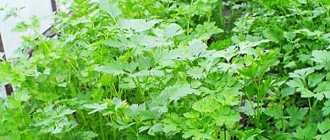
Even in winter you can grow parsley at home. In order to get full-fledged succulent branches without much hassle, rather than thin blades of grass, it is better to use the forcing method. To do this, you will need several parsley roots, which you can dig up in the garden or buy at the market.
Parsley varieties for growing on a windowsill
Growing parsley at home occurs under not entirely favorable conditions - insufficient humidity and low light. Therefore, not every planting material is suitable for growing parsley from seeds on a windowsill. Early ripening varieties are the most suitable.
Which parsley do you prefer, leaf or curly?
LeafyCurly
Breeders, taking into account the interest in vegetable gardens on windowsills, have developed a number of varieties that make it possible to successfully grow parsley on a windowsill:
| Leafy | “Morning freshness”, “Ordinary leaf”, “Gloria”, “Beads”, “Russian feast”, “Fitness”, “Prima”, “Emerald lace”, “Appetizing”, “Universal”, “Italian hero”. |
| Curly | “Astra”, “Fragrant Alley”, “Green Pearl”, “Vorozheya”, “Grandma’s Garden Bed”, “Curly Sue”, “Petra”, “Curly”. |
Helpful information
Daria Vorontsova
Amateur gardener. He is interested in growing various greens at home.
Curly parsley has a less pronounced taste and aroma, but, having an unusual foliage shape, is great for decorating salads and other dishes.
All of these varieties are united by early ripening, which allows you to use tasty and healthy fresh greens all year round.
We create conditions for growth
The main requirements for the conditions for growing parsley in a city apartment are to create the required level of illumination, humidity and temperature.
The plants will not die in the shade, but you should not even expect a satisfactory harvest. The leaves will be frail, pale and tasteless. It is important that daylight hours at any time of the year last at least 12 hours, and preferably 14. For additional illumination, it is necessary to install fluorescent or diode lamps, phytolamps. You will need to turn them on in the morning and evening, and in cloudy weather during the day. In the summer, boxes of parsley can be taken out onto the balcony.
Parsley can grow at any temperature; Leaves grow most intensively at room temperature. If during the day the temperature on the windowsill is less than 16...18 oC, it is better to find another place for the box. The worst thing is if the roots are cold: in this case, the container with the plants is placed on a piece of foam plastic, foil or other material that protects the parsley from the cold windowsill. Too high a temperature (more than 24 ° C) is also undesirable: in this case, especially without lighting, the leaves will be greatly stretched.
Air humidity is a less significant factor, but if there is a radiator nearby, excessive dry air will prevent the leaves from developing normally. In this case, you need a household humidifier or at least a bowl of water placed next to the box.
Features of growing parsley on a window
When choosing a method for growing parsley on a windowsill, you should take into account that sowing seeds is a longer process, allowing you to get the first harvest 1.5-2 months after sowing. The advantage of this method is the ability to obtain fresh herbs for a long time.
Planting with root vegetables is an easier way. The harvest can be used much earlier. In addition, there is confidence in the variety of parsley, while when sowing seeds you can only rely on the inscription on the bag. The disadvantage is that the soil is quickly depleted and it becomes necessary to replace it or replant the plant in a new pot.
Helpful information
Daria Vorontsova
Amateur gardener. He is interested in growing various greens at home.
One of the prerequisites for growing parsley from seeds is thinning out the seedlings. The interval between them should be at least 3-4 cm. Root crops can be planted in a pot almost close to each other.
With any method, drying out of the soil is unacceptable. Excess water from the pan must be drained. After watering, to avoid the appearance of a dense crust, the soil should be loosened. It is recommended to cut off not the first sprouts that appear, but to wait until the plant has strengthened. If you want to grow parsley all year round, in summer in good weather you can move it to the balcony.
Reviews
Mikhail, 44 years old:
After harvesting, we plant parsley in the greenhouse so that it does not sit idle. It grows quickly and produces a good harvest. As a result, we always have fresh and tasty greens on the table.
Evgeniy, 38 years old:
I plant parsley in the greenhouse from autumn to winter. I like this method because in the spring I can get fresh greens several weeks earlier than with conventional cultivation. At the same time, minimal care is required for plants.
Growing parsley from seeds
Step-by-step algorithm for growing from seeds:
- Wet the seeds and leave to germinate for several days;
- Place drainage at the bottom of the container;
- Pour the soil mixture on top and lightly moisten it;
- Make grooves in the ground no more than 0.5 centimeters deep;
- Sow seeds in the furrows and sprinkle with a small amount of soil;
- Moisten the soil with a spray bottle;
- Place the container in a warm place;
- Water regularly with warm water;
- Thin out the first shoots and place the container on the windowsill;
- Provide additional lighting;
- Start harvesting.
The process of growing from seeds is quite long. From sowing to harvest it takes about one and a half months. Another growing option is hydroponics. With this technology, the seeds are placed directly into a special substrate.
Rules for harvesting and storing crops
The first leaves can be plucked a month to a month and a half after the seeds germinate, but the real harvest grows in another month. The leaves by this time are at least 10-12 cm high. Cut them off as needed, but no more than 1/3 at a time. When cutting, stumps 1-2 cm high are left. If you cut a lot of leaves at once, it is advisable to feed the plants. The number of possible cuts depends on the variety of parsley and the growing conditions. Even with mass cutting, if properly cared for, there can be at least three of them.
It is better not to store fresh produce for a long time, but if necessary, unwashed leaves in a slightly opened plastic bag can be kept in the refrigerator for 5-7 days. Excellent ways to prepare parsley leaves are freezing and drying.
A variety of greens are grown on the windowsill, and parsley is no exception. Green leaves straight from the home garden will decorate the dining table and diversify food at any time of the year, without causing much inconvenience to the apartment owners.
Growing parsley from roots
Step-by-step instructions for growing from root vegetables:
- Place drainage on the bottom of the container;
- Sprinkle soil mixture on top;
- Using scissors, trim off any existing greenery on root vegetables;
- Plant the roots in the ground so that they protrude slightly above the surface;
- Sprinkle water on the soil when planting;
- Place the pot on the windowsill;
- After three weeks, start harvesting.
Helpful information
Daria Vorontsova
Amateur gardener. He is interested in growing various greens at home.
The length of the rhizomes should not be too long - no more than 5 cm. The excess should be trimmed, not forgetting to leave the apical bud.
How to plant roots
To combat white rot, it is useful to pollinate the roots with chalk before planting. If they are too long and do not fit into the planting container, then their ends can be cut off. In this case, they are planted 2 days after the procedure so that the sections have time to dry. For forcing, a container with a height of 13-15 cm is usually sufficient.
In order not to cut off large roots, when planting, you can place them in the ground not vertically, but at an angle, i.e. in an inclined position. Then they will require less space.
Place a 1.5 cm layer of drainage at the bottom of the planting box or pot, and moist soil on top of it. You can plant it in dry soil, but then it will need to be watered well after planting so that the water reaches the very tips of the roots.
Root crops are planted at a distance of 3-6 cm from each other and 5-12 cm between rows. They are buried in the ground almost to the very top, but the head is left open. The top of the soil is sprinkled with ash or dry sand.
Plant care
Simple rules for caring for the plant will help you grow a bountiful harvest. First of all, these include watering and fertilizing.
Watering
The plant will produce abundant aromatic greens when the soil is moist. When watering, water must penetrate the entire depth of the soil layer. Residues will end up on a tray placed under the pot. On sunny days, watering should be done in the morning or evening, when the heat subsides.
Measures should be taken - if there is too much water, the roots will begin to rot, and if there is not enough water, the foliage will turn yellow.
Before the first shoots appear, spraying should be used so as not to wash away the top layer with the seeds in it. Use settled water at room temperature for irrigation. Watering frequency is 2-3 days.
Top dressing
When planting, fertilizers are added to the soil mixture. If the leaves become yellow and weakened, this indicates that there are not enough nutrients. The mineral complex should be added after cutting the leaves.
- After applying fertilizer, you should not cut off the leaves for consumption for a couple of weeks.
You can feed them with fertilizers made up yourself from nitrogen, potassium and phosphorus, or buy a ready-made product, for example, “Growth”.
Care after landing
Growing parsley on a windowsill requires simple steps.
To get a bountiful harvest of vitamin leaves, you need:
- Watering. The soil in the box should be kept moderately moist at all times. Drying of the top layer is a signal about the need for watering. Take settled water at room temperature. In summer you usually have to water parsley twice a week, in winter 2-3 times less often. Excess water can cause rotting of the roots; too little water can cause yellowing of the leaves. In the first weeks after the emergence of seedlings, water carefully, along the walls, since at this time the seedlings are very fragile.
- Loosening. Periodically, the soil is slightly loosened. To do this, you can use a special tool, or, if you don’t have one, even an ordinary kitchen fork.
- Thinning. Parsley seeds germinate unevenly, which is why they are sown in excess. As soon as the seedlings get stronger, the excess ones are obviously removed. As they grow, the following ones are pulled out; they can already be eaten. At the age of 1-1.5 months, an interval of about 15 cm is left between plants.
- Feeding. If the seeds are sown in fertile soil, you can do without fertilizing. But yellowing of the leaves under normal conditions may indicate a lack of nutrition. In this case, after cutting off the main part of the leaves, the parsley is fed with complex mineral fertilizer, adding half the dose recommended on the package. After feeding for 2-3 weeks, you should not cut off the growing leaves.
Parsley, both in the garden and on the windowsill, gets sick very rarely. If not properly cared for, it can be affected by fungal diseases such as powdery mildew, which can be combated with the help of Fitosporin. In the event of pests (for example, aphids), one must beware of using insecticides, making do with folk remedies.
Diseases and pests
Improper care can cause plants to be damaged by fungal diseases. These include powdery mildew and white spot. Treatment with the biological product “Fitosporin” will help to cope with them. The main pest of parsley is aphids. At the first sign of its appearance, the leaves should be sprayed with Fitoverm. After treatment, parsley leaves should not be eaten for the period indicated on the product packaging.
Powdery mildew
Aphid
Fitosporin
In the future, watering, temperature and other conditions should be adjusted.
Selecting a type and variety
Parsley is divided into root and leaf. The first species has an underground part in the form of dense, thick roots. They are used as a seasoning for canning vegetables and making sauces. The green part of the plant is also used for culinary purposes, but only after the roots have ripened.
The most delicious varieties of this group:
- Sugar;
- Spicy;
- The final;
- Konika;
- Alba.
In leafy varieties, only the green part is eaten. She has a very delicate taste. Such bushes grow up to 50 cm in height and the width of the plant is up to 30 cm. Leaf parsley is consumed raw, dried or frozen. The following varieties are popular from this group of spices:
- Aster;
- Bogatyr;
- Breeze;
- Carnival;
- Rosava;
- Appetizing;
- Green crystal.
Is it possible to grow dill, onions, parsley at home in winter?
Maxi
You can add as many onions and parsley as you like from bulbs and root vegetables, but it’s better not to sow dill, because it stretches out from lack of light and there will be almost no leaves on it, just a stunted stem. You can plant garlic, root vegetables, beets, and celery on greens. The greens grow well and are enough for salads, especially for children. That's about it.
Yulyashk@
Why not
Elena Schmidt
Yes
Nikolay Tsuprunov
You can, you need boxes with fertile soil and additional lighting.
EkaterinaNemchinova
Certainly
Elena Zubkova
Yes
Tatiana Vedenina
Since the fall I have been planting a few roots of parsley on the window. Leaves all winter. I periodically plant turnips on a feather. 2-3 harvests. Dill is difficult to germinate and is better to buy.
Olga
Place containers with soil on the windowsill, sow and water and everything will grow
Kitty
In principle, it’s possible. But even on the south window these will be thin threads. It is better to transfer the roots of parsley and chard from the garden for the winter. And leaves will grow. Melissa from the garden grows well on the window.
Elena Gubaidullina
it is possible and necessary! Fresh herbs on the table are good! vitamins!
Sonrisa
Only onions. Don’t bother with perch and especially dill, nothing will happen. The result is skinny strings even from the roots of the parsley, and it’s not even worth talking about the seeds. I have south windows. In the photo (from the Internet) all this is growing, but there is a lamp there! If you want to install all this, there will be results.
Lyubov Bazhenova
Svetlana Golubeva
Of course you can, I have had a “green garden” on my windowsill since the end of autumn, all winter and the beginning of spring
How to grow greens in winter at home?
We have tried many times to grow parsley and dill at home, but it doesn’t work.
ivan785
I’ll tell you everything in more detail now!!!-
I'm starting to tell -
do everything as I say-
To grow parsley and dill at home you need:
first, good land bought in a store;
secondly, you will also need fertilizers, although not like manure and others, but mineral fertilizers are sold in the store!
third, if you are planting dill and parsley, you must first soak the seeds for one day, and then plant them, they will grow faster (if you need them to grow faster);
fourth, when you start planting, you don’t need to cover the seeds with soil, you don’t need to cover the seeds too much (so that the house will grow), you can cover them a little;
fifth, when you planted the seeds, you need to cover them so that they germinate better and faster (cover with a simple white bag);
sixthly, you planted, watered the seeds, covered them and wait for them to grow (you don’t need to water anymore, when they just grow, and when the soil is dry)
they grow quickly, that's all, the method is proven!
try my method, I checked it myself, I have been working with land and gardening for 12 years!!!
everything has been checked, I won't lie.
Volna-luna
We grow it every winter. First, we soak the seeds on a plate on a napkin, and when the sprouts begin to appear, we transplant them into a box on the windowsill. They grow well. But with onions there are no problems at all. We plant the bulb in a glass of water, again, as soon as the roots emerge from the bottom, we transplant it into a box. Greenery all year round.
Slivka
I recently did a kind of home experiment.
I bought it at a kiosk where they sell seeds - parsley seeds, light soil, drainage and a large plastic tray.
I came home and immediately rushed to set up my winter garden, or home garden.
I did everything as the seller advised - I poured drainage and soil, planted the seeds superficially, sprinkled them with water, covered them with cling film and waited...
I didn’t soak the seeds... A week passed and the first white sprouts appeared. Soon I will cut the harvest and treat my family.
Lenore
Every winter I grow oats, wheat, dill and parsley for the rabbit. In principle, everything is the same as in the summer, only you can either sprinkle sawdust on top of the ground or even grow it in sawdust instead of soil, which will result in even more seedlings. The main thing here is that mold does not start from moisture.
ivan785
Hello! Can I ask you a question? Please tell me how do you grow them? and what do you want to grow at home?
Growing dill in a greenhouse
To prolong the production of dill, its sowing on the allotted area is carried out in several stages with a gap of 10-12 days or used as a compactor for onions (by changing the planting pattern of the bulbs), lettuce, Chinese cabbage and other crops.
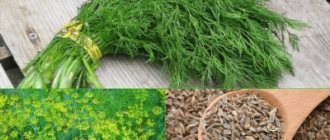
Preparing dill seeds
To quickly produce greens, dill is sown with sprouted seeds. To do this, 3-4 days before sowing, wrap the seeds in double gauze. Soak in water 40-50 °C. This technique is necessary to remove essential oils from the surface of the seeds, which will speed up the emergence of seedlings and more uniform growth of seedlings. During soaking, change the water once a day, and rinse the seeds thoroughly under running water. At the end of the 3rd day, spread the seeded seeds on a dry napkin to dry.
Dill varieties for the greenhouse
It is most rational to grow early ripening varieties in a greenhouse for forcing for a family.
- Aurora (cut greenery on the 25th day from germination),
- Gribovsky (cutting greenery on the 30th day from germination),
- Far (cut on the 38th day from germination).
Over the course of a month, they form fragrant, juicy greens, which must be removed immediately, since the plants then begin flowering without interruption.
Rack in a greenhouse for winter growing of greens. © thinmac
Preparing the soil for dill
Dill is undemanding to the soil, therefore, as a compactor, it grows and develops normally in the substrate of the main crop. When growing separately, forced dill is sown in a separate container - a container or box. Mix the soil with peat, humus, vermicompost, sand, and any other baking powder to increase water and air permeability. In heavy, dense soils, dill roots begin to rot, the plant becomes sick with powdery mildew, and treatment with drugs is not recommended.
Further preparation of the soil, as for onions. Add to the substrate per 1 sq. m area of boxes of 20 g of urea and 15 g of potassium sulfate, can be replaced with wood ash. Mix thoroughly with soil and water. The soil under dill should be constantly loose, for greater access to oxygen.
Sowing dill
In the prepared moist soil, we make grooves 2 cm deep every 12-15 cm. We sow the seeds line by line and sprinkle them with a small layer of soil. Most often, a single-line sowing scheme is used, but you can sow using a belt method in 3-5 lines. In this case, the distance between the grooves in the tape is 8-12 cm, and between the tapes is 15-20 cm.
Hydration
For dill, constant soil moisture is optimal (without excess moisture, as the greens will be watery and may get sick). Before germination, the soil is moistened daily with a sprayer. With the emergence of seedlings, the seedlings are watered once every 5-7 days with a moderate amount of water when the top layer of soil dries.
Top dressing
Fertilizing is carried out twice before the first cutting: nitrophoska 15-20 g/sq.m. area of boxes or fertilizer solution used when sowing seeds. After large cuttings, the remaining 5-10 cm of “stumps” are fertilized with an ammonia solution of 10-15 g/10 l of water. If cutting is done selectively (for the family), then no more fertilizing is done until the final harvesting of greenery.
Temperature and light conditions
Dill is a fairly cold-resistant crop, so we maintain the air temperature in the greenhouse at 15..18 °C without drafts. It can be placed closer to the doors. Dill is so unpretentious that it can tolerate cultivation in shaded areas. When growing in boxes on racks, we additionally illuminate with phytolamps only the lower racks, where the highest shading of the plants is observed.
Harvest
In order for the bushes to be leafy, dill needs sufficient area for nutrition. Therefore, at a height of 10 cm, we thin out the crop by carefully pulling out the plants by the roots or pinching them off at soil level. The plucked plants can be replanted or used for food.
Greens in the greenhouse
What plants can be turned into greenery?
You can drive out all the plants whose greenery we love to feast on in the spring. Many people include healthy young radish tops for soups or beet and carrot leaves, which are especially good as an alternative to pesto. And in winter, it is even more worthwhile to use all the useful parts of the plant for a healthy diet. And the leaves are all the more valuable because they contain almost the same set of useful substances as mature root vegetables.
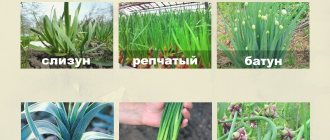
One type of forcing - onions for greens - is definitely familiar to everyone. But you can harvest not only onions, but also other edible onions, garlic, parsley, celery, parsnips, carrots, beets, radishes, radishes. And if you dig up the roots for the winter and replant them in pots, even rhubarb, lovage, wild garlic, mint, lemon balm, kale, and chard can be successfully grown on the windowsill. But, of course, greens are usually distilled from the simplest “material” - root vegetables.
You can use your own harvest, purchased vegetables, and “waste” - a trifle that makes no sense to store. The main thing is that root vegetables and onions have an undamaged, uncut apical bud. And if root vegetables and onions suddenly sprout at home, or you notice vegetables with sprouts on the counter, then they are the first candidates for forcing vitamin greens. Of course, only healthy, large root crops without signs of pruning or damage are suitable for forcing.
For all “long” root vegetables (parsley, carrots, parsnips), the minimum diameter for forcing is 2 cm, for round ones - 5 cm. There is one exception: with beets you can get tasty leaves even from the smallest specimens.
Celery goes through a dormant period in the refrigerator before forcing
Business costs
- Construction and equipment of a greenhouse. Everything will depend on your starting capital; you can build a greenhouse yourself or purchase a ready-made version;
- Purchase of seed material. Dill and parsley seeds are inexpensive. In the future, you can collect seeds and no longer spend money on purchasing them, continuing to grow greens;
- Purchase of fertilizers. To get a good harvest, you need to take care of proper fertilization and protection of plants from pests.
Disadvantages of a greens growing business
As with any type of income, there are also certain disadvantages.
Firstly, cut greens cannot be stored for a long time and require immediate sale. Therefore, it is so important to establish a good distribution channel for finished products.
Secondly, there are difficulties with growing dill and parsley in the cold season. If you want to make your business year-round, then you need to equip a greenhouse for growing greens in winter. Although these are additional costs, believe me, they will quickly pay for themselves with a skillfully established distribution channel.
Video on the topic
How to choose the right dill variety
If you decide to grow dill on the balcony, growing the earliest varieties of this plant will be a mistake: such varieties are characterized by the rapid formation of flower stalks and a very small amount of edible foliage. Late varieties of dill, which are not popular with gardeners because they often do not have time to ripen in the garden beds, are almost ideal for winter gardens on balconies and loggias, where the main goal is to obtain a large amount of fresh herbs.
How to grow dill on the balcony yourself
Late-ripening varieties of dill include, for example, Salyut, Gurman and Russian size. Many of those who are interested in how to grow dill on the balcony in summer or winter would like the greens to ripen not all at once, but one at a time. To do this, it is enough to plant both early and late varieties at the same time. When grown on a balcony, early, unpretentious varieties of dill grow well, producing their first green harvest even when the later ones are just beginning to actively grow. The most common varieties of this plant include Grenadier, Richelieu, Kibray and Gribovsky dill.
There is another reason for germinating varieties of dill with different ripening times on the balcony: if sudden temperature changes turn out to be too frequent, then there is a high probability that at least one of all planted types of dill will be more resistant than the rest and will survive the force. major conditions.
Video tips from a famous TV channel
- Author: Mikhail
Rate this article:
- 5
- 4
- 3
- 2
- 1
(0 votes, average: 0 out of 5)
Share with your friends!
Gourmet test: guessing iconic Soviet products
How is sorrel forced in a greenhouse?
Soil for growing greens
In order for greenery to feel good on the balcony, you need nutritious soil, saturated with the micro- and macroelements it needs, making up for the lack of those that greenery growing in open ground receives under the influence of sunlight. It is optimal to purchase a universal soil mixture for this and mix it in equal parts with ordinary garden soil.
To prevent water from stagnating in the containers with beds, a three-centimeter layer of coarse-grained sand should be placed on the bottom of each of them. On top of the sand you need to lay the same layer of expanded clay, and then fill the resulting drainage with no less than a ten-centimeter layer of fertile soil.
We grow dill on the windowsill with our own hands
Experienced gardeners recommend installing boxes with soil on foam stands, which, as when using foam plastic in construction, will prevent the greenery from overcooling. If it turns out to be too cold on the balcony in winter, you can also insulate the side surfaces of the containers with polystyrene foam.