Tomato Cosmonaut Volkov is a famous variety among gardeners. It is distinguished by large fruits of excellent taste, rich in vitamins and nutrients. This culture has been tested by time and occupies an honorable place not only in the list of popular domestic varieties, but also in the hearts of gardeners. Despite numerous new products, the variety is in great demand in markets.
The article will reveal the secrets of productivity and introduce you to competent agrotechnical techniques that will undoubtedly help grow healthy plants with a decent harvest.
Characteristics and description of the variety
The unusual name of the variety was the result of strong friendships. Russian cosmonaut I. N. Maslov, having retired, took up gardening. As a result of his hard work, a tomato was born, which Maslov named in honor of his best friend, pilot-cosmonaut Alexander Aleksandrovich Volkov, who tragically died in 1971 in the accident of the Soyuz-11 spacecraft.
Distinctive features
The type is indeterminate, tall, up to 2 m high. The first cluster is tied above the 9th leaf, the subsequent ones - every three leaves.
A mid-early variety, it takes 110-120 days from the first shoots to full ripening.
The productivity is high, up to 7 kg of fruits are harvested from 1 seedling, provided that no more than 3 plants are planted per 1 square meter. m.
The variety is distinguished by its stable immunity to many dangerous diseases of the nightshade family. Recommended for cultivation in open and protected ground, perfectly adapted to any climatic conditions.
The culture requires obligatory staking and pinching of tall bushes.
Fruit characteristics
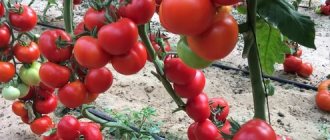
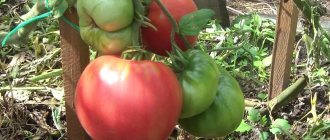
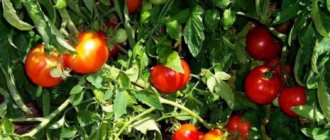
The fruits are large, with an average weight of 500-650 g. The vegetables on the lower branches are the largest, their weight reaches 800 g. The shape is round, strongly flattened on top, the color is bright red. The taste is excellent, sweet, harmoniously combined with sourness. The pulp is juicy and fleshy. There are 6-7 seed chambers.
The purpose is universal: tomatoes are suitable for preparing fresh dishes and winter preparations. Ripe vegetables are processed into juices and ketchups. Despite their large size, the fruits are stored for a long time without loss of quality. Tomatoes also withstand long-distance transportation very well.
The photo shows Cosmonaut Volkov tomatoes.
Description of tomatoes Cosmonaut Volkov
The tomato in question is part of the group of large-fruited indeterminate type tomatoes. Long-time gardeners remember it from the 80s of the last century. Despite the fact that the tomato is not registered in the State Register, it has gained recognition among amateurs and was also grown on an industrial scale in vegetable farms.
The variety is distinguished by a powerful, tall bush and large foliage. In a greenhouse, tomato bushes reach 2.3-2.5 meters, when planted in open ground - 160-180 cm.
Ripening time is 110-115 days; it is advisable to pick the fruits unripe and then ripen them indoors. The tomatoes are large, fleshy, average weight - 350-500 grams. When forming clusters (removing excess flowers), specimens weighing 600-900 grams are obtained.
The shape of the fruit is round, slightly flattened, there is slight ribbing in the area of the stalk. The skin is dense, the color is bright red, the flesh is sugary and sweet. The taste of tomatoes is excellent, balanced, and this is noted by gardeners from various regions.
On a note ! The characteristics and description of the variety will be incomplete without information about the seeds. It is advisable to buy seed material from trusted suppliers or reputable collectors, as there are a lot of mismatches or fakes.
Consumption of fruits - fresh, use for salads, slicing. Such juicy and fleshy tomatoes produce excellent juice and thick, aromatic tomato paste. Only small fruits are suitable for preservation (usually formed on the upper tiers), but there are very few of them.
Fruit
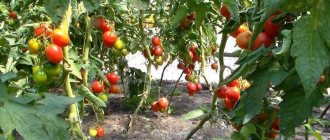
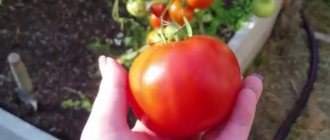
Tomatoes are large, on average weighing 300-400 g, diameter 10-12 cm or more. There are specimens up to 800-900 g. The surface has pronounced ribbing, glossy, rich red or pink. Cosmonaut Volkov tomatoes have an oval shape with a noticeable flattening at the top and bottom. There are 5-6 seed chambers, there are few seeds in them. It can be collected because it is a variety and not a hybrid - therefore, the new offspring will also bear fruit.
The pulp is very tender and juicy, dense, fleshy consistency, not watery. The taste is excellent - many rate these tomatoes as “excellent”. There is a balance of sweet and light sour notes, and a pleasant tomato aroma.
Cosmonaut Volkov tomatoes are very large, with an interesting taste and aroma
Important! The largest tomatoes appear at the bottom of the bush. To prevent them from bending it to the ground, the plant is tied to a support.
Application area
Thanks to their excellent taste and juiciness, these tomatoes can be consumed straight from the plant, in any dish (sauces, soups) or sent for processing:
- tomato juice;
- paste;
- mashed tomatoes;
- lecho, horseradish, adjika and other preparations.
Tomato types in general are not suitable for canning because they are too large.
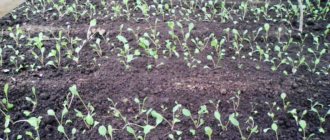
How to grow seedlings
Sowing of seeds begins 2 months before planting seedlings in the ground. Seed material is purchased in specialized stores or prepared independently. Purchased seeds do not require processing. Only those grains that were collected independently undergo special preparation before sowing.
Seed preparation
The seed material is checked for suitability by placing it in a saline solution for 10 minutes. Those that float to the surface are empty, they are disposed of. Afterwards, the seeds are placed for 20 minutes in a weak solution of potassium permanganate. Thus, the grains are disinfected. After disinfection, they are washed with running water.
To improve germination, grains are germinated on damp gauze for 2-3 days. The place for germination is chosen dark and warm, with a temperature of at least 26°C. As the gauze dries, lightly moisten it with warm water. After the first sprouts appear, the seeds are sown in the ground.
Container and soil
The soil is prepared from garden soil mixed with humus in equal quantities. To make the soil lighter, washed river sand is added as a loosening agent. After thoroughly mixing all components, the soil is disinfected to destroy pathogenic flora.
To do this, pour it with a hot solution of purple potassium permanganate or steam it in the oven for at least 15 minutes at a temperature of 50°C. The cooled soil is laid out in planting containers, having previously made small drainage holes at the bottom so that excess moisture drains into them.
Plant in a common wooden box or in separate containers. From individual containers, peat pots are preferable, as they simplify further care.
Reference . The walls of peat pots feed the young roots with additional beneficial substances throughout the entire period of seedling growth.
Sowing
The seeds are sown in grooves 2 cm deep, sprinkled with soil on top and watered generously with warm, settled water along the edge of the containers. Then the containers are covered with film or glass and left in a warm and dark room at a temperature of 22-24°C.
Further care of seedlings
When seedlings appear, the containers are moved to a well-lit place, on the windowsill . The duration of daylight hours is at least 13 hours. If there is a lack of natural light, add phytolamps.
Water the soil as the top layer dries out with warm, settled water, without flooding the seedlings. For watering, use a small watering can or a regular tablespoon. Afterwards, the soil is loosened, thereby improving the penetration of oxygen. To accelerate the growth of seedlings, add a Nitrophoska solution to the watering.
When 2 true leaves appear, the seedlings are picked and placed in separate containers. The picking procedure involves removing the main root by one third. During picking, weak and non-viable plants are disposed of. If the seeds are sown in peat pots, picking is not required.
Reference . Diving helps to strengthen the root system, since after the procedure the lateral roots are intensively built up.
2 weeks before transplantation, young plants begin to harden, thereby helping to adapt to new conditions. To do this, the containers are taken outside in the daytime for 1 hour, gradually increasing this interval to 11-12 hours. At the same time, the night temperature is reduced to 13°C.
Terms and rules of transplantation
In May you can plant seedlings in the ground
The optimal time for transplanting to an open garden bed is mid or late May, depending on climatic conditions. It can be planted in a greenhouse in the first ten days of May.
Before planting, the seedlings are hardened off for a week - taken outside on sunny days and kept for 40-60 minutes. For the last 24 hours, they are left to spend the night in the fresh air under cover.
Preparing the site
This is a heat-loving crop, so it needs to be planted in a sunny place, where there are no strong winds and stagnant moisture.
The bed is prepared in the fall - a bucket of last year's manure (compost), 3 kg of ash, 100 g of superphosphate and potassium nitrate are added to 1 m².
If you plan to plant on loamy soil, you can add a couple of buckets of sand.
To reduce the acidity level, the area is additionally sprinkled with slaked lime, chalk or dolomite flour - 350 g are consumed per 1 m². After this, digging is carried out.
In the spring, two weeks before planting the seedlings, the area is watered with a urea solution (600 g per 20 liters of water). This fertilizer increases soil fertility and also destroys all pathogenic bacteria and microbes.
Scheme and technique
Dig holes according to the size of the root system of the seedlings at a distance of 50-60 cm from each other. The optimal distance between rows is 70 cm. 3-4 bushes are enough per 1 m².
Each hole is spilled with water, and after it is absorbed, bushes are planted. Sprinkle with soil, compact in the stem area, and mulch with peat to avoid rapid drying out of the soil.
In the first 3-4 days, tomatoes should be covered from the scorching sun with burlap or agrofibre, and at night with film to protect them from freezing.
How to grow tomatoes
After 2 months, the seedlings are ready for planting in the ground. The soil is prepared in the fall - dug up and fertilized with compost. If the soil is clayey, it is diluted with sand and humus, since tomatoes love light and fertile soil.
Landing
For 1 sq. m place no more than 3 plants in a checkerboard pattern. This method of planting allows each bush to receive sufficient sunlight and be regularly ventilated.
The seedlings are transferred into holes 20 cm deep along with a lump of earth. Then the holes are covered with soil and watered abundantly with warm, settled water. Full care begins after 2 weeks, when the young bushes finally adapt to the new conditions.
Reference . There is no need to replant seedlings from peat pots. They are lowered into the hole along with the container. The pots dissolve in the ground without causing harm to the root system, and continue to feed the roots with useful substances.
Further care
Regular watering is established once a week. Water abundantly - at least 5 liters of warm water for each bush . This regime is maintained until budding begins. After the buds appear, water more often, once every 4 days, using 3 liters of water for each seedling.
When the fruits ripen, do not stop watering, as this can lead to cracking of the vegetables. For irrigation, water is collected in a large container exposed to the sun. Within 2-3 days the water is heated and settled.
After each watering, the soil is loosened, removing all weeds with roots. To retain moisture in the soil, the beds are mulched with peat.
Reference . In addition to the necessary agricultural practices, loosening and mulching beds serve as preventive measures in the fight against fungal diseases and many pests.
Throughout the entire growing period, the Cosmonaut Volkov tomato variety constantly needs feeding. Before the budding period, it is fed with nitrogen fertilizers: mullein infusion, herbal infusion or urea. Plants should be watered only with highly diluted organic matter, otherwise the root system will receive a serious burn. The optimal dilution ratio is 1:15.
During the formation of ovaries, potassium-phosphorus fertilizers are used as fertilizers. There is no further need to add nitrogen, since oversaturation will lead to the growth of green mass, which will negatively affect fruiting. For tomatoes, fertilizing with wood ash is useful, which is added to watering during fruit ripening.
Features of care and possible difficulties
The height of the plants requires staking. It is most convenient to tie tall bushes to a trellis. To do this, supports are installed on different sides of the bed and wire is pulled between them. The stems and branches of plants are fixed to a horizontally stretched wire. If there are few bushes, they are tied to wooden stakes installed next to each seedling during transplantation.
If the crop is planted in a greenhouse, it is necessary to ensure good lighting. A lack of light will negatively affect the growth of seedlings, which will stretch towards the ceiling of the greenhouse. In this case, the thin and fragile stem will not be able to provide the developing fruits with the necessary nutrients, and the yield will be significantly reduced.
How to build a trellis for tall tomatoes. We tie up the tomatoes
Attention ! The indeterminate type has no growth restrictions, so in mid-July the tops of the plants are pinched, thereby marking the growth point. Otherwise, the bush will not be fully formed.
Plants are planted once a week, forming 1 or 2 stems. All excess shoots are removed, preventing them from consuming the nutrients needed by the developing fruits. Late brushes, despite the ovaries forming on them, are cut off. In any case, tomatoes will not have time to reach technical maturity, but they may well cause the spread of fungal infections.
Diseases and pests
Improper watering and temperature violations contribute to the development of brown spot (cladosporiosis). This is a fungal disease, the preventive measures for which include systematic loosening, moderate watering, removal of weeds and regular ventilation of closed structures.
When plants are damaged, the preparations “Hom” and “Fitosporin” are used. Traditional methods also help, for example, an aqueous solution of iodine (40 drops per 10 liters of water), which is used to water well-loosened areas.
The most dangerous pest for tomatoes is the whitefly, a white moth that damages the leaves. The drug “Confidor” or pheromone traps installed next to the tomatoes help in the fight against it.
Greenhouse spider mites are repelled from bushes by a soap solution that is sprayed on plants, especially the affected areas. And regular ventilation of the greenhouse destroys the parasite’s usual habitat. But do not forget that tomatoes do not like drafts.
Constantly wet beds increase the risk of slug infestations. To prevent pests from around the tomato bushes, sprinkle the ground with ash or ground hot pepper.
Preventive measures and pest control
Despite the resistance of the Cosmonaut Volkov variety to various diseases, during an epidemic it is worth taking preventive measures. In addition, pests are not averse to eating juicy foliage and fruits. To preserve tomato plantings, you need to take the following measures:
- Malicious tobacco mosaic can completely kill the plant. If infected branches are found on a tomato, they should be cut off and burned. The wound on the plant is treated with a strong solution of manganese.
- As a result of mistakes made by the vegetable grower, brown spots appear on the tomato. This is due to improper watering or temperature violations. After regulating these actions at the initial stage, you can get rid of this disease. If everything is neglected and the tomatoes are severely damaged, you can try to save the plants by spraying them with chemicals. The last resort is to remove the affected tomato bushes.
- The whitefly is a nasty white moth that causes damage to tomato foliage. You can get rid of the enemy with the drug Confidor. A solution consisting of 10 liters of water and 1 ml of the drug is sprayed on tomato plantings. This volume is enough to treat an area of 100 m2.
- Tomatoes growing outdoors are at risk of spider mites. A regular soap solution will come to the rescue. Tomato bushes are sprayed with it, and severely affected areas can even be washed.
- If there is often dampness under the bushes, there is a possibility of slugs appearing. The method of struggle is simple. Ash or ground hot pepper is scattered on the ground around the tomato bushes.
It is better to protect yourself from any pest or disease using preventive measures. In advanced cases, no medications can help.
Nuances for greenhouse conditions and open ground
Difficulty in care arises due to the large size of the bush . You have to build a trellis to which the stem and branches of the plant are tied. It is not always possible to tie up all the branches. Additional supports are often required for heavy bunches of fruit.
The lower branches are the least convenient for fixation. Vegetables of the greatest weight ripen on them, which bend the fruiting clusters to the ground. If these branches are left unfixed, constant contact of vegetables with wet beds will cause them to rot and increase the risk of developing fungal infections.
Tomato does not like frequent watering; it is better to water less often, but abundantly. Incorrect watering regime affects the quantitative indicator of fruiting. In addition, ripe vegetables may have a watery taste.
When planting in a greenhouse, the top layer of soil must be replaced every season. Larvae of insect pests and pathogenic spores successfully overwinter in the ground, which begin to develop in the spring, causing harm to healthy plants. The introduced soil must be disinfected by spilling it with a solution of potassium permanganate and treating it with copper sulfate.
According to the rules of crop rotation, tomatoes are planted in the same soil where legumes, cabbage, zucchini, and winter crops previously grew. After them, the soil is not depleted, but, on the contrary, is filled with nitrogen, necessary for the full development of tomato crops.
Planting tomatoes Cosmonaut Volkov for seedlings
The Cosmonaut Volkov tomato variety is perfect for growing seedlings.
Sowing time
Tomato seeds for seedlings should be planted in early March or late February. Planting time depends on the weather and conditions of each individual region. If the weather permits, you can plant the seeds earlier than the specified time.
Landing capacity
Any container must have drainage holes
Different containers are used for sowing:
- seedling boxes or plastic containers 10-12 cm high;
- disposable cups or peat pots with a volume of 400 ml;
- cassette.
The main condition for the planting container is the presence of drainage holes for the drainage of excess moisture, otherwise the soil will become moldy, and with it the young shoots.
Priming
This garden crop likes to grow in light and loose soil with a neutral acidity level. For better growth and development, organic and mineral fertilizers are added to the soil. Spend 1 tbsp per bucket of soil. l. superphosphate and potassium sulfate, 500 g of wood ash, 2 kg of humus (compost), ½ bucket of sand.
Before placing it in a planting container, the soil is disinfected in any convenient way - a strong solution of potassium permanganate, poured with boiling water or steamed in the oven at a temperature of 180°C.
Seed preparation
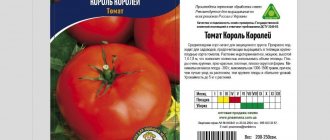
Seeds of the Cosmonaut Volkov variety can be purchased at any gardening store.
The main thing when purchasing is to pay attention to the expiration date, because... expired seeds have a low germination rate. On the seed packets, the manufacturer indicates the shelf life during which the seeds are guaranteed to germinate. If there is a date on the package, for example, “December 2022,” this does not mean that in January 2022 the seeds will no longer be viable.
You can also get seedlings from tomatoes grown on your own plot. They are separated from the pulp, washed and dried. Then they go through several stages.
- Rejection. You can select high-quality specimens that will produce good seedlings by pouring them into salt water for half an hour (10 g dissolved in 1 liter of water). All that float up are disposed of, and those that sink to the bottom are washed under clean water and dried.
- Then they are dipped in a solution of potassium permanganate for 30 minutes to destroy all pathogenic microbes on the surface. Prepare at the rate of 1 g of manganese per 1 liter of water.
- The washed ones are dipped in one of the growth stimulants - Epin, or Zircon. Soaking time - 40 minutes. After this treatment, the seeds germinate and take root better.
- 2 days before sowing, spread evenly on a damp cloth, irrigate with warm water, wrap and place in a cool, dark place for 48 hours. During the aging period, they need to be sprayed several times so that they do not dry out. Moisture will help them swell and hatch, which will speed up the germination process.
Tomato seeds must be germinated at a temperature not lower than +25 degrees. In a cool room this process will take a long time.
Sowing
The scheme and rules for sowing tomato seeds depend on the type of container used:
- when sowing in groups in boxes or containers, make grooves at a distance of 5 cm, then lay out the seeds, keeping a distance of 2-3 cm;
- Make a small hole in a disposable container and place 1-2 pcs. for one glass or pot.
Planting depth is 1-1.5 cm; if you sow deeper, the seeds will germinate later than usual, some of them may not germinate at all.
The seeds are sprinkled with a light, loose mixture of sand and garden soil (1:1), irrigated with warm water and covered with any transparent material (film, glass).
Conditions for germination
For quick and easy germination, the planted seeds are covered with film. The box with future seedlings should be placed in a bright place, but so that the sun's rays do not directly fall on it. You don't need to water much, just moderate watering to refresh the soil.
If all the rules are followed, the first shoots should appear 5-6 days after planting the seeds. The main thing is to properly process the seeds and follow the planting pattern.
Crop care
The speed of seedling germination depends on the conditions of detention. Seedling boxes are placed in a warm place with diffused daylight, ensuring a stable temperature within 21-23°C, humidity not higher than 60%.
Additionally required:
- daily ventilation for half an hour to avoid the formation of condensation and mold on the surface of the soil;
- irrigation with settled room water as the top layer of soil dries;
- weed removal.
After about 7-9 days, you can expect a massive appearance of sprouts. After this, the shelter is removed, and the containers with seedlings are placed on a southern or southwestern windowsill with the possibility of shading during the midday.
When sowing in groups, the sprouts need to be planted in separate pots. This procedure is carried out at the stage of formation of the first two true leaves.
First, the crops are watered abundantly; after an hour, each seedling is carefully removed and transferred together with a lump of earth into a container (a glass or a pot).
The resulting voids are filled with a nutritious soil mixture of ordinary soil and last year's manure (1:1). For better survival, seedlings are moistened, then with a urea solution (15 g per bucket of water). Consumption per sprout - 50 ml.
Hardening of seedlings
10-14 days before planting in the ground, seedlings need to be hardened, that is, prepared for more severe real conditions. To do this, the seedlings are transferred to a cooler room, so they get used to the drop in temperature, which should not fall below +8 °C. It is prohibited to harden seedlings in drafts and in places with direct sunlight.
When hardening, seedlings should be taken out into fresh air, but for no more than 30 minutes. The hardening process must be systematic. If all the rules are followed, the plant will be able to tolerate frosts down to -5 °C. A couple of days before planting seedlings in the ground, they need to be sprayed with a solution of copper sulfate, adding to it any biological preparations for fungal diseases.
Important! The favorable temperature for plant growth should be +22…+24 °C.
Harvesting and application
The harvest is harvested in August - late July. Ripening is amicable, with whole clusters. It is important to try to prevent the fruits from overripening, because the branches, despite reliable fixation, find it difficult to hold heavy vegetables.
The purpose of tomatoes is universal: tomatoes look great in a salad, complement the taste of first and second courses, and are good in vegetable stew. They make excellent freshly squeezed juice.
For canning and marinades, vegetables are used cut; for whole-fruit rolls they are too large. Tomato products (juice, paste, adjika, ketchup) give a rich red color and excellent taste, maintaining a sweetness that is harmoniously combined with sourness.
Ripe vegetables are stored for a long time and can withstand transportation over long distances. But the shelf life of the fruits is preserved only if they are properly cared for: abundant but not frequent watering, regular fertilizing and timely tying and pinching the tops of the plants.
Reference . The quality of the fruit depends on the care of the tomatoes.
Agrotechnics of cultivation
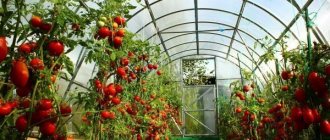
Tomato bushes of the “Cosmonaut Volkov” variety require obligatory gartering, as they reach 2 meters in length.
The “Cosmonaut Volkov” variety belongs to tall crops, so to get good results, the gardener will have to become familiar with all the features of its cultivation, and careful care will be required. Here are its features.
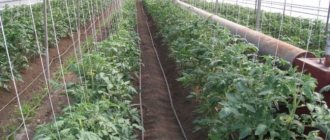
- Since the bushes grow to a height of up to two meters, the plant will need supports. In the greenhouse you need to build a structure consisting of trellises and ropes. The stems will need to be tied to them so that they do not break under the weight of their own fruits. In open ground, the height of the bushes will be smaller, but still the supports will not interfere - at least to protect the plant from strong winds.
- Another requirement for a greenhouse is to ensure normal lighting. If there is not enough light for the plant, the bushes will begin to reach for it. As a result, the trunk is formed too thin and weak.
- The crop is grown using the seedling method. You need to purchase plant seeds in advance and sow them in boxes or other containers two months before planting in the main place.
- You can plant seedlings in a greenhouse in the middle or even at the end of March. Seven days before planting, the seeds need to be hardened and also treated with the same potassium permanganate in order to protect them from diseases.
- When you plant seedlings, strive to keep the interval between individual bushes within 70 cm. This will allow them to grow more freely and provide protection from diseases.
- The depth of planting seedlings in the soil is 2 - 3 cm.
- You can pick seedlings if at least a couple of full leaves appear. It is also possible to plant them in separate containers.
- Around mid-July, the variety needs to be pinched. This way you will stop the rapid growth of the bushes and allow them to finally form. It is also recommended to cut off late clusters, which obviously will not have time to form before the main harvest.
- The crop should be watered infrequently, but abundantly, gradually increasing watering from the moment the ovaries form. The water should not be cold; watering should be done in the mornings or evenings.
- Every time after watering, open the greenhouse slightly and loosen the soil a little. This is necessary so that insects that will pollinate the tomatoes get inside. But since harmful insects will also enter the room along with beneficial insects, it will be necessary to carry out preventive measures from time to time to combat them.
You can start harvesting without even waiting for the fruits to ripen completely. Place them in a warm place where they will reach the required condition on their own. The harvest is good, all the tomatoes ripen at the same time.
Advantages and disadvantages
Despite some difficulties in care, tomato has numerous advantages:
- high productivity;
- possibility of breeding in all regions;
- resistance to dangerous diseases;
- mid-early maturation;
- the ability to prepare seeds yourself;
- excellent taste;
- large fruits;
- amicable maturation;
- versatility in cooking.
The disadvantages of this variety include:
- regular stepsoning;
- obligatory garter;
- regular feeding;
- mandatory watering regime;
- the influence of agricultural technology on the quality of ripe vegetables.
Specifics of planting tomatoes
It is recommended to grow Cosmonaut Volkov tomatoes using the seedling method. In this case, vegetable growers receive abundant harvests of healthy vegetables.
Preparing soil and seeds
Varietal tomato seeds purchased in specialized stores do not require additional processing or preparation.
If the seeds are obtained independently from the previous vegetable harvest, then the following measures are carried out before planting:
- Planting material is carefully sorted and calibrated, leaving only viable whole specimens for planting.
- Selected seeds are treated with antibacterial agents and growth accelerators.
- Next, the seeds are hardened and germinated. To harden, the planting material is wrapped in a damp cloth and placed in the bottom drawer of the refrigerator for 48 hours. After time, the seeds are moved to a warm room for germination.
- As soon as the first roots appear on the seeds, they are transferred to containers with fertile, loose soil.
- Before planting, the containers are thoroughly washed and treated with a manganese solution.
- A drainage layer of small stones is placed at the bottom of the boxes or pots, and a layer of fertile soil mixture is poured on top.
- The soil mixture for planting seeds is purchased at flower shops or made independently, combining turf soil with humus, peat and minerals.
Advice! To protect the soil from the development of fungi and viruses, the container with the soil is placed in the oven and heated for several hours at a temperature of 50-60 degrees.
Timing and technology of sowing
It will take 2 months to grow strong, healthy seedlings. Therefore, seed planting is planned for the end of winter or the first week of March. In containers with prepared soil, make grooves or holes no more than 1.5-2 centimeters deep. Seed material is placed in the planting holes, leaving a distance between seedlings of 2 to 3 centimeters. The seeds are dropped in with loose soil and moistened with a spray bottle. Containers with planted seeds are covered with film and sent to a warm room.
Growing conditions and seedling care
The first shoots appear 7-10 days after planting. As soon as the first plants appear, the covers are removed from the containers and sent to a room with good lighting. After 10-14 days, tomato leaves appear on the plants, which means the beginning of picking the bushes.
Each bush is transferred to a separate pot with fertile soil or large boxes, leaving a distance of up to 10 centimeters between plantings.
Caring for transplanted seedlings includes watering, fertilizing and observing temperature and light conditions. 2 weeks before planting tomatoes in open ground, the seedlings are hardened off. To do this, the bushes are taken out into a cool room for 4-5 hours or moved outside.
Farmer reviews
Reviews from those who planted the Cosmonaut Volkov tomato testify: this is not the variety with which you should start mastering the cultivation of tomato crops. However, experts recommend this tomato to experienced gardeners as a reliable large-fruited crop. Here are the opinions of some gardeners.
Irina, St. Petersburg: “I plant tomatoes in a greenhouse, and first I always fertilize the soil with humus. The seeds germinate well, the seedlings are strong and healthy. The variety pleased me with decent yield. The bushes grew up to 2 m. We managed to grow fruits of a record weight - 870 g. The taste is excellent, I prepared a lot of juices and salads for the winter.”
Vasily, Saratov: “In the photographs, the Cosmonaut Volkov variety of tomatoes is very tall, so I placed a trellis in the garden bed in advance. The tomatoes were regularly watered and fed with mineral fertilizers. The fruits turned out very large and tasty. Purpose: salad, too large for canning. The approximate weight of the tomato is 450 g. Next year I will plant again.”
Basic care
Caring for Cosmonaut Volkov tomatoes is simple and involves several manipulations.
Watering
This plant loves moisture, but in moderation - from a lack, the fruits are not so large, juicy and tasty, and from excess - watery.
The first moistening of the seedlings is carried out a week after transplanting to the garden bed. 1 liter of water is poured under the root of each bush. All subsequent waterings are carried out as the soil dries out.
Be sure to water tomatoes before flowering and at the stage of fruit filling - this will improve the quality of both processes.
Loosening and mulching
Regular weeding and loosening of the soil increases its moisture and breathability qualities, and this is important for the development of the bush and further productivity.
To protect against lodging and drying out after watering, the area under the bush is covered with garden soil.
As they grow, weeds are removed, which choke the plantings and provide an excellent breeding ground for pests and infections.
Formation
Bush formation increases productivity
To obtain larger fruits, they are formed into 3-4 stems. After the formation of the first brush, pluck out all the stepsons and leaves under it. As it grows, 2 or 3 stepsons are left above the flower brush, the remaining parts are removed.
Fertilizer
A balanced diet of organic and mineral fertilizers will help increase productivity and immunity against diseases. They are carried out according to a certain scheme.
- The first time - 3 weeks after transplanting the seedlings to the garden bed. Use a solution of urea or nitrophoska. 15 g of one or another substance is dissolved in 10 liters of water. 200 ml of liquid fertilizer is poured under each bush.
- The next feeding is applied at the beginning of the flowering period. Fertilize with a mixture of mineral components - 1 tbsp. l. superphosphate and potassium nitrate per bucket of water. Consumption per plant - 0.5 l.
- The tomatoes are fed the third time at the stage of fruit filling. Use the same composition and in the same dosage as in the previous case.
Additionally, you can carry out foliar nutrition with a solution of boric acid (0.2 g per 1 liter of hot water) - this will improve the quality of budding and fruiting. When everything has cooled down, irrigate twice - before flowering and after it.
History of selection and regions of cultivation
Tomatoes Cosmonaut Volkov appeared at the end of the last century thanks to the fruitful work of an amateur breeder. After completing his service in the space industry, I. M. Maslov took up professional gardening and breeding development. Thanks to many years of work, the former space engineer received a unique variety of tomatoes, which he decided to dedicate to the memory of his best friend, cosmonaut A. A. Volkov, who tragically died during testing.
The new variety of vegetable crop passed state registration and was included in the registers of vegetable crops in 2001 with a recommendation for cultivation in closed and open ground.
In the southern regions, tomatoes are grown in open beds; in cold climates, vegetables are planted in greenhouse conditions.