What are mini greenhouses with tablets for?
Many flower and vegetable crops grown in our area have a long growing season and do not have time to complete it in 2-3 warm months. Therefore, they are grown as seedlings, starting to sow seeds in February-March and planting them in the ground only after the likelihood of frost has passed. Of course, you can buy ready-made seedlings in the spring, but their price is much higher than the cost of a bag of seeds, and many gardeners like to care for their plants themselves from the very beginning. However, not everyone is able to even germinate a seed, much less get a strong and healthy seedling from it. The reason for this is not only a lack of experience, but also the inability to create suitable conditions.
Germination of seeds
What do seeds need to start growing? Moisture and warmth. During the germination period, air temperature and soil moisture must be constantly monitored, but there is not always time for this. What to do? The answer is simple: buy a mini greenhouse for peat tablets. The principle of its “work” is simple:
- Water-saturated tablets are installed in greenhouse cells;
- A seed is planted in each tablet;
Sowing seeds is done one at a time in each tablet.
- Greenhouse The tablet is covered with a transparent lid and placed in a warm place. The lid does not prevent the penetration of light, but retains heat and does not allow moisture to quickly evaporate;
- When the crops need to be watered, water is poured into a tray, from where the tablets take the required amount. Thus, the frequency of watering is reduced, and the nutrient substrate does not dry out.
As you can see, everything is simple and convenient. You can make a similar greenhouse with your own hands by simply pouring soil into any container and covering it with film or glass after sowing. But in this case, you will have to water from above, at the risk of washing away the soil from the seeds or not guessing with the amount of water.
Seedling care
When seeds begin to germinate, in addition to warmth and moisture, they will need a lot of light and nutrients. Our tablets will provide them with all this - miniature greenhouses are transferred to a windowsill or to a backlit rack, where young plants will be illuminated while continuing to be under a warm hood, and the nutrients dissolved in water that make up the tablets will allow you to do without fertilizing and fertilizers. What else is convenient for using this simple device:
- Often seeds germinate very unevenly, with an interval of several days. It becomes difficult to create ideal conditions for all seedlings growing in a common bowl. But if they are planted in tablets, they can be removed from the greenhouse “maternity hospital” and transferred to another without disturbing the seeds that have not yet sprouted.
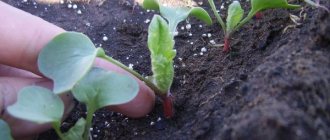
The photo shows that not all the seeds have sprouted yet.
- Many plants do not like moisture on their stems and leaves - they begin to ache and wither. Watering in a peat greenhouse is done from below - through a tray. The tablets absorb the required amount of moisture, which does not harm the seedlings in any way.
- The most crucial moments in growing seedlings are picking and planting the seedlings in a permanent place. The instructions require transplanting the seedlings as they grow into more spacious conditions. In this case, the roots are often damaged, the stems are broken, and the transplanted plants spend a lot of effort on adaptation. With tablets, all this can be avoided, since the seedlings are transferred to pots or into the ground along with them without any damage.
For reference. It is especially convenient to use tablets to grow plants from small seeds, as well as capricious crops that do not tolerate unnecessary manipulation.
Soil heating
Excrement consists of partially or completely digested organic matter and also contains various microorganisms involved in the complex process of food digestion.
One of the characteristics of these microorganisms is that they continue to process organic matter even after their intestines have passed .
During their life, quite a lot of heat is released, which is used to heat the soil. However, such use of excrement is associated with serious risks, so it is necessary not only to understand what processes occur inside the manure mass, but also to take measures in advance to neutralize the negative effects of fresh manure.
How to use peat tablets correctly
Peat or peat humus tablets are made from pressed peat to which trace elements and nutrients have been added. They are placed in a bag made of fine mesh, which protects them from falling apart. Only the top plane remains open.
Compressed tablet
Note. Tablets are produced in different diameters - from 2-3 to 7-8 cm for growing seedlings of crops of different sizes. If the purchased mini-greenhouse for peat tablets has cells, pay attention to their sizes.
To prepare peat for planting seeds, pour the tablets with warm, settled water for a few minutes. While maintaining their diameter, they increase in height by 5-7 times, turning into a cylinder. After this, the excess water is drained, and a recess is made in the upper part of this cylinder, into which the seed is placed.
When saturated with water, the tablet increases in volume several times
Then everything is as described above: the cylinders are installed in cells or on a greenhouse tray, covered with a lid and sent to a warm place. Your task is to add water on time, since the peat dries out very quickly. Let us give you some more practical advice:
- If you decide to use peat tablets, it is better to take cellular mini greenhouses. In a solid tray, when the cylinders are tightly installed, the roots of plants can intertwine as they grow. Or place the tablets at a distance from each other.
- When filling the tablets with water to swell, add a little potassium permanganate to it to disinfect the peat.
- If a white coating forms on the surface of the tablet, this indicates constant waterlogging. Watering should be temporarily stopped and the greenhouse should be well ventilated.
- Seedlings need to be replanted when the roots of the plants grow outward. To do this, they are placed in a separate glass with soil, without being separated from the tablet. But before that, you need to remove or at least tear the mesh from it so that the roots can grow freely into the soil.
Transplanting seedlings into separate pots
- If after sowing all the seeds you still have extra tablets, you can save them until next season. They do not have a limited shelf life if stored in a cool, dry place.
The danger of fresh excrement
The basis of any soil is made up of three components:
- clay;
- sand;
- humic acids.
Clay is a natural binder that holds all other soil components together. Its main drawback is its inability to pass water, so clay soils absorb liquid very poorly.
Sand is a natural loosening agent that increases the soil’s ability to absorb and pass water. However, only humic acids , in other words, humus (humus), are a nutrient substrate suitable for absorption through plant roots.
Fresh manure or droppings contain substances that change humic acids and negatively affect any plants, so introducing fresh excrement in close proximity to seeds or roots quickly leads to their death .
What you need to know before growing a crop
But before you decide to grow seedlings, you need to check the fact that they will grow in you. Some plants may not tolerate low temperatures at night.
Advice. If you live in the middle zone, then you should not plant eggplant and pepper seedlings, they will not grow for you. But it is quite possible to reap a good harvest by growing seedlings of radishes, tomatoes or cabbage.
When can you start building a convenient mini greenhouse with your own hands and then planting seedlings:
- The exact date, of course, cannot be given. You need to rely on the weather. It is very important that the temperature at night stays at least +7 or +8. And during the day, the bar on the thermometer should show no less than +13.
- But you should worry if you didn’t get the weather right. It’s just that the seeds will germinate not in two weeks, but in three or four. It has long been believed that planted seedlings grow stronger by the end of April or the beginning of May.
Advice. In mini greenhouses, it is very important to use a proven and high-quality substrate for seedlings; you must prepare the seeds in advance and follow all instructions when growing seedlings.
How to choose a place for a mini greenhouse on your site?
How to choose a place for seedlings?
A flat surface and a quiet place are ideal for this “mini greenhouse”. A surface in the garden is best. As long as there are no leaves on the trees and they do not provide shade, the seedlings will sprout and their root system will be able to strengthen. Place your “plant incubator” conveniently so that the water tap is located nearby, or, for example, the shed is located nearby. Seedlings in mini greenhouses: how to choose the right size?
| Actions: | Recommendations: |
| Beginning of work | Before you start making the structure yourself, draw up a clear work plan or simply sketch out an approximate diagram on paper, think about what dimensions you would like for it in terms of width, height and length. |
| Consider the material from which you will build the greenhouse. | According to the standard, a mini greenhouse is one meter wide, and you can take the length as you see fit. |
| The height of such a structure will be 50-60 centimeters. | These are the optimal sizes for a mini greenhouse. It will not interfere with you when working on the site and will not take up a lot of space. |
How to make a mini greenhouse, instructions:
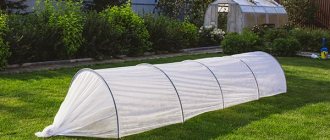
- Let's immediately look at the simplest version of a mini greenhouse. It turns out to be cheap in terms of material costs and comfortable for growing your future crop.
- After the seedlings grow, such a greenhouse can be immediately removed from the site, and the planting material will grow beautiful and healthy.
Note. To build such an “incubator” you only need to purchase film. Everything else is done exclusively from improvised means.
How to make arcs for a frame?
Arcs for greenhouse
Of course, you can use frame arches from last year (if any), ask your neighbors or purchase inexpensive and already used ones on the market. But if all these options do not suit you, you can build them yourself. Any material is suitable for them:
- These can be metal-plastic pipes left over after repairs, fittings or ordinary steel wire. You can even use a wooden beam, only then you will get not arcs, but a wooden rectangular frame.
- If you have already decided on the dimensions of your mini greenhouse or took as an example those that were proposed by us earlier, install arcs or another frame you built around the perimeter.
In order to avoid compromising the stability and load-bearing capacity of your frame, after covering it with plastic film, install the arcs as little as possible in distance from each other.
How does a mini greenhouse work?
After you have finally finished installing the arches, lay a small base of wood under them, you can use bricks to make a “high bed”.
Advice. This is necessary so that a high-quality substrate can be laid for planting seedlings. Only in it will your seeds be able to germinate as much as possible and grow into healthy seedlings.
If you wish, you can tie the greenhouse frame to its lower part to make the structure stable. This is done so that at the first gust of wind the polyethylene will not be torn off and the future harvest will not be spoiled. Why cover the greenhouse with film:
- Experts advise purchasing a film of medium strength and good light transmittance.
- It is thanks to these qualities that the sun's rays will warm up your mini greenhouse well, the film will serve you for more than one season, and at night the temperature inside the structure will be as stable as possible.
- It is advisable to purchase polyethylene of a size that best matches the size of your “bed”. How to stretch the film? It's very simple.
- You need to throw the material from one side to the other, stretch it evenly along the entire perimeter of the frame, and tie a load along the edges.
- You can use old bricks or pipes for weight; they will help hold the film on the frame.
You have made your own mini greenhouse, now all you have to do is prepare a high-quality substrate for the seeds and you can get down to business.
Features of arranging portable greenhouses
The main difference between this type of greenhouses is the ability to install them anywhere on the site. In addition, in most cases they are small in size, so they are suitable for installation in one bed.
The preparation of such greenhouses begins in early or mid-autumn, for which, after harvesting green manure, the soil at the site of their installation is covered with mulch from rotted sawdust or manure.
After the snow melts, the mulch and top fertile layer of soil are removed , then a trench is dug, the width of which is 2–2.5 times the width of the bed, this will compensate for the influence of cold soil.
Indeed, in large greenhouses, the temperature of the soil even outside the manure-heated beds is slightly higher than that of the soil outside the greenhouse. If in small structures the lower soil temperature is not compensated, then the plants will grow in less comfortable conditions, so the width of the trench should be slightly larger than when creating insulation inside a greenhouse.
It is also advisable to increase the depth of the trench so that more material can fit into it, this is also one way to compensate for the lower temperature of the surrounding soil.
What other options are there for mini greenhouses?
Another homemade model
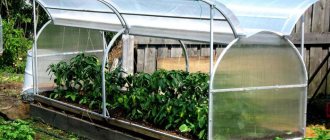
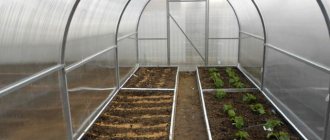
Mini greenhouses for gardens and cottages can be very different. You can build not only an arc greenhouse; there are also more interesting and convenient options. You can build a structure from polycarbonate. This is considered the most practical option.
Note. You can simply order it according to the sizes you need. They will deliver it to you, install it, and all you have to do is plant the seeds and wait for them to sprout. This type of mini greenhouse has many advantages, there is only one big drawback, its high price.
Mini greenhouse – thermos
Greenhouse thermos
We can say everything about this type of construction in three words - excellent, functional and practical. Having studied this model in more detail, you can make it yourself, according to the diagram, or invent your own model. This design can be covered with old glass windows.
Note. The mini thermos greenhouse was created specifically for avid gardeners. Such a greenhouse can be built with an additional function: soil heating.
How to build a wooden greenhouse with glass:
- First you need to knock down a wooden box under the greenhouse, then install it on the base (you can take bricks).
- This is a great idea for people who like to plant their seedlings early.
- Inside you need to pour a high-quality substrate, plant seeds and cover with glass, the structure is ready. Now you can expect the first shoots.
How to make a cheap greenhouse for a summer house and vegetable garden
The simplest and cheapest option for growing seedlings is to make a mini greenhouse using the means at your disposal. So:
- It can be not only old windows, you can even take broken and unusable refrigerators. Of course, in appearance it does not look entirely aesthetically pleasing or beautiful. But it works great.
After watching the video, you can see the process of making a mini greenhouse.
