A mini-greenhouse or mini-greenhouse is an indispensable thing for a gardener who does not have a large plot or lives in an apartment on the floor. In this case, home greenhouses can be installed on the balcony and plants of suitable size can be grown in them. You can buy ready-made ones or make them yourself. Making a mini-greenhouse in your apartment is very simple. We will provide you with step-by-step instructions with photos and types of designs, one of which you will complete yourself at the lowest financial cost. And so a mini-greenhouse with your own hands is easy.
DIY mini greenhouse
Why a greenhouse?
In an apartment, it is best to do seed forcing in a mini-greenhouse . Some will ask: why? After all, the apartment is already warm and light, let it grow the old fashioned way in boxes! They've been growing this way for decades! That’s right, but how much effort can be saved during care and how much the quality of seedlings can be improved if you use a mini-greenhouse for this!
The conditions in the apartment are far from ideal - the central heating dries out the air, winter-spring sunlight is insufficient for plants, cold air blows from the window, etc. And tender seedlings need greenhouse conditions.
Mini-greenhouse against the wall
This is a tall but rather narrow design, in which vertical shelves predominate. These greenhouses are very successful in Western countries. Its design always has several shelves, but there is enough space on them, because... The shelves are made wide, but the greenhouse itself takes up very little space and saves space.
The structure turns out to be very light, but it must be firmly fixed to the wall so that it does not collapse.
An inexpensive profile for polycarbonate and plasterboard is suitable for cardboard. When the greenhouse is not being used for its intended purpose, tools and gardening equipment can be stored on it.
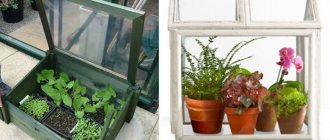
Mini-greenhouse on the windowsill
The window is the place where pots with indoor flowers and winter mini-beds with onions, parsley and dill are traditionally placed. Why not organize a small aesthetic greenhouse here that would decorate the interior?
For greenhouses located on window sills, there are certain requirements:
- the main thing is that it should be aesthetic and not completely block the light from the window, so as not to cause inconvenience to household members;
- an optimal regime for plants ;
- provide easy access to plants for care;
- have a good margin of safety for repeated use.
Installing a mini-greenhouse on a windowsill will allow you to save energy on additional lighting. During the day, the sun will shine on the plantings, and you can extend the daylight hours with phytolamps.
Another advantage is the central heating battery. Bottom heating of the greenhouse will be provided without additional devices and costs.
How to make it yourself at home?
Design
First of all , you should decide on a project , guided by your needs and capabilities. You can choose one of the options for factory-made mini-greenhouses and copy the design. Consider how the greenhouse will open, where boxes or pots with plants will be placed, and whether the greenhouse will often be moved from place to place (in the latter case, you can make handles or even wheels). Then you should sketch out a drawing of your future creation.
Preparation of materials
When the project is ready, you should begin searching (purchasing) and preparing materials . How to make (build) a greenhouse at home (at home), let's look at the example of two popular projects: a greenhouse with a metal frame , covered with plastic film, and a greenhouse with a wooden frame .
Metal frame and polyethylene film
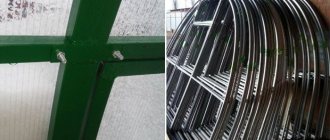
The frame will consist of aluminum or steel tubes and will have the appearance of a shelf . Boxes or pots are located on shelves. Metal tubes should be cleaned of rust; if they are steel, they can be painted. Aluminum tubes do not require cleaning or painting. Then holes for the bolts are drilled in the required places.
Shelves can be made of wood or taken ready-made (for example, from an old refrigerator). It is best to screw the shelves using metal brackets.
If you think that the frame may turn out to be unstable, immediately prepare two identical planks on which the structure will stand (they will again have to be secured with bolts using brackets).
At the next stage, measure and cut out the required amount of plastic film. If it happens that the film needs to be glued, this can be done with a regular iron, placing the film on the rubber and covering it with wax paper on top so that the iron glues and does not burn.
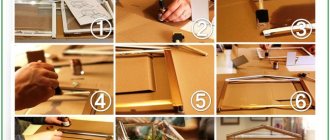
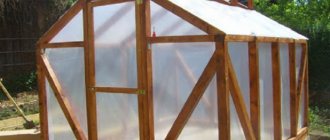
Wooden frame
The simplest option is a frame in the form of a rectangular parallelepiped (like an aquarium) made of wooden slats with a wooden bottom. To support the slats, they should be removed from metal elements (for example, driven nails), planed, treated with a wood antiseptic so as not to rot, because the humidity inside is high, and painted. The upper edge of the parallelepiped should be made opening , which will require door awnings and a handle.
Each of the faces, just as in the previous case, will be clogged with film . The film is nailed using long wooden slats so that the nails do not tear it. Those who want to use glass will have to work extra hard, making a frame with grooves for the glass, like in wooden window frames, and cutting out the glass edges themselves.
Rice. 2. Film greenhouse at home, with a wooden frame in the shape of a parallelepiped (photo).
An option is possible when only the top edge is glazed , and the rest of the greenhouse is a low wooden box (see figure).
Rice. 3. Box with an opening glass lid (step-by-step production).
Types
There are a great many types of mini-greenhouses on the windowsill, from simple cookie containers to complex automatic designs produced by industry.
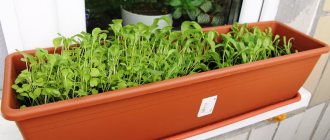
Greenhouse from a container
It's easy to make mini-greenhouses for sowing seeds from plastic food containers . Such a container should be deep enough and have a convex lid so that the seedlings have room to sprout. And they look neat and are easy to care for. They need a tray where excess water will drain after watering. At the bottom of the container, just make a couple of drainage holes - and the greenhouse is ready.
If you make a neat rack around the perimeter of the window, you can fit many of these greenhouses on its shelves. The seedlings will grow in them until the time comes to plant them in separate pots.
"Houses"
If the window sill is wide, you can put a miniature copy of a garden greenhouse on it - a small house with an opening front panel. In it, already picked seedlings can be grown in cassettes.
In addition to seedlings, in such a greenhouse you can grow herbs, salads and even radishes all year round.
Breadbox
A greenhouse-bread bin will look great on the window . Transparent from all sides, it will provide good lighting to the plants. For maintenance and ventilation, it can be opened with one movement of the hand. If the window sill is fully adapted for a mini-garden, it can be made to its full length.
In this mini-greenhouse you can even grow early radishes in cassettes.
Old aquarium
If you need a mini-greenhouse, but don’t want to waste money and time, use an old aquarium (if, of course, you have one in the house). The only thing you have to do is a transparent cover.
Such a greenhouse is good for everyone, one inconvenience is that you will have to get to the plants through the top.
Step-by-step instructions for making a home shelving unit
Step 1. Selecting materials for the shelving
Wood is considered the best material. It is an easily accessible and durable building material. They sell ready-made bars that you only need to cut to your size. Ready-made wooden panels, which are already available in stores, are suitable for shelves. Now it is possible to cut materials to your size right in the store.
Photo: White construction has many advantages.
The wood will need to be treated with impregnation or painted to protect it from moisture. A protected tree will last for decades. Nowadays it is very fashionable to paint everything white or stain like oak or larch.
A structure made in white will be less noticeable in the room and will not look bulky. Also, all dirt and the possible appearance of mold are immediately visible on the white color, which will help maintain perfect cleanliness. And this is so important for our housewives and for plants!
You can also use metal or plastic frames. Shelves can be made of tempered glass or thick plexiglass. “Home inventors” create many crafts from fiberglass pipes, which are also suitable as a frame.
| Important. The main condition for the durability of such a rack is good protection of the surface from environmental influences - corrosion, sunlight, moisture, etc. |
Step 2. Take measurements
You need to measure the height, width and depth of the window opening. Then we determine the distance between the shelves. We divide the height by the number of shelves and get the desired distance. You can place the shelves at equal distances from each other. You can make the lower shelves at a greater distance - for heavy and massive seedlings, and the upper shelves at a shorter distance - for small containers and cups.
Having accurate measurements, you can cut the required number of panels or bars right in the store.
Photo: Be sure to measure the window before making the shelving.
Step 3. Making racks
The entire structure can be made monolithic (not collapsible) or collapsible.
Having taken all the necessary dimensions, draw the future rack on paper to scale. This will help you to see any shortcomings at an early stage and think through the sequence of stages of the upcoming work.
The complexity of the design depends on your skills and imagination. Shelves can be attached to the corners directly to the side walls or attached to the sides of the slats. Shelves will be placed on them. Use self-tapping screws of the longest possible length. This will make the structure stronger.
What are we growing?
The choice is great and it depends only on your enthusiasm for selecting varieties of vegetables that can grow in a mini-greenhouse on the windowsill.
- greens - onions, dill, parsley, celery, mint, etc.;
- tomatoes of the Balcony Miracle variety - yield up to 2 kg per plant (the weight of 1 fruit is no more than 30 g), suitable for fresh consumption, canning and freezing;
- hot peppers. A bush with fruits can become a decoration for your interior, it looks so beautiful; leaf salads - watercress, arugula, spinach;
- early radish;
- seedlings
Some craftsmen even manage to grow cucumbers on their windowsills.
Mini-greenhouse from an old barrel
This is a very simple design. In addition to the barrel, an old can will do.
First, you need to place the container horizontally on the ground and make three large holes in the walls so that it is comfortable to pour soil inside and plant certain plants in it.
After this, you will need a tarpaulin or double thick film: it needs to be secured on top with four screws or other fasteners at hand.
A tarpaulin is more suitable: it copes better with gusty winds.
After this, you can fill the minigreenhouse with soil and plant the seeds. Do not forget about watering seedlings and caring for seedlings.
Greenhouse construction process
How to build a greenhouse? First, you need to draw in detail your future building and decide what size it will be. Expect that it should be located closer to the light. If you buy additional lighting, it should be located where it will look harmonious and not interfere with your movement.
After the drawing, you can begin building the shelving. Using a hammer and nails, build a structure that in the future will be the greenhouse itself.
Tips for choosing materials
In order for a home structure to meet all the requirements for growing plants, when making it yourself, a key role is played by the selection of suitable materials.
The most practical and convenient option for a mini greenhouse is a shelving unit mounted on a window and secured around its perimeter. To ensure that the structure lets light into the room, it is better to make the shelves not from wood or plastic, but from plexiglass. It is transparent, but at the same time quite durable, but when purchasing you should choose sheets with a thickness of 10-12 mm.
If you want to make a closed greenhouse with your own hands, buy plastic containers with a transparent lid or special containers with peat tablets inside in advance.
Which backlight to choose
In January and February it is necessary to use additional lighting. With insufficient lighting, the seedlings stretch out, their immunity and growth rate are weakened. They take root less well when transplanted; the main trunk becomes bent, which subsequently leads to damage from the weight of the fruit and inconvenience during care.
For lighting, phytolamps, low-power cold-light fluorescent lamps, halogen lamps, and ordinary low-power incandescent lamps are used.
In winter, when there is little sun, plants need lighting.
Purpose
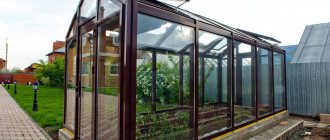
Small home greenhouses are made in order to provide an optimal microclimate for plants of various types grown in apartment conditions. The first greenhouse structures were used back in the 18th century, but many historians believe that they were used earlier. If you approach the arrangement of a small greenhouse competently, then the owners will have an excellent opportunity to grow even the rarest plants in any quantity without leaving home.
A microgreenhouse can be used not only for growing healthy fruit or vegetable seedlings, but also for growing various varieties of flowers, for example, tulips or orchids - it all depends on the wishes of the owners.
Lighting
For seedlings that grow in an apartment greenhouse, it is very important to provide good lighting, especially when it comes to the winter season, when the sun's rays appear infrequently and for a short time. If you have placed the plants on the shelves of the rack, then they can be supplemented with special phytolamps. Such products do not affect the air temperature in any way. In addition, they are environmentally friendly, durable and very economical.
Popular LED lamps boast approximately the same characteristics. If you install these devices, then choosing the appropriate light spectrum is not difficult, as is the level of lighting intensity. Experts advise using low-power cold-light fluorescent lamps for additional illumination of the shelving structure. In addition, it is permissible to refer to linear, xenon and halogen options. Some users are confident that lighting in the form of two or three low-power incandescent light bulbs will be sufficient for a shelving structure. These specimens are the most affordable, but their effectiveness leaves much to be desired. They emit heat energy in a large volume, but they produce only 5% of light, which is very little.
New products regularly appear on the modern lighting market. The choice of optimal options depends on the preferences of the owners.