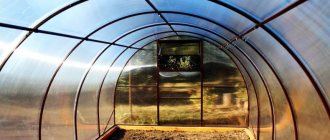
Greenhouses made of fiberglass reinforcement differ from their predecessors in a number of advantages, including the lightness of the material and anti-corrosion resistance. Reinforcement made of fiberglass and polymers bends easily, but does not become less strong, which allows you to assemble fairly reliable and rigid structures. After disassembling them, the rods easily return to their original shape, so they are more convenient to store.
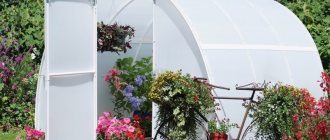
Greenhouse frame drawing.
Building a fiberglass greenhouse does not require much time, special tools or special skills.
The simplest temporary greenhouse with a composite frame can be assembled in 1-1.5 hours.
Types and features of fiberglass reinforcement for greenhouses
The two main points that people pay attention to when choosing or building a greenhouse are the frame material and the roofing material. Most often, when building a greenhouse with your own hands, fiberglass is used as reinforcement for constructing the frame.
This is due to a number of reasons:
- Fiberglass is a very durable and lightweight material.
- It easily takes shape and is convenient for making arched frames.
- Fiberglass is easy to knit into a frame.
- Does not rust, does not conduct heat.
- It is convenient to attach the simplest greenhouse roofing material to fiberglass reinforcement.
- You can make a greenhouse of different sizes from fiberglass.
A do-it-yourself greenhouse made of fiberglass reinforcement can be built on a base of wooden slats. It can be high (as tall as a person) or low, only for plants. In a high greenhouse, you can install a door made of slats or make an entrance only from film.
The most common material used to cover a greenhouse is film. It comes in different densities, it is better to choose the one that is denser. The fiberglass reinforcement itself can be of different thicknesses. It is usually sold rolled up in 10 or more meters.
For a standard greenhouse, it is enough to choose reinforcement with a diameter of 8 or 10 mm. To strengthen the fiberglass frame, you can use a wooden lath or a small diameter plastic pipe.
Also read: How to build a canopy over a porch with your own hands
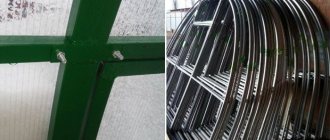
Most often, a greenhouse is made from fiberglass reinforcement using the principle of an arched structure. To do this, the reinforcement is cut into equal parts of the selected size and installed in a row in the shape of an arch. Arcs are attached in different ways.
The principle of making a greenhouse is quite simple. There are several design options, so let's look at each of them in more detail.
Tips and tricks for gardeners
- It is better to buy seeds of varieties and hybrids that have immune protection and disease resistance;
- trellises of different types make it easier to care for tomatoes, provide access to air and sunlight, since ultraviolet radiation kills infections and pathogens;
- tomatoes love hot weather and sun, so trellises and supports are placed in the direction from north to south, the sun will heat the bushes all day.
- Wide passages should be left between the supports to increase the feeding area and ease of care and harvesting;
- the condition of the trellises must be monitored by covering them with antiseptics and removing them, if possible, for the winter to extend their useful life;
- You should also tear off the lower leaves of tomato plants; in contact with the ground, they can be affected by diseases. To prevent the infection from spreading, they must be removed.
It is necessary to pick off the lower leaves of tomato plants
Although you can buy almost any kind of tomatoes in supermarkets and markets, many gardeners prefer to grow these nightshades themselves, investing their own energy. In constant search for improved methods of cultivation, more advanced devices (for example, trellises), they put a lot of effort into obtaining a decent harvest. This is why homemade tomatoes taste so much better.
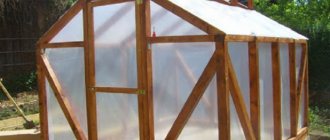
Tall greenhouse with a fiberglass pipe frame and a slatted base
This greenhouse made of fiberglass reinforcement can be made by hand and has 3 features. Firstly, it is installed on a slatted base, secondly, it is made to the height of a person, and thirdly, it is equipped with an entrance door made of slats.
To create such a greenhouse you need the following material:
- fiberglass pipe with a diameter of 10 mm. It is sold in 50 m rolls;
- rail 40 by 25 mm;
- timber 50 by 50 mm;
- plastic pipe 50 mm;
- film 6 by 8 meters with a thickness of 1 mm.
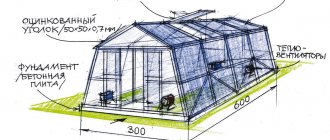
It is first important to determine the size (width and length) of the greenhouse. Dimensions of the greenhouse on the sample: length – 6 m, width – 3 m, height – 1.8 m.
Do this:
- You need to start with a frame, which will serve as the basis for the greenhouse. You need to cut the slats into pieces of the required size, twist them overlapping into a rectangle with screws.
- Make the end from 50/50 timber, twist the door from the slats and hang it on the hinges.
- Cut the reinforcement into 10 pieces of 5 m each.
- In the base, drill holes for reinforcement on both sides at equal distances. 10 holes on each side.
- Drill 10 holes in a plastic pipe at equal distances, pass reinforcement through them and stick the ends into the holes on the base.
- Fix the pipe to the stand at the back and to the timber end at the front.
- Cover the greenhouse with film, press it with shingles, and sprinkle the ends with earth. To fix the film on the fittings, you can use office clips.
The greenhouse is ready. It is better to build it immediately on the site reserved for planting.
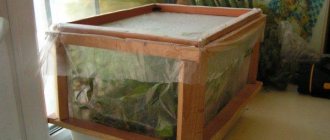
Do-it-yourself greenhouse from scrap materials
Such a phenomenon as greenhouse personal farming, in contrast to the industrial greenhouse complex, originated and became widespread in the seventies of the last century. We can say that greenhouses on personal plots began to appear on the basis and similarity of greenhouses, where collective farms, state farms and agricultural complexes grew the first long fresh cucumbers for Soviet citizens by March 8th. There were queues for cucumbers; you could buy two cucumbers per hand. Citizens were not happy with this state of affairs. Those who had their own plots decided not to wait for favors either from nature or from the state, but to try to get an early harvest of their own vegetables. Obviously, for this it was necessary to create certain conditions for the seedlings, in particular, the greenhouse effect.
Low greenhouse with fiberglass frame
This do-it-yourself greenhouse made of fiberglass reinforcement is small in height. But this is not a minus. This design is easy to use, lightweight and mobile. In addition, it is very simple and quick to do.
The following materials are required for work:
- reinforcement 6 mm;
- rail and bolts for the base.;
- film.;
- furniture stapler.
The length of the greenhouse is 3 m, width – 1.5 m, height up to 1 m, as shown in the sample. It is better to bolt the frame together to ensure strength and rigidity. The frame is light and rigid.
You should do this:
- Assemble the frame from the required size slats.
- Make holes half a meter apart in the frame on both sides.
- Cut arcs from the reinforcement of the required size, bend them and insert them into the frame holes on both sides.
- Cover the greenhouse with film and attach it to the base bars.
The film can be attached to the frame in different ways, for example, with a furniture stapler or choppers. The ends of the film can be tucked under the frame. This will help isolate the wood from the ground and protect the frame from rot, moisture and insects.
Such a greenhouse is made very quickly, the work will take no more than 30 minutes. It is easy to assemble and disassemble, you can lift it, process the beds, ventilate it and put it back. Such a greenhouse can be easily stored for storage or moved to another place.
Building a domed greenhouse with your own hands
First you need to do the preparatory work. You need to choose the right place and soil. The place should be well lit so that buildings or tall trees do not cast a shadow on the greenhouse. The soil should be leveled if necessary. The top layer of soil must be removed.
The sequence of construction of a domed greenhouse:
You need to prepare asbestos cement pipes 165 cm long. 10 such pieces are enough. Holes should be dug in the ground 1 m deep. A drill is used for this. Pipes need to be placed in the holes. Next you need to start creating the base. The material of manufacture is wooden beam. When constructing the foundation, it is necessary to rely on the drawing. Wooden elements must be treated with antiseptics so that the wood does not succumb to rot, insects or fire. To connect the bars and strengthen the base, you need to prepare “heels”. The bars prevent the frame from moving. “Heels” with bars should be inserted into buried pipes. The frame should be mounted on them
It is important to properly seal all joints. When all this has been achieved, you can bury the pipes with “heels”. Frame elements should be created from wood
On the sides of the bars you need to make cuts for the connectors. They hide metal parts inside the greenhouse. Connectors can be bought at the store or made yourself. We must not forget to process wooden elements. Connectors must be mounted on the base at the joints. Metal bolts are used to secure them. Then you can begin installing the frame. All work should be performed as carefully and correctly as possible. It is necessary to provide space for doors and windows. At first, the structure may seem completely unstable, but when all the elements are connected, the frame will be quite strong. The base needs to be sheathed with boards and additionally insulated. Next, you should make windows and doors and secure them to the frame. The final work is covering the greenhouse with polycarbonate.
At this point, the greenhouse installation is ready. Further work will be related to the internal arrangement of the greenhouse. It is necessary to correctly form the beds and arrange the plants.
You can install hanging beds in a domed polycarbonate greenhouse. Shelves for such placement can be purchased in special stores or made independently. For irrigation in the greenhouse, you can organize a drip system.
Greenhouse 6 by 3 m with net for cucumbers
This greenhouse has impressive dimensions: 6 by 3 m. It is quite high - 2 m, and has a built-in net for cucumbers. It is made of 8 mm reinforcement and reinforced with a beam for strength. The greenhouse covering is made of agrotextile, which is secured with boards that imitate formwork.
You can do it yourself using a simple and understandable scheme:
- Assemble the base from the slats. It is better to fasten it with overlapping bolts. The base can be made according to the sample dimensions: 3 by 6 m, or according to dimensions convenient for your site.
- Cut the reinforcement into pieces. 6-10 pieces of 4.5-5 meters each are enough.
- Drill holes in the base and insert reinforcement.
- Reinforce the arches on top with a pipe or beam.
- Cover the arches with netting if you plan to grow cucumbers.
The greenhouse frame is ready. All that remains is to cover it with agrotextile. You can use any other material, for example, film.
Assembly technology
The process of building a greenhouse with your own hands is quite simple. If we consider the assembly technology in stages, it is as follows:
- We prepare the necessary materials and equipment;
- Next, you need to prepare the area for assembling the greenhouse - level the ground surface, remove stones, roots and other debris;
- We bring the tree to the site, unroll the film;
- then we fasten the boards so that we get a rectangular base;
- we install and strengthen the support on the surface of the earth;
- now we cut the reinforcement into pieces of the same length (you can use roofing scissors to cut the profile);
- we bury pieces of reinforcement one by one into the ground inside the support to a depth of about 30 cm, then attach them to wooden beams using a stapler or other accessible method;
- we strengthen the support with ridge reinforcement (the rods are attached longitudinally in the form of a mesh);
- next you need to install sections with doors and windows (if any);
- Now we are once again checking the reliability of the structure, additionally strengthening weak points;
- Finally, we stretch the covering (film), fix it with a stapler from below to the support and in places of contact with the reinforcement.
Now the prefabricated temporary greenhouse is ready. A stationary winter structure is installed according to the same principle, only double-glazed windows are used as a covering.
Greenhouse made of reinforcement 10 according to the principle of a tent 10 m long and 3 m wide
This greenhouse is easier to make than the previous one. A base is not mounted for it, only arcs are cut out, which are stuck into the ground at a distance of about 0.5-1 m. All arcs are secured from above with a pipe and ties.
For strength, you can make ribs that guide along the perimeter of the greenhouse by threading the reinforcement horizontally through the arches. A greenhouse of the specified size required approximately 150 m of reinforcement. On top you can cover it with agrofibre or film.
Differences between a greenhouse and a greenhouse
Designs that have the same functions have several significant differences.
- Greenhouses below 2 meters in height are usually not installed. Greenhouses are rarely built higher than 1.2 meters.
- Greenhouses are real “houses” for plants, stationary, with a fixed frame, walls, and roof. A greenhouse is only a “temporary shelter” that has a removable, portable structure.
- A greenhouse, especially a heated one, can be used all year round. A greenhouse is characterized by a short period of operation (usually early spring - by May there will be no trace of greenhouses left on the dacha plot).
On a note! These characteristics greatly simplify the life of gardeners who want to help vegetables grow earlier and better, without spending a lot of effort, money and personal time.
How to cover a greenhouse made of fiberglass reinforcement
Film is most often used to cover greenhouses. This is a convenient material, it is easy to attach, you can choose, vary the width, length, trim or extend it by simply adding a new overlapping layer.
The film is easily fixed to the frame with a stapler, clips, tucks or any clamps. It retains heat well, protects from drafts and precipitation.
A significant disadvantage of such material is its fragility. But this can be compensated by the fact that the film is easy to remove and replace with a new one.
Another popular material used to cover a DIY fiberglass greenhouse is a hydrophilic membrane. Its advantages:
- A special fiber structure that allows drops of condensation to flow onto the soil, moisturizing it and nourishing the plants.
- Ability to retain heat well.
- High strength and wear resistance.
- Vapor permeability.
Another type of coating is reinforced polyethylene. It is very durable, will last at least two seasons, but conducts light rather poorly.
PVC film has all the positive properties that are valued by summer residents; in addition, it is very durable and will last at least 6 years. The disadvantage is the cost.
Any of the listed types of film can be easily mounted to a fiberglass frame. You can use any fasteners, even improvised means, office clips or wire. The film can be used to protect the base of the wooden slats from moisture by simply tucking it down. It is convenient and does not require much labor.
Fiberglass reinforcement can withstand any of the described coatings. The choice is up to the summer residents.
Post Views: View statistics 1,423
Required materials and tools
The construction of any greenhouse begins with the selection and acquisition of materials. In this case, we will consider a project of a simple structure consisting of a wooden base, a frame made of reinforcement and upholstery made of film. To build such a structure you will need the following materials:
- wood (blocks or boards) - if we consider a portable option, then bars are best suited for it, but high-quality wooden slats can also be used;
- reinforcement (its diameter and quantity depend on the size of the future greenhouse) - for a structure measuring 6 x 3 m and a height of 1.8 m, 50 m of reinforcement is required (10 arcs of 5 m each) with a cross section of 10 mm;
- film - if you buy a new one, then its total area should be 50 square meters. m, but you can also use used film that remains from repair work, and it may not be a single piece, but several different pieces.
Additionally you need to purchase:
- bolts, screws, nuts, nails - the length of the fastening material must necessarily exceed the thickness of the wooden block or board;
- ridge reinforcement with a large cross-section (used to fix and strengthen the support);
- wooden or metal corners (for fastening the base).
You will also need the following tools: drill, tape measure, square, screwdriver, hammer, saw, construction stapler. A jigsaw and sander can also come in handy, but usually building a temporary greenhouse yourself is a little easier.
This set of tools and materials is needed to erect a portable and temporary structure.
Greenhouse design
As has already become clear, the greenhouse is assembled from fiberglass reinforcement. This is a spiral-shaped ribbed profile consisting of glass, polymer and other composite fibers. It is from this material that the main load-bearing element of the structure, the frame, is built with your own hands. As a rule, the greenhouse frame has an arched shape, since it is easiest to bend the reinforcement into this position.
It should be said that reinforcement is an ideal material for building greenhouses with your own hands
It bends well, is easy to process, fits harmoniously into any design and, importantly, its cost is literally a pittance. You can create a project for such a greenhouse yourself, without having any special knowledge in the field of construction and architecture.
The simplest greenhouse design is made up of the following parts:
- base support (the so-called foundation) - the easiest way is to make a support from wood, but if you wish, you can lay a real concrete foundation, but you need to take into account that such a greenhouse will no longer be portable or you will have to spend a lot of effort, and possibly funds;
- outer frame - this part of the structure is assembled with your own hands from fiberglass reinforcement bent into an arc, which is attached to the base (support) and connected to each other using longitudinal rods;
- doors - to fasten the doors, you need to install an additional section of reinforcement with hinges (the doors themselves, as a rule, are made of the same material that is used to cover the structure, but you can also use ready-made ones);
- sheathing – you can use polycarbonate as a covering for a greenhouse, but this option can hardly be called economical, so most often the greenhouse is covered with film.
As for the base support, it is a rectangle of arbitrary size, consisting of long boards or several bars fastened together. Its function is to hold the frame and the greenhouse itself on the surface.
Tips and tricks for gardeners
- It is better to buy seeds of varieties and hybrids that have immune protection and disease resistance;
- trellises of different types make it easier to care for tomatoes, provide access to air and sunlight, since ultraviolet radiation kills infections and pathogens;
- tomatoes love hot weather and sun, so trellises and supports are placed in the direction from north to south, the sun will heat the bushes all day.
- Wide passages should be left between the supports to increase the feeding area and ease of care and harvesting;
- the condition of the trellises must be monitored by covering them with antiseptics and removing them, if possible, for the winter to extend their useful life;
- You should also tear off the lower leaves of tomato plants; in contact with the ground, they can be affected by diseases. To prevent the infection from spreading, they must be removed.
It is necessary to pick off the lower leaves of tomato plants
Although you can buy almost any kind of tomatoes in supermarkets and markets, many gardeners prefer to grow these nightshades themselves, investing their own energy. In constant search for improved methods of cultivation, more advanced devices (for example, trellises), they put a lot of effort into obtaining a decent harvest. This is why homemade tomatoes taste so much better.
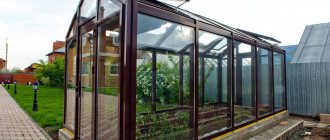
Why a wooden frame?
A wooden frame for a greenhouse made of polycarbonate slabs has a lower cost and is a more technologically advanced material. And most experienced craftsmen consider all fears that wood in greenhouse structures is short-lived to be exaggerated. To prevent rotting, all wood must be coated with antiseptics, and if you want to save a little, treat it with ordinary copper sulfate; this procedure will perfectly protect wooden elements even in the ground.
A treated wooden frame can stand directly in the ground for many years and show no signs of wear. Of course, you can also build a universal version of the greenhouse frame, that is, make it in the form of a designer, in which case it will be possible to easily replace any part damaged over the years with a new one, just by unscrewing a couple of screws.
Foundation for a greenhouse
A greenhouse frame made of steel reinforcement requires the construction of a foundation. This design is heavy, so the reinforcement that is not secured in concrete will gradually “sink into the soil.”
To reinforce the foundation, rods with a diameter of 12 mm are used, but the frame itself can be built from thinner reinforcement - with a cross-section of 8 mm.
Greenhouses equipped with a strip foundation, the depth of which is up to 100 cm, retain about 10% of heat.
For a heavy reinforcement frame, it is necessary to construct a strip foundation. Optimal design dimensions:
- depth 0.5-0.8 m;
- width – minimum 20 cm.
In the northern regions, the foundation is laid to the depth of soil freezing. In addition, it needs to be insulated using pieces of foam plastic placed in the trench.
Approximate foundation option:
The process of building a foundation for a greenhouse using rebar with your own hands:
- A trench of the required depth and width is dug. When marking the perimeter, you should align it diagonally, and then install stakes in the corners.
- Formwork is constructed, the height of which should be from 10 to 15 cm. For its manufacture, you can use 25 mm thick boards, chipboards, and plywood. The top of the formwork must be leveled using a level.
- The preparation of the reinforcing mesh from the reinforcement is in progress.
- Reinforcing mesh is laid.
- Pre-prepared frame sections are installed in the trench.
- Concrete is poured in several layers (the thickness of each layer is 15-20 cm). Each layer must be compacted to avoid the formation of voids. Do not place stones or crushed bricks in the trench - this will negatively affect the strength of the foundation.
Additionally, you can find out on our website how to build a greenhouse with your own hands: foundation, frame from available materials, profile pipes, how to cover the greenhouse, how to choose polycarbonate, what color, how to make windows, heated floors, infrared heater, interior design, also about repairs , winter care, preparation for the season and how to choose a ready-made greenhouse.