More and more improved designs are appearing on the modern market of greenhouse models.
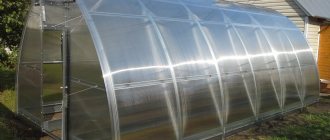
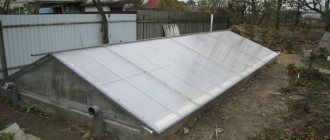
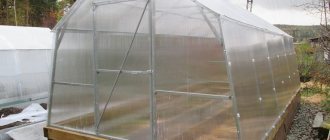
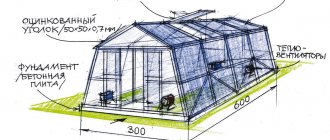
But, despite this, everyone’s favorite greenhouse model “Urozhay” does not give up its position. This design can be made in the form of an arch (“Harvest Elite”) or in the form of a house (“Harvest Classic”). The frame of this greenhouse is made of galvanized steel pipe 25x25 mm and 0.9 mm thick. Its height is 2.2 m, width – 2.5 m. The length can be arbitrary, a multiple of 2 meters. Ventilation in the greenhouse is ensured thanks to two built-in windows. There are two doors at the opposite ends of the greenhouse; the distance between the arches is 1 meter. The greenhouse can be covered with either cellular polycarbonate or white agrotex, depending on your desire.
The greenhouse frame can be installed directly on the ground, or, if necessary, a foundation can be built. The frame is so light that it can be easily moved and even lifted by one person.
The Harvest Elite greenhouse is one of the latest models in the Harvest greenhouse series. Although its assembly is much more complicated than the basic version, this is fully compensated by its increased strength and improved design, which is very important in the harsh Russian winters.
The “Harvest Economy” greenhouse model is also popular. It is compact and relatively inexpensive. Available in two sizes: 1.5x1.8x4 m - with two doors on opposite ends, and 2x2x4 m - a door on one side and a window on the opposite side.
“Harvest Elite”: what is the design?
"Harvest Elite" is a pipe greenhouse designed to create a favorable climate for growing plants.
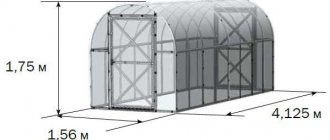
This greenhouse is an arched structure 2.1 meters high and 3 meters wide. The length can be 4 m or more (always a multiple of 2).
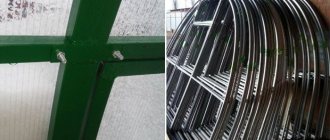
The frame is presented in the form of a galvanized (on both sides) closed square pipe. The dimensions of the pipe are 25 by 25 mm. Its thickness is 0.9 mm. Self-tapping screws are used to assemble the frame. The arcs are located at a distance of 64 cm from each other.
The product is equipped with two end doors (90 cm wide). You can also purchase additional side windows.
No screws or self-tapping screws are used to secure the polycarbonate covering to the frame. Fastening is carried out using galvanized ties.
Note: To secure the Harvest Elite greenhouse, its T-shaped ends are dug into the ground. Also, installation can be done on a metal corner, board or beam.
Choosing the optimal greenhouse size
Manufacturers offer different lengths of the “Harvest Elite”, starting from a minimum of 400 cm. The gardener can choose the length of the structure that suits his requirements; it can have a duration of 6, 8, 10, 12 or more meters. The main thing is that the planned length of the frame is a multiple of two, since the width of a standard polycarbonate sheet is 210 mm.
Did you know? Witty gardeners have adapted polycarbonate greenhouses that were empty in autumn and winter for walking poultry, since the building is relatively warm, light and the cold wind does not blow. In response, laying hens delight their owners with a long period of egg production, which is quite rare in the cold season.
Advantages of the design
The Harvest Elite greenhouse has widely proven itself due to the following advantages:
- Availability of galvanized frame. Its painting is not required, since thanks to galvanization, rust does not appear either inside or outside the pipe. This makes the structure durable.
- During manufacturing, the galvanized sheet is closed into a square pipe, forming an additional stiffening rib. This makes the structure durable.
- The small distance between the arcs (64 cm) makes the structure even more rigid, capable of withstanding heavy snowfalls.
- The role of additional reinforcement of the structure is played by ties. They are placed on each arch, preventing them from breaking under heavy loads from snow in winter. In summer, ties can be used as places to tie up plants.
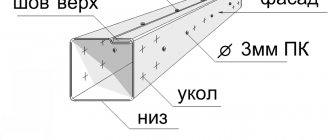
- High technology. There is no need to use bolts and screws to cover the frame with polycarbonate. They have been replaced with galvanized tie strips. This way the material is tightly pulled along its entire length and there is no need to make holes, which extends the life of the structure.
- Each joint of the parts is reinforced with an additional U-shaped profile and an internal sleeve with a smaller diameter to increase the rigidity of the structure.
- Doors and vents are equipped with convenient latches and handles made of galvanized material.
- Ease of transportation due to the fact that the greenhouse is collapsible and is sold packaged in boxes that can easily be placed even in a passenger car.
- Possibility of self-assembly. Each part is marked, there are all the necessary holes and instructions with detailed illustrations of each connection and joint.
- Possibility to add length. For this reason, the design can be called universal.
- Affordable price and high quality.
How to position the greenhouse?
The temperature inside, the yield and the durability of the structure will depend on where the greenhouse will be installed and how correctly the installation was carried out.
When determining the most suitable location for installing a greenhouse, you need to consider the following:
- Solar lighting. It is recommended to locate the building from east to west. This will ensure that the plants receive the right amount of light.
- Wind protection. It is better to use wood, bushes or artificial barriers located on the north side so that they do not shade the sunny sides of the greenhouse.
- Location close to seed beds. In this case, it will be easier to transplant the plants from the greenhouse to the garden, if necessary.
- Surface relief. It is recommended to locate the greenhouse on a slope that slopes slightly to the south. If thin polycarbonate sheets were used for the greenhouse, it should be installed on a flat surface.
- Location relative to the watering source and power supply. If there is no electricity near the greenhouse, you need to place a container of water near the structure so that you can water the plants manually.
Foundation
In order for the greenhouse to last for a long time, it is better to make a foundation for it. Otherwise, the profile may rust in moist soil after a few years, and the stability of the structure will deteriorate.
Most often, this type of greenhouse is placed on a wooden beam placed on concrete pillars.
Let's consider this construction of the foundation in stages:
- Digging square holes (approximately 50 by 50) 60 cm deep. Three holes will be required for the end sides. The length of the holes will need to be located every 2 meters.
- Filling holes with sand.
- Installation of square concrete pillars 10-20 cm high on the sand. They need to protrude from the holes by about 5 cm so that the wooden beam can be laid correctly. It is recommended to use a six-meter beam with a cross-section of 100×150 mm.
- Laying timber on concrete posts. Checking the location using a level. In case of non-compliance with the horizontal, the required amount of sand is added or removed under the concrete blocks.
- Fastening the timber to the concrete with anchors.
Laying the foundation for the Harvest greenhouse
For greater reliability, it is advisable to place the “Harvest” greenhouse on a foundation, because the dug-in legs made of galvanized profiles can easily rust. Experienced experts advise making a foundation with the following composition: sand cushion, posts and timber. You need to purchase 10 ordinary concrete cubes in advance, 4 cubes on both sides and one on the ends. You will also need a sand machine. You will spend the whole day making the foundation.
First you need to dig 10 holes 60 cm deep and 50x50 cm wide. The bottom of the holes is filled with sand and compacted well. After this, you can lay the prepared timber. The best option would be to order it in a store, 6 meters long, and process it there. If the beam is cut in half, this will worsen the strength of the structure installed on it.
it is very important to maintain a perfectly horizontal plane when laying out the entire perimeter. To do this, more sand is poured under some cubes, and, on the contrary, sand is removed from under others.
Using a building level, the correctness of the horizontal plane is determined. As soon as the standard is reached, laying the foundation can be considered complete.
After this, it will be necessary to eliminate the gaps that have arisen between the greenhouse and the foundation, which are about 15 cm - from the lower profile to the timber, which is not small at all. The most successful material for solving this issue is linoleum, which is not afraid of either moisture or frost.
Erection of the frame and covering it with polycarbonate
You can install the Harvest Elite greenhouse on T-shaped ends from the profile or on the foundation.
The best option is the foundation. When assembling the frame, you need to consistently follow the recommendations in the attached instructions.
Let's consider an approximate sequence of work:
- First of all, the end parts are assembled horizontally. They are then placed on the desired surface and covered with polycarbonate.
- Next, the polycarbonate is opened to secure it to the ends of the doors and vents. For cutting, you can use a construction knife or jigsaw. The protective film cannot be removed from the material.
- The cut plates are fixed to the end of the frame.
- When the end parts are assembled, the main part of the structure is installed. Initially, the transverse partition arches must be assembled. Profiles are used to attach them to the ends.
- When the frame is ready, all that remains is to cover it with polycarbonate plates. For this purpose, galvanized steel tape is used. It is thrown along the arc of the structure and the polymer is pressed against the frame.
Polycarbonate sheets can be overlapped since their width is slightly larger than the size of the frame section.
It will be difficult to assemble such a product alone. An assistant is needed to support the structural elements. Before work, be sure to wear construction gloves to protect your hands from injury from the edges of the polycarbonate.
How to assemble a greenhouse with your own hands
To properly assemble a house for plants, you need to prepare the area, mark it and strictly follow the instructions given in the instructions. It is recommended to build a foundation for the structure before starting assembly, but you can do without it.
Choosing a foundation
The greenhouse frame can be erected on various types of foundation: brick, thick boards or poured concrete. Also, in some cases, it is possible to install the greenhouse frame directly on leveled ground. Before installing the foundation, you need to choose a suitable location for the greenhouse. It should be located from south to west, this contributes to good illumination of the plantings inside the structure by the sun's rays.
The most durable foundation will be a concrete foundation. Tall trees should not grow near the selected location, which can cast a shadow and produce partial or complete shading of the internal space. A successful location for the greenhouse will be on the south side of any structure: a house, a barn or a permanent windproof fence.
Important! When constructing a foundation for a greenhouse frame, the builder must use a building level to check the levelness of the site. If the site is uneven, the polycarbonate sheets will be distorted, which will lead to failure of the structure.
Construction of a capital foundation:
- The soil in the place where the greenhouse will be located is well leveled, after which markings are made.
- The capital foundation for the walls of the frame is constructed along the entire perimeter of the future structure and has a width of 30–40 cm. Before its creation begins, a trench 30 cm deep is dug along the perimeter.
- Pegs are installed at the corners of the perimeter, between which wooden boards are laid for pouring concrete formwork. Formwork boards must be installed along the entire perimeter of the structure, positioned along the edge in two parallel rows, between which a distance of 30–40 cm is maintained.
- The bottom layer of the future foundation is poured out of sand; the thickness of this layer is 10 cm.
- The next layer will be a layer of crushed stone, the thickness of this layer is about 20 cm.
- Further, at the corners of the foundation and in the place where the doors will be located, metal supports up to 50 cm high are also installed; in the future, the greenhouse builder will be able to shorten them, according to the requirements of the installation of the structure.
- Builders pour concrete mixture into wooden formwork. The concrete is left to harden in the formwork for a couple of days, after which the formwork boards are removed. The capital foundation is ready for the assembly of the structure's frame.
Making a brick foundation:
- A brick foundation for a greenhouse is much easier to construct than a poured concrete foundation. After preparing and leveling the site, builders mark the future structure using pegs and ropes.
- A small ditch is dug along the perimeter of the building, the depth of which does not exceed 10 cm and the width 25 cm. Sand is poured into the ditch so that the level of the sand and the adjacent soil are at the same level.
- Next, bricks are laid around the perimeter of the building. The laying is done tightly, the bricks are laid in one row, with the longitudinal sides facing each other. If desired, bricks in a row can be fastened with cement-sand mortar. You can also make the foundation not in one row of bricks, but, for example, in 2 or 3 (at the request of the builder).
- The completed brickwork is left for several days until the cement mortar has completely hardened, after which the foundation is ready for the construction of the greenhouse frame. If the bricks are laid without the use of cement mortar, the installation of the frame can begin immediately after the completion of the foundation construction work.
To install a greenhouse without a foundation:
- In this case, it is necessary to first prepare and level the area, after which metal pegs or pipe cuttings are driven in along its perimeter, on both sides of future doors and in the corners. This is a necessary condition so that after (or during) installation of the greenhouse frame the builder can firmly secure the structure.
- To secure it, a bunch of frames and metal pipes protruding from the ground are tied together using iron bolts or hooks. This is a necessary safety measure to prevent the greenhouse from being blown away by hurricane winds.
Video: foundation on pipes
Assembly of the end sides
The first steps in assembling the frame begin with connecting the metal parts of the greenhouse ends. End assembly process:
- The work is carried out on a flat surface, it is best to do it outside. All parts are assembled according to the drawing supplied with the model.
- After completing the assembly of the end from the metal profile, polycarbonate is fixed to the end frame.
- Parts made from a sheet of cellular polycarbonate are marked according to the drawing, and then cut out from a solid sheet of coating using a hand jigsaw or a sharp construction knife. When cutting and attaching polycarbonate to the frame, a protective film is left on it.
- To secure the polycarbonate to the frame in the required places of the plastic covering, the builder independently makes holes for self-tapping screws. Therefore, to carry out such work, it is advisable for the builder to prepare an electric or hand drill, a carrier for connecting to electricity and drills of the required diameter.
- The door frames are assembled separately from the end parts. To cover the doors and the transoms provided for ventilation, polycarbonate is cut to size. After that, the cut out parts of transparent plastic are attached to the frames of doors and windows. Finished doors are secured to assembled and polycarbonate-coated end parts.
Video: assembly of the end sides
Frame assembly
When the end parts are completely ready, it is time for the builder to start constructing the main greenhouse frame. To do this, first assemble the base of the frame around the perimeter. Frame assembly process:
- If the greenhouse is installed on a foundation, then the assembled perimeter is rigidly fastened to the foundation.
- Next, the side arcs of the frame are secured.
- When all the side arches are installed, long transverse frame fasteners are installed and placed on the side walls of the structure.
- After the main body of the structure's frame is assembled and firmly secured, builders secure the pre-prepared end parts. To assemble and connect the parts of the metal frame, a drill and self-tapping screws are used.
Video: assembling the greenhouse frame
Frame covering
After the frame is completely ready, it is time to install the greenhouse covering sheets. If the ordered kit does not include plastic profiles for longitudinally connecting polycarbonate sheets to each other, then the builder will have to lay the sheets so that they overlap with adjacent sheets by about 10 cm.
Did you know? A gardener can easily grow cucumbers in a greenhouse, the length of the fruits of which will reach almost 1 m. To do this, it is enough to plant varieties of cucumbers such as Chinese long, Chinese miracle or Chinese white.
In places where there is overlap, the polycarbonate is secured with self-tapping screws. To do this, you need to drill holes of the appropriate diameter with a drill. I would like to note that the option of using connecting profiles is much more expensive, but it is preferable to working with self-tapping screws, since installation using a profile does not damage the polycarbonate at the joints.
Covering the frame with polycarbonate The gardener chooses the thickness of the greenhouse cover according to his wallet, since the thicker the polycarbonate, the more expensive it will be. But this is exactly the case when the stingy pays twice, since thin cellular polycarbonate will last only a few years, after which it will need to be replaced. But if you consider that purchasing a greenhouse for a summer cottage is quite expensive, then it’s worth paying a little more, but getting quality and a guarantee of coating service for many years.
Important! Builders are recommended to use thick gloves when working with polycarbonate sheets (cutting, mounting). If you neglect to protect your hands, there is a possibility of injuring your skin on the sharp edges of the plastic.
Polycarbonate can have a thickness from 0.75 mm to 50 mm, but its honeycomb variety, used for greenhouse coverings, has a thickness of at least 3.5 mm. The most suitable thickness of polycarbonate for greenhouses is considered to be 8–16 mm. Each of these colors indicates the degree of protection of plants growing inside the structure from ultraviolet rays.
Also, cellular polycarbonate can have different plastic colors: transparent, blue, blue, yellow or red
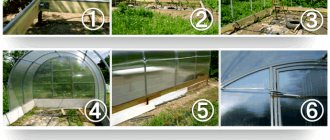
Greenhouse improvement methods
It is not always possible to provide for all external factors that can affect the greenhouse during its use. In most cases, summer residents assemble the structure themselves. Therefore, no one is immune from technical flaws, also caused by the human factor. However, many summer residents have come up with solutions that can compensate for most of the shortcomings. Below we consider the main ones:
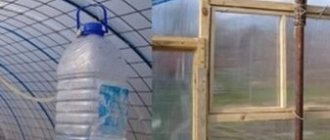
- Summer residents often complain that during heavy rains the vents in the greenhouse leak. If such a problem occurs, you can use a plastic corner by gluing it along the edge of the window. This will help water run down the V-shaped edges without getting into the cracks. In addition to the corners, you can use any durable convex material of linear shape.
- To prevent deformation of the greenhouse from snow, you can remove the polycarbonate from the frame for the winter. It's very easy to do. Several ties are unscrewed, and the polycarbonate is rolled up and stored indoors. At the same time, in the spring the soil in the greenhouse will also be renewed due to melted snow.
- If there is no desire or opportunity to remove the polycarbonate, you can install wooden spacers every two meters from the inside of the greenhouse. This way, even a large layer of snow will not be able to deform the structure, and there will be additional protection against it being overturned by the wind.
- Don't forget about the greenhouse in winter. Sometimes you need to go inside and check how securely everything is built.
- During spring and summer thunderstorms, boards 30 cm thick should be attached to the bottom of the structure to avoid being overturned by the wind. Self-tapping screws can be used to fasten the boards. The same boards can be used to divide the greenhouse into two ridges and a passage. This will prevent the spread of pests and soil infections.
Greenhouse assembly
The disassembled greenhouse can be easily transported in the trunk of a car, and the cellular polycarbonate cover, rolled into a roll, has a length of 2.10 and 70 cm in diameter, which is also convenient for transportation.
Assembling the greenhouse pleases all its owners with its simplicity and ease. The main reason for this is the interchangeability of greenhouse parts. And all models of the “Harvest” series, unlike others, have the correct cutting of the polycarbonate coating, in which the honeycombs are directed downward, towards the ground.
To quickly and easily assemble a “harvest” greenhouse, you will need the following tools: a screwdriver with reverse, a screwdriver, a hammer, an angle grinder with a disc for concrete (for cutting polycarbonate), drills for self-tapping screws.
One of the advantages of the Harvest greenhouse is that there is no need to drill polycarbonate in it. To install it, a special fastening tape is used, thanks to which the polycarbonate will last much longer, and the assembly process itself will be much faster. Polycarbonate is included in the greenhouse kit, has a thickness of 4 mm, and is initially covered on both sides with a protective film - white and transparent. It is attached to the greenhouse with the transparent side facing out.
Unfortunately, not everyone liked the assembly of the Harvest greenhouse. Despite the speed of installation of the greenhouse, one could hear complaints that the doors had to be tightened many times, as well as about the unknown reason for the sagging of the polycarbonate covering.
The greenhouse has T-shaped legs that are dug into the ground to a depth of 25 cm. You can also make a simple foundation and install the greenhouse on it.
All greenhouse doors have vents for air circulation. To add strength to the greenhouse, special frame reinforcements are sold.
Unfortunately, the Harvest Economy greenhouse model does not have good installation instructions, it does not contain detailed photos, and the installation procedure is explained very vaguely. Therefore, before starting installation, it is advisable to watch the video instructions, which are much clearer and more accessible.
Price
The cost of the Harvest Elite greenhouse will depend on its length. So, for a four-meter structure you will need to pay 17-19 thousand rubles, depending on galvanization. This means the price for the frame along with polycarbonate. Separately, a frame of this length will cost 11-13 thousand rubles.
A six-meter structure will cost 20-23 thousand rubles (frame 14-16 thousand rubles), an eight-meter one - 25-28 thousand rubles (frame 18-19 thousand rubles), a ten-meter one - 30-35 thousand rubles (frame 21-25 thousand rubles).
If you need to add length to the structure, you can purchase a two-meter insert. It will cost approximately 2,900 rubles for a frame and 4,500 rubles for a frame covered with polycarbonate.
There is a separate fee for assembly. It will also depend on the length of the greenhouse:
- 4m - 4.5 thousand rubles;
- 6m - 5.5 thousand rubles;
- 8m - 6.5 thousand rubles;
- 10m - 7.5 thousand rubles.