A high-quality greenhouse can withstand 10 or even 15 years of operation. Such figures are a theory, but in practice, many owners are faced with the fact that the service life of the structure is only 2-3 years. If the installation was done on your own, then they usually blame themselves for this, although most often the components and their quality. If you purchased a ready-made kit, then the manufacturer is “to blame” for everything, which is not always true, although it is not without reason. The “Dacha treshka” greenhouse, developed by , is used quite often today; it has certain advantages and disadvantages, this applies to both its assembly and its operation. Let's try to understand these aspects and find out whether the long-term service life of this design is achievable.
Greenhouse equipment
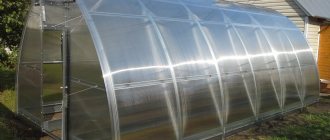
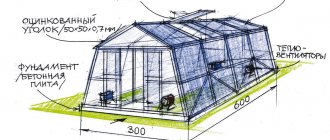
The “Dachnaya treshka” greenhouse model went on sale almost five years ago. It has a standard width and height (3 and 2.1 meters, respectively), but the length is an optional parameter and can be selected depending on specific needs. The manufacturer offers options for 4.6 and 8 meters, but if necessary, the length can be further increased to the required level. Basic package includes:
- prefabricated frame and fasteners;
- end, hinge and door seals;
- windows and doors;
- stands for ground installation.
You can purchase ready-to-install kits or frames separately. If you need a finished polycarbonate structure, you can choose from three options:
- “Dachny” is the cheapest solution, but this is “compensated” by the fragility of the structure’s service life (up to 4 years), as well as the small thickness and density of the profile);
- “Standard” - service life is 10 years, thickness and density are average;
- “Premium” - lasts the longest, up to 15 years, and is characterized by increased sheet density.
It is possible to equip a standard greenhouse set with additional elements, for example, side windows, a heating set, shelves and partitions, galvanized beds and an automatic ventilation system.
Hydraulic
Automatic opening of the window with a hydraulic drive is reliable. This lever system can be purchased at a store or made yourself.
The principle of operation of the mechanism is based on the ability of liquids to expand when heated. Factory devices consist of a hydraulic cylinder with liquid (paraffin or oil) and a movable rod attached to the window. When the air in the greenhouse is heated, the liquid in the hydraulic cylinder expands and pushes out the rod, which gradually opens the window. The air cools, the liquid narrows and the window closes.
The do-it-yourself system works like communicating vessels.
One of the vessels is located below and acts as a thermostat. It is sealed, half filled with liquid and half with air. Another vessel is located at the top and acts as a weighting agent. The window leaf must be fixed on a rotating central axis. A weighting material is installed on one side of the sash, and a counterweight on the other.
As the temperature in the greenhouse rises, the air in the lower vessel expands and pushes liquid into the upper vessel, and the window opens. When the temperature in the greenhouse drops, the system works in the reverse order and the window closes.
This design can be made using ordinary plastic bottles.
This is the simplest, but at the same time effective automatic window opening system. A minimum of effort and materials are spent to create it.
The disadvantage of this system is that the liquid takes a long time to cool down. In case of sudden cold weather, the window will close for about 20-30 minutes. Hypothermia can be detrimental to cucumbers and other crops that cannot tolerate cold.
Advantages and disadvantages
This design is not ideal; it has both advantages and disadvantages, which a potential buyer should be aware of. Benefits include:
- compact packaging;
- ease of use of the finished design;
- availability of sufficient space inside the greenhouse;
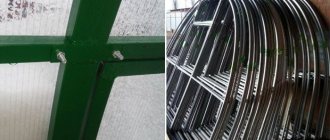
- resistance of the galvanized frame to corrosion.
The main disadvantage of the greenhouse is a continuation of its advantages and is associated with the use of a hat profile in the design.
Yes, it is light in weight and inexpensive, but its mechanical strength leaves much to be desired. This point can be compensated for by installing additional supports, but even in this case, peak snow loads may be excessive. The manufacturer himself calls the collapsible frame an advantage of the greenhouse and this is indeed so; another thing is that this leads to an increase in items for assembly and can confuse an inexperienced assembler. This is why the service for assembling a greenhouse is so in demand that sometimes you have to wait quite a long time for specialists to arrive. At the same time, the build quality is not always at the required level due to the difficulty of control on the part of the company over this point.
Device
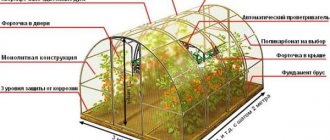
The design of vents in greenhouses may differ in size, location and opening mechanism. The last characteristic is the most significant. To organize good air circulation, it is possible to use natural or forced ventilation.
In a film or glass greenhouse made independently, they usually use the simplest and cheapest way to equip the greenhouse with the correct microclimate - natural ventilation. Natural ventilation involves ensuring air exchange through open doors, windows, and vents. The overheated and humid air of the greenhouse is gradually replaced by fresher outdoor air.
Considering that hot air tends to rise, you should install a window on the roof, and the side position of the door will ensure air flow.
Such ventilation will sufficiently provide good conditions in a small greenhouse, but requires mandatory human control. However, for large greenhouses such ventilation will not be enough.
Modifications “Dachnaya Dvushka” and “Dachnaya 2-DUM”
The “Dachnaya 2-DUM” model preceded the “three-ruble note” and is not very different in appearance, the difference is visible only in the struts installed under the arch and the overall height. In theory, the snow load should be quite high, up to 150 kilograms per square meter (180 is the value for a three-ruble note), but in practice its resistance to snow masses is minimal. This state of affairs forced the manufacturer to give only a one-year warranty for the greenhouse and classify it as an economy option.
The “Dachna kopeck piece” model is also positioned as a budget model, but has a higher resistance to snow loads (240 kg/per 1 square meter) and has a two-year warranty.
To ensure that the service life of any greenhouse is as long as possible, you should adhere to the recommendations given by:
- Before purchasing a greenhouse, you should take into account the wind load characteristic of a particular area, for example, “Treshka” can withstand no more than 24 meters per second;
- You should not install a greenhouse in an area where the snow load index is higher than that nominally intended for it;
- You should not leave a polycarbonate greenhouse unattended under the snow for the winter; if control is not possible, the panels must be removed.
Selecting a location
You should start by determining the location for installing the greenhouse. If the site has a small area, then there will not be much choice; for large spaces there are different options. In order for the choice to be correct and error-free, you must adhere to some recommendations:
- the greenhouse must be installed at a distance of at least 2 meters from any nearest object from which snow may fall on it;
- The structure should be placed on a flat surface; hills or lowlands are not suitable for installation;
- the ideal option is that the greenhouse is located in the south-eastern part of the site and is covered on the north side by some kind of structure;
- on the cardinal points, it is best to place the greenhouse with its ends facing west and east;
- If there is a roadway next to the area, the greenhouse must be placed away from the fence so that dust from the road does not fall on it.
It would not be amiss to provide for the potential expansion of the greenhouse in the future, especially if business development is planned.
How to make it yourself?
Having familiarized yourself with the features of the design of vents, you can make a homemade device from available materials. First you need to choose the right place for the future structure, taking into account the location of the frame slats and the physical properties of the air.
As a rule, vent structures are fixed on rotary hinges from the outside. The fastening mechanism will not greatly affect the microclimate in the greenhouse. But if in the future it is planned to use an automatic device, it is necessary to think in advance about the method of attaching it.
When all the drawings and calculations have been made, it is necessary to prepare the material and tools.
To work you will need the following components:
- hacksaw for metal;
- knife-cutter;
- screwdriver;
- self-tapping screws with a seal and a wide head (such screws will prevent water from entering the greenhouse during rain);
- a file to process the edges of the profile;
- connecting parts for fastening the profile.
When creating a window, you should adhere to the following sequence:
- first, a hole is cut in the desired location; you should act carefully, taking into account the dimensions with all allowances;
- the base for the sheathing is cut out, the sides of the frame should be 0.5 cm smaller than the sides of the hole for the window;
- by tightening the profile with mounting tape, stiffening ribs are created in the corners, and if this is not enough, a diagonal rail is added;
- fitting is carried out, if everything is satisfactory, the sharp corners of the structure are polished with a file;
- the frame is coated with a primer or regular paint and connected to polycarbonate;
- all holes in the sheet must be sealed with sealant or other means;
- the edge of the hole is covered with rubber and the sash is installed in place;
- hinges, bolt and limiter are fixed.
A simple hydraulic system made from a car's shock absorber can be added to the design. The liquid that will react to temperature will be machine oil. To create a hydraulic automatic machine with your own hands, you will need a car shock absorber rod, a gas spring, a cylindrical metal pipe for oil and two taps.
The shock absorber piston is attached to the desired window.
Taps are attached to the pipe on both sides. One will work to fill the oil, the second to drain, as well as to regulate the pressure in the cylinder. A carefully cut spring is connected to the oil cylinder.
Now, when the temperature in the greenhouse rises, the oil in the pipe will expand and push out the rod, thereby opening the window. When the temperature drops, the oil will regain its previous volume and the valve will close. The design is considered low-cost and easy to implement.
Foundation preparation
A foundation is not a prerequisite for installing this greenhouse, but it is still necessary for year-round use. Here several material options can be taken into consideration: wooden beams, brick, strip foundation poured to a shallow depth.
The last solution is considered the most rational in this case, but before making the final choice in its favor, a variety of factors should be taken into account, in particular:
- if the place for the greenhouse turns out to be unsuccessful, then moving it to another will be very difficult;
- It is difficult to fill the foundation alone; outside help is needed, as the solution hardens quickly;
- costs will increase and the payback period for the greenhouse will take longer.
On the other hand, such a foundation reliably protects against ground frosts and pests, and also protects the greenhouse from deformation, increases its stability and reduces heat losses.
The procedure for pouring a concrete foundation involves the following activities:
- clearing and marking the area to suit the size of the greenhouse;
- digging a trench with a width of 15 and a depth of 30 centimeters;
- compacting the bottom and covering it with a layer of sand 10 centimeters thick;
- moisturizing this layer and compacting it;
- installation of formwork from boards;
- making a solution of cement and sand in a ratio of 1 to 2, water and crushed stone;
- pouring the foundation;
- removing the formwork after a week and covering the foundation with waterproofing.
Model range of greenhouses "Volya"
The assortment of folk greenhouses includes not only greenhouses and inexpensive greenhouses for the southern regions, but also reliable models for year-round use for farms.
The model range is not only wide, but also well structured, including models for every taste and wallet size.
Recently, experts analyzed these reviews and compared them with the results of many years of “field” tests of greenhouses, as a result of which it was determined that these negative reviews are unfair
The entire model range can be divided into three types:
- Country houses with polycarbonate coating and frame strength classes: titanic (three models); guaranteed (two models); standard (three models); class "Sesame" (model "Dacha Zvezdochka").
- Country greenhouses covered with polyethylene film (five models).
- Industrial with polycarbonate coating of the “Farmer” type (rows of models width (m): 3.5; 4.2; 4.5; 5; 7.5).
If your site is flat, then a foundation is not needed, and you can secure the structure in the ground with special T-shaped ends of the frame arcs
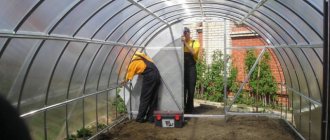
Frame assembly
At first glance, it may seem that assembling this greenhouse is very difficult, but in reality everything is not so scary, it’s just that the time spent the first time will be quite large. The main problem is that there is little text in the instructions, it consists almost entirely of diagrams, but the markings of all parts of the frame are intended to help in this matter.
The connection is made “profile to profile” using factory fittings. First, the power arcs are assembled, after which the purlins are attached to them. Next, the lower arcs are installed with the lower purlins secured to them on both sides. Racks and supports are attached to these arches, also connected by purlins. Then the end parts of the frame are installed and the internal struts are assembled. They are attached to each of the arches using struts and ties inside the frame, then the struts and ties are connected by a stiffening bevel.
The next step will be the installation of tubular door reinforcements, as well as the installation of the end brackets necessary to secure the panels. Finally, the operations of assembling the windows and doors are performed.
Note: During the assembly process, the greenhouse does not have sufficient rigidity, so it would be a good idea to further strengthen it with improvised means.
Drilling additional holes or installing parts not included in the kit is not recommended. All this can compromise the integrity of the structure and will void the owner’s warranty.
Peculiarities:
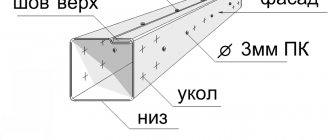
The reinforced frame is made from a galvanized V-shaped metal profile 60×20 and 1 mm thick. Installation is carried out both on the ground using T-shaped parts, and on a foundation made of timber or blocks. A passport and detailed assembly instructions, sealing profiles and all fasteners are included. If the buyer wishes, professional installation teams from the factory are available.
There is no need to disassemble the greenhouse for the winter; the base can withstand a moderate amount of snow up to 90 cm, but to protect against pressure on the sides, the manufacturer recommends removing the snow cap once or twice during the winter. Also, you should not place two greenhouses too close to each other or next to a fence, leave a margin of about a meter.
Polycarbonate fastening
Initially, you will need to mark the polycarbonate sheets according to the option proposed in the instructions. This can be done with a regular saw or electric jigsaw, immediately marking the protective UV part of the sheet, since after removing the film it will no longer be possible to distinguish it from the normal side. Fastening is carried out using complete fittings in accordance with the instructions. It is important to remember that the degree and force of tightening must be controlled with particular care, otherwise the surface of the sheet will be deformed and destroyed.
FAQ
Question
— What can be grown in polycarbonate greenhouses?
Answer
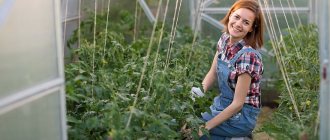
“The diversity in this regard is very large; almost any agricultural crop can be grown in greenhouses; the main thing is to create the correct microclimate inside the structure corresponding to it.
Question
— What are the differences between polycarbonate greenhouses?
Answer
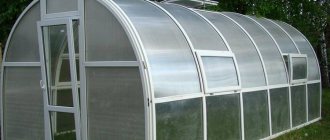
— There are quite a few types of greenhouses; there are different options, for example, arched or with a pitched roof, with a galvanized profile or with a frame made of steel or galvanized pipe. Greenhouses made of galvanized profiles are the cheapest, they are considered an economical option and are resistant to corrosion. Steel pipes are good in their ability to withstand significant snow and other loads, but their condition should be monitored to prevent rust from occurring. Structures made from galvanized pipes resist external influences very well and are distinguished by their frame strength.
Question
— What is the preparation of a greenhouse for winter?
Answer
— First of all, the correct choice of location for installation will help the greenhouse survive the winter cold. It must be located away from buildings and trees so that snow does not fall on it from them. The greenhouse should also not be exposed to too much wind load. You can clear the snow around the greenhouse with your usual shovel, but it is not suitable for the structure itself; a broom is needed. This is explained simply: a shovel can damage fragile polycarbonate and its protective ultraviolet layer.
Question
— What thickness should a polycarbonate profile have?
Answer
— The range from 4 to 6 millimeters is optimal for regions with average snow load. Options of 8 or 10 millimeters are needed for those areas where such a load is considered high.
Question
— Is it possible to use a polycarbonate greenhouse in winter?
Answer
- Yes, this is possible, but it requires installing a foundation. In addition, for the safety of the crops grown, a thermal insulation pad is necessary. Given the high degree of condensation in the greenhouse in winter, it will not be possible to grow plants that do not like high humidity.
What to choose?
Both options are made of a galvanized frame, are inexpensive, and do not require the installation of a foundation. However, Volya is much more difficult to install, and its service life raises questions. With Pomidorkin House products you can safely grow vegetables and herbs all year round and leave them for the whole winter without regular cleaning. The choice of a specific solution is up to the buyer, but the main thing is always worth remembering: without a reliable foundation, even premium polycarbonate will not withstand and will crack.
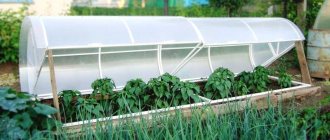
Are you the owner of a small but cozy dacha plot and are you thinking about starting the dacha season as early as possible? Or are you simply planning to grow heat-loving crops? Then you need to purchase a greenhouse or greenhouse. And the “Dachnaya-Dvushka” greenhouse is an excellent option for a small vegetable garden, since it takes up quite a bit of space, but will delight you with an excellent harvest in the fall.
Choosing a greenhouse in the modern gardening market is extremely difficult. And all because the choice of these designs is quite large, but few know how to buy exactly the greenhouse that is suitable for a specific summer cottage.
The fact is that now greenhouses differ not only in size, but also in the quality of materials, complexity of installation, and ability to withstand extreme weather conditions.
Polycarbonate is the best covering for a greenhouse
Perhaps these are the main points regarding the choice of greenhouse. However, at the beginning of the article we talked about a modest vegetable garden, for which the only right choice would be a small greenhouse. The best option is the Dachnaya-Dvushka greenhouse, which is produced and sold by the Russian company.