Do you want to provide yourself with fresh vegetables from your own garden, but the plot next to your house is too small? Are you planning to switch to cultivating plants indoors, but do not have enough experience in this matter? Are you planning to grow seedlings? Ask yourself these questions, and if the answer to at least one of them is “yes,” then it’s time for you to think about how to build a polycarbonate lean-to greenhouse with your own hands.
DIY polycarbonate lean-to greenhouse
Pros and cons of a wall greenhouse
There are a sufficient number of positive aspects of the wall-mounted greenhouse, namely:
- Space saving, since this greenhouse is attached to one of the walls of the house.
- It does not require a large amount of materials, so in the end the costs are not too significant.
- Easy and simple to install.
- Quite durable, especially if you place the greenhouse on the south side to provide maximum protection from strong winds.
- If desired, you can make an entrance from the house, which will be more convenient and will also allow heat from the house to enter the greenhouse.
You can connect the greenhouse to a central heating system and will not need to install heating devices.
Despite a significant number of advantages, a wall-mounted greenhouse also has some disadvantages, which should definitely be taken into account:
- The size of the greenhouse directly depends on the size of the wall to which it will be attached.
- Due to the wall of the house, there will be shade in the greenhouse and not so much sunlight will pass through.
- The choice of material for building a wall-mounted greenhouse depends on the architecture of the house.
How to make a lean-to polycarbonate greenhouse with your own hands
There are many ways to make a greenhouse for your garden with your own hands. However, it is better for a novice summer resident to stick to the simplest model of a film shelter. To make such a model, you only need plastic film, materials for the frame and skillful hands, as well as the desire to work hard for a rich harvest.
- Main advantages
- Features of growing vegetables in a greenhouse
- The simplest model of a greenhouse
- Increasing the service life of a homemade greenhouse
- Features of industrial structures
Types of wall greenhouse
A wall-mounted greenhouse can be built in different variations, so there are several types that have their own characteristic features and nuances in construction:
End
Such a greenhouse, in principle, can have any shape, but its end must rest against the wall of the house. As a rule, such greenhouses are small in size and equipped with an entrance from the house. The length of the end greenhouse does not depend on the wall of the house, but on personal preferences and the area of the site.
Polygonal
It is considered the most beautiful type of wall greenhouse. In most cases, this type of greenhouse is used to design a winter garden, since they are not very practical in their use. Typically, a polygonal wall greenhouse uses a metal or wood frame and glass as a covering.
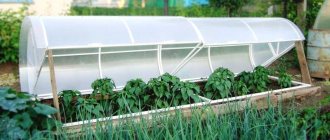
Single-pitch
One of the most common and practical types of wall-mounted greenhouses. This greenhouse has a simple and economical design; in most cases, the entrance is located on the side. In appearance, a lean-to wall greenhouse resembles a standard gable greenhouse, but cut in half.
Semi arched
You could say it’s similar to a lean-to greenhouse, but the design is a little more complicated and there are a significant number of bent elements. As a rule, polycarbonate is used as a covering for such a greenhouse.
With entrance from home
One of the practical types of greenhouses, which is also easy to use. It is worth noting that such a greenhouse can be equipped with only one entrance from the house or an additional one from the street.
Preparatory work
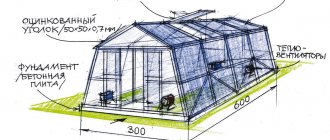
Before starting construction of an extension to the premises, preparatory work should be carried out. The first step is to develop drawings of the future lean-to greenhouse. In the drawing, indicate the dimensions of the building - length and height. These two values should not exceed the dimensions of the room to which the greenhouse will be attached.
You also need to prepare the foundation. Foundation construction technology:
- Dig a trench across the entire area of the future extension - depth 40-50 cm, width 25-30 cm;
- Using boards, fiberboard or chipboard sheets, assemble the formwork;
- Place reinforcing mesh in the trench to strengthen the structure;
- Install support pillars;
- Pour concrete solution;
- After 5-7 days, the solution will become solid and construction of the greenhouse can begin.
Wall greenhouse frame
You can make a frame for a wall-mounted greenhouse from the following materials:
- Wooden beams are one of the available materials that can be processed very well. When creating a wooden frame for a wall-mounted greenhouse, it is necessary to build the upper and lower supports, and then the slopes and the door frame. When creating a frame from this material, you can use various fastening elements, but all cracks should be well sealed with tow.
- Profiled pipe is a sufficiently arched material to form the frame of an attached greenhouse. As a rule, pipes measuring 40 by 20 mm are used to create the frame, and pipes of 20 by 20 mm are used to connect them. The most suitable option for fastening this frame is considered to be welding and the structure must be assembled from the end walls.
- PVC profile is one of the simplest and lightest materials for creating the frame of an attached greenhouse. The frame made of this material is quite resistant to loads, but requires fixation, as it may not withstand strong gusts of wind.
Polypropylene pipe is one of the most popular materials for building the frame of a wall-mounted greenhouse. The material has a high level of flexibility, is light in weight, but is quite difficult to attach to a concrete surface.
Foundation
For the construction of a foundation, a beam with a cross section of 100x100 mm or 150x150 mm is suitable. It is measured and cut according to the required dimensions. Before laying in prepared trenches, lumber must be treated with an antiseptic.
Advice! For the foundation for a wall-mounted greenhouse, it is best to choose larch timber, as it is characterized by high strength and moisture resistance.
Immediately before laying in the trench, the beams must be connected to each other. The connection can be made using a metal corner and self-tapping screws; fastening with dowels is often performed by connecting “into a paw” or “in half a tree”.
The resulting box of beams is then carefully placed in the trench, after which the box is leveled horizontally using a level.
The last thing to do is fix the foundation made of beams. This can be done in two ways:
- Drill a through hole in the beams at the junction, and then drive a metal rod at least 50 cm in length into the ground through it.
- Install metal pins 50 cm long at the inner corners, driving them firmly into the ground.
After the foundation of the greenhouse is securely fixed, you can begin to assemble the frame for the extension to the house.
Covering a wall greenhouse
Any of the following materials can be used as a covering for a wall-mounted greenhouse:
- Polyethylene is the most inexpensive material that can be used to cover a wall-mounted greenhouse. Reinforced polyethylene film is considered the most practical and durable for this purpose. It is worth noting that this material protects plants well from sudden changes in temperature and precipitation, but it collects condensation inside the greenhouse, does not allow air to pass through, and is not very durable to use.
- Glass is one of the durable materials and transmits sunlight well, so it is often used as a greenhouse covering. At the same time, it is worth considering that this material is too fragile, heavy in weight and has a fairly high price.
Cellular polycarbonate is the most practical option for covering a greenhouse, as it is durable and resistant to stress. Also, this material perfectly transmits sunlight, has good thermal insulation, is easy to process and bends.
Among the disadvantages, it is noted that polycarbonate has a high cost and can become deformed over time due to temperature changes.
Features of industrial structures
Despite the large number of ideas for building homemade greenhouses, many summer residents prefer to use industrial greenhouses. Among them there are sometimes quite unusual, original models. At the same time, they are simple in design and easy to use.
In order for vegetables to grow well under the film, you should choose a greenhouse made of thin, “breathable” material. The main condition for a successful purchase is purchasing equipment in specialized stores, where a guarantee is provided and detailed operating instructions are attached to the greenhouse. It is advisable that the step-by-step instructions for assembling the equipment are accompanied by drawings or photographs. The instructions must be in Russian only. The warranty is provided for a minimum of one year.
The more capricious the vegetable or berry crop, the thicker the covering material should be. And, conversely, a thin film is quite suitable for unpretentious plants. The main thing is that it provides good protection from wind, hail and heavy rain. You can read about agricultural technology for growing various crops in greenhouses in specialized literature or on online forums where gardeners share their accumulated experience.
You should not choose a greenhouse with a complex design. Otherwise, it may turn out that building a homemade greenhouse is much simpler than assembling ready-made equipment. You should pay attention to the country of manufacture, since Russian-made greenhouses are designed for colder climates than European and Chinese products. It must be borne in mind that purchased products are often small in size, therefore, if a gardener plans to grow a large number of vegetables, it is better to calculate the dimensions of the shelter yourself and make a homemade greenhouse of any size.
A greenhouse made with your own hands using any available materials is a great chance for an amateur gardener to increase the yield of heat-loving vegetable and berry crops. And for a professional, competent use of a greenhouse will allow him to grow agricultural products for sale all year round and successfully earn money while doing what he loves. The main thing is to choose the right model. In most of the Russian territory, where the weather can sometimes be very capricious, a purchased or homemade greenhouse is an indispensable gardening equipment.
The best wall greenhouse models
If there is no desire or opportunity to build a wall-mounted greenhouse yourself, then you can buy a ready-made one in disassembled form and just assemble it.
Below are the manufacturers and best models of greenhouses that can be used as wall-mounted ones:
Greenhouse "Gardener Pristenok-Reinforced"
A high-quality lean-to greenhouse, it can be used for an extension to the wall of a house or a fence. This greenhouse has 2 doors and end windows, is covered with polycarbonate, and the frame is made of galvanized metal.
Greenhouse Green Storage G1002F
A popular greenhouse, which can be either wall-mounted or standard type. This greenhouse is equipped with a sliding door and 2 windows on the roof. The frame of the greenhouse is made of aluminum and covered with cellular polycarbonate.
"Wall" Very Strong
One of the most durable and durable wall-type greenhouses. The frame is made of galvanized steel pipe, and the coating is polycarbonate with protection from direct sunlight. This greenhouse model has 2 doors and windows.
Step-by-step installation
All work comes down to several stages:
- the site is prepared and the foundation is laid;
- a frame made of suitable materials is installed;
- the frame is covered with polycarbonate sheets.
Let's consider these points in more detail.
Foundation work
The area is leveled, markings are applied along the perimeter according to the drawing using pegs and twine. The construction site is cleared of debris, excess vegetation, grass, etc. are removed.
Suppose we are building a light summer greenhouse. In this case, the steps to lay the foundation are as follows:
- A trench is dug along the perimeter of the site, the width of the timber used and the depth of half the timber plus 10 cm for the sand cushion.
Territory. on which the foundation will be laid must be level - The trench is leveled, then filled with sand (or gravel) and compacted thoroughly.
- A frame is constructed from timber that matches the length and width of the trench. All wooden parts are treated with an antiseptic.
- We cover the bottom of the trench with plastic film, place the frame on top and wrap it with film. We reliably level the frame in the hole, laying down soil or bars, and attaching the film.
- It is recommended to drill holes in the timber and secure the frame in the trench with metal pins.
A more substantial construction will require laying a shallow shallow foundation.
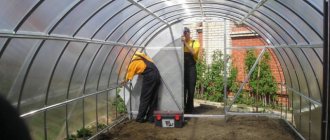
Frame construction
The materials can be:
- profile beam;
- metal profile;
- pipes (aluminum or PVC).
During installation, take into account the presence of doorways, windows and vents for ventilation. The roof slope angle is 30°.
You can use wood or metal for the frame of a lean-to greenhouse
Drill holes to attach the rear profiles to the wall of the building, then fasten them. Next comes the turn of the horizontal guide. The horizontal posts are attached towards the supports of the front part.
Wooden parts are treated with an antiseptic, metal parts are painted with white oil paint in several layers.
Polycarbonate finish
The sheets are cut using a knife or jigsaw according to the existing drawing. Drill holes for thermal washers for polycarbonate with some technical clearance (2–3 mm). The ends are sealed, then secured to the frame with self-tapping screws and thermal washers. The sheets are overlapped. The direction of installation is from top to bottom.
After molding, polycarbonate sheets are attached to the frame of a lean-to greenhouse using self-tapping screws and thermal washers
The constructed greenhouse needs to be equipped. To do this, electricity is supplied to it, it is insulated and heated. You can also provide shelves for seedlings.
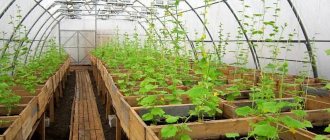
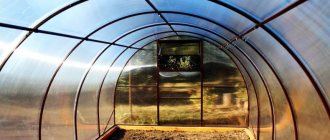
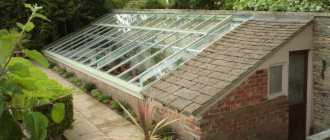
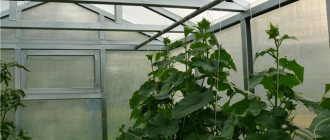
Photo of a wall greenhouse
We make the roof
Even if your budget is limited, try to purchase the highest quality polycarbonate for your roof.
Before cutting the material, carefully consider its cutting. Ideally, the roof is made from a single piece. In this case, the polycarbonate ribs run parallel to the rafters. Please note that the edges should extend approximately 20 centimeters beyond the dimensions of the greenhouse walls.
Individual sheets are connected with a special profile - this is the only way to ensure tightness. And the ends of the polycarbonate also need to be sealed:
- self-adhesive foil on the side of the house (and on the walls above);
- perforated tape on the opposite side.
Sheets of transparent coating are fixed with standard self-tapping screws for metal tiles - do not forget to use sealing rubber washers.
Once the roofs are completed, they move on to the long wall and then to the end walls. Windows and doors are finally cut on site.
The last stage - all joints are made with neutral silicone. The seam in the area where the greenhouse meets the house can be sealed with polyurethane foam.
Source of the article: https://parnikprofi.ru/pristennaya-teplitsa-s-odnoskatnoj-kryshej.html
Ready-made drawings with dimensions
Option 1 – sectional gable greenhouse.
Typical design of a sectional greenhouse with a gable roof
Using the calculation of 1 section as a basis, you can build a greenhouse of almost any length. This is especially convenient when building in an open field, when each section is used for a specific type of garden crop.
Option 2 – Mittleider greenhouse.
The design of the Mitlider greenhouse allows you to get a good greenhouse for growing flowers and other garden crops. The peculiarity of the roof makes it possible to place additional vents for ventilation and temperature regulation inside.
Option 3 – winter.
Drawing of a winter greenhouse made of wood with dimensions in centimeters
A winter greenhouse is usually located above a pit. Then the plants will be below the soil freezing level, and less energy will be required for heating.
You can learn about heating a greenhouse in winter from the article on our website.
Option 4 – mini-greenhouse for the garden and home.
A small greenhouse is suitable for beginners in gardening. It will allow you to get used to excavation work throughout the year, and in cold weather it will please your family with a healthy harvest.
Frame materials
It cannot be said that the assortment is large, since only three types of building materials are usually used. This:
- tree;
- metal;
- PVC.
Tree
Even the lazy person already knows about its popularity. The building material most often is timber with a square or rectangular cross-section. It is readily chosen for classic greenhouses with strict forms. In the case of arched or pointed structures, the craftsman will be in for a big embarrassment, since it is unlikely that it will be possible to bend the material without getting a mass of defective parts as a result. Constant humidity is the reason for careful processing of timber. It is dried and several layers of antiseptic impregnation are applied to protect against insects, rot, fungus and mold.
Metal
To construct the “frame,” profiles are used: steel or aluminum. A hit was a profiled pipe with a cross-section of 20x20 mm, or more impressive dimensions. The reasons for its popularity are sufficient strength, low weight and reasonable price. Galvanized or painted products are durable, as these coatings guarantee protection against corrosion. Elements of metal frames are assembled in various ways: using welding, self-tapping screws, nuts and bolts, “crab systems”.
Polyvinyl chloride
This almost weightless material is used for the construction of small structures that are not so susceptible to wind and snow loads. Flexible polyvinyl chloride profiles/pipes are easy to transport, store and work, which takes a minimum amount of time to construct the frame. Low cost is another “charm” of the material.