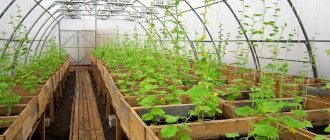
Hello, our dear friends. Lovers of homemade twists and fresh tomatoes. We all love summer for the variety of goodies that can be found in our well-kept garden.
There is green parsley, a pimply cucumber, and a perky radish with sparkling red sides. But in winter, all these joys can only be found in the supermarket, and at very steep prices. Sad, right?
Meanwhile, a wall-mounted greenhouse with a pitched roof will completely help you out. Even residents of high-rise buildings who are lucky enough to have housing on the ground floor add one to their apartments as a winter garden.
There is no need to talk about summer residents. But what is so attractive about such designs, and what shortcomings do they hide? About all this in our review today.
What are the types of wall greenhouses?
If you decide to build a greenhouse near the wall of your house, then you need not only to choose a suitable location, but also to decide on the type of structure. Such greenhouses differ in the complexity of their design and their location to a residential building and are:
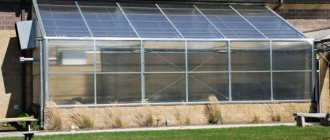
- End ones, which are attached to the end of the building. Thanks to this connection, they can be single-pitch, gable and arched, and also have two entrances: from the street and from the house. The length of the structure can be made to any length, and it depends on the area of the site.
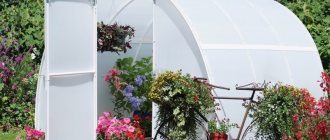
- Polygonal greenhouses are used as a decorative structure in which flowers are grown. They serve as a winter garden. The frame is assembled from wood and covered with glass or polycarbonate sheets.
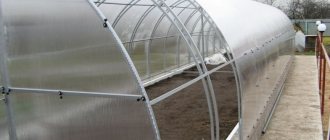
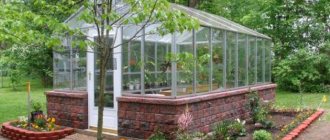
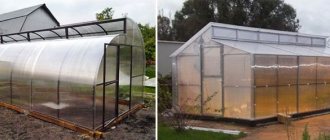
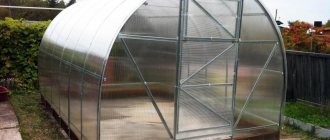
- Lean-to-wall greenhouses are economical and are the most common of all types. This is a greenhouse that is divided into two parts. It is located along the wall of the house and the entrance is on the side of the building. A lean-to wall greenhouse has a small usable area, which is its disadvantage.
- Semi-arched greenhouses have not yet gained popularity due to their complex design using bent slats. It is difficult to build such a structure on your own and you need to contact specialists. This greenhouse is covered with polycarbonate.
Preparation of materials and tools
As mentioned above, the wooden structure of a greenhouse attached to the wall is the best option in terms of budget savings and ease of installation. For our structure you will need:
- Beam with a section of 100x100mm;
- Beam with a section of 50x100mm;
- Door hinges 2 pieces;
- Window hinges 2 pieces;
- Galvanized or phosphated self-tapping screws;
- Bolts or studs for tightening the harness;
- Galvanized corners to strengthen the structure;
- Valves 2 pieces;
- Polycarbonate;
- Thermal washers for fastening the polymer coating.
ATTENTION!!! All lumber must be of natural moisture content. Otherwise, the frame will be deformed due to warping and torsion of the wood due to increased humidity inside the structure.
Tools for constructing a greenhouse attached to the wall will require:
- Leg-split;
- Roulette;
- Hammer;
- Square;
- Set of wrenches;
- Screwdriver;
- Saw.
Advantages and Weaknesses
Wall-mounted greenhouses are in demand because of their advantages, namely;
- Savings in installation;
- Occupies a small area;
- Protected from the wind;
- Possibility of supplying heating system, water and electricity;
- Stable design.
But despite all the advantages, wall-mounted greenhouses also have their weaknesses. These include:
- Limited area of the greenhouse, which depends on the wall of the building and the site itself;
- Limited lighting due to the wall of the building to which it is attached;
- Increased humidity in a greenhouse can lead to the destruction of the supporting wall of the house.
Methods for attaching a greenhouse to a house
To attach a greenhouse structure to the end of a house, you need to determine important aspects for yourself:
- Location of the greenhouse;
- What type of building will it be;
- Necessary material for construction and equipment.
When choosing a location for a greenhouse, you need to take into account the fact that plants require light and heat. Therefore, you need to choose the sunniest place near the house, namely the south side.
When determining the type of construction, you need to pay attention to:
- Spacious interior space;
- Long-lasting natural light;
- Easy maintenance;
- Convenient ventilation;
- Low thermal conductivity.
Lean-to greenhouses fall within all of these criteria. Rainwater will not be retained on the roof, and the plants in the greenhouse will receive enough light thanks to the roof structure, which is usually covered with polycarbonate. The construction of such a greenhouse does not require many building materials.
It is enough to stock up on profiled pipes or wooden blocks to create a frame.
How to build a lean-to greenhouse yourself
To work you will need the following tools and materials:
- For the construction of the foundation - wooden blocks;
- To build the frame - profile pipes;
- For fastening - bolts and screws;
- Metal corners and hinges;
- For covering - polycarbonate sheets.
Important! The thickness of the sheet depends on the operation of the greenhouse. If it will be used all year round, then you need to choose a sheet fifteen millimeters thick. If the plants are planted in the warm season, then you can take sheets with a smaller thickness.
To build a wall-mounted polycarbonate greenhouse, you need to purchase:
- Tape measure;
- Levels and squares;
- Saw for working on wood and metal;
- Construction knife for cutting polycarbonate sheets;
- Welding machine.
Do-it-yourself wall-mounted lean-to greenhouse
Well, now the algorithm for making a winter garden in expanded form:
Creating a working project
- We decide on the covering material. You have to choose between glass and polycarbonate, while glass will always be preferable, since you are not glazing the windows in your house with thermoplastic.
- Based on the chosen cladding, skills and available budget, we also plan the construction material. Again, it could be wood or metal. The first one is easier to process and does not impact the budget as much. The second one is reliable and looks beautiful. We would advise you to opt for a steel profile. It will be more solid than lumber, but cheaper than aluminum.
- We determine the intended purpose of the greenhouse and the desired operating load.
- Based on the previously indicated data, as well as taking into account the geometric and architectural features of the mother building and the existing site plan, we are developing a working drawing of the greenhouse, and creating a list of all the tools and materials necessary for the implementation of the planned project. Agree, discovering that you are missing something already during the construction process is unpleasant, to say the least.
Purchasing materials and clearing the site
- Having finished with the paperwork, we purchase the required quantity of building material, or better yet, even with a small supply. (+10-15% is usually enough). And we conduct an audit of the existing tool. When working with metal, electric welding, a grinder and a drill are a must!
- At the same time, we clear the construction site. It is necessary to remove all the debris from there, level out uneven areas, cut down interfering bushes, or even dismantle the blind area that has been poured around the house. Concrete is not the best flooring for a greenhouse.
Excavation
- We mark the contours of the shaped foundation and dig a trench under it, about half a meter deep and 250-350 mm wide. The main thing is that it is convenient to choose the land. Note that if we were planning a full-fledged extension, we would have to make a closed foundation and lay it at the same depth as the foundation of the mother building.
- We form a sand cushion 20 cm thick. The sand must not only be poured into the trench, but also compacted using a tamper and water. This layer will help protect the foundation from frost heaving. At the same stage, hammer into the ready-made foundation on which the wall stands, cuttings of 12-16 gauge reinforcement, having previously drilled holes for the crutches with a hammer drill.
Foundation
- If the walls of the trench are smooth and the soil in the area is dense, you can do without formwork inside the “pit”, limiting yourself to small, ten-centimeter sides above the ground level. For sandy or dusty walls, the sides should be installed from the sandy lining itself.
- We reinforce the resulting contour with the twelfth reinforcement. Two rods five centimeters from the bottom of the trench and two at the same distance from the upper border of the formwork. In this case, the step between them will remain within the permissible 400 mm.
- Having finished with the preparation, pour concrete inside the formwork of at least grade M-150, and even better grade M-200. To prepare one yourself, you need to follow the following recipe:
1:1,9:3,2
That is, for one volume of five hundredth Portland cement there are 1.9 volumes of sand and 3.2 volumes of crushed stone.
- When the foundation is strong, and this will happen no earlier than in 28 days, we remove the formwork, lay waterproofing on top of the concrete and build a brick base for our greenhouse. Most often it is laid out level with the base of the house, but not higher than 500-800 mm, especially if the plant is supposed to be planted directly into the ground.
During masonry work, do not forget to embed mortgages between the bricks, to which the frame of the future greenhouse will subsequently be welded.
Work progress on greenhouse construction
- First of all, excavation work needs to be done. To do this, remove all grass in the area where the building will be located. If there is retaliation near the house, it is removed. The ground is leveled. After this, they begin to mark the foundation for the greenhouse. There must be a drawing of the wall-mounted greenhouse, according to which all subsequent work will be carried out. For the foundation, a trench is dug to lay a wooden beam on a sand bed.
- They begin to build the foundation. The wooden beam prepared for this work must be treated with a special solution that protects it from rot. Larch boards are best suited for foundations. This tree is moisture resistant and durable. The boards are connected to each other with metal corners. After this, the wooden box is placed in the trench. Align using levels. The foundation is fixed with metal pins, which are driven into the beams and into the ground to a depth of fifty centimeters.
- Create a frame. The required number of sections are cut from the profiled pipe to attach them to the end of the building using clamps. It is imperative to leave 40 centimeters of free space, which will protect the roof of the greenhouse from icicles falling on it when melting. When pipes are attached to the wall of a house, they create horizontal fastenings. This is done using a welding machine. When the frame is assembled, you need to provide space for ventilation and make an opening window. When the frame according to the drawing is ready, it needs to be painted to avoid corrosion.
- The roof is covered with polycarbonate. Carefully make markings on the sheet and only after that cut them. You need to work with the material carefully, because it is fragile and can break and crack. Drill the fastening points and connect the sheets using bolts with rubber gaskets or plastic profiles.
- The door to the greenhouse can be made on one side.
When all the work on building a wall-mounted polycarbonate greenhouse is completed, you need to start sealing it. All connecting seams are sealed with polyurethane foam or silicone.
Construction stages
Placing the dimensions of the foundation on a plane
At the first stage of construction of the wall frame, it will be necessary to place the markings of the structure on a plane adjacent to the house. To do this you will need:
- Clear the surface of all excess;
- Remove the fertile layer of soil;
- Using a tape measure, cast-offs and twine, mark the perimeter of the base;
- Dig a trench of the required depth for pouring the foundation or laying timber frame.
- After which it is necessary to prepare a reliable foundation.
You can learn how to make a timber foundation for a wall-mounted greenhouse here.
ATTENTION!!! The depth of the concrete foundation must be no less than the depth of soil freezing. In order to save on concrete, the trench can be filled 1/3 with crushed stone and 1/3 with river sand. The remaining part is filled with concrete mortar. This method will not allow the forces of frost heaving to squeeze the foundation out of the ground.
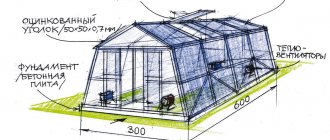
After a concrete base has been prepared for a lean-to wall greenhouse, you will still need to lay a wooden frame made of timber with a cross-section of 100x100mm on it. Corner connections of the beds are made in a paw or in a quarter. You can secure the beams together with staples or pins. The strapping is fixed to the concrete strip using anchor bolts.
Front and rear wall assembly
At this stage of the construction of our lean-to greenhouse made of polycarbonate, adjacent to the wall of the house, two walls are assembled: front and rear. For this we need a beam with a cross section of 50x100 mm. From it you need to make:
- 2 upper beds and 2 lower beds 508 cm long;
- 12 vertical crossbars 152.4 cm high for the front wall;
- 12 vertical crossbars 252 cm high for the rear adjacent wall;
- 22 horizontal crossbars 42 cm long (11 for each wall);
All crossbars intended for the manufacture of the wall part of the greenhouse frame will need to be cut on one side by 30°. This will be the angle of the roof slope.
Now we assemble the small (front) frame. We place short vertical crossbars between the upper and lower legs. The distance between them should be 42 cm. Using a square, we set the correct right angles at the frame. These elements are attached using reinforcing corners and self-tapping screws. In order to increase the rigidity of the structure, short horizontal crossbars are installed between the vertical crossbars.
The tall, rear frame of a wall-mounted greenhouse is assembled in a similar way, with a slight nuance. To provide the greenhouse frame with the proper angle of the roof slope, it will be necessary to cut the upper ends of the long crossbars at an angle of 30°, onto which the upper beam will be placed at the same angle.
Installation of frames and rafter system
After preparing the high and low walls of the greenhouse, they are installed on the prepared frame made of wooden beams. The high frame of the frame is mounted close to the south wall of the house. Screw connections are used for fastening. All cracks are filled with polyurethane foam to reduce heat loss during operation of the wall-mounted greenhouse. The small frame is mounted on the harness in a similar way. Using a square or plumb line, set a right angle and fix the frame with screws to the base and wooden boards to the back wall.
To install the roof, you will need to make 12 rafters from 50x100mm timber. To accurately connect the rafters to the wall of the house and to the upper beam of the front frame of the greenhouse, their ends must be cut at an angle. For the end adjacent to the wall, this angle should be 30°; for the opposite end, it should be 60°. After that, the rafters are laid on the upper beams of the frames and secured with self-tapping screws.
To strengthen the rafter system, 11 crossbars 42 cm long are installed between the rafters in the center. The same number of crossbars will be required to arrange the ridge. All crossbars are fixed with reinforcing galvanized corners and self-tapping screws.
Side wall assembly
To assemble the side walls, we will need to prepare the following elements:
- 2 beams 50x100mm, length 236 cm;
- 2 beams 50x100mm, length 196 cm;
- 2 beams 50x100mm, length 69 cm;
- 2 jibs 163 cm long;
- 3 crossbars 61 cm each;
- 4 crossbars 26 cm each.
The assembly of the side faces of the wall-mounted greenhouse structure is carried out according to the presented sketch.
Assembly and installation of doors and windows
We prepare elements for the door:
- 3 cross beams 42.5 cm each;
- 2 vertical beams 187.3 cm each.
We assemble the frame according to the sketch and hang it on the hinges.
For one window we prepare:
- 2 beams with a section of 50x50mm, 34.5 cm each;
- 2 beams with a section of 50x50mm, 97.2 cm each.
We assemble the window according to the sketch using self-tapping screws and corners. We place them between the rafters and fix them on hinges to the ridge crossbar. To automate the ventilation process in a wall-mounted greenhouse, you can use special pusher devices that lift the windows when the temperature inside the room rises.