What summer resident does not want to receive abundant harvests of large and high-quality vegetables every season? But to achieve this by growing crops in open ground, you need to put in a lot of effort. In addition, there is always a risk of losing part of the harvest due to sudden frosts, unfavorable weather, pests or diseases. A simple and effective solution to all these problems is a glass greenhouse.
Glass greenhouse
Advantages of this building
Advantages of glass greenhouse buildings
Below are just some of the advantages of glass greenhouses:
- Glass greenhouses have been proven over time as long-lasting buildings. For example, the French have been actively using just such greenhouses since the end of the 16th century to this day. Rest assured: a glass greenhouse will be your servant for decades.
- Glass does not block ultraviolet rays, which are necessary for rapid plant growth and fruit ripening, thus allowing maximum benefit from the energy of sunlight.
- If you use laminated or tempered (thermal) glass, then this structure can withstand the most unfavorable conditions (precipitation in the form of large hail, extreme heat and even severe frosts will not matter to the structure).
- Glass greenhouses have excellent thermal insulation. In addition, it is possible to install heating devices in them.
Of course, there are also negative aspects to a glass greenhouse that must be taken into account when constructing it. For example, the fact that glass is a rather heavy material (1 m² of glass with a thickness of 4 mm weighs 10 kg, and 6 mm - 15 kg) should affect the presence of a solid foundation, as well as the construction of a strong structure - a frame. But unlike greenhouses covered with other materials, experienced amateur gardeners turn a blind eye to the shortcomings of greenhouses covered with glass, because, in their opinion, only in glass greenhouses do plants not only grow and bear fruit much better, but also get sick less.
Glass as a material for a greenhouse - pros and cons
The advantages of glass coatings include:
- almost complete transparency and light transmission of the material; the ability to maintain optical properties for a long time (the transparency of polycarbonate is 10% lower than that of glass, in addition, every year due to microcracks it decreases by an average of 4%);
- chemical inertness;
- ease of maintenance, the ability to use a wide range of detergents;
- comparative resistance to abrasive influences;
- low coefficient of thermal expansion;
- the possibility of recycling old windows and doors with glass elements, which has a positive effect on construction costs;
- ease of replacing damaged glass elements;
- high aesthetic qualities and profitability of the structure - the greenhouse lasts on average 25-30 years, while the invested costs usually begin to pay off after 4-6 years of operation.
However, one cannot fail to note a number of vulnerabilities of the material:
- fragility - strong hail can damage the coating;
- higher thermal conductivity compared to other materials (for example, polycarbonate);
- relatively high weight (exceeds the weight of a polycarbonate sheet with similar parameters by 2-3 times), making it difficult to work with glass and requiring the installation of a strong frame and a reliable foundation.
Selecting a location for the future greenhouse
We carefully select the location of the building.
There are small tricks regarding choosing a place for a greenhouse. The following factors are taken into account:
- The degree of illumination of the proposed location. Since the greenhouse must be well lit, it is necessary to make sure that there are no shadows of trees and other objects on the proposed building site. It is advisable to orient the greenhouse towards the south to ensure even distribution of sunlight and heat throughout the day.
- Wind mode. It is necessary to find a windproof place, in the absence of which the building must be installed so that the wall exposed to wind attack is reliably protected, either planted with a protective strip of bushes, or insulated with special materials.
- Surface soil layer and topography of the selected area. You should find an exceptionally dry, maximally level place on a small hillock, otherwise there will be a decrease in air temperature and, as a result, a disruption of the microclimate inside the building. It should also be noted that if you want to use the greenhouse all year round, you need to place it in a place where you can remove the top layer from the soil. This way, you will protect your plants from winter winds and drafts.
- Distance from sources of water supply and electricity.
Construction design
In order for a beautiful greenhouse house built of glass to last long enough, you must first determine the optimal design for it. Adherents of classical forms should pay attention to the two-story greenhouse. In appearance, this structure resembles a miniature house, and it is noteworthy that snow and moisture do not linger on the roof of the greenhouse. If you want to create a DIY greenhouse as an extension to a residential building, you may prefer a single-sided copy.
However, in this case, place it on the south side so that the plants will have sunlight in the future. The thermos greenhouse is considered quite popular. This project involves placing the main part of the greenhouse below ground level. That is, the greenhouse is built into the ground. This will allow you to worry less about maintaining a stable high temperature.
Project selection
Selecting a project and drawing up drawings
To make the construction process easier for yourself, you need to select a project, i.e. the plan for the construction of a glass greenhouse developed before us, and correct the drawings.
What needs to be considered at this stage? Much will depend on the architectural shape of the greenhouse. Since you will be covering it with glass, and this material does not bend, the choice is narrowed. It is better to choose a rectangular or multifaceted greenhouse under a single or gable roof. However, if you wish, the roof can be given a pyramidal shape with four or more sides.
Gable greenhouse
If you are interested in a round-shaped glass greenhouse, then you need to take into account the poor air exchange characteristic of this type of building, which can be improved by installing several additional side vents in the roof.
The wall-mounted form of the greenhouse will help you save free space in your summer cottage. In addition, you will put less effort into heating it.
It should be mentioned that combined greenhouses under glass are gaining the most popularity. In this design, 50x50 mm timber is used for the frame, and it is often glazed with old window frames, which will significantly save your money. Someone installs double-glazed windows in a PVC profile. At the same time, the upper heads are qualitatively strengthened and an arched roof with metal trusses is installed. Cover the roof with polycarbonate or plexiglass.
Having decided on the shape of the future structure, you need to move on to the drawings. Which someone will do in the classical way - with a pencil and paper, and someone who has basic basic PC knowledge can produce them in 3D, for example, using the Google Sketch Up program.
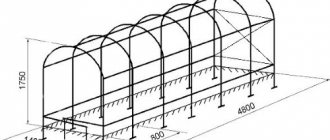
Scheme of a glass greenhouse
Drawings are a very important stage in building a greenhouse, since they will help calculate the required amount of consumables and determine how much money you will need to make it.
Glass greenhouse with wooden frame - step-by-step instructions
Divide the process of constructing a glass greenhouse into the following stages:
- construction of the lower trim;
- installation of vertical racks;
- construction of the upper trim;
- roof arrangement;
- glazing.
Each stage, in turn, is divided into separate steps, performed sequentially one after the other. So, let's start with the construction of the lower trim.
Construction of the lower trim
Step 1. Measure and cut a beam with a section of 100x100 mm. There should be four segments - two along the length of the greenhouse, two along its width.
Step 2. Treat the timber with an antiseptic.
Treatment of timber with antiseptic
Step 3. Cut the ends of the beams for a half-timber joint as shown in the image below.
Cutouts on the bars
Step 4: Mark the holes for the anchor bolts and dowels and then drill them.
Drilling holes for anchor bolts
Step 5. Lay the beam on the foundation according to the markings and fasteners, check the correctness of the diagonals. It is recommended to first lay a waterproofing material - for example, roofing felt, as shown in the diagram below.
Step 6. Secure the entire beam to the brick plinth using anchor bolts. To prevent them from interfering with the glazing of the greenhouse in the future, drill niches for the heads of the anchor bolts in the bottom trim. An alternative method is to lay a ripple board on top, as in the image below, and secure it with screws.
How to attach timber to a plinth
One of the options for creating a seat on the base for fastening the frame
Installation of vertical racks
Now install the uprights. They will require timber with a cross section of 50x50 or 100x100 mm. For greenhouses with polyethylene or polycarbonate cladding, the vertical posts are fastened using corners, but in our case this is not suitable - they will interfere with further glazing of the frame.
Step 1. Cut the beams according to the number and height of the posts.
Step 2. Select a beam for the first corner post and drill a hole for the dowel in its lower part. Drill holes in the harness in the same way.
Step 3. Insert the dowel into the bottom trim and insert it to the required depth. By doing this, you not only connect the rack and the base of the frame, but also fasten the beam of the lower frame to each other in the corners.
Vertical stand mounting diagram
Step 4. Place the vertical post on the dowel and check if the fixation is secure.
Step 5. To maintain verticality, nail down temporary slopes.
The stand is fixed with temporary bevels
Step 6: Repeat steps 2-5 for the remaining corner posts.
Step 7. Install intermediate vertical posts. To do this, you can also use dowels or insert them into the cut of the lower trim and attach them to screws. An alternative method is to secure it with metal plates, as shown in the image below.
Installation of intermediate vertical posts
Prices for anchor bolts
anchor bolts
Construction of the upper trim
The arrangement of the upper frame trim is similar to what you have already done for the lower one, but there are no problems with anchor bolts. However, here you will have to work at height, so the presence of a stepladder and assistants is mandatory.
The top frame is also often called a Mauerlat, since it is not only an element of the greenhouse wall, but also a kind of support for the rafters.
Step 1. Measure and cut timber for the top trim along all sides of the greenhouse.
Step 2. Make cuts in the material for a half-wood connection.
Top trim diagram
Step 3. Install the timber on the vertical posts, align them with each other.
Step 4. Secure the top trim to one of the corner posts using self-tapping screws or dowels.
Step 5. Repeat operation 4 with the diagonally opposite corner, and then with all the remaining ones.
Step 6. Secure the top trim with the vertical posts using self-tapping screws. Instead of a “plane-end” connection, it is permissible to use a connection with metal fastening plates.
Roof arrangement
The last stage of creating a frame for a glass greenhouse made of wooden beams is arranging the roof. Here it is very important to monitor how strong and reliable all the connections are - this structural element will hold not only heavy glass, but also a considerable amount of snow.
Step 1. Attach a vertical post, also called a headstock, to the top frame beam in the gable of the greenhouse. Use either a flat-to-end connection or metal mounting plates. Repeat this step with the opposite gable.
Headstock mounting diagram
Step 2. Install and secure the ridge beam on the posts.
Step 3: Prepare the rafters. If necessary, make cuts from the ridge and cornice sides.
Step 4. Secure the rafters to the gables using angles or nails.
Installing a roof truss on the frame of a homemade greenhouse
Options for attaching rafter legs
Step 5. Repeat step 4 with the remaining rafters. They should be located on the same line as the vertical wall studs.
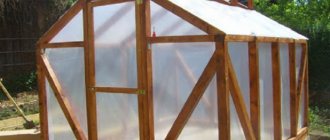
Ready frame
Note! An alternative way of arranging a roof is to assemble trusses on the ground, install ready-made structures on the top frame and lay the ridge beam.
Glazing
Now proceed to the last, but at the same time the most important stage - glazing the greenhouse. You should start with the walls.
Step 1. Mount wooden glazing beads or slats with a cross-section of 20x20 or 40x20 mm in the opening on the inside of the greenhouse. Fasten with small nails.
Step 2. Cut out the glass using a special tool. The width and height should be 2-3 mm less than the dimensions of the opening between the posts. If this is not done, the wood, which swells when wet, will compress the glass.
Glass cutting
Step 3: Apply putty or silicone sealant to the area where the glass will be installed.
Step 4: Use the suction cups to hold the glass and place it on the putty. To create a gap at the bottom, place matches if necessary.
Suction cup holder for glass
Greenhouse elements for glass installation
Schematic glass fastening
Step 5: Install the glass on a waterproof seal, such as isobutyl or polybutadiene rubber. After applying the sealant, lay each glass panel in place and secure on all sides with rigid rubber blocks.
Step 6. Immediately after installing the panel in place, secure it with a semicircular strip or overlay (bead).
Glass seals
Step 7. Repeat steps 1-6 with the remaining openings.
The roof glazing is carried out in a similar way. The operation is carried out from the bottom up - from the eaves to the ridge. The beads on the inside must be reinforced, as they carry an increased load. A reasonable solution would be to replace them with small-section timber or boards with appropriate fasteners. Install a wooden plank or board on the eaves side to prevent the glass from sliding down under snow load.
If two or more elements are used in one opening when glazing a roof, install them with an overlap of 5 mm relative to each other or carefully seal the connection with a sealant.
After completing work on the walls and roof of the greenhouse, windows and doors are knocked down from medium-section timber (up to 100x100 mm), glazed and installed on hinges. Additionally, you can equip the transom doors with thermal cylinders to provide the greenhouse with an automatic ventilation system.
Transom opening diagram
Video - Example of building a glass greenhouse with a profile frame
Pouring the foundation
So, you have chosen a suitable place to build a greenhouse and, using drawings, calculated its dimensions. Now, using pegs and rope, you can mark out the area for construction.
Trench for the foundation
Let's move on to the crucial moment - laying the foundation of the greenhouse. It should be noted that with a properly poured foundation, you can save up to 10% of heat in winter.
Experts recommend the use of a strip foundation, which ensures the strength of the structure. In this case, concrete is poured to the depth of soil freezing (from 55 to 80 cm).
How to pour a foundation for a glass greenhouse?
- Dig a trench 30 cm wide and 40 cm deep.
- Next, pour sand into it, which needs to be compacted.
- Place reinforcement into the trench to strengthen it and fill it with concrete.
Erect a plinth 10 cm high above the foundation, while increasing the formwork. Using a level, level the top of the formwork and refill the concrete layer to the edges. To create waterproofing, lay a narrow strip of roofing felt or bitumen mastic on the hardened concrete. Now make brickwork to the height of ½ brick at the base of the frame. You can slightly change the process of pouring the foundation, however, the principle remains the same - the use of embedded reinforcement and waterproofing material.
The foundation should be additionally insulated on all sides with polystyrene foam boards.
Arrangement of the basement
Step 1. Prepare the required number of bricks. Lay them “dry” on the foundation to estimate the layout of the plinth.
Step 2. Prepare the solution.
Step 3: Start styling. Build the base using the “half brick” method. Control the position of the bricks using a level and tensioned threads.
Laying the plinth
Using a building level
Work on laying the plinth continues
Brick laying options
Bricklaying
Step 4. After installation, remove excess mortar so that it does not spoil the appearance of the base.
Removing excess solution
Step 5. Insert anchor bolts from above into the joints or into the holes drilled in the brick. In the future, the latter will be used to fasten the glass greenhouse frame. In this case, choose places for the bolts a little to the left or to the right of the location of the vertical post. The interval is from 1 m, but not less than 2 anchor bolts on each side of the greenhouse.
Location of anchor bolts
Step 6. Place a waterproofing layer of roofing felt or similar material on top of the brick.
As a material for the plinth, in addition to brick, you can use foam concrete blocks or their analogues.
Brick prices
brick
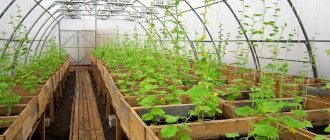
Construction of walls and roof
Now it's time to make the frame. Let us remind you that glass greenhouses especially need a strong and durable frame, which can be built from either metal or wood. The first is characterized by its durability, the second by its environmental friendliness.
To build a metal frame, pipes or angles from a steel profile are used, and for a wooden frame, beams with a cross-section of 100 mm are taken, which are ideally made of wood impregnated with an autoclave and guarantee a long service life of the structure.
If the wood is not properly impregnated, then it should first be prepared by treating it with an antiseptic, then staining it and finally painting it. For the most part, today old window frames are used for glazing greenhouses, and the frame for such a building is made from 100x100 mm beams.
Photo
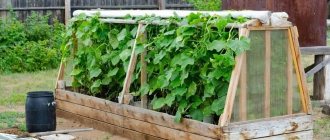
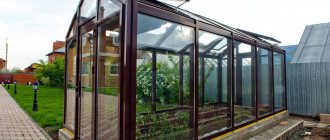
In the photographs provided, you can see other options for greenhouses made of glass:
Large glass greenhouse
Compact glass greenhouse
Small glass greenhouse
Construction of a glass greenhouse
Homemade greenhouse from window frames
Ready-made greenhouse made of window frames Hexagonal glass greenhouse
Greenhouse for flowers
Made of glass and matelloprofile
With windows
Double-glazed construction
Construction process
Before creating a greenhouse, you need to take care of a reliable foundation. A concrete strip base filled with a bed of sand and gravel is ideal. The recommended height of the base is about 70 cm, the thickness of the sand cushion is 20-25 cm. During the pouring process, metal corners are installed in the foundation, to which the frame is subsequently attached.
Glass greenhouses are built exclusively in the shape of a house. Four vertical walls form a rectangle from which a gable roof is made.
The frame consists of a lower and upper frame, as well as racks. The intervals between the posts do not have to be equal. The distance is calculated from the existing window frames , and their sizes may vary. Frames are easily attached to the frame using self-tapping screws or regular nails.
All cracks between frame elements must be carefully blown out using polyurethane foam so that the structure of the greenhouse is completely airtight. The glass sheets are either inserted into pre-cut grooves or secured with caulk and secured with pins.
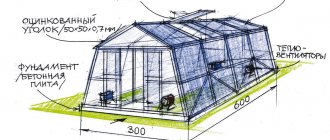
Blueprints
If you decide to make a glass greenhouse yourself, then you can use the drawings provided:
Bolted frame
Drawing from profile
Greenhouse frame Drawing of a metal greenhouse
Forms of greenhouses Greenhouse frame with plywood elements
Folding greenhouse
Greenhouse material consumption
Wooden frame diagram
Greenhouse assembled from a metal profile
Did the article help you?