I have owned my dacha for a year now. I arranged everything a long time ago - I poured everything with new concrete, made a veranda, paths from decorative bricks, wood crafts for aesthetics and much more. And then suddenly I wanted to take up farming. I set aside space for fields with beds, dug them up, planted various crops: grapes, potatoes, peppers, tomatoes, cucumbers... But for some reason I was drawn to heat-loving crops. And I learned from a neighbor that our area has excellent soil for strawberries. Without thinking twice, I decided to make a greenhouse with my own hands. I decided to make it from polycarbonate, since it was available, and I didn’t really want to make it from glass. Glass breaks easily, and, more importantly, children often come to my dacha (grandchildren, godchildren, children of friends), I don’t want them to get hurt. So, everything is ready, only the polycarbonate doors remain, let's see what came of it.
Source remontbp.com
Polycarbonate greenhouse 10 meters
This is an easy one day job. To make such a polycarbonate body with a wooden frame 9.5 meters long and 3.5 meters wide, you don’t need to look for an ideal site, because the structure does not have a foundation, so it can be assembled even on sloping terrain. The base is made up of several steel anchor spikes, about 5 cm square wooden pegs with a depth of 40 cm were used here. The sides are connected by two large boards. The left side is installed first, then the end parts are aligned. In the middle of the greenhouse there are long raised beds on each side and a path in the center.
The sheathing is 10mm double-walled polycarbonate, a total of 38 sheets will be needed.
Photo source: www.incredible-edible-todmorden.co.uk/blogs/how-to-build-a-greenhouse-part-1/?c=Blogs#page-top
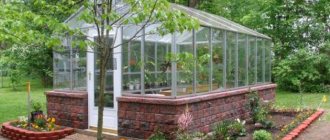
Polycarbonate greenhouse
A greenhouse is not just a way to grow vegetables or flowers, but also a part of your landscape design. Look at this beautiful polycarbonate greenhouse - a wonderful project for the garden and any summer cottage. The octagonal shape is not typical for buildings of this type, which is why it looks so attractive. On the website you can read a manual with a detailed description, however, in the step-by-step photos, the process is also shown in great detail. Will not provide all the instructions. here are a few points. How to make a foundation is shown in the photo, that is, you make formwork in the shape of an octagon, eight trapezoids, which are later secured in place with mortar. This will allow the original foundation to be filled in and the blocks to remain above grade so there is no wood contact with the ground.
Then frame the structure, base and walls. Cut 2x6 boards to 2x4s. The scraps will be useful later for tenons and trim. The studs are 183cm, the bases are 72cm and the sills are 68cm. Use strong ties to attach the studs to the base at a 22.5 degree angle. Since you are losing some of the width or length from the cut, you can trim the dimensions down a bit to make a perfect fit. One side of the octagon will be open for the door opening. Then cut eight more pieces, the same as the base, and attach to the top of the studs. Next comes finishing the strips for attaching the windows and lower wall panels.
The studs for the sills, plinth and wall caps are 65 x 3.5 x 3.5 cm wide. Line up all the spindles 2 x 2 - finished size 3.5 x 3.5 cm. They are set 2.5 cm from the edge of the sills, to take into account the horizontal closure strips for polycarbonate and the depth of the panels. Again, the edges should be bent to 22.5 degrees. For vertical clamps, use scraps from boards. Next, set the table saw blade to 22.5 degrees and cut that angle so the tenon sits flush with the studs and remains parallel to the outside wall. Framing the rafters. Attach the structure to the concrete using Tapcon screws, great stuff because they come with a masonry bit. Measure the distance between the rafters. Set the table saw so that it cuts the edge at a 30-degree angle, is flush with the rafters, and locks with minimal clearance. Cut the edges 22.5 degrees to fit between the rafters. The windows are made from trim pieces cut at 22.5 degrees to fit the openings.
Door frame. Measure the hole and subtract 5mm from the height and width. Measure the space for the window sill to match the surrounding walls. Window opening and bottom panel with the same finish as on the walls. It was also necessary to install transparent polycarbonate panels.
The dome is made in such a way as not to allow rainwater to pass through and at the same time to allow normal air circulation. The top consists of glued panels 923 x 23 cm. Make it a little bigger so you can clean it when the glue dries. Trim all corners to 45 degrees. Roof. The idea of a reflective surface is to reflect more light inside the structure and create more warmth inside. If you are making a structure like this, two packs of 3-tab asphalt shingles will suffice. If you've never done this before, it's best to look up roofing instructions online.
Photo source: www.instructables.com/id/Octagonal-Greenhouse/
Drafting
Work on the preliminary design of a polycarbonate greenhouse is carried out in several stages:
First you need to choose a place to build a greenhouse. The evaluation criteria and their meaning are shown in the table below.
Table. Criteria for choosing a location for a polycarbonate greenhouse.
| Criteria | Meaning |
| Sunlight distribution | The area for the greenhouse should ideally receive sunlight from any direction from morning to evening. Shading from nearby buildings, fences and trees is undesirable. If this condition cannot be fully met, then at a minimum, the place for the greenhouse should be illuminated by the sun from noon until 6-8 hours. |
| Landscape | It is advisable to equip the greenhouse on level ground. If there is a slope, terracing will be required. |
| Orientation by cardinal directions | Ideally, the greenhouse should have its “long” walls facing north and south, and its ends facing west and east, respectively. In this case, ventilation windows should be located on the south side. |
| Winds | It is not advisable to build a greenhouse in a place regularly blown by cold air currents. Therefore, the northern slopes of the hills are hardly suitable for the construction of buildings. |
Important! It is also advisable not to set up a greenhouse in lowlands or on peat soils - the temperature in these places is not much, but below average, which will affect the condition of the plants.
The size of the greenhouse is selected based on the area of the plot, the budget for construction and the goals that the owner of the personal plot sets for himself. All greenhouses, except domed ones, have the shape of an elongated rectangle. Along the edges of the building there are beds with agricultural crops, and in the middle there is a path. If the greenhouse is wide, then it is possible to arrange several paths and rows with beds.
The optimal width of the bed is about 100 centimeters, the path is 60-70. At lower values, working in the greenhouse will become inconvenient. The width of the building is calculated as follows: the widths of the path (or paths) and all the beds of the greenhouse are summed up, and 10-15 centimeters are added to the resulting figure, taking into account the thickness of the walls of the greenhouse. The final result will be the width of your greenhouse. On average, it is from 2.5 to 6 meters.
The length of the building should be a multiple of 2-2.1 meters - the width of a standard polycarbonate sheet. The same 10-15 centimeters of the greenhouse walls are added to this number. The result is the final length of the object.
Advice! The building will be strong if the vertical frame elements are spaced at intervals of 1 meter. Take this into account when calculating the length of the greenhouse.
The height of the greenhouse depends on the shape. For arched buildings without a plinth, it is limited to 2.1 meters at its highest point. To make the greenhouse taller and more convenient to use, you will need to create a base using stone, timber or brick. For other types of greenhouses, the height is chosen at the request of the site owner.
Separately, it is worth mentioning the size of the greenhouse-bread bins. In most cases, such greenhouses are extremely small in size, allowing you to work with plants or seedlings without entering the greenhouse. Accordingly, there is no need for a track. The height of such greenhouses should not exceed human height, otherwise raising and lowering the doors will not be very convenient.
The shape of the greenhouse is selected based on the personal preferences of the owner of the plot. More details about the arrangement of each of them will be discussed below.
The greenhouse frame is made of the following materials.
The type of foundation depends on the expected mass of the building. If you plan to build a small greenhouse-breadhouse or another, then there is no need for a foundation. For medium-weight buildings, a point foundation or a timber-based structure is preferable. If you plan to build a long and high greenhouse, then it makes sense to equip a strip foundation made of concrete.
Prices for PVC profiles
Calculation of doors and windows is carried out based on data on the length and width of the greenhouse. In addition to the “bread bins,” all other greenhouses must have at least one door. The optimal dimensions are 1.7-2 m in height and 0.75-0.9 m in width. For greenhouses longer than 6-8 m, it is desirable to install two doors at opposite ends of the building.
In small-area greenhouses, ventilation can be carried out through the same door. If we are talking about buildings of significant size, then there is a need to install ventilation windows, which must be evenly distributed along the entire length. Folding transom windows equipped with thermal cylinders are best suited.
Important! To protect plants from hypothermia, ventilation windows should be installed on the south side.
Now it’s time for the final stage - drawing up the drawing. If you have not had experience in drawing before, then use graph paper or regular double sheets from a squared notebook - it’s much more convenient to work this way. Instead of pens, use a pencil - it’s easier to erase a mistake or omission than to redraw everything again. For summer residents more experienced in design, it makes sense to draw up a drawing in CAD programs.
You need to carry out the plan in at least two projections - from the end and from the long wall. Another view, in isometry, can give a better idea of the building.
The drawing is performed step by step as follows.
Step 1. The scale is determined.
Step 2. The external contours of the greenhouse are drawn, the length, width and height of the building are carefully observed, adjusted for scale.
Step 3. The base of the greenhouse is applied.
Step 4. Vertical supports of the walls emerge. If we are talking about a single- or double-slope greenhouse, then the rafters are also drawn.
Step 5. Horizontal frame elements, slopes and lintels, doors and ventilation windows are applied to the drawing.
Step 6. The drawing is supplemented with notes, local views (especially useful when creating a fastening diagram) and calculation of the amount of materials needed.
The following are drawings of the most popular types of greenhouses. Attached to the drawings are descriptions and some features of designing such greenhouses.
Advantages of polycarbonate greenhouses
Polycarbonate is an affordable and high-quality material that is often used for the manufacture of greenhouses. The advantages of choosing a material include:
- Sufficient strength.
- Excellent flexibility, which allows polycarbonate sheets to be laid on a metal or wooden frame.
- Ease of working with the material. The construction of a structure of this type does not require special skills and abilities from the master.
- Polycarbonate can be easily cut with sharp knives, which allows the installation of doors and circulation vents.
- Polycarbonate creates an additional layer from ultraviolet radiation, protecting plants.
- Has excellent resistance to high temperatures.
An important selection criterion is the affordable price. In addition, financial investments will quickly and more than pay off. For the convenience of craftsmen, today there are a huge number of detailed instructions on how to make a greenhouse.
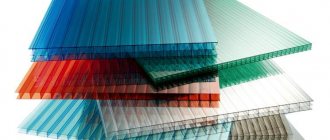
Features and types of material
Polycarbonate is produced in monolithic and cellular versions. These materials have different aesthetic and technical characteristics. Each type of polycarbonate is installed in a specific type of sliding structure, which ultimately determines the appearance of the finished sliding door and polycarbonate partition.
Important
! The variety of polycarbonate sheets allows you to use it for the manufacture and installation of a sliding door, similar to natural glass, or use it as a decorative panel material. It can be used as an independent material for the manufacture of door leaves, or in combination with other decorative materials (laminated chipboard, MDF).
Monolithic polycarbonate
This is a single sheet of polymer with a smooth surface. It is a full-fledged analogue of natural glass.
They are produced by analogy with silicate glass sheets with a material thickness of 2-12 mm. Thus, you can make either a frameless panel 10 mm thick for installation in a hinged structure for glass doors, or use them as inserts in a profile frame for sliding wardrobe systems.
Thick sheets of this material are highly durable and are also called anti-vandal. They are not only resistant to impacts, they cannot be broken even intentionally.
Cellular polycarbonate
This material is a hollow sheet that consists of two or more thin layers connected by thin bridges. Manufactured by extrusion.
Due to the cellular structure, a door made of this material weighs more than ten times less than a door made of glass.
Due to the multi-layer nature of the material, it cannot be made as thin as monolithic polycarbonate. The thickness of the produced sheets starts from 4 mm. Panels 32 mm thick are made from cellular material.
Important
! When planning the dimensions of a sliding door or partition made of polycarbonate, you need to remember that the width of the strip of cellular material is 2.1 m, and its length is cut in stores in increments of 1 m. The length of the end profile for polycarbonate is associated with these dimensions.
Frame structure
As mentioned above, it is rational to use bent profiles for the construction of a greenhouse. However, for a non-specialist, rectilinear structures will seem simpler.
Below are several frame options with different types of geometry.
Greenhouse frames
At the same time, gable models with inclined side walls (“Dutch”) and arched ones with a teardrop-shaped upper arch are also distinguished.
The basic dimensions of homemade polycarbonate greenhouses are suggested below, taking into account ease of maintenance and the differences in crops grown.
Planning the size of the greenhouse
The design of the frame depends on the material chosen to create the structure:
- wooden beam. Due to the high humidity in the greenhouse, they are susceptible to rotting and require mandatory treatment with moisture-proof and antiseptic impregnations. Optimal for rectilinear building geometry;
- thin galvanized or aluminum profile - convenient for creating curved shapes, not too durable;
- metal-plastic pipes - allow you to quickly assemble a strong and rigid structure, which at the same time weakly resists heavy winds or significant snow loads;
- steel pipe (round, square, rectangular profile) or angle, channel. This type of frame is the most durable, but it is difficult to bend it at home; it is better to use it for pitched greenhouses. Requires a concrete base or pile foundation.
Greenhouses are characterized by a simple design that provides the necessary strength and a small area of opaque elements. In arched and pitched versions, a general scheme is used, consisting of arches (polygonal elements) of repeating shape and size, ties connecting them, a base and places for entry/exit and ventilation. In this case, the type of base and the frame material used are interrelated.
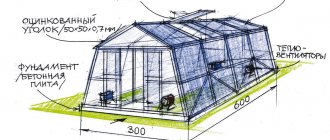
Greenhouse diagram 6x3
Gable and lean-to greenhouses
The main difference in the drawings of greenhouses with a traditionally shaped roof is the number of slopes, one or two. Their angle of inclination varies, from 20° to 30° or even up to 45°. Such values ensure the removal of precipitation (in particular snow) from the roof, therefore it is undesirable to use lower values, otherwise in a very snowy winter there is a risk that the top of the greenhouse will break under the weight.
To ensure greater strength of the walls between the vertical elements, the placement of diagonal crossbars or slopes is permissible. In principle, it is advisable to make both the slopes and all other parts of the frame from a steel profile with a cross-section of at least 40x20 millimeters.
Important! It is advisable that diagonal beams and slopes on opposite walls be placed in the same way.
The optimal distance of vertical frame elements between each other is 1-1.2 meters or less. This also applies to rafters, which are placed on the same lines as the vertical elements of the walls. An example can be seen in numerous drawings of polycarbonate greenhouses with a gable or pitched roof.
When calculating the length, width, height of the greenhouse, as well as the distances between frame elements, it is very convenient to proceed from the dimensions of a standard polycarbonate sheet - 6 meters in length and 2.1 in width. Do not forget that it can be divided into two or four parts, and in the same way, when designing, proceed from elements of 3x2.1 or 1.5x2.1 meters. Here you may have a question - why is the sheet not divided by width? The fact is that sawing through a six-meter sheet is labor-intensive and, moreover, using sheets 6x1.05 or 3x1.05 meters is impractical.
Drawing up a plan for a future polycarbonate greenhouse will significantly simplify the process of its construction and protect you from possible mistakes. A greenhouse created according to a competent plan will be durable and effective, bringing an abundant and high-quality harvest every season.
Video - Assembling a polycarbonate greenhouse
Did you like the article? Save so you don't lose!
How to install a greenhouse bread box
In order for a greenhouse structure to last as long and efficiently as possible, you need to know where and what to install it on. Every requirement needs to be taken into account.
Selection, preparation of site and foundation
It is necessary to correctly install the greenhouse, adhering to the following recommendations:
- the area should be sufficiently illuminated by the sun throughout the daylight hours;
- the structure should be located from south to north;
- do not place the greenhouse near tall plants because of their shadow on cultivated crops;
- the surface for installing the greenhouse structure should be as flat as possible (the slope of the site can cause the frame to skew);
- the optimal distance from outbuildings to the greenhouse is 5-7 m;
- the distance from the shower/bath should be within 8-10 m;
- The greenhouse must be installed at a distance of 25 m from the wastewater treatment plant.
The area allocated for the greenhouse bread bin must be cleared of weeds and other debris. The foundation can be made of either wooden blocks or concrete and bricks, with preliminary excavation of a trench into which sand and crushed stone are placed.
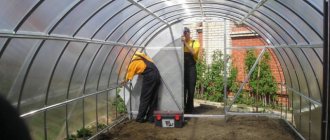
Greenhouse installation
A self-assembled structure made of polycarbonate or film material is once again checked for rigidity so that the structure is resistant to adverse environmental factors. All connection points must also be checked. If the greenhouse is ready, it is installed on the foundation.
Advice! As an option, the manufactured breadbox structure can be placed in the chosen location on “legs” pre-welded at the corners, which are buried in the ground.
The greenhouse must be connected to the foundation at several points. For a wooden base, it is good to use staples. If the foundation is made of brick or concrete, then it is worth taking screws for installation. Making a greenhouse bread box yourself is not difficult, the main thing is to stick to the scheme and use only high-quality materials. To extend the service life of the metal frame, an anti-corrosion compound, primer and metal paint are used, and for a wooden structure, deep penetration antiseptic agents are used.
Rules for the production of sliding doors
To assemble the sliding product, you will need the following materials and tools:
- polycarbonate sheet in height and width is 5-6 cm larger than the size of the doorway;
- an iron tube for creating a guide 2 times the width of the doorway;
- fasteners;
- anchors for securing the iron tube;
- set of materials indicated above.
When a sliding structure is made, work begins with attaching the guide. In this case, the iron tube must be fixed at a height of 5 to 10 cm above the door clearance. One half of the tube is placed directly above the door opening, the second is shifted along the plane of the wall in the direction where the door should open.
Then rings are screwed onto the polycarbonate sheet with fasteners, with the help of which the sheet will move along the guide. The rings should be attached in such a way that the door is at a distance of 1-1.5 mm from the floor. If a threshold is installed in the gap, then the canvas can be lowered a little below it, which will create the possibility of closing the opening more tightly.
Rings with polycarbonate are hung on a guide, at the ends of which limiting elements must be installed. Handles are attached to the canvas as needed. A stylish and safe door is ready!
The use of polycarbonate to create interior doors with your own hands is an ideal option for making your home more unusual and beautiful, without spending significant effort and money. These products will last for quite a long time, and if necessary, they can always be replaced with new ones.
More recently, the main purpose of polycarbonate was the construction of country greenhouses, shower cabins, and the construction of canopies or canopies over the porch. But today this material is successfully used for finishing apartments. Thus, polycarbonate doors have become a successful design development, which can be used to decorate not only garden buildings, but also city premises.
Frame doors consist of a wooden, plastic or metal frame into which polycarbonate sheets are inserted.
The huge number of color options in which this building material is produced makes it possible to produce interior structures that fully correspond to the style directions and shades of the apartment’s decoration. And other advantages of doors made from polycarbonate with your own hands are obvious:
- The material has a small mass, which makes structures made from it light and airy.
- Polycarbonate elements are more reliable and safer than glass elements.
- Even when cracked, polycarbonate does not crumble into small fragments.
- Caring for elements made from this material is very easy and simple.
Taking into account all the above advantages of the material, it is possible to produce interior elements that are characterized by a long service life and durability.
Functional characteristics of the design
Sliding doors are a functional solution for any size greenhouse. During ventilation, they will not slam shut from a sharp gust of wind. Such designs take up much less space. The construction of greenhouses with sliding doors requires an arched structure and a roof made of cellular polycarbonate.
Its recommended thickness is 5-6 mm. Compliance with this parameter creates an optimal temperature regime and guarantees strength. The entire structure is based on building arcs installed at exactly 1 m intervals.
If a gardener spends little time on a country plot, then sliding arches can be installed. It will be enough to simply move the moving parts apart so that all the snow and other types of precipitation do not accumulate on the roof during the absence of the owners.
If it is impossible to constantly open and close the doors, for example, when bringing seedlings or equipment into the greenhouse, latches will help keep the sliding structures open for a certain time. The main thing is that they are made of durable material that is resistant to prolonged aggressive exposure.
Design
There are several ways to make a door to a greenhouse. Doors that swing open on awnings, sliding and folding doors can be covered with a polymer panel.
The door can be made completely frameless; all the necessary fittings are attached directly to the polycarbonate sheet.
In this case, the rigidity of the structure is ensured by the material itself, so for this purpose it is recommended to use monolithic polycarbonate of maximum thickness. Naturally, such a door will not be cheap, but outwardly it will look presentable.
Cellular polycarbonate is not suitable for this option; it is less durable and much lighter, which is why it is used to fill or cover frames made of plastic, wood and metal. Samples of various designs can be seen in the photo of a door for a greenhouse.
From scrap materials
Turning unnecessary things into useful products - our people have no equal in this. They make greenhouses from things you would never even think of.
For example, you can easily make a greenhouse with your own hands from old window frames. When replacing windows, do not rush to throw them away. They can be used to make an excellent greenhouse. Moreover, the designs may be different. The simplest is a body made of boards, to which a window frame (with glass, of course) is attached on top as a lid.
A simple frame greenhouse: a wooden frame to which an old window frame is hinged
To ensure that the plants receive maximum light, one side of the frame is made higher (which faces south or east). There are different frames, any of them can be used for these purposes. As proof, here is a photo gallery of greenhouses made from frames that were made with their own hands by zealous owners.
They make greenhouses out of barrels. Cover with an old umbrella made of transparent film or cut-off plastic water cans.
Greenhouse from an old barrel
Way to grow cucumbers
A homemade greenhouse can be made from a plastic or foam box. Although “do” is a strong word. All you need to do is stretch the film.
Everything ingenious is simple
Do you have a plastic box? Can be adapted for seedlings
What kind of material and its varieties?
Polycarbonate can be used even under the most extreme conditions, which is why it is used for both outdoor and indoor structures. Of course, the material cannot be completely comparable to glass, because it does not have such high light transmittance, but thanks to its flexibility it allows you to create the most complex and unusual structures, for example, greenhouses.
There are two types of polycarbonate:
The second option does not bend as well as the first, but if there is such a need, it is shaped by hot forming.
Types of doors to the greenhouse
The design of the door to the greenhouse can be of several types:
- Swing. One-piece construction mounted on heavy-duty door hinges to ensure a tight seal. Installation of the structure is quite simple, especially if the greenhouse is made of a frame and film;
- Sliding. This option is very convenient, because it prevents the door leaf from hitting the door jamb, and the movement of the door itself is limited. The tight fit of the fabric is ensured by the seal;
- Option with a window. If the door frame allows, then you can make a window in it, but you will only need to open it manually.
Installation
The sheet must be secured to the finished door using self-tapping screws and special sealing washers, which provide protection against moisture and dirt; in addition, they make the fastening points airtight.
They will also prevent damage to the material when installing the door, since the leaf will fit tightly to the frame, eliminating shifts and loosening of the fastening points.
For complete sealing, it is advisable to use a special adhesive aluminum tape. It is advisable to use perforated tape at the bottom. Such means will prevent dirt from getting inside the structure, and the perforated tape will ensure condensation escapes.
To install doors in new places, awnings are required. In addition to performing the main function (opening/closing the leaf), they give the doors stability and reliability.
The canvas may not hermetically cover the entire opening; small gaps around the perimeter are allowed. The door frame should even be smaller than the opening by about 1.5mm. This can be corrected with insulation.
If a sliding sash is planned, then installation of a special mechanism is necessary. This action requires special attention; any mistake will lead to incorrect movement and disruption of the tight fit of the door leaf.
How to cover a greenhouse with polycarbonate
Covering a greenhouse with polycarbonate sheets yourself is not difficult, and most importantly cheaper than hiring specialists. No experience? That's why there are step-by-step instructions. If you want to get as much information as possible about what polycarbonate panels are, how to choose them correctly, prepare and cover the greenhouse with your own hands, read the informative article at this link, which is located below the photographs. Look at the gallery with a selection of pictures, everything is depicted beautifully and easily, with captions and arrows. Spend a little time and in half an hour you will be a polycarbonate specialist. And you’ll figure out prices, accessories, which polycarbonate, how much ultraviolet light it transmits, and even how to attach the sheets depending on the air temperature.
8 reasons why a polycarbonate greenhouse is better than a glass greenhouse
Price
Budget is the most important and starting factor at the beginning of any project. So, if you are on a budget, polycarbonate panels will cost less compared to glass. Not only are polycarbonate prices less than glass, but also the installation costs and labor required for polycarbonate panels are less than glass. The ease of handling and maintenance of polycarbonate greenhouses saves not only money, but also most of your time spent on installation, maintenance and repair.
Strength.
Polycarbonate has another strength advantage over glass. It doesn't break like glass. They can withstand the normal things that a greenhouse might encounter. Hail, any heavy flying or thrown objects hitting greenhouse windows. And if children are playing next to you, then you won’t have to worry about broken windows caused by balls or other objects.
Best insulating properties
One of the main factors for using polycarbonate roofing for a greenhouse is the insulating properties of polycarbonate. They provide much better insulation for the greenhouse than regular glass. Thus, the average temperature will be several degrees higher than in a glass greenhouse
Maintaining temperature is very important, it improves the performance of the greenhouse. And the double layer, available in double wall polycarbonate, further improves thermal efficiency
If you use a greenhouse commercially, you can expect higher returns on year-round harvests. In addition, you do not need to install heaters, as is the case with glass greenhouses. This will save energy and money.
Durability of a polycarbonate greenhouse
Polycarbonate's strength and high impact resistance have a longer lifespan than glass greenhouses. Polycarbonate can withstand a lot of damage.
Easy to install
Due to their light weight, polycarbonate walls and roofs fit much more easily into the greenhouse frame. Even one person can install polycarbonate sheets on the greenhouse frame, while installing glass panels requires several people
No special care is required when working with polycarbonate. If you need to replace the panels, it's quite easy to do.
Anyone can assemble polycarbonate greenhouses with their own hands, simply using their creativity and a little knowledge. While glass greenhouses require skilled workers.
UV protection
Polycarbonate walls provide protection from harmful ultraviolet radiation.
Light scattering
Polycarbonate is a plastic, and plastic scatters more light than glass. This way, the light will spread more evenly in the greenhouse. An equal quantum of light received by all plants will not require you to rearrange the plants from an area of more light to an area of less or vice versa. This saves time.
Setting options
Polycarbonate sheets are available as single wall, double wall or triple wall panels. Double-walled panels retain more heat than single-walled panels. So, even among polycarbonate panels, you have many options to choose from. Glass panels do not provide this opportunity. In addition, polycarbonate panels come in different shapes and sizes, so you can choose the one that suits your needs.
Insulation
The structure is insulated with special seals. The most common type of such products is made of rubber.
A rubber seal for a door in a greenhouse retains heat and moisture inside the greenhouse, provides protection from adverse natural phenomena and increases the strength of the entire structure, since it reduces vibrations that occur during gusts of wind.
A high-quality and well-sealed door should protect the internal atmosphere of the greenhouse from the adverse effects of the external environment.
Triangular greenhouse made of boards
This greenhouse is good for seedlings, but you can make it for peppers and eggplants. A stand is nailed in the middle of the base. There are two inclined boards attached to it. The cross section results in a triangle. If you need a long greenhouse, the same structure is installed approximately every meter. All tops are connected with a long bar or pipe. This greenhouse has a simple and convenient design.
Cucumbers are grown with it only until they begin to curl. Under the cucumbers, the covering material is removed, posts are nailed (screwed) to the sides, and twine is pulled between them.
Triangular greenhouse made of boards
Here's how to remake such a greenhouse for cucumbers
Frame panels
The polycarbonate design with a frame will be more noticeable and will be perceived as a full-fledged door. The frame will serve as a frame, which will give rigidity to the panel.
The compartment version is most suitable for making a sliding door made of polycarbonate. The frame made of profiles for a sliding polycarbonate door is assembled using self-tapping screws; there is no need to install additional fittings on the door leaf. Polycarbonate with a thickness of 4 and 10 mm can be installed in the frame. Thin parts are installed in the profile using a special seal. In this option, you can make a combined fabric, with inserts made of monolithic, cellular, transparent or colored polycarbonate.
Sliding mechanisms with frame panels can be supported or hinged. In the rooms, hinged systems are installed, in which there is no bottom guide, and the door is held in place using U-shaped flags installed on the floor to the side of the opening.
In support mechanisms, the leaf moves along the lower guides, and the upper roller serves to balance the sash. Support structures are installed in openings with low traffic.
The rollers in structures with a frame are attached to the upper and lower horizontal crossbars of the frame frame. Each manufacturer produces its own range of profiles, which differ in shape and type of coating, but all standard sizes are the same.
How to plant crops?
Still, a greenhouse is a limited space, and every meter must be used rationally. At the same time, you should plan how the cultivation of vegetables will be organized, because some plants cannot be neighbors, and for this you will have to delimit the territory.
Let's look at planting schemes for basic seedlings for a warm garden.
Tomatoes
There is a wide variety of tomato varieties for indoor soil. They are thermophilic, prefer light soil and moderate watering. Tomatoes need ventilation and air circulation. Therefore, the best place for tomatoes is the central bed opposite the doors, which are located at the ends. Good neighbors for tomatoes are cabbage, onions, lettuce, and radishes.
cucumbers
Cucumbers require plenty of watering and moisture. They cannot be planted with tomatoes, so the best option is to cover the plants with plastic. Dill, lettuce, eggplant, parsley, and basil are considered good combinations.
Pepper
Sweet and hot peppers cannot be planted together - they can cross-pollinate and change their taste. But they grow well next to basic crops.
Other crops
It is quite possible to plant strawberries and strawberries in a greenhouse, and still get the harvest earlier than your neighbors
It is important to plant plants at a distance of 15-20 cm
In the spring, pay due attention to preparing the soil; it should be very nutritious and loose. The ideal composition is a mixture of soil from your site, peat or humus, and river sand
In enclosed spaces, the likelihood of bacteria and viruses occurring is much higher. To do this, try to change the soil every year. In the fall, you can fumigate the room with sulfur (shaker).
In spring, polycarbonate should be washed both outside and inside. In the summer, after planting, you should weed the soil to remove weeds.
Review of the 3x6 greenhouse in the video below.
Preparatory steps
Polycarbonate is quite easy to install; you only need a small set of tools. Moreover, this list is practically the same for both hinged and sliding structures:
- drill and drill bits;
- screwdriver;
- level;
- roulette;
- construction square;
- jigsaw;
- carbonate slabs;
- corner;
- self-tapping screws;
- construction gloves;
- fasteners.
To build and install polycarbonate doors you need to stock up on tools
How to assemble a polycarbonate greenhouse with your own hands
If you want to get into gardening, you might want to consider a greenhouse. Today there are several options for greenhouse materials available, including glass, various types of plastics, fiberglass, acrylic, you just have to choose the material. One of these options, perhaps the most effective and cheapest, is polycarbonate. It has other benefits such as light weight, improved insulation and heat retention properties. You can make a greenhouse yourself or buy a ready-made kit that fits your size and pocket. Here you can see how to assemble a polycarbonate greenhouse with your own hands from a kit. Very detailed step-by-step photos, and if you prefer to watch a video, a link to the site is under the gallery.
Photo source: www.builders.ph/-how-to-build-a-polycarbonate-greenhouse/
How to assemble a polycarbonate greenhouse from a kit
Here is another small example of how to assemble a polycarbonate greenhouse kit. Working from the inside of the greenhouse, attach the bottom plate to the corner braces and the wall studs to the bottom plate. Corner posts are attached to a gable roof using a corner plate. Use two bolts in the corner posts and two in the gable roof. Install two additional bolts into the center pillars. They are necessary to connect the brackets and the door cap. Place the four bolts on the roof gable and secure them to the corner post using the corner plate, then tighten the nuts. Assemble the other end wall in the same way, but without the door frame.
Lay out the posts and attach them to the lower window sill. The two side walls are assembled in the same way. To attach the corners, loosen the four nuts on the plate that connects the end wall to the roof gable. Open this joint, then fasten the bottom staples at each of the four corners. To attach the ridge support, simply loosen the bracket, push it in and tighten. Attach the six roof studs, aligning them with the wall studs and securing them with bolts. Assemble the door and window frames and secure with bolts. Attach the handle to the door. Install window and door panels. Make sure the greenhouse frame sits straight and level on the base before screwing it down.
Insert the polycarbonate panels and measure the spacers. Press the gasket all the way and install it in place. After installing the side walls, press the side gaskets. With the side panels and spacers in place, it's time to install one roof panel and then slide the support from top to bottom. The windows should just slide into place. Attach the hinges to the door frame and then insert the door. The top of the greenhouse wall is the drainage system. Install the included gutter to drain water away from the greenhouse. Install an optional exhaust fan. Use a utility knife to cut a hole in the polycarbonate panel on the back wall of the greenhouse. Install blinds outside. Secure the fan to the motor using the carriage bolts.
Photo source: www.diynetwork.com/how-to/outdoors/structures/how-to-build-a-greenhouse-from-a-kit
How to assemble an aluminum greenhouse under polycarbonate (from the kit)
If you have purchased a ready-made polycarbonate greenhouse kit, this does not mean that you are spared from minor and major troubles that may arise during assembly and operation. Here, using the example of this design with an aluminum frame and polycarbonate panels, it is shown how to eliminate some of the characteristic shortcomings with your own hands. This does not mean that you bought low-quality products, just that they do not always meet your personal needs and the characteristics of your site. Of course, in each case there will be other shortcomings, and maybe you will be lucky and won’t have to redo anything.
To improve this polycarbonate greenhouse, the following was done: Covering questionable polycarbonate panels with high quality 6mm UV protected plastic film. Create a rigid shelving frame using 2x4 lumber that serves as a strong internal structure for mounting. “Raise the roof” of the HF unit almost a foot using 2x12 boards on the edge of the greenhouse base. Reconfiguring the front door so that it is firmly attached to the frame rather than acting as a flimsy slider. You can read specifically about all these transformations on the website, link under the gallery. See detailed step-by-step photos below.
Photo source: www.instructables.com/id/Building-and-Improving-the-Harbor-Freight-6×8-Gree/
Greenhouse assembly
Finding out how to assemble a greenhouse frame is easy. If the greenhouse is purchased ready-made, assembly is carried out exactly according to the instructions. Homemade frames can be made of wood or metal: the former are easier to install, but the latter are more durable.
If the structure is homemade, you should adhere to several rules:
- It is better to start with the end parts, then install the side and arc connections. The fittings (handles, etc.) should be left for the very end.
- The arches, if they are collapsible, must be fixed immediately. Other parts can be adjusted and aligned later. A level is used for leveling.
- If there are many crossbars, first install the main parts and the longitudinal ones, which will connect the ends and arcs.
- The frame is dug in or mounted to the foundation only after it has been fully assembled and adjusted.
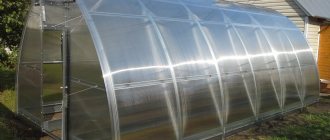
Once the frame is assembled and secured in place, you can begin covering the greenhouse with polycarbonate. It is advisable to do this when there is no wind, since the material is thin and can easily fly away or get damaged.
When installing, it is also worth remembering several rules:
- First of all, the sheets are cut and cleared of the protective transport film.
- The sheets are installed with the UV layer facing outward and fixed with self-tapping screws. The latter should be located at a distance of approximately 50 cm from each other. If parts protrude, they can be cut off with a sharp utility knife.
- There are two ways to fix polycarbonate. The first is that the sheets are installed end-to-end and the resulting seams are covered with special strips or tapes. The second option is to lay the sheets overlapping and fasten them together. The main thing is that there are no gaps between the sheets of plastic.
- Windows and doors are installed at the very end.
Experts recommend regularly checking the screws and tightening them slightly if necessary.
How to build a greenhouse out of wood
If growing your own food and knowing where it comes from is one of your top priorities, then of course you need a greenhouse
Eating healthy now is just as important as not having to eat out of a can in the future.
There is no need to worry about the upcoming costs associated with purchasing a ready-made kit. If you do not have experience in construction, you can first make a simple wooden greenhouse with your own hands under film without much expense. A wooden frame is one of the simplest options.
The supplies you'll need for your greenhouse will vary, so this list may not be exactly what you need, but this is what was used for this particular project.
- 8 2 x 4 boards, 3 m long.
- 14 2 x 6 boards for greenhouse base and raised beds.
- 10 slats 1 x 2 for sealing the film on the greenhouse.
- 5 strips 1 x 4, 250 cm long, for window and door frames.
- 3 bars 2 x 2, also 250 cm long, for the door.
- Several 4 x 4 beams of approximately 2 m each.
- There are a lot of 75mm screws, nails are cheaper, but screws are better for extra strength.
- 15 meters of greenhouse film and double-sided tape for sealing the film.
- 6 roofing panels for greenhouses
- Roof gable 3 meters.
- Along with the above, buy some loops and metal plates to reinforce the seams (this is not necessary, but will come in handy).
Instructions on how to make a wooden greenhouse
Try to find the flattest spot possible to minimize the work. Dig holes for supports 60 cm deep. Then assemble the frame. Don't attach anything to the front where the door will be yet. Trim the tops of the 2 x 4 boards to ensure the roof is level. Putting the roof together is a little tricky, but much easier than trying to measure each truss. Use 2 pallets to make the center point of the roof.
- Measure the width of the greenhouse and divide it in half to get the distance from the center on each side.
- You will need two people to install the roof. Attach the roof to the frame using metal ties and nails.
- Once the roof and frame are ready, make the frame for the door. Then knock down boxes for raised beds.
- Attach the film using double-sided tape (on top) to separate it from the frame and also to strengthen the seal. Then nail the slats along the outer edges.
- The most interesting part is cutting and laying out the roof panels. This is something that needs to be done by 2 people, at the very least you need someone to hold the ladder.
- Secure the roof panels using drywall screws and rubber washers.
- Then insert the door into the doorway and tighten the hinges. Install a hook or latch.
This is a short instruction, you will probably have a lot of questions, so you can watch the video on the website (link below), which contains more detailed information than what is presented here.
Photo source: survivalistprepper.net/diy-greenhouse-design/
Useful tips for cutting polycarbonate
The process of cutting polycarbonate for the ends is quite simple in steps, but you may encounter some difficulties when performing them. To do everything correctly and prevent damage to polycarbonate, familiarize yourself with the basic cutting rules.
- It is better to cut a stack of sheets rather than just one - this helps to avoid cracks.
- Not suitable for cutting polycarbonate: a hacksaw, a saw with large teeth, construction scissors and scissors for cutting hard plastic.
- Suitable for cutting polycarbonate: assembly or stationery knife, electric jigsaw, hacksaw, grinder, circular saw, laser.
- You can cut polycarbonate more accurately by working together - the second person should hold the sheets.
- It is most convenient to correct small irregularities in the cut with a knife.
- For greater durability and tightness, sealing tape (top) and perforated tape with an end profile (bottom) can be glued to the cuts. This way moisture will not destroy the honeycomb from the inside.
- You need to cut the fabric along the line along the empty cells.
- Remove the protective film only after installation is complete. It is a mistake to leave it - later the glue will deform under the sun, and the polycarbonate will lose its transparency and its appearance will deteriorate.
Some manufacturers provide the service of cutting polycarbonate for self-installation by the buyer. This greatly simplifies installation work and eliminates cutting errors. And the safest thing is to order installation from the manufacturer, since he is the one who best knows the technology for installing his greenhouse. Contact us and we will offer the most suitable purchasing option for you.
Construction and installation recommendations
It is necessary to choose polycarbonate doors carefully. It is advisable to study the technical characteristics of the product before purchasing. It is recommended that a future purchase meet the following characteristics:
- safety - in the event of sudden closing or opening, the doors should not be damaged;
- attractive appearance;
- no sharp corners;
- ease of movement along the guides;
- noiselessness.
According to their design, sliding doors can be framed or frameless. In the first case, structures made of wood or plastic are used. In the frameless version, only polycarbonate is used. Next, the purchase must be installed correctly. To do this you will need the following tools:
- square;
- level;
- roulette;
- drill;
- screwdriver;
- jigsaw
It all starts with the correct measurement of the opening. Ideally, the guide frame should be 1-1.5 cm less than the length of the opening
Particular care should be taken to measure the parameters of the doorway using a square. Any error in measurements will lead to the fact that the sliding doors simply will not fit into the required place
After the frame has been assembled using metal corners, it must be coated with protective paint or varnish. It is strongly recommended that residents of regions with high humidity and sudden temperature changes not skip this important stage. At the time of assembly, polycarbonate sliding doors have a leaf that exceeds the opening area by 3-4 cm.
The guide metal tube has a length equal to twice the length of the opening. After fixing all elements in their positions, installation of anchors and fasteners is carried out. If no mistakes were made at the previous stages, then polycarbonate sliding doors will last at least 5-10 years, depending on operating conditions.
Material cutting
Once you have the exact dimensions, you can start shaping the door. In order for the cutting of polycarbonate to be correct, it is advisable to use a circular electric saw for cutting, or, in extreme cases, a simple construction knife.
During the cutting process, the resulting polycarbonate particles should be blown off with a stream of compressed air.
Often the door leaf is cut according to the installation location, and not separately according to size. In such cases, an error in size is unlikely. If desired, you can cut out a small window at the top and install a door closer.
Do not forget about the handle that the door must be equipped with. It can be made of metal or durable plastic. If the structure is equipped with a window, then you can also install a small handle on it.
For fasteners, holes of a suitable diameter are drilled in the material using an electric drill. You can use a regular metal drill. You need to drill between the polycarbonate stiffening ribs. The holes should be no closer than 40mm to the edge of the canvas.
Having cut out the polymer sheet for the door, you can, if desired, paint it in any color. But before that, sand and treat the surface with a protective agent.
Brick foundation for a greenhouse
In addition to the light and short-lived foundation made of timber, the home craftsman is faced with the question: can he make a reliable and solid foundation? If you really think about this, then we present to your attention an excellent solution - a brick foundation with a cement strip base.
Brick foundation for a greenhouse
Such a foundation can last for decades, but here, as always, the period is influenced by the correctness of its construction. Let's look at the process of building a brick foundation in detail.
- First of all, we make a trench with a depth of 40 to 60 cm. This will be quite enough. Then we pour a concrete base onto the sand cushion.
- We lay a row of brickwork. The number of rows of brickwork depends only on your imagination; the higher you want the greenhouse, the more rows you can install.
- Next, we lay a layer of roofing felt for waterproofing.
- We fasten the bottom trim with anchor bolts. The harness can even be made from timber.
Below in the photo we will look at step-by-step instructions for building a brick foundation for a polycarbonate greenhouse.
Brick foundation for a greenhouse. Step-by-step construction technology. Continued. Steps to build a brick foundation
Foundation for a greenhouse made of timber
A foundation made of timber is a simple solution for those who do not want to spend a lot of time constructing a foundation. To build this structure you will need:
- Beam with a diameter of 50*50 mm.
- Iron pegs for attaching the timber to the ground (provided you are not making it on screw piles or on a brick base) and drying oil.
- Drying oil is required in order to prevent wood from premature rotting due to direct exposure to soil and weather conditions (dampness, rain, condensation).
Before we get to the technology of constructing a timber foundation, we note that a timber foundation can be secured not only to the ground (which will cause it to quickly rot), but also to brick supports or screw piles, and then a timber frame can be made - this is the best option.
Using timber in the construction of a greenhouse foundation.
Attaching the frame to a timber foundation (timber frame)
A polycarbonate greenhouse in most cases requires a reinforced frame. It is the frame that is the basis of the structure when constructing a polycarbonate greenhouse. The frame can be made from various materials, but the main materials are:
- Wooden beam;
- Aluminum guides;
- Metal pipes;
- Metal corner, etc.
Craftsmen mainly use wooden beams when constructing frame elements, but wood, as noted above, is quite susceptible to rotting and the second disadvantage is the difficulty of dismantling the structure for the winter. When using a wooden frame, this becomes a problematic task. Let's consider various frame options for a greenhouse on a timber foundation.
Manufacturing
In order to make a reliable door of proper quality from a polymer material for a greenhouse, it is necessary to take into account some factors:
- If the entire greenhouse structure is sheathed with polycarbonate, then the procedure for working with the door trim will be the same.
- If only the door is made from this material, then the most important step in the work will be the correct manufacture of the frame; it should fit perfectly into the opening.
- If the frame of the greenhouse is made of metal, then the frame for the door should be made of a metal profile measuring 30x2 or 40x3.
- If the “skeleton” of the greenhouse is constructed of wood material, then the frame should be made of wooden beams with a cross-section of 50x50cm (it is advisable to take the timber from coniferous wood).
Having assembled the frame, you need to place it on a polycarbonate sheet and outline the outline. Then all that remains is to cut the polymer sheet according to the markings and secure it to the frame.
Assembling the frame
Let's consider the case when you decide to build an arch with straight walls on a site, and a metal profile is chosen for the frame. The base for us is a foundation made of timber, standard dimensions - 6m x 3m. It is best to install the frame on the ground, and only then install it on the foundation.
1 Assembling the end rear wall
- we cut the metal profile to the specified dimensions (width 3 m, height 1.5 m), open the end of the profile at the corners so that the side element fits into it (using pliers we unfold the internal rigidity and form a tongue);
- we connect with two screws with a flat head (in common parlance – bedbugs);
- after these steps you should get a rectangle with two transverse slats (they are attached in the same way, but inserted edgewise);
- temporarily fix the rectangular part of the entire free guide;
- We check the angles with diagonals (they can be played by a tape measure or an entire profile).
2 Create a pediment from racks
- find the middle of the rectangle;
- in this place the straight lines should intersect, creating an angle;
- cut off the excess, fasten the corner in the manner described above;
4 Making a hole for the doors
- We fix two metal profiles, height from the base to the roof line, at a distance of 60 to 80 cm in the center of the rectangle (these will be the doors);
- we cut out that part of the rectangle that crosses them transversely, and then attach this scrap higher (taking into account your height, so that you don’t hit your head on it every time).
5 Assembling the side walls
- we take the metal profile and cut it to size (total width - 6 m, height - 1.5 m, pitch - 1 m, that is, in addition to the rectangle, you get five more transverse slats);
- a 6 m base will consist of two profiles that need to be securely connected;
- the connecting element here will be a transverse profile, namely, we cut off a 20-centimeter piece of the profile, put it on the transverse one and get a structure in the shape of the letter “T”;
- the open ends of the two sections are “dressed” onto this connecting structure and fixed with self-tapping screws.
6 Connect the walls together
- first of all, the rear wall is installed on the foundation, again using self-tapping screws;
- pieces of metal profiles, similar to those described above, are attached to each of the walls and serve as a connecting element;
- We alternately connect each wall to the next one.
7 Installation of the roof base
- we prepare five rafters, assemble them according to the same principle as the front part in the end wall with the only difference - the screed should not be attached at the ends of the profile, but in the middle of their length;
- to attach the rafters to the walls, you need to cut the profile from the sides, and bend the resulting tongue under the wall profile, securing it with self-tapping screws;
- Additionally, you can place a piece of profile under the connection and secure it on both sides;
- the ridge element is made from a guide profile, and it must be attached in such a way as to make do with one cutout of the side wall for each triangle (that is, the angle of the ridge is formed by bending the profile and cutting out the bend for the rafters).
7 Attach the sheets
You can secure it using an H-profile: it is attached to the frame, and polycarbonate sheets at the joints are fixed into this profile.
You can do without it. But then you need to put a rubber layer on the places where the frame adheres to the polycarbonate panels, on top of this - the sheets themselves, then put metal overlays on top of them, and then connect all these “layers” with self-tapping screws along the seam between the two polycarbonate sheets.
Correct construction of a door frame for a greenhouse
The production of a greenhouse door can be based on any door leaf. Usually the same material is taken from which the greenhouse itself is constructed.
This could be wood, polypropylene pipes, metal profiles.
A wooden door is made using dry slats measuring 30x40 mm and film, which is then covered with it.
The process is as follows:
- The unfastened box is assembled using plates and corners according to the dimensions of the doorway;
- After this, polyethylene is stretched over the frame;
- Next comes fastening to the side post so that the door opens outward;
- The porch is also made of wood and secured with an end seal.
- A threshold for the door is necessary, as it will allow the structure to be raised above the ground;
- The handles are attached on both sides and are equipped with any closing device.
When asked how long it can take to build a door for greenhouses, you can answer that you can complete this work alone within 1-2 days.
Step-by-step instruction
You can install the structure yourself at home thanks to the characteristics of carbonate. To do this you need to follow simple sequential steps. Don't forget to think about safety precautions.
Before you begin the preparatory and main work, we recommend that you familiarize yourself with several rules for working with polycarbonate. They will help you simplify the installation process and reduce the risk of defects:
The protective film from polycarbonate sheets on hinged doors should be removed last.
Installation of a hinged door
In order to install the mounted type, you need to follow the following recommendations:
- Clearly measure the parameters of the opening. Particular attention must be paid to right angles - these are where the biggest problem arises with incorrect measurements.
- Tighten the corners of the opening with special corners. This is necessary in order to ensure that there is no distortion.
- Cut out the canvas. To do this, you can attach a slab to the old door and cut it to the old dimensions.
- Install the canvas using a canopy.
To install a model with a frame yourself, follow this procedure:
Installation of a sliding structure
By placing a guide element, you can open the structure along the wall, similar to the principle of operation of a wardrobe, thereby saving space.
Also, if you install a model with one leaf, you will increase the resistance to drafts and heat retention in the room.
There are different types of sliding door designs, choose the one that suits you best.
Installation instructions for this type differ only in the installation of a special mechanism. Let's look at it in more detail:
- Secure the metal guide mechanism 7–10 cm above the opening.
- Attach rings to the polymer sheet.
- Install the entire structure.
So, installing a polycarbonate door is a practical solution for your interior and beneficial for your budget. You can easily carry out the installation yourself by first drawing up a project and following simple instructions.