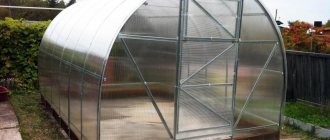
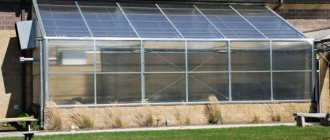
The Kremlevskaya greenhouse has been known on the Russian market for a long time, as a result of which the design has gained popularity among many summer residents and gardeners. The peculiarity of such structures is their long service life and high level of quality. The company is engaged in the production of Kremlin greenhouses, which has been operating since 2010. The company is located in the city of Kimry and has private production workshops and a design department. New Forms LLC occupies a leading position in the market of goods and services as a supplier of the Kremlevskaya greenhouse.
Key Benefits
The fame and popularity of this type of greenhouse is explained by their advantages, among which the following deserve special attention:
- increased volume of the structure’s supporting area, achieved through the design decisions made;
- the greenhouse has high strength and wear resistance;
- depending on the specific model, the mechanical load ranges from 250 to 500 kilograms per square meter;
- the design is stable and durable;
- service life, according to information from the manufacturer, is 25 years;
- compactness of the structure when disassembled;
- simplicity and ease of installation;
- the ability to independently select the dimensions of the greenhouse.
Most other models on the market come with a one-year warranty; in this regard, the Kremlyovskaya greenhouse compares favorably because it has a two-year warranty period.
Installation stages
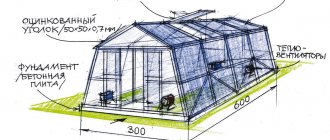
The assembly of the Kremlin greenhouse begins with preparing the base. As a foundation, you can mount a frame made of wooden beams, made to the size of the future structure. In the future, guides will be fixed on this basis. The frame must be additionally treated with antiseptics. The structure cannot be installed on frozen ground.
After preparing the base, you can begin installing the structure. The work is carried out in several stages:
- Assembly and installation of the frame.
- Cutting and installation of polycarbonate.
- Installation of accessories.
Greenhouse "Kremlevskaya" - types of construction
In the table below you can familiarize yourself with the types of structures and their key features.
| GREENHOUSE VIEW | CHARACTERISTICS |
| "Kremlevskaya-lux" | It is considered a basic model, distinguished by non-separable ends, and the kit includes two doors and windows. |
| "Kremlin-hero" | It differs from the basic model in its larger frame width and smaller distance between the arches. This allows the structure to be more resistant to snow loads. |
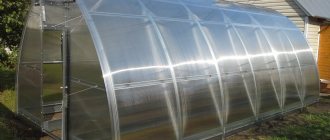
| "Kremlevskaya-zinc" | It is similar to the “luxury” model, but differs in that it consists of galvanized elements, which increases its strength and stability. |
There are also several varieties that have already been discontinued, but they can still be found on sale. For example, “Kremlin-star” and “Kremlin-president” are similar to the basic model, but differ in the materials used to make the frame. In addition, the “President” modification is also characterized by an unusual and original design. Finally, the Kremlin Strelka is a model that can withstand extreme snow loads, up to 500 kilograms per square meter. Its pointed shape allows snow not to linger on the surface of the greenhouse and roll down from it.
General Tips
In general, the greenhouse kit itself must include complete installation instructions, which even included photographs. Using the example of one of the polycarbonate Kremlin greenhouses, we will consider how the installation of the structure should be carried out.
Let's take, for example, a greenhouse with the magical name “Fairy Tale”.
Important!
When working, be sure to wear hand and eye protection, and wear something thick with sleeves, not a lightweight Reebok T-shirt. The materials are dense, durable and heavy; this is not an aluminum profile, but even real iron.
Fasteners and connections included in delivery
Installation of the frame must be done by “baiting” the fasteners, and not by tightening them with incredible force. The gaps in the connections will allow you to easily adjust the elements to one another, and after covering the structure with cellular polycarbonate, you will need to finally tighten all the fasteners.
Tools
Tools must be used in good working order, and it is undesirable to carry out the entire assembly with one wrench, a hammer and worn-out pliers.
You will definitely need:
- Box spanners;
- Socket wrench;
- Pliers;
- Phillips and slotted screwdrivers;
- Drill and screwdriver, can be “in one bottle”;
- Metal drills, not necessarily included in the set, can be limited to 4 and 5 mm;
- Roulette;
- Possible - building level;
- Polycarbonate trimming tapes, solid and perforated.
A lot has already been said about installing tapes on the ends of sheets of cellular polycarbonate: they serve to prevent moisture from flowing into the surface and to remove condensation from below. Most likely, the Kremlevskaya greenhouse made of polycarbonate does not contain such tapes as part of the kit; they need to be purchased separately.
Frame
It does not contain particularly many details, despite the apparent complexity and “monumentality” of the design. Installation can be done even alone, spending just one day on it. At the base of the frame there are T-shaped legs that allow you to install the greenhouse directly on the ground. This is good.
Covering the frame with polycarbonate
But the factory products included in the Kremlin greenhouse kits sometimes (often) come across such that it is simply impossible to connect the internal arches to each other manually. You need to unbend them, which takes a lot of effort and time. This is bad.
And one more thing: there are a lot of complaints from consumers specifically about the Kremlin kits, that they do not have enough fasteners. Banal self-tapping screws for all polycarbonate are simply not included in the kit in the required quantity. This is bad - 2.
Assembly instructions
The first step is to install a stand under the base of the greenhouse, which acts as a foundation. The design does not necessarily require a foundation; you can do without it by placing the greenhouse on the ground, but in this case the lower frame will suffer from corrosion, and it is almost impossible to avoid this. Next, according to the instructions, you should sheathe the ends with polycarbonate, then install arched forms and sheathe the sides of the structure.
Assembling the foundation
The general algorithm of actions for assembling the Kremlyovskaya greenhouse is described above, but now it’s time to talk about the main stages in more detail. As already noted, it is not necessary to fill the foundation, but it would be right to do it anyway to make the structure more reliable and stable. To this end, the following actions are being taken:
- A location for installation is selected. The chosen space should receive enough sunlight and have protection from the wind.
- Marking the selected area.
- Install bricks in 2-meter increments at the corners of the site.
- Prepare wooden beams, which involves treating them with a special compound and painting them.
- Screw the bolts in increments of 0.5 meters along the beam, so that later they can be used for tying.
Usually the timber is taken with a size of 50 by 100 millimeters, but if a more durable base is required, then it can be laid in two or three rows, like well crowns.
Assembling the ends
The material must first be cut, for example, you can assemble it from polycarbonate from the ZIL plant. To do this, select a flat surface on which this procedure will be performed and place the sheet. Cutting begins with the side segments; this is a prerequisite, since if you choose another option, you may encounter a banal shortage of sheets. Cutting is done using a sharp construction knife or grinder.
The end assembly algorithm involves the following steps:
- Applying the side end segment at right angles to the polycarbonate sheet.
- Cutting out the first element with an allowance of about 5 centimeters.
- Applying the side end element to the opposite corner of the sheet.
- Cutting sheet for the door.
- Mounting the frame for the front end.
- Fixation in the hinges of windows and doors with self-tapping screws.
Sheathing the end
The end must be sheathed with polycarbonate using special screws and thermal washers. This is an important condition; simple fasteners cannot be used, since polycarbonate can change its physical properties under the influence of temperature changes. Rigid fastening, inevitable when using conventional fittings, will lead to rapid wear of the casing.
Theoretically, you can get by with such fasteners, leaving gaps between the head and the sheet, but in practice it is very difficult to guess the correct distance, which explains the need to use special fasteners.
We mount and sheathe the frame
This is the final stage of the entire process. First, the trusses are installed at the step specified in the instructions, carefully monitoring their alignment. Next, horizontal jumpers are mounted, which are secured using T-shaped systems. The completion will be the assembly of the rear end of the greenhouse and covering of the trusses, for example, with Kimry polycarbonate.
Mounting and installation of the frame
Instructions will help you assemble the Kremlin Lux, which will definitely be included in the delivery kit.
Step 1. First, assemble a foundation from 100*100 mm timber and place it on a flat surface. Connect the foundation parts together using self-tapping screws and angles. A level will help to level it.
Foundation assembly
Step 2. Saturate the timber with a protective solution. You can use copper sulfate. Impregnation can be done both before assembling the foundation and after.
Processing of foundation elements can be carried out even before assembly
Step 3. Place on the ground and connect the end halves together and assemble all the arches. They are connected very simply - using a 15*15 mm metal pipe and self-tapping screws. The upper end part (and the arcs, by the way, too) are attached with curved pipes, and the lower part with straight ones.
Arc assembly
Stages of assembly of ends and arcs
Step 4. Place the parts of the greenhouse base on the foundation beam and connect them together with self-tapping screws.
Laying the greenhouse base on timber
Step 5. Attach the assembled base to the beam.
Attaching the base to the beam
Assembling the base without frame
Step 6. Install the ends and arcs alternately on the parts of the base laid on the beams.
Stages of installation of ends and arcs
Installation of arches
Step 7. Install the ties using spider parts. On each of the arcs, the parts must be attached with the middle stream down, and at the ends the same side faces to the side. In this case, the spiders must be supported on the connections between the arcs.
Fastening the ties
Spider connection
Fastening ties using spider plates
Step 8. You can start installing the window. It is mounted in the doorway or in any of the openings between the frame arches, excluding the outer ones. Attention: those spiders that will be located above the vents are secured upward with a stream. The window itself is fixed using hinges and self-tapping screws.
Stages of installing a window
Window installation
The windows are installed
Step 9. Install and secure the assembled doors to the ends. Attach the hinges on the doors approximately 30 cm from the edge - both upper and lower.
Assembled greenhouse end
Step 10. Proceed to cover the frame with covering material. Secure it with roofing screws. Start with the door, then install handles and screws. If you decide to install a window in a door, be sure to attach the polycarbonate only to its (door) frame, and then carefully cut along the gap line between the lintel and the frame.
Step 11. Cover the ends of the greenhouse with polycarbonate.
End sheathing with polycarbonate
Sheathing the ends can be carried out after assembling the entire frame
Attaching the side end panels
Step 12. Cover the edges of the polycarbonate with special protective end rubber bands (these can be purchased separately).
Sealing polycarbonate ends
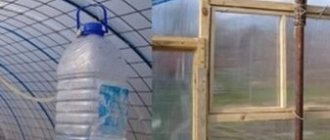
Attention! Do not cover the bottom ends of the polycarbonate so that condensation can escape freely from the honeycomb cavities.
Step 13. When covering the main frame, remember that the sheets of material should overlap by about 10-20 cm. They are attached every 50-70 cm, starting from the bottom.
Frame cladding stages
Sheathing of the main frame
Attaching polycarbonate to side windows
Advice! Leave a small cap (a few centimeters) over the end to protect the honeycomb of end panels from water.
Assembly of the “Kremlin Lux” is completed
The assembly of the Kremlin Lux greenhouse is completed. You can learn more about the process by watching this video.
Prices for timber
timber
Video - Installation of the Kremlevskaya greenhouse
Assembly instructions for the reinforced greenhouse “Kremlevskaya Lux”. Downloadable file (click the link to open the PDF in a new window).
Assembly Guide
The Kremlevskaya Lux greenhouse can not only become the pride of your dacha (it will allow you to get a wonderful harvest), but also decorate it. This arched design looks harmonious and neat, despite the fact that it is a reinforced model. And in order for it to serve for many years, it needs to be properly cared for. Timely cleaning, disinfection and careful handling will extend its service life.
Greenhouse heating system and popular heating methods
Equipping the structure with an additional heating system will increase the volume of the harvest, and this will not be superfluous even in the case of seasonal use of the greenhouse. There are many heating options, the simplest and most affordable would be solar energy. To increase it, you can place natural stones at the back wall of the structure, which will heat up during the day and begin to give off this heat at night. To distribute it evenly throughout the space, you can use a fan.
From an installation point of view, an easy option would be to use electric convectors, but the downside is their high electricity consumption, which makes such devices unprofitable from a financial standpoint. And the danger of drying out the air forces the use of a humidification system, which will again increase costs.
A solution could be the use of infrared radiation, the energy costs of which are low, although only at the operating stage, initially you will have to spend a lot on lamps.
A realistic option is air heating, in which a stove running on solid fuel is installed inside the greenhouse. You will need to run duct pipes around the perimeter of the structure, although you can do without this by using a fan. In addition to new forms of heating, you can use ancient, time-tested ones. Horse or cow manure, which is buried in the ground and warms the soil for three months, has proven itself to be excellent.
Water heating and boiler selection
An example of a system that is costly to install but economical to operate is water heating. The basis is a stove operating on solid fuel; the most ordinary barrel can act as its role. Using a pump, the water heated in the barrel is supplied to the pipes and, due to their heating, the air temperature in the greenhouse increases.
You can use various radiators, either cast iron or bimetallic, but you can do without them by opting for large-diameter steel pipes. It is imperative to equip the system with an expansion tank and lay out a chimney for smoke removal.
Note: A good economical option would be to use a solid fuel boiler, which is easy to operate and has low financial costs. An additional advantage will also be the production of ash in the form of waste, which can be used as fertilizer.
A more expensive solution would be a gas boiler. It does not require constant inspection; it can function automatically. It does not require removal to the outside, since combustion products are absorbed by plants. When choosing this option, it is advisable to provide a backup heating system in case there are interruptions in gas supply.
Soil heating
In the Kremlyovskaya greenhouse, you can organize a system similar to a “warm floor”. The following technology is used for this:
- the top layer of soil is removed, approximately 0.5 meters;
- insulation is laid and sand is poured;
- reinforced mesh and pipes (or cable) are laid;
- pouring a layer of sand (5 centimeters);
- laying a protective mesh;
- placement of fertile soil.
The system must be equipped with temperature sensors so that neither hypothermia nor overheating of the soil occurs. The maximum positive temperature should not exceed 25 degrees.
What can be grown in such a greenhouse?
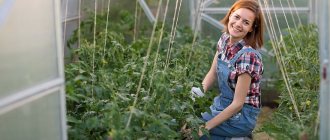
Thanks to their characteristics, in greenhouses of this configuration it is possible to grow not only standard vegetables, herbs and berries for our region, but even exotic crops that require a lot of light and heat, and also react negatively to temperature changes. Moreover, the design of the greenhouse allows you to plant climbing vegetable crops and plants of indeterminate species (with unlimited bush length).
Did you know? The largest area (1.5 hectares) has the Eden greenhouse, located in the UK in the county of Cornwall.
Greenhouses of the “Kremlin Lux” type will help not only to systematically obtain a rich and high-quality harvest in a small area, but also, thanks to their arched design, they will decorate any area. Such structures allow greenhouse technologies to become more and more popular every year among gardeners and farmers.
Caring for the greenhouse correctly
A two-year warranty, for example, for the Kremlyovskaya-Lux greenhouse from the manufacturer, of course, is not the maximum period of its operation. The structure can last much longer, but subject to proper installation and proper care.
Every spring, the surfaces of the greenhouse should be washed with warm soapy water. During this procedure, you need to use soft fabrics or napkins, hard abrasive materials are prohibited, the same applies to aggressive chemicals, since they can damage the integrity of the structure.
Resistance to snow loads does not mean that there is no need to remove snow from the greenhouse. The stability of the structure is high, this is indisputable, but when it melts, an ice crust forms, which negatively affects the greenhouse.
Selection of the optimal greenhouse option
The efficiency of a greenhouse primarily depends on the selection of the optimal design option. To do this, you must definitely decide for what purposes it will be used, and what will be located inside in the future. The calculation of the most appropriate size of the structure, as well as the choice of the best material for cladding, depends on this.
Sizing
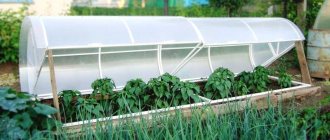
If you plan to engage in plant growing as a hobby, the basis of which will be the production of seasonal fruits, green herbs and flowering plants, you can start from the minimum dimensions of the structure. In this case, a structure measuring 2.5 × 2 × 2.1 m (L × W × H) will function successfully. In addition, this option is optimal for all owners of small plots.
When the size of the garden allows you to install a larger structure, you can use the standard model, dimensions 3.5 × 3 × 2.1 m (L × W × H). If you plan to use a greenhouse for private farming or a small business, with an automated irrigation system, you can get a larger model. The following dimensions are considered to be the best for this purpose: 6×4×2.1 m (L×W×H).
Important! It is not recommended to install greenhouses with one side measuring more than 6 m in summer cottages.
Caring for large structures is more labor-intensive and requires mechanized solutions, so it is better to install several small or medium-sized structures.
Selection of coverage
There are several types of coverings for greenhouse houses. The most famous and widespread is glass - this material is environmentally friendly, has excellent light transmission and insulating properties. Its main disadvantages are considered to be high cost, impressive weight and fragility, which is why most manufacturers have abandoned it in recent years.
Polycarbonate has the best combination of price and quality. It consists of transparent thin sheets of plastic with various hollow cells. This gives the material lightness, but at the same time strength and good thermal insulation properties. Polycarbonate has good flexibility, so it allows you to build a high domed roof.
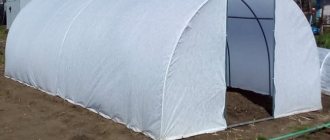
To reduce the cost of a greenhouse, film materials can be used as a covering. The cheapest option would be a simple polyethylene film; it can be with or without a reinforcing mesh. However, this coating is not UV resistant and will require annual replacement.
Read how to properly stretch the film onto a greenhouse.
Spunbond, a non-woven dense polymer material, has the best thermal insulation properties and weather resistance. It can last up to 5 years, but is only suitable for wall cladding, since it is almost completely unable to transmit sunlight.
Tips for selection and operation
The popularity of these models gives rise to certain difficulties associated with the risk of purchasing non-original products, which may have an aluminum frame and low-quality polycarbonate profile. To protect yourself from this, you should consider a number of points when purchasing. First of all, the price lower than that of the manufacturer is a signal of a possible fake, in addition, the standard model with a length of 4 meters weighs 97 kilograms, there should be no deviations.
As for operation, the manufacturer recommends adhering to several rules that help extend the service life of the structure:
- During the winter, plant remains should not be left inside the greenhouse; the entire space should be thoroughly cleared;
- before planting in the spring, you need to check the condition of the polycarbonate sheets and replace them as necessary;
- You cannot light a fire inside the greenhouse, this will lead to damage to the profiles.
Stage 3: assembly - sheathing
Polycarbonate coating is delivered in separate sheets, rolled. Before the sheathing itself, the end sheets must be cut and cut. To do this, just use a regular sharp knife, or you can use a jigsaw. Please note that before cutting sheets, be sure to remove the protective film from them!
When covering the frame with polycarbonate, it is important to follow one rule - the sheets must be overlapped, with a margin of 10-15 cm. The upper part of the structure must be covered with one common sheet, leaving small canopies over the end parts of the greenhouse. An important point is that the polycarbonate honeycombs must be located perpendicular to the ground. Only in this position will the accumulated moisture be able to drain freely.
How to modernize the Kremlin greenhouse?
With all the power of the structure, the “Kremlin” greenhouse still needs strengthening, especially for snowy areas. The easiest way to improve this is to install wooden supports under the trusses; this will reduce the risk of sagging or even collapse of the greenhouse.
For situations where the greenhouse becomes a stationary structure, it is recommended to secure the connections not with self-tapping screws, but by welding the joints. With this option, no supports are required. Finally, it is still advisable to make a foundation from the beginning; this will increase the reliability of the greenhouse to various kinds of external influences.
Design Features
A mention in the name of any product or service of the Kremlin is invariably associated with high quality of the product. The operational characteristics of the Kremlin greenhouse fully correspond to the assigned tasks and meet the expectations of consumers.
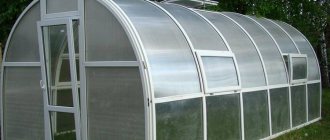
The designs of Kremlin greenhouses, including the “Lux” model, are distinguished by their strength and durability. They successfully withstand heavy snowfalls and high wind loads, maintaining their integrity. The main purpose of the structure is operation in the harsh conditions of the European part of the country and Siberia. The key to the quality of Kremlin greenhouses is compliance with SNiP 2.01.07-85.
The Kremlevskaya Lux greenhouse model is considered the most durable structure among arched structures. If we consider the impact of snow cover, it will withstand 240 kg/m2, and this is not the limit of its capabilities. High strength is ensured by a special frame configuration, where each arc is assembled from two pipes fastened together. The gap between them does not exceed 5 cm. The second name for the arched frame element is a truss (by analogy with the roof rafter system). To produce arcs, a steel pipe with a cross-section of 20x20 mm is used.
The distance between the arches of the Kremlin greenhouse of the “Lux” series is 1 m, the connection is made with ties. The individual elements are assembled using cross clamps called spiders.
Comment! The design proposed by the engineers promotes the uniform distribution of wind and snow loads. But the large number of parts included in the Kremlevskaya Lux greenhouse kit is the reason for the lengthy assembly of the structure.
The “Lux” model of the “Kremlin” greenhouse series has other significant advantages:
- The collapsible frame ensures easy transportation of the structure, despite its weighty dimensions when assembled. The only condition is the presence of a top trunk; it will not be possible to fit polycarbonate sheets into a regular trunk of a passenger car.
- At the request of the customer, individual companies can manufacture the frame of the Kremlevskaya Lux greenhouse from solid arcs. This approach will increase the strength of the structure; the only problem will be the need for transportation by truck.
- Coating the frame of the “Lux” model with special powder paint prevents the development of corrosion processes. The Kremlin greenhouse is not afraid of the humid environment that forms during the operation of the structure.
- The polycarbonate coating provides good transmission of sunlight, reliably retaining heat and moisture inside the “Lux” structure. These characteristics create optimal conditions for growing vegetables in the Kremlin greenhouse.
Main parameters of greenhouses of the Kremlin Lux series:
- Length – from 4 m or more in 2 m increments.
- The width varies from 2.5 to 3.0 m.
- Depending on the width, the height reaches 2.1 or 2.25 m.
- The area is correspondingly 12 m2 or more.
- The minimum weight is 107 kg, each successive 2 m block increases the total weight by 30 kg.
One of the design options is shown in the photo:
Complete set of greenhouse structure
The Kremlin Lux model contains a pair of vents and doors located at the ends of the structure. The basic kit parts are divided into 4 packages. A detailed description of the sets is presented in the tables:
Comment! The presence of special latches for vents in the kit prevents the automatic closing of the opening during operation of the Kremlin greenhouse.
The number of polycarbonate sheets varies depending on the length of the structure of the “Lux” model. For a 4-meter greenhouse made of Kremlevskaya polycarbonate, you will need 3 sheets with parameters 210x600 mm, a 6-meter long structure needs four sheets, and so on.
Gardeners who do not have the opportunity to visit their property every day are recommended to install a thermal drive system for vents and doors.
The dimensions of the Kremlin Lux series greenhouse allow you to equip two wide beds inside, located along the walls. If desired, you can arrange three beds of smaller width, while leaving two passages between them that are quite convenient for moving.