When you contact our organization, you receive high-quality and inexpensive service. The average experience of installers is 5-7 years. All installation specialists are trained within the company and pass an internal exam on dismantling and replacing polycarbonate in a greenhouse.
Our additional advantage is that we carry out all repairs without prepayment. Payment occurs upon completion, after signing the acceptance certificate. Upon completion of installation, we do not rush the customer, but provide time to evaluate the quality of our work. And only after this the payment for the repair of the greenhouse occurs.
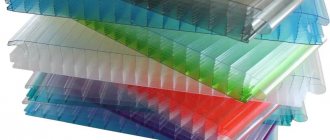
For residents of Moscow and the Moscow region, we provide 4 types of cellular polycarbonate with a thickness from 3.7 mm to 6 mm. Available plastic from European and domestic manufacturers. Any additional equipment for polycarbonate greenhouses and greenhouses is available for sale. Installation of windows, partitions, car lifts and beds is available.
When might greenhouse repairs be necessary?
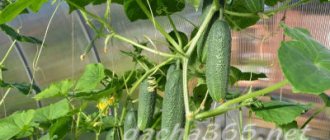
The average service life of polycarbonate is 7-12 years. After this, it begins to deteriorate under the influence of mold and fade in the sun. The honeycomb inside the leaf becomes clogged with grains of sand and insects. Polycarbonate becomes unusable even without mechanical damage. Buying a new greenhouse will cost more, which is when our clients turn to us for a service to replace polycarbonate in a greenhouse.
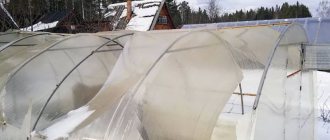
Sometimes, the greenhouse frame collapses under the influence of snow. In this case, we do not carry out repairs. Since restoration and restoration of such a greenhouse is impossible. The frame cannot be updated.
Prices for polycarbonate replacement
| Length | Price |
| 2 m | RUB 4,500 |
| 4 m | RUB 5,500 |
| 6 m | 6,500 rub. |
| 8 m | RUB 7,500 |
| 10 m | RUB 8,500 |
Polycarbonate cost
| View | Thickness | Life time | Price per sheet 6 m |
| Sellex-Matador (Russia-Austria) | 3.7 mm | 5 years | RUB 2,400 |
| Sellex-Comfort (Russia-Austria) | 4 mm | 10 years | RUB 2,900 |
| NANO GREEN HOUSE GOST (Russia) | 4 mm | 10 years | RUB 3,700 |
| Woggel (Germany) | 4 mm | 20 years | 4,100 rub. |
| Plastilux | 6 mm | 10 years | 4,200 rub. |
How to seal cracks and holes in a polycarbonate greenhouse
The first problem that greenhouse owners have to face is treating holes and eliminating the resulting cracks in the plastic. Before attempting repairs, you will need to determine the causes and make a small diagnosis of the damage.
Do-it-yourself polycarbonate repair begins with removing contaminants. In the transparent cladding of the greenhouse, it is quite difficult to discern thin cracks, from which the destruction of the plastic begins. Therefore, first of all, we do a little preparation:
- We wash the surface of the polycarbonate with soapy water, a sponge and a brush. Both the outer and inner surfaces of the plastic must be cleaned;
- Wipe the polycarbonate dry with a dry cloth or rags;
- In places where cracks may appear, apply a small amount of soapy water and water-based ink.
After a couple of hours, a network of small cracks can be seen on the damaged area of polycarbonate, which over time can turn into a hole or a long line of cracking.
Popular questions and answers to them
Is advance payment required for your services? No, we work without advance payment. Payment for repair services for polycarbonate greenhouses occurs upon completion of the work after signing the acceptance certificate. The customer must carefully inspect the greenhouse.
What is the guarantee for your work? There is a 1-year warranty for any types of installation and dismantling work on polycarbonate or additional equipment. This is indicated in the accompanying documents.
Can you be sure that the material is certified? Yes, we buy polycarbonate sheets from Russian and Austrian companies; certificates and test results for these materials are provided. The sheets themselves contain the manufacturers' logos.
Can polycarbonate be replaced in all greenhouses? We do not provide polycarbonate replacement services for M-shaped, L-shaped or U-shaped greenhouses. We work only with closed galvanized pipes up to 1.5 mm thick.
What to do if a warranty claim occurs? Call or write to our company. Provide your order number (it is indicated in the documents). After which, most likely, our claims department will ask you for photographs of the defect. The complaint will then be reviewed within 3 working days. If a warranty case is identified, we will send a team of technicians free of charge and fix the breakdown.
Useful tips for summer residents
Here are some useful recommendations for gardeners from experienced greenhouse growers:
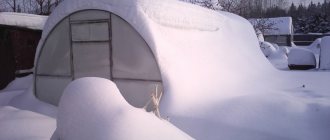
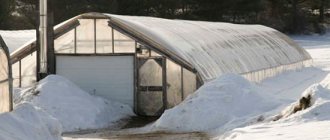
- It is best to clear the snow cap lying on the roof of the greenhouse before the snow compacts and settles. Fresh snow can be easily removed with a soft broom on a long holder. It is not recommended to use a snow shovel for these purposes; too often it damages the plastic covering.
- It is undesirable to leave the beds in the greenhouse bare; it is advisable to throw a 20-25 cm layer of snow into the greenhouse. With the arrival of warmth, the snow cover will melt and gradually saturate the greenhouse soil with moisture.
- At the end of February or beginning of March, the summer resident should choose a warm day with a temperature above 0°C, and use soapy water to wash the inside of the greenhouse walls and roof. This will increase the passage of sunlight inside the structure, therefore, the air in the greenhouse will heat up faster. This procedure will bring the beginning of a new growing season in a greenhouse closer.
- If, during operation, sharp surfaces have formed on the metal or wooden frame of the greenhouse that can damage the polycarbonate, these fractures can be neutralized by wrapping them in several layers of soft fabric. For this purpose, you can use old, no longer needed knitted clothing (T-shirts or T-shirts).
- You can get an early harvest of greens in a polycarbonate greenhouse if you sow dill, sorrel, and parsley seeds in the greenhouse bed in the fall. During the winter, these seeds will stratify and germinate as soon as the temperature in the greenhouse rises to +10°C. By sowing seeds in the fall, you can get greens to the table a month or a month and a half earlier than after sowing in open ground in the spring.
A polycarbonate greenhouse should be inspected to identify areas requiring repair at least twice a year: in the fall and after the end of the winter season. It is optimal to look after the structure regularly, especially in winter. Winter time is dangerous with strong winds and heavy snowfalls, after which urgent repairs may be required.
Do-it-yourself installation of polycarbonate to a metal or wooden frame
The most technologically advanced installation method is using special profiles. The panels are installed quickly and accurately, and the joint is already well protected from precipitation.
Types of profiles:
- connecting - for joining the edges of panels in a supportless unit, the profile itself is not attached to the sheathing;
- wall-mounted - for installing the sheet near the wall and sealing the joint;
- corner - for connections in corners;
- composite - the lower part is attached to the sheathing, the upper part after laying the panels;
- end - for sealing edges;
- ridge - adjustable to any angle of the slope.
Installation of polycarbonate to a metal frame is carried out in the following order:
- Remove the protective tape from the ends of the sheet (some manufacturers may not provide it).
- Orient the panel with film with inscriptions indicating UV protection towards the incident sunlight. A transparent film is glued to the back side, protecting the material from scratches during transportation.
- Cut sheets according to the design.
- Clean the channels from dust using a vacuum cleaner.
- Bend the films away from the edges by 80-100 mm, glue protective tapes, and cover the cuts with end profiles.
- When the metal frame is heated, local swelling of the polycarbonate is possible, so it is recommended to lay thermal insulating tape.
- Secure the lower part of the composite profiles to the supporting system using metal screws.
- Remove the entire bottom protective film from the sheets, and bend the top one by 80-100 mm.
- Place the panel on the profile shelves, place the upper component on top and press with your hand until it clicks. It is necessary to ensure that there is a compensation gap of at least 3 mm between the profile and the sheet.
- To join the wall, insert the panel into the wall profile, and glue the free shelf to the wall using sealant.
- If the distance between the profiles exceeds 1 m, the sheets are additionally attached to the frame with self-tapping screws with thermal washers in pre-drilled holes of larger diameter.
- After installation is complete, remove the top protective film.
Strength test
It is important to ensure the strength and stability of the greenhouse . If it is necessary to strengthen a polycarbonate greenhouse, then it would be optimal to install strapping rings around the perimeter. If it is necessary to strengthen the frame, then you need to strengthen the area at the base of the building and in the center.
You can also mount load-bearing columns that will take on the main load. It is recommended to install them along the entire greenhouse at equal intervals of at least a meter.
Frame faults
Being the basis of the structure, the frame is subject to the greatest loads. The cause of breakdowns can be the fragility of the material , its incorrect installation, or a violation of the position of the frame due to washing away with water. If maintenance is not carried out in a timely manner, cracks and other deformations may form in parts. Frame failures are often associated with exposure to heavy snowfall or gusty winds.
Bent metal parts can be straightened, and broken boards can be replaced or intact ones can be nailed on top of them. To avoid future breakdowns, it is better to further strengthen the fault location.
Like other work, frame repairs are best done on a clear, dry day with temperatures above freezing.
Features of polycarbonate installation
Polymer materials have features that must be taken into account during installation:
- High temperature expansion. When heated, the linear dimensions increase to several mm per 1 linear meter, which, if improperly fastened, can cause deformation of the sheets or even their destruction. To compensate for these movements, the assembly must have the ability to move the material during expansion or compression.
- Sensitivity to ultraviolet light. Exposure to direct sunlight leads to rapid aging of polymer materials; sheets become cracked and destroyed. To correct this drawback, during the production of polycarbonate, stabilizing additives are added to the raw material, and the side of the sheet facing the sun is covered with a protective film.
To avoid mistakes during installation, manufacturers mark the coating with the appropriate labels.
- Presence of stiffening ribs. They should always be positioned vertically to the ground so as not to prevent the condensation accumulated inside from draining. This only applies to cellular polycarbonate; monolithic polycarbonate can be mounted in any way you like.
- Low hardness. Despite the fact that honeycomb panels are quite resistant to shock loads, they can be easily damaged if installed carelessly. It is not recommended to use too much force when screwing in self-tapping screws, installing connecting profiles, or loading and unloading operations. This can lead to the destruction of internal partitions in the sheet structure, cracks, and the appearance of dark mold spots.
Polycarbonate is attached to a frame, which can be metal, wood or plastic. During installation, it is important to compensate for temperature deformations while maintaining the tightness of the connections. For this purpose, connecting profiles, elastic washers and gaskets, overlay elements, etc. are used.
Scotch
Most often, the material cracks in the direction of bending, that is, vertically or slightly obliquely in the most common, semicircular greenhouses.
If the crack is not noticed and repaired in time, it will quickly spread, which will lead to the sheet splitting. When reliable means are not available, it is permissible to use ordinary wide tape for repair as an urgent measure. This is better than nothing - at least the damage will be recorded. The surface of the polycarbonate must be thoroughly washed, dried with a rag, degreased with an alcohol solution, the crack sealed with tape, heated with a construction or household hairdryer and carefully smoothed.
Surface preparation
The surfaces of even the highest quality materials begin to deteriorate over time. Therefore, it is important to pay attention to cleaning surfaces . Corrosion, mold and other growths can lead to irreparable damage to the part over time.
At the first signs of such defects, you need to thoroughly clean the problem area with fine-grained sandpaper, then cover it with an antiseptic composition, paint coating or anti-corrosion enamel.
It is recommended to periodically paint the entire frame. This will not only keep it intact and protect it from corrosion, but will also improve the appearance of the entire greenhouse. The best paint for exterior use is one that is resistant to high humidity, different temperatures and the effects of fertilizers and chemicals.
Additionally, you can strengthen wooden parts by covering them with a layer of epoxy resin, and on top of it - applying a layer of varnish or paint.
Foundation destruction
The occurrence of such a problem is unlikely, but if it does happen, then the situation can be corrected.
The base of a greenhouse made of timber is especially susceptible to destruction, so it will need to be replaced periodically, unlike a concrete foundation. In such a situation, the structure is completely dismantled and assembled on a new foundation. It is preferable to do it. If the concrete foundation has cracked, then it is also possible to repair it. First you need to make a dig at the site of the breakdown.
You need to try to do everything as carefully as possible so as not to enlarge the crack.
After this, you need to fill the gap with solution. It is necessary to fill the solution until it stops being absorbed.
Device
Equipping a greenhouse with your own hands is not such a difficult task. To set up a place for growing plants, you need to make sure that the room always has clean and sufficiently humid air, and that the heating and water supply systems work well.
Heating
First of all, in order to keep the room where plants are grown constantly warm, you need to take care of additional heating. This is a guarantee that seedlings can be started to be grown in early spring, and they will not freeze. The heating system depends entirely on the size of the greenhouse. But the most important thing is that it should be full-fledged, and not local. After all, such a system is not capable of completely heating the entire room.
The second important point is that heat must necessarily flow from bottom to top, and not vice versa. There are three heating options that can be used in a greenhouse: gas, solid fuel and electric.
If possible, you can turn to innovative heating methods. Among these, it is worth highlighting the heating of the soil itself. This promotes rapid growth and maturation of everything growing in the ground. It is quite possible to implement such a system in your greenhouse. Heating occurs via cable.
Before laying it, you need to lay polystyrene foam or other means of thermal insulation, characterized by increased moisture resistance. A layer of sand can be laid on top, in which the cable is hidden. A protective mesh and a layer of soil are placed on top of it.
You can install a water radiator heating system. Infrared heaters are also quite popular. In addition, they are also capable of illuminating the room. The use of infrared heaters is also considered very beneficial because with their help you can divide the space into several separate temperature zones.
A gas heating system is also considered beneficial. Especially if it is possible to connect the greenhouse to the home heating system. You can also install a burner or an automatic heating system with a small boiler in the greenhouse. And in order for all the efforts spent on heating not to be in vain, you need to additionally insulate the place for growing plants.
Ventilation
It is also important to consider the ventilation system. The correct temperature conditions are created using ventilation frames
In addition, you can add a special fan to the room. Its installation will not only solve the temperature problem, but will also make it possible to distribute heat throughout the room. This type of fan is installed on the roof. Due to this, fresh air enters the greenhouse.
At the same time, when installing ventilation, you need to do everything so that during the cold season the cooled air does not penetrate into the room. This means there should be no problems with thermal insulation either.
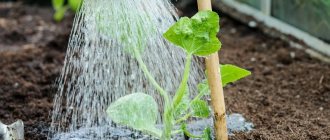
Water supply
The correct level of humidity in the room also plays a very important role when arranging a greenhouse. The condition of the plants depends on this. The fact is that if there is insufficient humidity in the room, the plants will dry out. But too much moisture is also not very good. In such an environment, the plant’s root system develops more slowly, and the harvest is also not very happy.
To ensure that the watering process does not take much time, and each plant receives as much moisture as it needs, it is necessary to equip the correct water supply system inside the greenhouse.
- The supplied water should always be at room temperature only. Too cold water harms the roots. They rot quickly in such an environment. Also, drops should not be allowed to fall on the trunks of plants and their leaves. This is harmful to some sensitive plants.
- It is worth watering the plants regularly. It is better to do this in the evenings and mornings. As for the amount of water used, it all depends on how deep the plant's root system is. The deeper it is, the more water is required. In general, the approximate water consumption is ten or twelve liters per square meter.
There are three main ways to supply water to greenhouses: drip, irrigation and subsoil. Surface irrigation should be abandoned. As a result, the humidity inside rises to an undesirable level, and water consumption becomes more difficult to control.
Sequence of selection and types of glue
Perforated tape for cellular polycarbonate
After the brand has been found and deciphered, you need to go to the store or find glue at home. It is best to look for packages with instructions, since they are the ones that tell you which polymers this or that glue can be used with and which it cannot be used with. The worst bonding materials are polyethylene, fluoroplastic, polypropylene and polystyrene. In such cases, it is best to use two-component glue. There are two types of adhesives:
- The first type dissolves the edges of the fault and allows them to harden. Solvents cannot solder all types of plastic - some types melt too much, and some are too resistant. When used correctly, solvents restore a broken item to its original state.
- The second type forms a fastening layer. This glue is much easier to use, since you don’t have to worry about compatibility, but the layer can be weak or may not react at all with the edges of the tear.
You need to use the first type with full confidence in its compatibility with plastic. To be sure, you first need to buy glue, focusing not on advertising, packaging or the seller, but on the glue instructions and reviews. In addition to the polymers mentioned above, the instructions may include the following types of plastic:
- plexiglass - PMMA;
- polyamide - PA 66;
- polyurethane - PUR;
- polycarbonate - PC;
You need to read very carefully what exactly the glue is not suitable for. Therefore, the process of selecting the ideal adhesive looks like this:
- Find out exactly the specific material from which the broken item is made.
- Find out what glue to use to glue plastic in a broken object, focusing on instructions and documentation, reviews and articles about the working mechanisms of this or that type of glue.
- Select and buy the desired composition.
- Start gluing.
Reading all the information about the type of glue you are choosing is a wise investment of time, since it will not be possible to firmly glue plastic together at home.
Types of adhesives
The market is replete with many types and brands of glue. There are thermal, liquid, reaction and contact adhesives. To choose glue as effectively as possible, you should know the features of each type:
- Hot melt adhesive is a special type of adhesive. The main feature is that this type acquires beneficial properties only if it is heated to 110-230 degrees. To work safely, you need a special device that will allow you to accurately and easily apply glue to plastic. Not applicable to plastics that melt at the adhesive's active temperature.
- Liquid glue is the most popular type; the famous PVC belongs to it. Consists of a solvent and a main substance. It works by allowing the solvent to evaporate at room temperature or upon contact with oxygen. The main thing when working with liquid glue is air contact with the seam, otherwise the evaporation of the solvent may take a long time. The stronger the solvent, the stronger the adhesive.
- Reaction glue - found in one-component and two-component forms. One-component ones consist of a hardener. These include “Superglue” and “Poxypol”. The hardener dries on the seam and securely holds both sides together. Two-component ones consist of a hardener and a fixer, which allows the combination to be securely attached to any surface. The most famous representative is epoxy resin. Great for slippery and smooth surfaces where other glue will simply run.
- Contact glue is one of the most reliable options for reconstructing plastic elements. It differs in that it is first applied to the sides of the tear, left for 10-15 minutes, after which the edges of the tear are pressed tightly against each other. The famous “Moment” belongs to this variety. Almost every representative of this group contains toxic substances, so the room should be ventilated when using.
It is thanks to this diversity that at the moment it is possible to glue any material to plastic. The two-piece and contact types are great for joining different types of plastic, since it is not always possible to glue plastic to plastic using liquid glue.
Silicone sealant
The second most common occurrence after cracks are holes around self-tapping screws that were tightened during the construction of a greenhouse. The problem manifests itself after just a few months - the polycarbonate sheets tend to bend and break, unable to pull out the fasteners. They must be unscrewed and provided with a plastic washer with a diameter of 5-8 cm before returning them to their place. And the sealant will help eliminate the damage.
The hole in the polycarbonate is cleaned, the edges are smoothed out with your fingers, filled with silicone, waited until it hardens completely, and then the installation is repeated, but without any extra effort.