- Greenhouse bread box: a functional design for growing vegetables
- Greenhouse bread box: design features
- Advantages and disadvantages of a bread box greenhouse: user reviews
- Practical advice for choosing a greenhouse installation site
- What plants can be grown in this type of greenhouse?
- Characteristics and dimensions of the greenhouse bread box
- Do-it-yourself greenhouse bread box: drawings, features of material selection
- Do-it-yourself greenhouse bread box: drawings, dimensions, manufacturing instructions
- Step-by-step instructions for creating a greenhouse in the form of a polycarbonate breadbox
- Do-it-yourself polycarbonate breadbox greenhouse: finishing work
- Greenhouse bread box made of polycarbonate: prices and features of finished structures
- Video: DIY bread bin greenhouse
Greenhouse bread box: a functional design for growing vegetables
The choice of greenhouse design, greenhouse, which is planned to be installed on the site, largely depends on the purposes that it should serve. A breadbox greenhouse is one of the most common options, since it is easy to make a greenhouse with your own hands, and its design is suitable for growing many crops. Let's consider the principle of independent construction of such greenhouses, as well as their characteristics and features.
The greenhouse bread box has a simple and easy-to-use design.
Foundation for a greenhouse
It is important to remember here that polycarbonate itself lasts for about one and a half to two decades. This factor is important
In some regions of our country, the cheapest option is to use a foundation made of timber. But is such a solution really advisable?
- First of all, it will create difficulties if you have to rebuild and change something. This cannot be done without destroying the integrity of the greenhouse itself.
- And the foundation itself in this case will serve three times less.
- The maximum service life of such a foundation is seven years.
DIY brick foundation for a greenhouse
One of the most acceptable is a foundation made entirely of brick. The main thing is to arrange it correctly so that the entire structure lasts as long as possible.
First of all, arranging the so-called pillow is an obligatory step.
- First, markings are made at the place where the foundation is expected to be located.
- The top layer of soil is removed to a depth of 200–250 mm.
- This distance is filled with fine gravel; it must be carefully compacted and leveled.
- The layer should have a thickness of no more than 50 mm after all work is completed. This is necessary so that the heaving of the soil does not harm the foundation.
- Next, concrete is prepared using a mixture of gravel and sand with cement.
Gravel and sand should be washed very well and cleared of foreign impurities.
Mortar and foundation quality
To prepare the correct composition, you can use the following proportions:
- 5 parts gravel.
- 3 parts sand.
- 1 part cement.
The gravel layer after all this should not exceed 10–50 mm in size. The dug trench is eventually filled with the prepared solution. We made a pillow for the future foundation.
The foundation itself can be built only after two weeks.
You also need to take care of waterproofing before starting work. Brick does not tolerate the aggressive effects of moisture from the soil quite well.
You need to use roofing felt in order to provide waterproofing. It is laid in one layer on a previously prepared pillow. That's it, after that you can move on to the foundation itself.
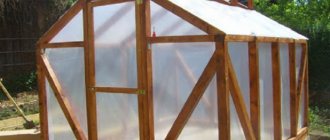
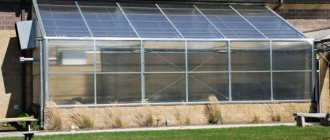
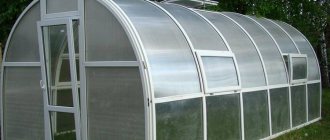
Greenhouse bread box: design features
Greenhouse frame Breadbox is a structure consisting of three parts: the right and left halves and the foundation. The microclimate inside is adjusted by raising the side flaps through the use of hinged elements. You can make or buy a greenhouse Breadbox yourself, in which one or both parts will open at once.
The folding sides of the greenhouse allow easy access to the plants.
The most common use of designs that provide for the complete opening of one part upwards. To do this, the hinges are installed on the lower frame of one of the sides. To be able to fix the frame in the desired position, use a wooden beam, on the end cut of which cuts are made.
Note! It is necessary to fix the sash in the open position with a wooden block, since, otherwise, a strong wind can close it, which is unsafe for the summer resident.
This model got its name due to the similarity of the working mechanism with a regular bread bin, the semicircular lid of which is raised. The rotation axis of the upper part is located in the end part of the vertical pipe. In this case, the sides are tightly closed. In order to open the greenhouse, the rotating part is lifted up.
It is easy to make a greenhouse-bread bin with your own hands or purchase a ready-made structure.
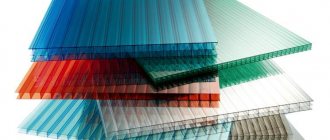
Profile metal or hollow polyethylene pipes are used as the material for making the frame, and polycarbonate or film is used as the covering material. In case of wear or mechanical damage to the coating, it can be easily replaced in whole or in part.
Useful tips
When constructing yourself, you need to pay attention to some important points:
- to create natural heating of the soil, it is advisable to cover the base of the greenhouse with grass, leaves and manure - the organic matter will release heat during the process of discussion;
- You should make a wooden support in advance, which will fix the doors when the wall is raised;
- a warm microclimate will be created by polycarbonate with ultraviolet protection;
- to remove dirt and dust from the covering material automatically, you can install a thin board with brushes attached to it on the upper part of the frame on the non-opening side;
- Before welding, you need to check all parameters with a level - this way you can avoid mistakes when building a greenhouse.
When creating a “Breadbox” greenhouse, it is important to make all the calculations in advance, including the cost of construction. On average, such factory-produced structures can have a price from 4 to 8 thousand rubles, depending on its dimensions.
Perhaps in some cases it is beneficial to purchase a ready-made structure, especially if you do not have the necessary experience and skills in construction.
To learn how to make a “breadbox” with your own hands from a profile pipe and polycarbonate, see the following video.
Source
Advantages and disadvantages of a bread box greenhouse: user reviews
Many gardeners prefer this design because it has a number of positive characteristics that make it easy to install and use. Let's consider what are the positive aspects of operating a greenhouse
The bread box is found in user reviews:
- self-production of a frame using ready-made diagrams and drawings is accessible even to a beginner;
- simple assembly and installation if you purchase a ready-made greenhouse;
- the ability to replace individual parts of the covering material increases the service life of the greenhouse;
- This design is suitable for growing almost any crop. The only exceptions are climbing plants;
- the greenhouse is light in weight;
- affordable price.
A bread bin greenhouse is easy to install on site and is inexpensive.
At the same time, this option also has some disadvantages that you should know about and take them into account before making or buying such a greenhouse:
- For proper operation of the hinges, it is necessary to regularly inspect them and periodically lubricate them;
- over time, you may experience creaking or jamming of the sash during the opening process;
- strong wind can cause the greenhouse to move if one of the flaps is open;
- installing a large greenhouse will require the efforts of 2-3 people, since it will not be possible to cope with this on your own.
On a note! You can attach the brushes to the opening part of the greenhouse frame. Then dust and dirt will be automatically wiped off the surface every time you open it.
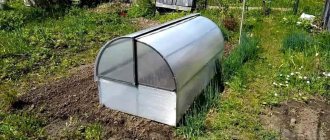
The Breadbox mini-greenhouse can be installed directly into the ground without prior preparation.
Assembly of a finished greenhouse
When purchasing a compact greenhouse, it can be taken to the site assembled, without being disassembled into separate parts. For transportation, a regular Gazelle is used. After delivery, the “Breadbox” is immediately installed in the prepared place. There are models that are sold disassembled. As an example, we can take the step-by-step assembly of the Novator Maxi design.
Open the box and carefully remove all the elements from it. In the box you will find metal ties, a lot of nuts and bolts. Set aside the side flaps and plinths. Horizontal ties at the ends have threads and holes. They can be twisted and immediately connected to each other.
The end doors are made in the form of arches or semi-arcs. Place them on the floor. Remove the protective layer from the polycarbonate sheets and carefully place them on top of both arches. When laying polycarbonate, pay attention to its coating, which protects plants from ultraviolet radiation. Label it so you don't mix up the sides. It should “look” outward, not inward. All sheets must be positioned evenly so that their border is flush with the edges of the sashes.
You may be interested in:
Greenhouse “Butterfly”, is it worth it? Owners of large plots can afford to install large heated and unheated greenhouses. In closed…Read more…
The polycarbonate must be screwed to the frame with dowels and excess material must be trimmed around the edges. Assemble the side parts using the same principle. Use long horizontal ties to connect two plinth elements. There should be five such connections on each side. After connecting, make the sheathing.
The connection of the two sashes must be done in three places - with long ties and sheathed with PC sheets. For fixation, use zip ties without protrusions. All that remains is to connect the “sides of the sashes” and sheathe them. There should be a small flap on the base of the greenhouse. There are holes in it through which you need to thread a long bolt. Now place the large sash and secure it with another bolt. Don't forget to put caps on the hollow ends of the frame and screw two handles to the doors. The “Breadbox” greenhouse is ready for use.
Practical advice for choosing a greenhouse installation site
In order for the crop grown in such a greenhouse to delight you with its abundance and quality, even at the construction stage you need to carefully choose the location for installing the greenhouse. It is worth paying attention not only to its location relative to the cardinal points, but also to the presence of nearby bushes and trees that can shade the greenhouse.
It is best to choose a place that is away from buildings. In this way, it is possible to ensure that the maximum amount of sunlight reaches the plants. Here are some basic standards to adhere to:
- the distance to the nearest building must be at least 5 m;
- if there is a bathhouse, sauna or summer shower on the site, the distance between them and the greenhouse must be at least 8 m;
- if there is a septic tank, the required distance from it is 25 m.
Layout of the greenhouse according to cardinal directions.
Another important selection criterion is the levelness of the site on which you are planning construction. In order to verify this, it is enough to use a simple building level. Such a check is mandatory, as it eliminates the risk that the structure will be installed unevenly or warped over time.
Favorable location
The type of greenhouse in question should be located in a place where there will be a lot of sunlight. Nearby buildings, bushes or trees that create shade can have a bad effect on the harvest.
It is necessary to install a greenhouse taking into account the following requirements:
- Buildings must be located at a distance of at least 5 meters.
- The greenhouse should be 8-10 meters away from small structures associated with moisture (such as a bathhouse and a summer shower).
- The septic tank should not be located closer than 25 meters from the greenhouse.
The place where the greenhouse will be installed must be level. To check this, you can use a level.
What plants can be grown in this type of greenhouse?
The Breadbox greenhouse is well suited for growing many crops, however, among them there are those that will feel most comfortable in such a greenhouse:
- strawberries and wild strawberries;
- any greens: dill, parsley, sorrel, onion, garlic, etc.;
- carrots, beets, lettuce, lettuce.
The greenhouse is also suitable for tomatoes. However, due to the large size of the bushes, over time they must be transplanted into open ground or a larger greenhouse.
Greens, onions, garlic and other low-height crops are most suitable for growing in a breadbox-type greenhouse.
On a note! If you equip a greenhouse with heating, it can be used not only in summer, but also in winter. So, fresh herbs and vegetables will be on your table all year round.
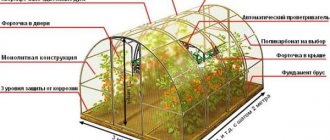
Installation and assembly features
To install the frame, you should find a lit place on the site. The greenhouse is placed in the direction from north to south. Since it consists of two halves, one half can be completely oriented to the south, opening it only during the day for ventilation, and the other half to the north.
Attention! To install the structure, support is required. Do not allow it to come into contact with the soil
To protect the greenhouse from moisture, it is best to install it on a sleeper or on a wooden beam. internal temperature adjustment window opener
“Breadbox” will be a suitable option for those summer residents who are tired of endlessly stretching the film onto the frame. It will take a little time to build a greenhouse with your own hands. It will also require a minimum of material, which can be purchased at the nearest specialized store at an affordable price. But all these worries will allow you to grow vegetables that do not contain pesticides, and at the same time save on buying expensive vegetables at the market or supermarket.
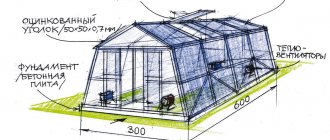
Characteristics and dimensions of the greenhouse bread box
The classic design of a greenhouse is a breadbox - an arched frame made of a round metal or profile pipe. In order to make such a base yourself, you need to cut the material according to how indicated in the drawing. Covering material (polycarbonate or film) is purchased separately and cut into pieces whose dimensions correspond to the openings in the frame.
If you purchase a ready-made structure, various manufacturers may offer some additional features designed to improve the ease of use of the greenhouse. For example, these could be legs designed to go deeper into the ground, or a border to protect plantings.
Some models open on one side and some on both sides; the pivot line may be located on the bottom frame or in the middle of the vertical end post. The differences between these models are clearly visible in the photos of Breadbasket greenhouses, which can be found on the Internet.
Standard sizes of a greenhouse Breadbox.
The dimensions of such greenhouses have some limitations: the width of structures in which one part opens is up to 1.3 m, for double-sided ones - up to 2 m. The length, as a rule, ranges from 2-4 m, and the height from 0.5 to 1 .5 m.
On a note! It is preferable to use polycarbonate as a covering material, since it bends well, but at the same time has high strength. The film is more difficult to fix, it breaks more often and requires replacement after 1-2 seasons.
Comparison of greenhouses from different manufacturers
There are several variations of the “breadbox” greenhouse:
- Single-leaf, or Fedorov's greenhouse. This is a simple design with convenient access to the beds - you just need to fix the moving part.
- Bivalve "butterfly". It opens on both sides and requires support for the doors.
- In-depth. The greenhouse is located in a hole, which allows for good heat generation and support. The roof is a ground part with transparent flaps for high-quality lighting and ventilation.
- French terrestrial. The frame is not arched, but pyramidal, the doors are divided into sections. Often used for growing seedlings in the autumn-winter period.
Do-it-yourself greenhouse bread box: drawings, features of material selection
In order to make a greenhouse with your own hands, you will need a drawing with precise instructions for all dimensions, as well as the necessary materials. For this purpose, plastic or metal pipes, wooden blocks, hinges, fasteners, and covering material are used. The foundation will require bricks, boards, sleepers and wooden blocks. Exact information about how much materials will be needed can be seen by reading the drawings and dimensions of Fedorov’s greenhouse.
DIY greenhouse assembly diagram Breadbox.
If you are planning to assemble a metal frame, you will need a pipe bender, a hacksaw, a drill and a welding machine. To work with wooden elements, you need a saw, hammer, screwdriver and knife.
You can make a wooden structure, however, it turns out to be heavier, bulkier and requires regular maintenance from the owner. For this option, use spruce or aspen bars, the size of which is 40x40 or 50x50.
On a note! For wooden greenhouses, metal strapping of beams is used at the places where the bolts are attached to extend the service life of the greenhouse. This way, the hinges will be secured more securely.
The ideal material for the manufacture of such a greenhouse is considered to be profiled metal pipes, the wall thickness of which is at least 1.5 mm, and each side is 2 cm. With this combination, the design is as strong and durable as possible, but at the same time lightweight. It is worth considering that it will not be possible to work with such material on your own without special tools and skills. In order to bend a pipe, you need a pipe bender and a welding machine to connect the individual parts.
A frame made of profiled metal pipes will be more durable than others.
Another option is to use polyethylene pipes for the frame, which are inferior to metal ones in terms of rigidity. Moreover, if you choose the wrong pipe diameter, the greenhouse will become unstable and will not be able to maintain its shape. It is important to maintain a balance here: thin pipes will not provide the structure with the necessary strength, and too thick pipes will bend poorly and cause excessive residual stress in the pipe.
Description
In order to build a greenhouse frame, you first need to decide what type of plastic pipes is best to use. They happen:
- PVC;
- polypropylene;
- metal-plastic.
The simplest and cheapest pipes are those made of PVC. It is easy to assemble a frame for a PVC greenhouse, since such pipes do not require additional equipment during installation
They have sufficient strength, which depends on the thickness of the pipe walls, which is something you should pay attention to when purchasing
The greenhouse frame made of polypropylene pipes has high ductility and durability at the same time. Polypropylene pipes can be described as durable. Installation, as with PVC pipes, does not require special devices, their cost is approximately the same.
Very stable pipes are those made of metal-plastic. Their design allows them to take any shape while maintaining their reliability. Due to the aluminum foil that lines the surface inside the pipe, they remain non-corrosive. It is better to select a diameter of such pipes for the frame greater than 25 mm.
Look at the photo to see what a greenhouse made of plastic pipes and polycarbonate looks like:
The positive aspects of the design obtained from any type of plastic pipes include:
- ease of installation of the frame;
- the ability to assemble any necessary configuration;
- low price of material;
- pipes are resistant to corrosion processes and humidity.
Negative points include:
- do not have high wind resistance;
- inability to glaze the greenhouse.
The shape that can be given to a greenhouse made of plastic pipes can be arched, pyramidal, gable and lean-to.
- The arched shape is the most popular. The frame looks like several arches located at some distance from each other.
- You won’t find a pyramidal greenhouse very often, since there is no particular need for it in an ordinary summer cottage.
- The gable frame looks like a small house. Convenient if you plan to grow tall plants in a greenhouse or make several tiers in a small area.
- The lean-to form of the greenhouse is clear what it looks like, based on the description of the gable form. Such a frame is rarely erected and only in cases where another structure cannot be erected for some reason.
Frame
The best solution when building a polycarbonate greenhouse is to choose pipes made of metal-plastic for the frame for the following reasons:
- they are more reliable for materials such as polycarbonate;
- it is possible to build a foundation for the greenhouse if it is supposed to be stationary;
- the ability to build a durable and fairly stable portable greenhouse;
- There are already ready-made arcs for greenhouses on sale, which will help you avoid a rather difficult stage during installation, such as bending pipes.
Important: polycarbonate is very convenient because it can be cut even with an ordinary construction knife.
Do-it-yourself greenhouse bread box: drawings, dimensions, manufacturing instructions
The first thing you need to create a breadbox greenhouse is a drawing. But construction work begins with preparing the foundation. This will require wood (timber and sleepers), bricks and concrete. You need to start by determining the desired size and marking of the beds. The trench is dug to a width of 20-30 cm and a depth of 40-50 cm. You need to make a cushion about 10-15 cm high from sand and crushed stone.
The next stage is laying bricks using mortar around the perimeter or creating formwork. Then concrete is poured inside and given time to dry. After this, the boards must be removed and any mortar drips from the masonry must be cleaned. Next, you can proceed to installing and securing the greenhouse. It is important that the size of the foundation exactly matches the size of the bottom frame of the greenhouse. To do this you need to use a drawing with dimensions. In this case, the Breadbox greenhouse will be strong and stable.
Installing a greenhouse on a site begins with preparing the foundation.
Another option for creating a base for a greenhouse is a wooden foundation. This option is good because it can be easily dismantled and, if necessary, moved to another location. To build it, you will need 150x150 bars, which need to be laid around the perimeter of the bed, deepening them into the soil by 5-10 cm and fastening the corners with bolts. A greenhouse is installed on top and secured in several places.
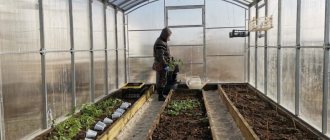
On a note! To create a natural heating of the greenhouse, you can fill it with organic debris on both sides. Prey, dry leaves, grass and manure will generate heat, naturally warming the soil.
Warm garden bed at Khlebnitsa
Warm beds are often made in greenhouses, which significantly increase the amount of harvest and accelerate the ripening of fruits. In the greenhouse design under consideration, you can also use a warm bed. To do this, at the site of the future greenhouse, a rectangular hole the size of the “Breadbox” is dug, 50-70 sizes deep.
To prevent the soil from crumbling around the perimeter, a foundation is laid out from available materials. Cardboard is placed at the bottom of the hole, so parasites will not get into the greenhouse and weed growth will be significantly reduced. Dry leaves, plant tops and manure are poured onto the cardboard. Next, a layer of soil is laid out. And after that, the greenhouse frame is assembled and covered with polycarbonate.
With proper preparation of a warm bed, humus will release additional heat, which in a greenhouse will become a favorable factor for the rapid growth of plants and the appearance of rich taste in fruits.
Step-by-step instructions for creating a greenhouse in the form of a polycarbonate breadbox
In order to make a greenhouse that opens on one side, the length of which will be 4 m, the width will be 1 m, and the height will be 0.5 m, you will need the following set of materials:
- profile pipes 20x20x1.5: 2 pcs. 4 m long, 2 pcs. – 1.6 m, 3 pcs. – 3.96 m, 8 pcs. - 1m;
- 2 hinges, screws and bolts for fastening the elements together;
- 2 sheets of polycarbonate, size 2.1x6 m, thickness 6-8 mm;
- paint for metal.
The dimensions and design of the Breadbox greenhouse allow it to be installed even in a small area.
On a note! To make a greenhouse, it is preferable to use polycarbonate, which has protection from ultraviolet radiation. It can not only protect seedlings from exposure to aggressive sunlight, but also retain heat inside the structure longer.
Using a pipe bender, you need to prepare 2 arcs 1 m long for the moving part of the greenhouse and 2 arcs 1.6 m each for the side parts of the frame. In this case, the diameter of the circle should be 1 m. Using a regular marker, mark the middle on the side parts.
The lower frame is assembled from two 3.96 m pipes and two-meter parts, which are welded together at the corners. The seams must be cleaned. Using a welding machine, the sidewalls are welded to the finished lower frame. Then you need to secure the end posts in the middle of the side and bottom elements. As a guide, you can use the drawing of the Bread Box greenhouse, which displays a model of a suitable size.
The holes for the hinges must be on the outside. To the marked middle of the sidewalls you need to weld a workpiece made from 3.96 m pipes. At this point, the frame part can be considered ready.
1. Base. 2. Metal crutch. 3. External sector of the prism. 4. Inner sector of the prism.
In order to make a moving part of the structure, the side arcs and two transverse strips 4 m long are welded together. The axial strips, which ensure opening with the help of hinges, are also welded to the frame. Each axial strip must be cut at an angle of 45º, and then welded together. The corners must be cleaned.
For hinges, holes are made on the inside of the planks, after which they are installed on the end posts. The moving part is hung and checked for proper movement. After this, all that remains is to paint the frame and make sure that the foundation is ready for installing the greenhouse.
Note! Before starting to weld the elements, it is recommended to check the verticality and horizontality of each part using a level.
Self-installation of the structure
After you have prepared a drawing of the future greenhouse, as well as calculated and purchased the material, you can begin construction. To do this, they work approximately according to the following scheme:
- Laying the foundation. For the greenhouse in question, it may be the simplest. Regarding the size of the frame, dig a trench of small depth, lay bricks or beams in it, knocked into a box, which have been previously treated with a special anti-rot agent.
- The frame is assembled. In order to bend the arcs for the top of the greenhouse, it is recommended to use a pipe bender. With a metal frame, welding will be required to attach structural elements. The seams need to be thoroughly cleaned. Next, check the doors for freedom of opening. If there are no problems, the finished frame is placed on the foundation and secured with anchor bolts so that the greenhouse does not subsequently be overturned by the wind.
- After installation, re-check the opening of the sliding doors. It is important that there are no distortions. Then the tightening of the bolts is checked. If there are no defects, you can proceed to covering the frame with polymer.
- The polycarbonate sheet is placed on a flat surface and smoothed, marked in relation to future fragments. It is recommended to use a jigsaw for cutting. For each end of the cut element, plugs are used to prevent moisture and dirt from entering the polycarbonate cells.
- The prepared polycarbonate elements are placed on the frame with their protection facing up. For fastenings, hardware with a sealing washer is used. Holes are pre-drilled for them.
- The greenhouse, already covered with polycarbonate, needs to be checked again to see if the doors can open. Each of them should open by sliding without any difficulty.
Do-it-yourself polycarbonate breadbox greenhouse: finishing work
If you use polycarbonate as a covering material, it must first be cut. You will need 4 parts for the sides of the frame, 1 part for the blind and 1 part for the moving sash. You can secure the material to the frame using ordinary self-tapping screws, using rubber washers for reliability.
Polycarbonate is perfect for covering a greenhouse frame due to its lightness and plasticity.
The greenhouse must be attached to the foundation in several places. If the foundation is made of wood, then staples are suitable for this purpose, and if it is made of brick or concrete, then screws.
As you can see, if you have some experience and a drawing, a DIY polycarbonate Breadbox greenhouse is a completely feasible task even for a beginner. The main thing is to comply with the recommended dimensions of Fedorov’s greenhouse and ensure reliable fastening of all its elements.
How to make
In order to make and install the structure you will need drawings, a sunny place and a little DIY work. Try to orient the opening sides to the north and south so that the plants receive maximum sunlight during the day.
It is best to build a foundation for the structure, for example, a wooden box pre-treated with fungicides. Dig a hole about 45-55 cm deep, as wide as the frame. Install the box (if using one). Pour a layer of sand 5-7 cm high into it, plant debris (leaves, tops, mown grass) on top, lay the next layer of fresh manure and fertile soil. Secure the frame (in a box, if using it) in the ground, compact it tightly. Now you can start covering the frame with polycarbonate.
Remember that it is better not to drill the sheets, but to secure them with mounting tape. At this stage, it is very important to prevent the formation of cracks in the moving parts of the structure so that water, fallen leaves, and insects do not get into it.
Greenhouse bread box made of polycarbonate: prices and features of finished structures
It is possible that buying a polycarbonate Breadbox greenhouse will not be much more expensive than making it yourself, taking into account the purchase of all the necessary materials, as well as the effort expended on the work. Therefore, before making a decision, it is recommended to consider the option of purchasing a finished product.
As examples, consider two options that are on sale, paying attention to their features and prices. Breadhouse greenhouses, as a rule, have the same design, and therefore their price directly depends on the quality and quantity of materials used for production.
If you don’t have enough experience to make a greenhouse yourself, you can purchase a ready-made product.
The Teplichka company offers its customers a polycarbonate greenhouse. The length of this structure is 2 m and the width is 1.2 m. The height of the greenhouse is 0.84 m. A foundation made of wooden beams is quite suitable for installing such a greenhouse. A profile pipe with a cross section of 20x20x1.0 mm is used for the frame. The distance between the arcs is 1 meter. The price of a greenhouse, taking into account the cost of polycarbonate, is 5,500 rubles.
Another popular option is the Snail greenhouse, which is designed on the same principle and has one opening flap. The product is made of steel pipe 20x20 mm, the strength coefficient of which is extremely high. The cost of this model in the size of 2.1x1.1x0.75 m is 5,000 rubles. In this case, the frame can be painted gray or green, which will allow the greenhouse to fit into the surrounding design as organically as possible and be not only functional, but also a beautiful element of the site.
Regardless of whether you decide to make a greenhouse in the form of a bread box with your own hands, or purchase a ready-made structure, it is perfect for growing seedlings of any plants. By opening one or two doors, you will have comfortable access to the inside of the greenhouse and will be able to water and fully care for the plants that are in it.
Which is better, a butterfly or a bread box?
One of the most popular greenhouse structures among gardeners is the “butterfly”. To make it easier to decide on a specific model, you need to compare their performance characteristics and pricing policy:
- Unlike a greenhouse, a butterfly bread box is slightly more expensive. This is due to the characteristics of the frame and the consumption of materials.
- The bread box is more portable.
- The butterfly has the ability to open the doors on both sides, providing the plants being grown with the same amount of light and heat.
- The bread box has a better chance of providing a high-quality thermal cushion for any placement option; the butterfly loses a little here.
- The design of the bread box makes it much easier to care for young plants.
- In terms of complexity of manufacturing, the butterfly is significantly inferior to the bread box.
Only by studying the design features of a product for cultivating heat-loving plants can one not make a mistake in choosing a functional greenhouse.
Plastic furniture
They have learned to use pipe-rolling materials in this area. Since polypropylene has a long service life, furniture made from it is durable. For such products you will have to use a soldering iron for plastic pipes.
Video: furniture
Shelves for the children's room
Not every young seed can allocate a lot of money from the budget to purchase expensive furniture.
An alternative method is to use hand-assembled pieces of furniture from plastic pipes and connecting elements. The main parts for the shelves are pipes and couplings. They will be supported by a frame made of PP pipes. And plywood shelves are attached to it with self-tapping screws.
Video
Various little things
Organizers. They can be placed near the desktop and they use pipe scraps of the same size. For ease of fastening, one end is cut at an angle.
Video: various crafts
Craft in the form of a shoe storage stand
From a large number of equally cut polypropylene pipes, you can fold and fasten a convenient shoe stand. Such structures save a lot of space in a small hallway, and shoes are not stored in a pile, each pair is separate.
The blanks can be laid out in any order and the structure can be fastened in the most convenient form for a particular room.
Video
Clothes dryer with many tiers
This device can be used in any home. Polypropylene products make a stable and reliable structure.
It cannot be carried away or overturned by strong winds. This dryer can be kept outdoors all the time, and it will not rust or rot. The convenient design makes it possible to move the dryer to the desired location at any time.
Video