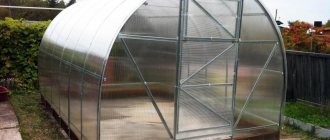
There are many options for buildings designed for growing vegetables indoors. Each of them has its own characteristics, advantages and disadvantages. The greenhouse with an opening roof, which appeared relatively recently, stands out separately. It doesn’t matter whether you are an experienced summer resident or just a beginner gardener, in any case, it makes sense for you to read this article and decide for yourself whether it’s worth taking a closer look at such greenhouses and installing them at home.
Greenhouse with opening roof
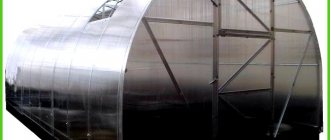
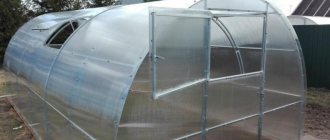
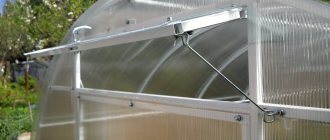
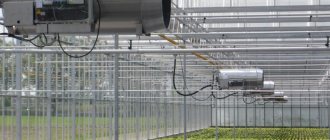
Device for opening the roof of a greenhouse
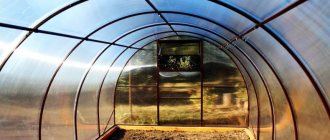
Opening greenhouse roof
What design to install
You can use the “matryoshka” principle in your design - polycarbonate sheets are simply placed on top of each other.
Such designs are best used for small greenhouses; you only need lower guides along which you will move light semi-arches in the summer. The ends of such small greenhouses can be made rigid or film can be used (this is the cheapest option). You can assemble a smart greenhouse with your own hands from ready-made structures. This will be an interesting game of “constructor” for you - anyone can calculate the number of load-bearing partitions, fasteners and polycarbonate sheets; no special skills or knowledge are required for this.
In construction stores you can buy absolutely all the materials used to secure the structure. You yourself can calculate how many windows and doors that open for ventilation you will need.
Shape selection
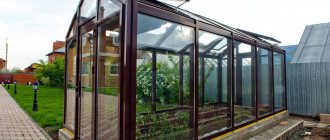
The design of the greenhouse mainly depends on the installation location, so if it is a free-standing structure, then an arched or gable roof is usually made; broken, spherical, and pyramidal shapes are less common. For wall structures, it is advisable to choose single-pitch or curved, asymmetrical ones.
Folding roof for a greenhouse made of polycarbonate, consists of large windows on lifts, also suitable for film buildings
The material of manufacture is also important, for example, making an arched frame from wood is quite difficult, it requires time and knowledge of technology, special templates and clamps, therefore, buildings on a wooden base are often rectangular in shape under a single- or double-pitched roof. It is easier to bend metal, especially if you have a pipe bender on hand; the service can be ordered at any hardware store; metal roofs are often built with arched roofs; curved and gable roofs are less common. If the base is made of PVC pipes, then it is better to stop at the arch. Glass buildings are only possible under a one- or two-slope roof, but moving the elements is fraught with fragile glass, and the material is heavy and unsuitable for folding and sliding structures. Modern technologies make it possible to bend glass, but the process is expensive and not practical for outbuildings.
Look how gracefully the roof of the lean-to greenhouse moved, a convenient and practical option.
[su_youtube url=”https://www.youtube.com/watch?v=eB4mJlDhxbU”]
Sometimes construction materials are combined, a wooden base is made, which is crowned with a metal truss, or vice versa, a metal frame under a gable roof made of wood.
Roofs of complex shapes, including broken and curved ones, are made extremely rarely, which is due to the complexity of manufacturing the rafter system. It is better to take ready-made drawings of a sloping roof for a greenhouse; all loads and joint angles are calculated there; independent calculations are quite problematic.
For small greenhouses, folding roofs, usually pitched roofs, are relevant. Now it has become popular to make opening roofs, usually of 2 types:
- arched sliding, sections that fold one on one;
- single-pitched, double-pitched roofs with folding roof elements.
Tilt angle
For pitched greenhouses, the optimal tilt angle is 15-45o; more precise parameters depend on calculations that are made based on wind and snow loads in your area. It is not recommended to make a flat roof, as there is a high probability of it sagging due to the weight of the snow.
Arched ones are considered the most suitable for all regions; they have excellent aerodynamic characteristics; there is practically no need to clean such structures from snow; it rolls off on its own from the sloping sides.
Sliding greenhouse roof
Making a simple retractable roof is not difficult; you will need a drawing of a polycarbonate greenhouse with a gable roof, but the sheet connections should not be made using thermal washers, but rather a groove system should be made from a polycarbonate strip.
Types and materials
Do-it-yourself greenhouse made of wood under film
The roof of a greenhouse can be not only sliding, but also movable and folding. Mobile segments can move in any direction and enter others, which is very convenient when it is necessary to save space. At the folding one they rise up.
A retractable roof can be single-pitch or gable. The first is convenient for greenhouses in which one of the walls is common with another building; for those that stand alone, a gable one is usually used. It is more functional - precipitation, fallen leaves and dirt will not accumulate on it.
The sliding roof and sides can be opened manually or automatically. If the greenhouse is made independently, the first option is usually chosen, since it is easier to implement. The greenhouse segments will need to be adjusted manually, and if it is large and this is inconvenient, mechanisms such as a winch may be used.
Models purchased for assembly can be equipped with an automatic system with electric drive and temperature sensors. It is enough to configure the parameters, after which the greenhouse will automatically open and close the roof and sides to maintain an optimal microclimate.
The following materials are used for the frame:
Tree. For self-production of conventional greenhouses, it is most often used due to its ease of processing, but in the case of sliding structures, the situation is exactly the opposite. Their elements must be made very accurately, which is why at home wood is rarely used for the frames of sliding greenhouses, but it is found in ready-made models. Metals. Their main advantage is durability; a metal roof can serve for decades. Disadvantages: heavy weight and difficulty in processing materials at home. Plastic. The most popular material for frames and moving elements. It is easy to install and process, it weighs little, and its strength is usually sufficient
It is also important that it is inexpensive. Metal-plastic can also be used - its parameters are similar.
For glazing of such greenhouses the following are used:
- Glass - less common than for ordinary ones. The point is the weight of this material - to hold such a greenhouse you need a strong frame and foundation.
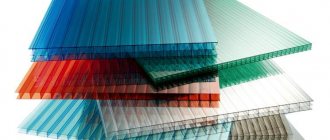
- Polycarbonate. Most often, gardeners call it the best option. It is easy to process, it is flexible and weighs little, while retaining heat well, transmitting a lot of light, but scattering the rays of the sun.
- Acrylic. Similar in properties to polycarbonate, it differs primarily in higher strength.
- Roll materials. They are used quite rarely because they cannot boast of durability. But they are still used because of their low cost, most often for greenhouses with a folding roof. They will last a season, maximum two, then you will have to change them.
Advantages and disadvantages
The main advantage of greenhouses equipped with a sliding roof, even more pronounced if they are supplemented with sliding sides, is almost ideal conditions for plants. Everything is provided by him exactly in the volume that is necessary, which cannot be achieved in a conventional greenhouse. The microclimate is excellent, and excess moisture quickly evaporates, so the plants inside are much less susceptible to late blight. The soil is ventilated, moistened and pollinated.
It is easier to care for the beds due to the fact that they are accessible not only from the inside, but also from the outside - the sliding sides especially help with this. It’s more comfortable to harvest. Ventilating the greenhouse can be done quickly and easily. In winter, it stands open, so that snow falls freely in it, which means that it does not have to be specially brought inside - and this is necessary so that the earth is then saturated with moisture and minerals. As you can see, greenhouses with a sliding roof are devoid of almost all the disadvantages of conventional ones, while at the same time they have all their advantages.
But there are several features that need to be taken into account:
- Moving parts should be inspected regularly as they may require maintenance. For example, in the spring, after thawing, the soil may partially subside and then a distortion will occur, which can lead to jamming. This can be eliminated by installing the greenhouse on the foundation, but this is a considerable expense.
- Cleaning of dust and dirt must be carried out as often as possible, otherwise the sections will move with difficulty, or even stop altogether. The guides need to be lubricated from time to time.
- You will need more space on the site than a regular greenhouse of the same volume, because in order for the panels to move freely, a reserve is needed - usually a minimum of 2 meters is left to other buildings and fences.
That is, in some ways a greenhouse with a sliding roof is still more demanding than a regular one. If you purchase a ready-made model, it is important not to save money - with cheap options, you will most likely have to suffer. It is necessary that all elements are well fitted, and the joints do not allow cold or moisture to pass through.
Types of greenhouses with a removable roof
Greenhouse from scrap materials: how to make it yourself
Agree, a removable roof for a greenhouse is only needed when it can be easily removed. Because in a maximum of 10 minutes. So let’s take a closer look at the options offered by the market:
Design #1 – removable and liftable roof
These types of designs can be ordered today from private craftsmen:
The roof of the “Clever Nurse” moves with a slight turn of the handle - very simply. In addition, the design has two more windows and two doors. Moreover, the dome of the greenhouse opens differently in winter and summer, for which a special mechanism is installed. But not everyone appreciates the “Clever Nurse” due to the fact that its cellular polycarbonate is oriented horizontally in honeycombs, which is why it can darken over time. Although it is on this greenhouse that you can easily organize automatic roof removal.
The Slava-Lux greenhouse has a similar design:
Design #2 – greenhouse-convertible
The option with compartment windows is also interesting. In this know-how, the roof of the greenhouse is not removed entirely, but only moved to the sides. In the summer heat, such a mechanism is used as vents, and in winter it is a direct path for snow directly onto the beds. They simply collected the harvest, moved parts of the roof - and with peace of mind returned to the city until spring. There is no need to come here to dump the snow or throw it with shovels inside the greenhouse. Such a greenhouse can also be divided into two compartments, and each crop can have its own growing conditions, because the compartment roof consists of two parts.
Another design option with a removable roof is meter-long polycarbonate sheets that slide down. These are the “Matryoshka” and “Cabriolet” greenhouses. And this is what the “Cabriolet” greenhouse represents. Height 2 meters, two vents at the ends and two doors. There are trusses on the roof every meter, and each of them has a special profile with grooves attached. Polycarbonate is inserted into them, which can be moved down with a slight movement of the hand. But there is also a special clamp on the side, which is used when the roof is closed - so that it does not move out.
At Dachnaya-Zvezdochka, polycarbonate is inserted into special grooves. By pulling the special handle, you can lower or completely pull out the polycarbonate.
Design #3 – sliding pencil case
But the “Matryoshka” greenhouse with a removable roof opens like a pencil case - its entire parts are superimposed on one another. It looks quite impressive, but snow will not fall on all the beds in winter - the furthest ones at the ends will remain empty. But the roof won’t break, and this is an arched greenhouse. But there is no handle here anymore - you need to unscrew the nuts for manual screwing, lift each section and move it closer to the end. Ventilation in this way in the heat is also noticeable.
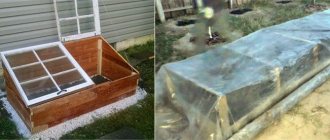
Design #4 – budget option
And, finally, the most budget-friendly option for a greenhouse with a removable roof is not to screw the polycarbonate with self-tapping screws, but to fasten it with plastic tapes so that it can be removed for the winter and hidden until the next season. Such a device, of course, is not suitable as additional or main vents. But the movable polycarbonate on the roof itself needs to be well sealed on the sides so that condensation does not form inside and any living creatures do not get in. The best approach for this purpose is a special membrane-type tape with fine perforation. It will let moisture through from above, but neither dirt nor insects will get into the honeycombs.
Or even adapt the film to wrap and unfold when needed:
The Sfera trademark also offers its greenhouse with a removable roof. Only 6 mm of polycarbonate is used in this design, but this is exactly what will have to be unscrewed from the roof every winter and screwed back in in the spring.
As those who assembled greenhouses themselves share their experience, a self-tapping screw will not fit into the same hole twice - you will have to drill new holes every year. And this will be a new, expensive polycarbonate in a couple of years. This is the advantage of “Dachnaya Zvezdochka”: the polycarbonate can be simply removed and inserted without drilling new holes in it.
Sometimes a completely polycarbonate greenhouse has a special film instead of a roof. It is also quite easy to remove, and the appearance of the greenhouse itself does not suffer at all from this combination. You can also use new phytoprotective nets instead of a special film - they allow moisture to pass through. This is the effect of sprinkling in bad weather without any equipment.
The only problem with a removable roof in a greenhouse is poor sealing. This is what engineers from well-known companies are currently working on, and enterprising folk craftsmen often serve as a storehouse of ideas for them!
Site and foundation preparation
We build it ourselves: a greenhouse made of wood and polycarbonate with our own hands
First, decide where on your summer cottage or garden plot the greenhouse with an opening roof will be located. In this case, one should take into account the direction of the winds, orientation to the cardinal directions and the presence of large objects nearby, such as houses, outbuildings, fences and trees.
Choosing a location for a greenhouse
So, it is desirable that the greenhouse be located in a place protected from the north wind and air currents caused by the “wind tunnel” effect. To fulfill this condition, there must be sufficiently large objects at some distance from the greenhouse that will “cover” the structure from the wind.
But it is worth understanding that “at some distance” does not mean “nearby”. Otherwise, a shading problem arises when a tree or house blocks the sun from entering the greenhouse. And, consequently, the growth rate and yield fall. Therefore, it is advisable that no large objects are located in front of the greenhouse on the south side, and only at a distance of at least 3-5 m on other sides.
Geographical direction of installation of a polycarbonate greenhouse
After identifying the area for the greenhouse, mark it using pegs and rope. Clear the designated area of debris, rocks, fallen branches and tall vegetation. If there is a significant slope, level it or build a terrace. Then you need to build the foundation. Since greenhouses with an opening roof are in most cases lightweight buildings designed for use only during the summer season, there is no need for an expensive and complex structure. In this case, it is enough to build a foundation made of timber or brick.
Step 1. Measure out the required amount of material.
Beam for foundation
Step 2. Dig a trench under half the height of the timber or brick. If the soil is hard enough, you can skip this step.
Step 3. If timber is chosen as the material for the foundation, put together a rectangular box from it to the size of the greenhouse, using reinforced corners and wood screws as fasteners.
Connecting foundation elements with a reinforced angle
Step 4. Lay the timber box or brick blocks on the prepared area. Align them horizontally using a building level. For additional waterproofing, the foundation can be covered on top with a layer of roofing felt.
Checking the foundation using a level
"Orion"
, Dubna. No foundation required. Metal square 25 mm. Price – 18800 rub.
Disadvantages: Difficulty in self-installation.
Preparation and installation of the greenhouse
After choosing the type and material, you need to decide on the place where the greenhouse will be located. It is important to take into account the orientation to the cardinal points and the direction of the winds, as well as the location of buildings on the site. It is best if the place for the greenhouse is protected from the north wind, and generally not too exposed to air. It’s good if the greenhouse is protected by buildings or trees, but they should still be located at a distance, and not very close, and not block the sun. The south side of the greenhouse should remain open.
Next, you need to choose whether you will purchase a ready-made greenhouse, which only needs to be assembled, or whether you will make it yourself. The choice depends on your skills and experience, as well as on your needs - in some cases it is not possible to find a ready-made greenhouse that meets all the requirements. Then all that remains is to start making it yourself. Let's look at this process step by step using the example of a greenhouse with a metal frame, a gable sliding roof and sides.
The first thing you need to do is make a drawing of the future greenhouse - even when making it yourself, they most often turn to professionals. The slope of the slope should be at least 15 degrees - then snow will not accumulate. Calculate the optimal sizes of all elements - usually strips about a meter wide are used. Decide how many segments will be movable: you can limit yourself to a few or make them all so.
The frame is made of corrosion-resistant metal pipes - they can be welded or attached with screws. When it is ready, you can start covering it with polycarbonate. Next to the movable elements on both sides, grooves are installed along which part of the cover will move.
The location chosen for the greenhouse must be marked with pegs and rope, cleaned and leveled if necessary. If a foundation is required, it is usually made of brick or timber - this is enough for a lightweight structure. The foundation is useful not only for increasing strength, but also for protecting the soil from freezing in early spring.
Greenhouse options
Scheme of a greenhouse with a sliding mechanism made from window frames.
Why throw away old window frames when replacing windows? They will make a wonderful greenhouse with an opening roof. The method of installing it yourself is quite simple - it consists of connecting all the window frames together using nails or self-tapping screws and giving the finished structure a special shape. This design option is quite popular due to its minimal construction costs and good protective effect, guaranteeing a stable harvest. Thanks to the opening roof, such buildings can be used at different times of the year and give wonderful results in any weather.
Non-woven covering materials and polyethylene imply the use of a frame to create a greenhouse on which the material will be attached. By providing movable elements in the sheathing design, it is possible to form an opening roof. However, this step requires additional costs of material resources for design and implementation. If the frame can be made from any available means, be it wooden beams or metal racks, then the moving elements that move the roof should be chosen of the best quality, since the entire procedure for moving the roof will depend on their reliability and durability. Non-woven material and polyethylene are rolled products and, accordingly, have a small margin of safety. However, in terms of thermal and light conductivity characteristics, they are not inferior to their solid counterparts, which allows them to be freely used as the basis for similar structures.
How to make a retractable roof for a greenhouse with your own hands - manufacturing instructions
Based on a review of opening roofs, we can conclude: either the roof or an entire segment of the greenhouse moves on rails, or a part opens using a special lift. Both options are available when building a greenhouse with a retractable roof.
Option one - on rails
In fact, the rollback of segments is carried out according to the principle of conventional compartment doors. We make a solid base and attach a rail to it, which is better to buy in a store. We make the arched parts separately, and attach a metal strip to them from below, equipped with wheels for smooth movement. It is recommended to install a stopper at the end of the rails to prevent the parts from going beyond the bar.
Tip: If it is necessary for the segments to overlap one on one, then the arcs should be of different diameters, from smaller to larger.
A mechanism that will help you make sliding polycarbonate greenhouses
If you have a rectangular structure, then the rail mechanism can be installed on the top frame and an arched sliding roof can be mounted on it. In buildings under pitched roofs, you can make sliding walls, again based on this device.
Option two - simple, homemade
Sliding structures are very simple to implement and do not require the purchase of expensive elements. The principle of operation is a groove system, that is, special pockets should be made on the frame along which the polycarbonate sheet will go. This sliding principle is suitable for arched and pitched roofs.
Making a retractable polycarbonate greenhouse roof with your own hands is quite simple:
- Attach a strip of polycarbonate, 70-100 mm wide, to the rafters or pre-prepared arches
- We install special overlays on the strip; plastic strips with a thickness of 6-15 mm and a width of 15-30 mm are suitable.
- We again attach a strip of polycarbonate on top, so we get a groove, in the photo below, into which we will insert the sheets.
The photo shows an example of how to make grooves for a retractable roof.
A pitched roof can be moved down in this way, but for an arched roof it is necessary to provide a place where the sheets will slide in, so some part of the roof at the top of the arch should be left blank.
The photo shows an arched structure with sliding elements
Types of pop-up greenhouses
For home cultivation of garden crops, greenhouses of standard dimensions are usually installed: 2x4 meters. Depending on the type of structure, the following types of structures are distinguished.
Cabriolet. The frame resembles a bread box. The roof is not removable, but folds back or slides down along built-in grooves. If necessary, you can open not the entire roof, but only sections of it.
Butterfly. It looks like an arch. The roof consists of several parts that rise when it is opened upward. If you plan to install a large structure, it is recommended to divide it into separate segments - this will protect the crop from hypothermia.
Matryoshka. Greenhouses of this type are similar to the “butterfly” one, however, in this case, the roof parts are moved to the side, which allows both to completely open the space and to ventilate individual areas. No foundation installation is required, and the entire structure is easy to assemble and transport if necessary.
Polycarbonate greenhouses with opening top: features and purpose
A greenhouse is an agricultural structure designed for growing seedlings or small plants in closed ground conditions. Due to the fact that the walls of the greenhouse are made of transparent material that does not prevent the penetration of sunlight, the soil inside heats up, and the moisture does not evaporate as it does in open ground. As a result, the most favorable conditions for plants are created inside: high and stable temperature, as well as humidity.
A compact, opening greenhouse for seedlings with a shelf for gardening supplies and fertilizers can be built independently without large financial investments.
It is important not to confuse a greenhouse with a greenhouse, since these structures have serious differences from each other, and primarily this concerns their dimensions. Greenhouses are significantly larger in size than greenhouses and can be used for growing large crops
Greenhouses, as a rule, do not exceed human height in height and are used for seedlings or small plants.
The standard dimensions of a greenhouse do not exceed 1-1.5 m in length, 1-1.5 m in width if the structure is single-leaf and 2-3 m if it is double-leaf. The length of such a structure can be from 1.5 to 4 m, depending on the desires and capabilities of the owner.
Structures of this type are used for growing a variety of crops, including all kinds of greens: dill, parsley, lettuce, lettuce, sorrel; vegetables: carrots, onions and others. You can also grow berries, such as strawberries, strawberries. Greenhouses are often used for growing flowers.
Polycarbonate greenhouses with an opening top are ideal for growing small plants such as aromatic herbs, peppers or strawberries.
It is important to understand that placing plants inside a greenhouse is only one of the stages of growing them. In the future, you will have to constantly ensure that the conditions inside the structure are comfortable for the plants being grown.
Do not allow overheating or freezing. It is for this purpose that opening doors are used, which allow you to regulate the temperature and prevent dehydration and death of plants.
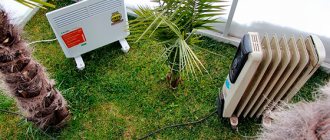
Results
It is most profitable, both financially and in terms of time, to use ready-made solutions for automating the ventilation system in a greenhouse. Moreover, all structures that have folding or sliding hatches for ventilation can be equipped with such devices.
loading. loading. loading.
Polycarbonate is the optimal choice for both industrial and small garden greenhouses. However, purchasing one that is ready for assembly.
The use of improvised means and recycled materials gives excellent results in the manufacture of greenhouses. The most common windows that are replaced are...
A year-round greenhouse is an opportunity to grow environmentally friendly vegetables, berries, herbs, and flowers 12 months a year. For a good harvest one.
Successfully growing dill in a greenhouse at any time of the year
The presence of a greenhouse on the site opens up wide opportunities for the gardener: in the spring you can grow seedlings of flowers and vegetables, in the summer - cucumbers, peppers, tomatoes and eggplants, and growing dill, parsley or any other greens in a greenhouse is possible almost all year round.
What conditions are necessary to grow dill in a greenhouse?
Even in the harsh Siberian climate, the first fresh greens in the greenhouse can be obtained by the end of March, the main thing is to follow the basic rules:
- Maintain a sowing depth of up to one and a half centimeters;
- sow greens twice a month to ensure constant new shoots;
- do not forget to enrich the soil with essential microelements;
- Be sure to loosen and water the soil;
- Plant ready-made greenery seedlings in greenhouse soil, not seeds.
Photo of dill
If the above rules are followed, it is also possible to successfully grow dill in a greenhouse in winter, if in addition you take care of additional lighting, since such a light-loving crop as dill necessarily requires long daylight hours. Video about the tricks of growing dill
Dill is a long-ripening plant, and it can take more than two months to grow it in greenhouse conditions, but as a result, you can get two kilograms of lush greenery from each square meter, and the taste of homemade dill will be much brighter than store-bought or dill, grown on a windowsill.
Like any other greens, dill is not demanding on the soil - ordinary soil, sandy or clayey, is suitable for it.
But, if it is important for you to receive greens in large quantities, it is worth fertilizing the soil with humus in the fall, as well as applying mineral fertilizers before sowing. It is advisable to choose a soil that is neutral in acidity, since dill can often get sick in alkaline soil.
It is worth noting that dill can be planted directly in greenhouse soil in winter only if the soil does not freeze in the greenhouse. Most often, dill seeds are sown in deep boxes filled with soil. Just be sure to make sure that the drawers have holes for water drainage.
Dill in the photo
In greenhouse conditions, growing dill in winter is possible at an air temperature of at least +15 degrees. The soil must always be kept moist and watered only with warm water. When there is a lack of moisture in the ground, dill begins to bloom, which reduces its bushiness.
And of course, dill plantings must be supplemented with light, providing the plants with twelve hours of daylight. This is the main secret of how to grow dill in winter green, lush and fragrant.
Step-by-step guide on how to grow dill in a greenhouse
The varieties of dill that grow best in a greenhouse are those that are sufficiently resistant to light deficiency: Kutuzovsky, Grenadier, Frost, Karusel, Anker, Sevastopolsky, Umbrella, Almaz. These domestic varieties are capable of producing a large amount of greenery and do not bloom for a long time.
Photo of dill in a greenhouse
Having selected suitable varieties and prepared fertile soil, you can begin sowing dill:
- place the seeds in water two days before sowing and change it every eight hours - the essential oils from the seeds will be eliminated and germination will be faster;
- thoroughly moisten and loosen the soil in the boxes;
- make grooves every fifteen centimeters;
- Scatter the soaked dill seeds along the grooves;
- Cover the top with a thin layer of soil and lightly moisten with a spray bottle;
- when sowing seeds directly into greenhouse soil, you can simply distribute them over the surface of the ground, then covering them with a rake, but then thinning will be more of a hassle.
Photo of growing dill in a greenhouse
Over the next two weeks, water the soil daily with warm water from a spray bottle until small shoots appear. In the future, you can water only as needed to prevent the soil from drying out. Regularly remove weeds and loosen the soil so that dill grows better.
When the seedlings reach a height of ten centimeters, they need to be thinned out, pulling every second plant out of the ground. There is no need to throw them away - you can transplant the removed specimens into another container to achieve an even larger harvest. Video about growing dill in a film greenhouse
When cultivating dill in a greenhouse, it should be fed once every two months with ammonium nitrate or peat, distributing it at the base of the bushes. You can easily tell that dill is lacking nitrogen by its yellowed leaves.
In the final stage of growth, dill bushes can reach one meter in height - this also needs to be taken into account when planning its cultivation in a greenhouse. Harvest greenery gradually, without pulling the plants entirely out of the ground, but simply tearing off their leaves.
orchardo.ru
Useful tips for installing a greenhouse
The yield you can get from a greenhouse without a roof depends on many factors, for example, its location
Therefore, it is worth paying great attention to the installation of the structure
It is important to correctly position the opening greenhouse on the site. Source homeli.ru
Here are the basic principles for installing a greenhouse:
- The area
where the greenhouse is located should be
sunny and not subject to drafts
, then the room will quickly warm up. - You should not place the greenhouse next to trees
, because leaves and fruits will fall from them, and the crown will
block the sun
. - Before installation, you need to level the site
so that the greenhouse does not skew.
It is better if the soil
is
hard
. - It is more rational to locate the greenhouse near the harvest storage areas
and
close to the water supply
. - You should not place the greenhouse right next to the garden bed
, because then you will have no access and no room to work.
How much does a greenhouse with an opening roof cost?
One of the most budget-friendly options for a sliding greenhouse is “Marusya”. The frame is made of galvanized pipe 25x25 mm, its standard pitch is 1-0.5 m. The Marusya greenhouse can be installed either on a foundation or without a foundation. Please note that its length along the center line should be 2.07 / 4.11 / 6.15 / 8.19 / 10.23 meters, in accordance with the length of the greenhouse, and its width should be 2, 2.5 or 3 meters.
The Marusya greenhouse is well adapted to the Russian winterSource poradum.com.ua
A two-meter version of “Marusya” with an arc pitch of 70 cm will cost 12,000 rubles. A four-meter one will cost 16,900 rubles, and a ten-meter one will cost as much as 35,000. Moreover, many companies and trading platforms offer their assembly services. This option in the Moscow region costs approximately 6,000 - 10,000 rubles, depending on the length.
A 3x4 m "Tulip" greenhouse will cost approximately 13,500 rubles, and the same model 6 m long will cost 17,500 - 18,500 rubles. The same greenhouse with an opening top 10 m long costs about 46,000 rubles. The price is indicated taking into account the cost of polycarbonate.
“Botanik” costs even more. Such a 3x2 greenhouse with a glass coating and an aluminum frame will cost 60,000 rubles. If you increase the length by another 2 m, the price will be approximately 74,000 in Russian currency. The ten-meter “Botanist” costs about 136,000 rubles. Such high prices are associated with two features of this model: firstly, the manufacture of glass cladding is quite expensive and time-consuming, and, secondly, the frame itself has a rather complex design.
The “botanist” greenhouse is a high-quality, but expensive option. Source rusremontstroy.ru
Advantages of pop-up greenhouses
A greenhouse with an opening top has an optimal cost, unlike conventional structures. On average, the price difference is only 5%. Such a greenhouse has an incredible number of advantages, and each point can fully justify the investments and expectations of those who prefer these products.
Due to the fact that the roof is removable:
- Snow does not accumulate inside and tightly covers the ground.
- As a result, the soil remains protected during the winter from freezing and desalination, and beneficial microorganisms do not die out in it.
- The benefit of this is very great, and it lies in the fact that there is no need to apply fertilizers annually to supply the soil with beneficial bacteria, which will prevent the penetration of infections and parasites into the greenhouse that can destroy all plantings.
Due to the fact that snow falls inside the structure and envelops it from all sides, it is supported both from the outside and from the inside. Thus, pressure equalization occurs, which preserves the covering material throughout the entire period when snow falls.
The retractable roof provides protection from overheating throughout the summer. Removable roofs are very useful as they can be opened slightly or opened completely. Accordingly, if necessary, you can make a regular draft to ventilate the space inside or open the structure completely so that the plantings are saturated with ultraviolet rays. This also helps to saturate the plants with the right amount of oxygen and light. Polycarbonate is a material manufactured using modern technologies, and therefore it is created to absorb harmful ultraviolet rays and transmit exclusively useful components. Assembling a greenhouse with a convertible top is not difficult and does not even require additional help, and if you design the building plan correctly, then a couple of minutes will be enough to install it.
Sliding roof device
There are special mechanisms on sale for automatically opening and closing windows in various buildings. The principle of operation of such devices is to expand a special liquid placed in a cylinder limited on the end sides by pistons. When the temperature exceeds a threshold value, the piston pushes out the rod, and the windows in the greenhouse open slightly, the higher the temperature in the room. And, conversely, as the temperature decreases, the volume of liquid decreases and the internal spring returns the pistons back.
Thermosetting mechanism for greenhouse with automatic sliding roof
You can learn more about automatic ventilation mechanisms, their operation, installation and configuration from this video:
Using this or similar mechanisms, it is quite easy to equip a standard greenhouse made of a metal profile with folding windows or a sliding roof with your own hands:
- The frame of the structure is assembled from bent profiled metal pipes of square section. Fastening can be done by welding or screw connections. But such methods have a lot of disadvantages, ranging from the impossibility of disassembling to the difficulty of attaching collapsible joints. The best option is to use universal fasteners. Other names are crab system or spider.
Collapsible frame with mounting points for universal fasteners
- The installation location of the window is chosen at the end of the greenhouse so that when it is opened, an air flow is formed. A ventilation system is considered optimal when, at maximum use, it occupies from 25 to 30% of the entire coverage area of the building envelope (walls or roof). Other location options may be used. It is often practiced to install special ventilation vents at the bottom of the wall or in the foundation, greenhouses with an opening top. This air flow system is the most effective in terms of speed of cooling the internal space, but can damage some plants.
The arches of the window are curved at the same curvature as the frame
- The frame is placed between two crossbars, the hinges are attached to its own stand, this gives the frame additional spatial rigidity.
- After the entire frame, including moving elements, is sheathed with cellular polycarbonate, an automatic opening mechanism is installed. In this case, a universal device based on a thermosetting liquid was used - Autovent XL.
Ventilation hatch with installed opening mechanism
Important! During installation, it is necessary to ensure the tightness of the joints between the ventilation hatch and the roof of the greenhouse. It is often practiced to use monolithic polycarbonate with overlapping vents installed in the frame.
Smart greenhouse
The greenhouse nurse clever is designed specifically for Siberia, where there are snowy, frosty winters and hot summers.
Novosibirsk craftsmen came up with an effective and functional greenhouse with a fully opening sliding roof, which fully justified itself in the Siberian climate and after “going out to the people” received a lot of enthusiastic reviews and such a soft and pleasant name “greenhouse Nurse Smart with a sliding roof.”
This lightweight (50 kg), compact structure can be assembled in 3-4 hours, a foundation is not needed for it, since the support posts are dug in to a depth of 20 cm. The nurse greenhouse has an arched shape, the frame is made of a square profile with anti-corrosion powder coating, the coating is cellular polycarbonate 4 mm thick.
Depending on the type, the frame is connected by welding or special plates (collapsible version).
In addition to the sliding roof, the greenhouse is equipped with a ventilation window, which is opened using a hydraulic cylinder of a simple design: when the temperature inside the room rises, the oil, heating up, pushes out a piston, which in turn pushes the window frame. When the air inside cools, the piston is drawn into the cylinder and the window closes.
The width of the greenhouse is from 2 to 3 meters, and any length can be assembled, since it is possible to separately purchase two-meter segments. In other words, a nurse greenhouse with a sliding roof is suitable for any summer cottage, both small and large.
Connection nodes of the nurse's greenhouse.
The roof extends manually with such easy movement that even a child can turn it. Thanks to the arched shape and strong connection of the elements, the structure can withstand significant snow and wind loads, sudden temperature changes and other negative atmospheric influences.
It must be said that if such a greenhouse can perfectly withstand the harsh Siberian winters, then it will have no equal in any other climate.
Greenhouse Flora-Cabriolet
, Vladimir region. The frame is galvanized or painted. Profile 20 mm. The roof is removable. A foundation is required. The frame costs 22,300 rubles. + foundation for 4000 rub.
Advantages: Straight walls. You can order a galvanized frame.
Disadvantages: The painted frame will rust over time. Welded, welding seams rust. High walls have greater windage. Bulky, inconvenient to transport in a car. Not convenient to use. The edges of the removable roof are located at a height of 2 meters, making it difficult for short people to use. Before winter, it is necessary to completely remove the roof and put it away, and in the spring, insert a long three-meter sheet into the guides in place; this requires two tall people and a free space of 2-3 meters on one side. The length of the polycarbonate sheet on the roof is 3 meters; you need to have a free space of 2-3 meters on one side to use it. In summer, the sheets cannot be extended more than 20 cm, otherwise the wind will fray the free ends and may even tear them out of the guides or break them. There are no seals, the heat will escape through the cracks. The kit does not include high-quality, durable polycarbonate. Greenhouses “Flora Cabriolet” are equipped only with cheap polycarbonate from the KS Profplast plant without UV protection on the surface in the form of a film, but only “in bulk”. Such polycarbonate can be destroyed by the sun within 5 years. The walls are covered with weak, “lightweight” polycarbonate with a reduced density. Difficulty in self-assembly.
Assembling the roof of the greenhouse “Nurse-Umnitsa”
The next stage is the assembly of the movable roof of the “Nurse-Umnitsa” greenhouse. The parts used are shown in the table below.
Table. List of parts for assembling the movable roof of the “Nurse-Umnitsa” greenhouse.
| Name, photo | Quantity |
| End (extreme) arc of the roof | 2 pcs. |
| Intermediate roof arch | 5 pieces. |
| Horizontal screed | 12 pcs. |
| Wheel | 8 pcs. |
| Platband | 3 pcs. |
Important! The number of parts given in the table is designed for a “Nurse-Umnitsa” greenhouse with a length of 6 m. For models with other sizes, the equipment may vary.
Step 1. Attach three horizontal ties to the end arc - one in the center on the T-shaped fastener, two on the edges, simply on M6x30 bolts with nuts without special connectors.
Attaching horizontal ties to the end arch
Side ties are attached without special connectors
Attaching the central horizontal tie
Step 2. Attach the first intermediate roof arch to the installed horizontal ties. It differs from a similar part intended for the greenhouse itself in its greater length. The intermediate arch is attached to the ties at the edges using T-shaped connectors, and to the central one using cross-shaped connectors.
Fastening the intermediate arch
Example of fastening using a T-shaped crab connector
Example of fastening using a crab cross connector
Step 3: Repeat step one on the opposite end of the roof.
Step 4. Consistently build up the roof frame using ties and intermediate arches. Connect all its elements together. Carefully control the process - the roof is a moving element, therefore the requirements for the accuracy of its dimensions are more stringent.
Assembling roof frame elements
Connecting roof frame elements
Step 5. Lay cellular polycarbonate on the roof - for a greenhouse 6 m long, one standard sheet of material should be used.
Polycarbonate sheet is laid on the roof
Step 6: Align the cellular polycarbonate sheet on the roof. The “peaks” formed on both sides should have the same length. This also applies to the size of the protruding parts of the cellular polycarbonate to the left and right of the roof frame.
The “peaks” formed on both sides must have the same length
Step 7. Attach the cellular polycarbonate to the roof frame using 5.5x19 mm roofing screws. There are 6 fastening points for each arch, 2 for the outer ties, 1 for the central one for each individual frame part. Do not forget to mount hooks for roof latches on the end arches under the polycarbonate.
Fastening cellular polycarbonate
Greenhouse roof “Nurse-Umnitsa” with fully secured cladding
Step 8: Turn the roof over and place it on a level surface. Attach wheels to the end arches (two for each). Place them at a distance of 10-15 cm from the left and right edges of the frame with a shift of 2-3 mm back.
Wheel mount
Step 9. Attach the wheels to the third, counting from both ends, frame arcs - two for each. The distance from the left and right edges is the same as in the previous operation, but now the wheels are installed strictly in the center of the profiled pipe.
On the left you can see a wheel attached to the intermediate arch of the roof frame, and on the right you can see the same wheel, but on the end
Step 10. Install the trim. They are necessary to bridge the gap between the walls and the roof of the greenhouse on the side where the latter will move when opened.
Platband installation