A greenhouse is an indispensable structure in any garden. It allows you to protect seedlings, greens and early crops from frost, ensuring a bountiful harvest even in cold weather. The structure can be of various shapes and sizes, so it will not be difficult to select it for any site so that it fits harmoniously and does not take up useful space. In specialized stores, this design is not cheap. It is not necessary to spend a lot of money on it, because... You can make a greenhouse with your own hands and save money.
Location on the site
Before you move on to building a greenhouse, you need to decide on its location. Especially if it is stationary and not portable. The choice of location determines the size, shape, and amount of material consumed.
When choosing an area for a greenhouse, you need to consider the following:
- Pre-level the area. The structure cannot be installed on a slope. When there are stumps, snags and other obstacles, they will need to be removed before constructing the greenhouse.
- Crops need sunlight. Therefore, you cannot build a warm shelter in the shade. This will adversely affect the development of seedlings and further fruiting.
- Agrotechnical work will need to be carried out in the greenhouse. Therefore, it is necessary that it is easy to reach with equipment so that it opens easily.
- It is recommended to build the structure from east to west. Thanks to this, the plants will receive maximum sunlight. When it is necessary that this occurs only in the morning and evening, the structures must be installed in a north-south direction. This will provide protection from the midday sun.
- If you plan to constantly grow tomatoes or cucumbers in a greenhouse, it is recommended to install another one nearby. This is due to the fact that these crops need to be replanted annually in a new location. Thanks to the presence of a second greenhouse, crops can be swapped every year. When there is no space for so many structures, you can create mini versions of them.
Helpful information! It is best to start construction in mid-spring. There is no more snow, and the plants have not yet had time to reach full growth. You can, of course, build greenhouses any time you want, except in winter (the work will be complicated by severe cold and frozen soil).
Preparing seedlings
Pepper is a crop that has the longest growing season, so it is sown earlier than all crops grown by seedlings. Recommended sowing time is the end of February.
The root system of pepper is very fragile, so it does not like frequent replanting. Experienced gardeners recommend sowing peppers in separate containers.
Cups without a bottom are placed in a box or on a pallet and filled with a mixture of soil and sand or peat (2:1). You can use a ready-made soil mixture for peppers from the store.
The seeds are pre-treated with a solution of potassium permanganate, then with a growth stimulator.
Containers with crops are covered with transparent material and placed in a warm and bright place. When the peppers grow to 15-20 cm, they should be pinched . This technique stimulates the growth of side shoots to form a lush bush. A large number of shoots will increase the number of fruits on one bush.
It is recommended to feed the seedlings several times. The first feeding is carried out in the phase of three leaves, the second - 4-5 leaves. The pepper should receive the largest amount of fertilizer when the bush forms 8-9 leaves, since from this time the formation of flower buds begins.
An important stage in growing seedlings is hardening. Containers with sprouts are taken out to the balcony during the day; at night they must be moved to a warm place. The pepper also needs to be acclimated to sunlight, from time to time placing it outside in a shady place. Peppers that are not prepared in this way will begin to hurt when planted in a greenhouse, as it will be difficult for them to get used to the sudden change in microclimate.
ADVICE! Treatment of plants with Epin, which increases plant immunity, will help increase the resistance of plants.
Types of greenhouses
The most reliable and convenient types of greenhouses that you can make yourself:
| Photo | Design |
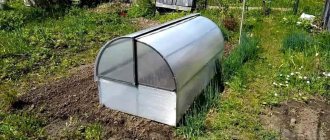
| Breadbox . It opens like a bread box, hence the name. It is convenient because the lid does not fall and does not need supports. | |
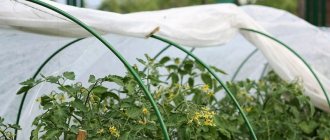
| Arched . A simple and budget-friendly greenhouse scheme. The arcs are stuck into the ground and covered with film or spunbond. Easy to assemble and disassemble without special skills. For manufacturing, you can use pipes after bending. | |
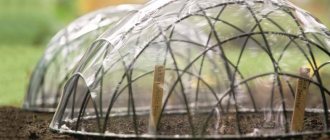
| Thermos . The greenhouse is dug into the ground. There is only a cover on the surface for access to the plants and ventilation. Thanks to this, heat is better retained inside. | |
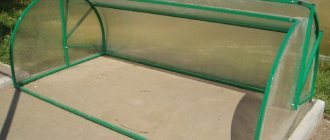
| Butterfly . Arch or house shapes. A special feature is that the two doors hinge outward, reminiscent of wings. Access is provided from both sides. Doors can be made of polycarbonate. | |
| House (gable) . The boards are connected at the ridge. Covered with film or covering material. This type is quick and easy to install, can be portable, but is not very stable. Therefore, it is most often used as a temporary shelter. | |
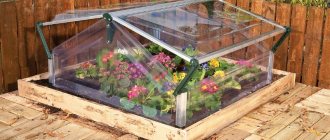
| Single-pitch . The design resembles a chest with a flat lid. To ventilate, props are placed under the roof. |
The listed varieties can be upgraded by adding additional elements.
The most important thing is to think through the entire scheme step by step.
Helpful information! You can find a lot of old things in the attic and barn that are perfect for creating a greenhouse. For example, window frames, old beds, drywall, polypropylene or aluminum profiles, etc. You just need to use your imagination to figure out how to make them a shelter for plants without investing money in it.
Let's look at the most popular materials for frames and shelters. And also, below are step-by-step instructions on how to make a greenhouse with your own hands from various materials.
Care
There are several simple rules for growing tomatoes in a greenhouse. The number of fruits removed from the bushes depends on proper care of tomatoes. Plant care consists of the following stages:
Watering and fertilizing
Tomatoes should be watered sparingly , as excess moisture in a greenhouse will lead to the development of diseases. When watering, water must reach the roots, so you should water in several stages, waiting for the liquid to be absorbed. Complex special fertilizers are used to feed tomatoes
IMPORTANT! Do not feed tomatoes with ammonium nitrate. From such fertilizing, the foliage will begin to grow sharply, but fruits will not form.
Pinching (trimming)
Too thick tomato bushes in a greenhouse interfere with the formation of fruits on them, so excess stems are removed from them. The lower branches extending from the trunk (stepchildren) are removed using pruning shears. On some varieties you should also trim the top so that the bushes do not stretch upward. These techniques help plants form a sufficient number of fruits, rather than expending energy on building up leaf mass.
Garter
To prevent the bushes from falling under the weight of the fruits, they are tied to pegs stuck 20 cm from the stem into the ground.
There are many ways to properly tie a garter. The main thing is not to forget that the rope should be soft and not damage the tender shoots.
Hilling and loosening
Several times a season, tomatoes in a greenhouse should be loosened and hilled. Loosening provides oxygen access to the roots , and hilling helps to form additional roots on the trunk.
Disease Prevention
Once every 20 days, tomatoes are treated with copper-containing preparations to protect against late blight.
Stimulation of fruit formation
There are special preparations to increase the formation of ovaries on tomatoes. These mixtures are sprayed on plants during flowering. You can use a solution of boric acid 1g. per liter
ATTENTION! Experienced gardeners advise shaking the bushes during flowering to pollinate the flowers.
Ventilation
Tomato does not like air humidity and overheating above 30 degrees , so the greenhouse should be opened slightly at the ends or the frames should be raised. When hot weather sets in, the cover can be removed completely, covering the tomatoes only at night.
Frames for greenhouses
When making a greenhouse frame, you can use different materials:
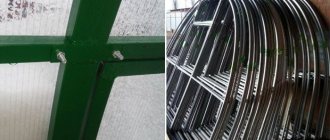
- Metal . Durable and strong, but heavy. To build a greenhouse from reinforcement, special tools are needed (to weld metal parts). The material is susceptible to rust, but this can be corrected by galvanizing it. If the structure falls (for example, from corrugated pipes), it will crush the plants.
- Wood , PVC, chipboard. It is easy to create such a structure; you only need basic construction skills. Wooden structures made from timber must be coated with special compounds to prevent beetles from infesting them.
- Plastic, propylene . Lightweight and durable. It bends well and can be used to create structures of various shapes. If a plastic greenhouse falls on crops, nothing will happen to them. The disadvantage is that it cannot withstand the load, bends and cracks.
Attention! To create a greenhouse, you will additionally need furniture corners, screws, clamps, etc. You can also make doors with handles.
Greenhouse made of wooden planks: step-by-step instructions
In this case, the frame will be wood, and the covering material will be film.
| Photos of the process | Explanations |
| When preparing the boards, it is better to treat them with an antiseptic in advance so that they do not rot and last longer. | |
| We assemble the base, fastening the boards with screws and corners around the perimeter. | |
| We mark the distance at which we will place the pegs. It depends on the length of the greenhouse. Usually after 40-70 cm. | |
| We hammer stakes, 5x5 cm, 50 cm long, into the ground with a mallet to a depth of at least 10 cm. | |
| We also attach them to the base using self-tapping screws. | |
| We take planks measuring 5x2 cm, with a length equal to the distance between the opposite bars. We secure them. | |
| We stretch the ropes between the slats so that the film does not fall through. |
Next, we will look at the materials that can be used to cover greenhouses and how to do it.
Variety selection
Not all varieties of pepper are suitable for growing in a greenhouse or greenhouse. For cultivation in closed ground conditions, you should choose low- and medium-sized varieties. The most popular pepper varieties for greenhouses are:
- Negotiant.
- Pinocchio.
- Tibul.
- Centurion.
- Master.
- Barguzin.
- Bagration.
- Chord.
- Cornet.
All these varieties are resistant to the most common pepper disease - blossom end rot. They quickly begin to bear fruit and manage to ripen on bushes in unheated greenhouses and greenhouses.
Materials for greenhouses
The best greenhouse designs are made from polycarbonate, double-glazed windows and low-density polyethylene (HDPE). They are inexpensive and can even be lying around somewhere in the barn (for example, window frames). Let's consider the characteristics of the materials:
| Options | Polycarbonate | Glass | Film (HDPE) |
| Installation complexity and weight | Lightweight, self-supporting material. When choosing it, you can reduce the number of frame parts without creating a foundation. | It is a heavy material that requires a strong frame and base. | The lightest material presented. It can even be carried away by the wind, so it needs to be attached to the frame. |
| Operational period | It has a long service life of 20-25 years. Manufacturers usually give it a 10-year warranty. The material itself is an element of the supporting structure. After installation, it does not deform or warp. | It will last a long time if it is protected from hail, snow, etc. Such a greenhouse can be placed under a canopy. | It has a short service life (maximum 2-3 years). Polyethylene deteriorates when exposed to sunlight. |
| Soundproofing | It has a honeycomb structure. This muffles wind noise. | If a glass greenhouse is poorly installed, a draft will penetrate inside and the glass will ring and rattle. | Virtually no noise reduction. In strong winds the film begins to rustle a lot. |
| Aesthetics | Looks very modern and attractive. To some extent, it can even become the decor of the site. | When installed well, it looks very aesthetically pleasing. | It looks aesthetically pleasing only at first, then it begins to deteriorate and fade under the sun. |
| Safety | Does not break or crack when dropped or hit. Stronger, but at the same time lighter than glass. | If the glass breaks, it can cause injury. Therefore, during installation work, it is recommended to take care of safety equipment (rubber gloves, thick shoes, etc.). | Completely safe. |
| Care | The accumulated dust is almost invisible. If desired, it can be washed off with plain water from a hose. | After rain, cloudy stains may remain on the surface. They can only be eliminated by using special detergents. | When dirty, this material cannot be washed, because... There will be stains on it that prevent the penetration of sunlight. |
| Microclimate inside | It prevents heat loss, which creates a greenhouse effect. The resulting condensate flows down the walls without getting on the plants. It transmits and diffuses light well. | Retains heat worse than polycarbonate. It transmits rays well, but does not scatter them. If the glass is of poor quality, it can work as a magnifying glass, which is detrimental to crops, because sunburn will appear. | The new material retains heat well and allows the sun to pass through. However, the very next season it becomes thinner and cloudier. |
Spunbond is also often used. This is a breathable covering material. It allows oxygen and necessary moisture to pass through well. At the same time, it does not get wet and does not release heat. Cuts with scissors and can be washed.
Spunbond
Previously, we already looked at frames for greenhouses, and now let's see how to attach the materials that we talked about in the table.
How to choose a design
If you decide to build a polycarbonate greenhouse with your own hands, it is advisable to choose a design that allows you to use the main advantage of this material - its ability to bend. These are two types with curved roofs with arch-shaped supports.
In one design, the arcs extend from the ground itself. If they are curved in the form of a radius, a lot of area is lost at the edges, since it is very inconvenient to work there due to the small height.
If a radial polycarbonate greenhouse is made according to this drawing, it will be possible to work near the walls
Another design solves this problem - with a composite frame welded from several pieces. Straight posts emerge from the ground/from the base, which rise to a height of at least one and a half meters. An arc is welded to them. With this arrangement, the roof is rounded and the walls are straight. You can even work along walls without problems, standing up straight to your full height.
Option with composite frame
But the rounded greenhouse roof has several disadvantages. The first is that it is more difficult to make ventilation windows in it than in a straight line. The problem can be solved by making transoms in the walls rather than in the roof. The second disadvantage of a rounded roof in a polycarbonate greenhouse is that snow falls off from it worse than from flat, sloping surfaces. If you live in a region with snowy winters, you will either have to make reinforced trusses, or make a pitched roof - with one or two slopes.
If you weld two half-arcs at an angle, the snow will melt better
There is a third solution - to make a rounded part of the roof from two arches, welded at an angle, which forms a kind of ridge. With this structure, the snow melts well and the ridge can be protected with a wide strip of metal. This will improve snow melting and protect the joint from leaks.
Polycarbonate greenhouse: step-by-step instructions on how to attach the material to different frames
Let's look at fastening polycarbonate to various structures.
Read a great article about building a polycarbonate greenhouse.
Fastening polycarbonate to a metal frame
The metal frame must consist of rafters and purlins. It does not have any protrusions, so attaching the canvas to it will not be difficult. The distance between the rafters should be equal to the width of the polycarbonate sheets.
Step-by-step process for attaching cellular polycarbonate to a metal structure using profiles (click on the picture on the left to enlarge it):
| Materials and diagrams | Instructions |
| Self-adhesive rubber gaskets are placed on the metal beams. If you have a small greenhouse, you don't need to use them. | |
| They take special profiles for polycarbonate and attach them to the metal grill with self-tapping screws and thermal washers. | |
| Polycarbonate sheets protect against moisture, insects, and dirt getting into the cells using a sealing film that is glued to the ends. Perforated at the bottom, sealed at the top. | |
| The sheets are then inserted into the profiles and snapped into place. |
Don't forget to remove the protective film from the polycarbonate.
Fastening polycarbonate to plastic or wooden structures
We make the design as described above. Then we cut polycarbonate sheets according to the dimensions of the distances between the beams.
Important: Cellular polycarbonate is cut with a sharp knife or circular saw. It must be strictly secured at the workplace. These are necessary conditions to avoid denting the stiffeners.
We glue the ends of the sheets with a special tape for protection.
Next, we attach the sheets to the structure:
| Photo | Process |
| The sheets are placed on the structure so that it extends beyond the frame by about 3 cm. Holes for fasteners are drilled with an electric drill. | |
| Washers are placed on the resulting holes, then thermal washers. All this is tightened with a self-tapping screw using a screwdriver. |
The fastening pitch depends on the thickness of the polycarbonate (it is better to use 6-8 mm) and the size of the cut sheet. It is approximately 30-50 cm and lags behind the edge by at least 5 cm.
Video description
The video shows the sequence of assembling the profile for the greenhouse:
So, the galvanized profile frame is ready, all that remains is to install the polycarbonate. This material is also interesting because when laid on the frame it creates a sealed surface, because the material includes a special joining element, which closes the joint of the polycarbonate sheets from above.
The sheets are laid on top of the frame in even rows and secured to it with self-tapping screws with rounded heads. A neoprene rubber washer must be placed under the latter, which does not crack at both sub-zero and positive temperatures.
Joining polycarbonate sheets Source pinterest.ch
Greenhouse made from window frames: step-by-step instructions
| Illustration | Description |
| Treat wooden blocks with antiseptic or mastic to protect against insects and rot. | |
| At the marked place for the greenhouse, we lay out a brick foundation on a concrete mortar (you don’t have to do this, but just make a backfill of crushed stone. | |
| From processed wooden blocks according to the size of our frames we assemble a frame for a greenhouse. We place the resulting structure on a foundation made of powder or masonry. | |
| We insert window frames onto the wooden structure. We connect them with loops and screws. We attach a handle to the edge of the frame, located closer to the bottom, to lift the frames, if there were none initially. |
Attaching film to different types of frames
We already know that frames can be different. Let's look at how to attach film to various materials.
Wooden frame
Attaching the film to a wooden frame is carried out in the following ways:
| Illustration | Methods |
| You can use a stapler, but to reduce the breakthrough of the film, it is worth making a gasket, for example, cutting a tape from old linoleum or from any other strong material. It is better to use reinforced film so that it will last longer even if it is pierced with nails during fastening. | |
| You can secure the film using a strip nailed at the ends. The first method involves fastening the film, that is, piercing it, on the sides and on the roof. With the help of slats, we fasten only from the ends. |
If the film is not reinforced, it is more susceptible to breaks at the attachment points. The rack (second) method reduces cases of film damage.
Metal and PVC pipes
To secure the film to plastic pipes, special clamps are required. They can be purchased in special stores, they are not expensive.
You can make the clamps yourself. Plastic tubes are cut and the side of the same plastic tubes is cut out. To avoid tearing the film, the edges of the homemade clamps are ground off.
If metal clips are used, a gasket made of any material is placed under them so that when heated in the sun it does not spoil the film.
Office clips are used for fastening on narrow frames.
What you need to know about greenhouses
Purpose
Like a greenhouse, a greenhouse is used to create a favorable microclimate when preparing seedlings or when fully growing tomatoes, cucumbers, cabbage and other plants.
In a broad sense, both structures are perceived as the same thing, although in fact a greenhouse is a small and unheated structure. A greenhouse is a larger building with a heating and ventilation system, which allows for the cultivation of many crops at any time of the year.
Design
The structure of greenhouses is quite simple. A frame is assembled from pipes, metal or wood, which is covered with film, polycarbonate, glass, acrylic and other light-penetrating materials. If the weight of the structure is very large, it is additionally installed on the foundation.
For ventilation, removable panels or opening transoms are provided. Heating is carried out using water heating with radiators, infrared heaters or hot air from heat sources outside the greenhouse.
Installation
Since sunlight is vital for plants, the greenhouse should be built on the south side. It is advisable to place it on a slope and closer to other buildings in order to protect it from the wind and have access to utilities. It is better to stay away from high fences and trees: they provide shade, and falling leaves reduce light transmission.