Greenhouse / Industrial greenhouses
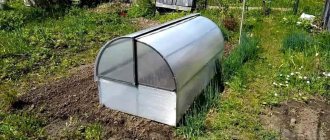
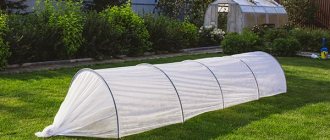
Photo of a portable mini greenhouse “Snail”
Mini “Snail” greenhouses made from profile pipes are popular. Full-size, permanent greenhouses take up a lot of space on the property and are difficult to handle alone. This problem can be solved using mini greenhouses. New portable mini-greenhouses are now available to everyone; they can be purchased and conveniently placed in their gardens.
- 1 Application of “Snail” and its components
- 2 Installation of the structure 2.1 Difficulties that may arise during installation
- 2.2 Advantages of the snail
Dimensions and installation
The length of the mini-greenhouse is 2 m, width 1 m, height varies from 75 to 85 cm. These characteristics allow the structure to be used most effectively for growing any type of seedlings , as well as short berries and vegetables.
Installing a greenhouse takes from 30 minutes to an hour , which makes life much easier for gardeners who still remember how much effort it took to build and install large greenhouses and homemade greenhouses.
The frame of the Snail mini-greenhouse consists of profile pipes coated with powder paint. Polycarbonate as a covering material for a mini-greenhouse . The design of the product is designed in such a way that it can be opened from both sides. Ordinary logs as a foundation ; you can use bricks.
How to make a “Snail” greenhouse with your own hands
One of the main advantages of the greenhouse model under consideration is the ability to create it yourself. This does not require any special skills.
Find out what a greenhouse is and how it differs from a greenhouse.
Dimensions calculation and drawing creation
First of all, you should calculate the dimensions of the future structure and draw a drawing. It is better and easier to use ready-made diagrams that show the dimensions.
The length, width and height of the structure can be arbitrary. But it’s most convenient to adjust the parameters of the greenhouse to the width of the polycarbonate sheets, which is standard 2.1 m. To get fewer scraps, it’s better to make a structure with the following dimensions:
- width 1 m;
- length 2.1;
- height 75 cm.
The lower part of the structure is a rectangular frame 2.1 × 1 m. 2 arcs are attached to this frame. In the narrow part of the base in the center, on both sides, there are reinforcing beams. Hinges for the moving part, which is assembled separately, will be attached to them.
Selection of materials and tools
For assembling the frame, a galvanized profile with a cross-section of 20×20×1.2 mm is best suited. The coating is best made of polycarbonate, but if desired, you can use reinforced film or pressed polyethylene. In order to sew up such a structure, a polycarbonate sheet 6 m wide will be sufficient.
Important! The frame of the greenhouse can be made of wood, but such a design will have a short service life, so it is better to choose materials for the frame that are resistant to corrosion.
Tools for assembly you will need:
- welding machine;
- drill;
- hacksaw;
- pipe bender;
- level;
- Bulgarian;
- metal circle;
- self-tapping screws
Selecting and preparing a site for installing a greenhouse
One of the advantages of this greenhouse is the ability to install it anywhere. The main thing is that it is smooth and well lit.
When the site has been selected, it is necessary to clear it, and then make a ditch with dimensions of 2.1 × 1 m. A foundation of wooden beams with a cross-section of 15 × 15 cm is installed in this recess. These beams should first be treated with a wood antiseptic and connected into a frame. Next, the resulting structure is placed in a ditch and the assembly of the greenhouse frame begins.
Step-by-step assembly instructions
First you should cut the profile pipe into pieces:
- 2 pcs. 2.1 m + 0.5 cm per seam (base details);
- 2 pcs. 1 m + 0.5 cm per seam (base details);
- 2 pcs. 1.95 m each for side arcs;
- 2 pcs. 75 cm + 0.5 cm for seams for reinforcing side beams on which the hinges will be attached.
Such blanks will be required to construct a solid frame. To create a moving part, you will need to cut other blanks:
- 2 pcs. 1 m each for side semi-arcs;
- 2 pcs. 2.15 m each;
- 4 things. 52 cm each.
Creating a wireframe
First, you should assemble the blind part of the frame. To do this, you need to weld the base parts into a rectangle, and then secure them to a wooden foundation.
After this, using a pipe bender, side arcs are made from blanks 1.95 m long and welded to the base. Next, the reinforcing side beams are welded (75 cm parts). This completes the assembly of the blind frame.
Important! Throughout the entire process of welding parts, use a level to ensure that the structure does not warp.
The moving part is assembled like this:
- Half-arcs are made using a pipe bender.
- They are connected by welding to long parts.
The remaining blanks, each 52 cm long, are connected together in groups of 2 in the shape of a triangle. The free ends are welded to the sides of the moving part. After this, hinges are installed on the reinforcing beams on the sides of the blind frame. The moving part is attached to them.
Required thickness of greenhouse cladding
When the frame is assembled, they begin to cover it with polycarbonate. Sheets with a thickness of 4 or 6 mm are best suited.
Thick polycarbonate has optimal light transmittance necessary for the normal functioning of plants and allows maintaining the correct microclimate inside the structure.
Sheathing should begin with the side parts, then move to the fixed upper part, and only after that sew up the movable structure. The polycarbonate is attached to the frame using self-tapping screws.
Advantages of the “Snail” mini-greenhouse
- mobility;
- reliability;
- simple installation;
- ease of use;
- moderate cost.
It will not take much time to move the greenhouse from one part of the garden to another.
Thus, it is possible to grow several crops in this mini-greenhouse in one season . At the same time, the greenhouse is designed in such a way that it can be used for many years, achieving an excellent harvest year after year.
Advantages compared to other greenhouses
- low price with many years of operation;
- the ability to move the structure to different beds;
- high-strength materials that allow you to use a mini-greenhouse in winter.
Installing the “Snail” does not take much time and does not require special knowledge from the owner. Assembly is carried out in several steps using a screwdriver . Using a greenhouse is easy: the covering material reliably protects the seedlings from adverse weather conditions. If necessary, you can open both sides of the greenhouse during the day. An interesting feature of the mini-greenhouse is the ability to use it in the autumn-winter period . In this case, it is necessary to avoid getting a large amount of snow on the roof of the structure, otherwise the latter may be damaged.
IMPORTANT! In order for polycarbonate to retain heat during the night, you need to make sure that it is well warmed up by sunlight during the day.
Advantages and disadvantages
The main advantages of this design are ease of maintenance and functionality, as well as resistance to external factors, low weight and ease of manufacture. Thanks to the hinged lid, you can easily access the seedlings and carry out the necessary agricultural activities. In the Snail greenhouse, warm air is concentrated in the upper part, so the plants do not mate.
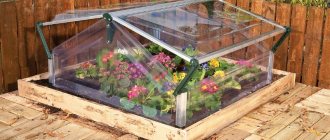
In such a compact greenhouse you can grow not only vegetables and berries, but also flowers. This structure does not need to be fixed to the foundation, so it can be placed anywhere on the site. The greenhouse is stable even in strong gusty winds. After the end of the summer season, the greenhouse can be easily disassembled. In addition to its positive characteristics, “Snail” has disadvantages. In this design it is not possible to grow tall plants due to the small height of the greenhouse.
There may also be difficulties when tying up plants. If you use film material as a coating, the design will become less functional. The hinges will need to be checked and lubricated regularly from time to time. It is not recommended to grow plants in such a structure in winter. In severe frosts, the greenhouse may be subject to deformation.
What crops can be grown?
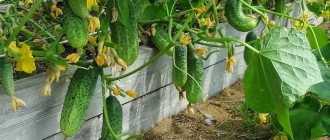
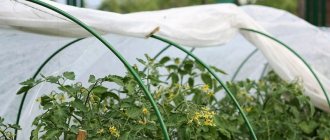
cucumbers and tomatoes, zucchini, squash, garden strawberries, and any greens grow well in a greenhouse The only rule that should not be neglected is the height of the crop , which should not exceed 80-85 cm.
The “Snail” mini-greenhouse is a successful model that can be effectively used in the garden for growing seedlings, as well as short vegetable and berry crops. A good option for year-round use, “Snail” to avoid complete freezing of the soil where it is necessary in the cold season It is suitable for many years of use due to its mobility and durability. If you dream of a small-sized perennial greenhouse, the cost of which should not exceed 5,000 rubles , then “Snail” is what you need!
Also on our website there are more articles about types of greenhouses: Accordion, Novator, Dayas, Cucumber, Breadbox and other crops.
Crops suitable for planting in the Snail greenhouse
The type of greenhouse under consideration is suitable for growing low-growing vegetable crops (radishes, herbs, tomatoes, cucumbers, peppers) and flowers. In general, a portable greenhouse is an ideal option for germinating seeds and then transplanting seedlings into open ground. When producing such structures yourself, you can vary the dimensions at your discretion and make them in accordance with the size of the plants that you plan to grow. Then it will be possible to cultivate tall nightshade crops in them. The model can also be used as a winter shelter for perennial heat-loving flowers or buried for the winter to preserve bulbs, cuttings, etc. planting material.
Did you know? Icelanders organize greenhouses on geysers, which makes it possible to maintain an optimal indoor microclimate without unnecessary energy costs.
The “Snail” greenhouse is an excellent solution for growing seedlings in early spring, when the weather is not yet warm enough. The model is small in size, easy to assemble/disassemble and takes up little space when stored in winter.
Useful tips
To increase the functionality of the greenhouse structure, fill the foundation base with manure, dry grass or leaves on both sides of the greenhouse. Over time, the organic material will begin to rot. This will generate heat, which will ensure the creation of natural conditions for heating the soil. A bar with brushes can be installed on the fixed part. Each time a moving element is operated, the brushes will remove dust and dirt.
When opening the greenhouse, it is recommended to secure the moving element with supports. It can be made from wooden beams. This will avoid injury if the sash lowers on its own in strong winds. When choosing polycarbonate, it is better to choose a material with UV protection. This polycarbonate will not only last a long time, but will also protect the seedlings from exposure to sunlight.
What you need for work
To make a frame, you will need profile, plastic pipes or wooden beams. The cross-sectional size of the pipe should be 2×20 mm. You will also need the following materials:
- Awnings
- Polycarbonate
- Bricks
- Boards
- Sleepers
To assemble a metal frame you need a welding machine, a drill, a hacksaw and a pipe bender. If you plan to create a wooden structure, then the tools you should prepare are a saw, a screwdriver, a knife, a hammer, and a level.
Installation of the structure
You can assemble a greenhouse with your own hands without spending a lot of energy and effort. The detailed instructions that come with the package will help you cope with this task. Main assembly steps:
- Installation of the base: two larger sectors are connected to each other using short jumpers and a screwdriver.
- Roof installation: two smaller sectors are connected to each other using long jumpers and a screwdriver.
- Connection of roof and base: the roof of small sectors is placed on top of the base and secured with bolts.
- Sheathing: cellular polycarbonate is first attached to the sides, then to the base and finally to the roof. A detailed assembly video can be viewed in this article.