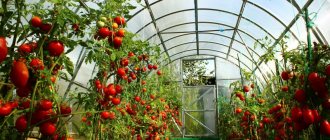
In most of the country, it is risky to cultivate tomatoes in open ground conditions. These plants are quite heat-loving, and sudden temperature swings and other negative weather conditions lead to diseases or death. But how can we not only protect tomatoes, but also increase yield and speed up ripening? The answer is simple - learn how to make a greenhouse for tomatoes with your own hands.
Primary requirements
The greenhouse you make for tomatoes should be warm. In spring, the soil in the greenhouse will be quickly warmed by the sun, making it very convenient to grow vegetables and care for them. In most cases, the frame is made of wood, and the base is built of concrete or brick. Frames can be glazed or covered with film. It is best to study the photo in advance and find a suitable option.
The greenhouse can reach 1.8 m in height. This is very convenient if you plan to plant late varieties of tomatoes. The plants are tall and will be easier to care for in a spacious greenhouse.
Summer residents often install heating systems in the greenhouse and use biofuel to increase the temperature.
Equip the building with a door, this will make it easier to disembark. It would be good if it was possible to remove the top of the greenhouse or the side frames. To prevent contact between the box and the ground, place the structure on a foundation; it can be made of brick. If we talk about the shape of the structure, the triangular version is common. In addition, the frame can be arched. Study the photo in advance, it will help in your work.
Make a greenhouse with your own hands. The process does not require much labor, the materials are cheap and readily available.
Polyethylene film is stretched over the frames. It can be ordinary, but if there is a large wind load, it is best to buy reinforced material. Polycarbonate is widely used, and glazing of openings is possible.
To make a frame, you can buy polypropylene pipes, wooden blocks or metal fittings. Greenhouses can be temporary, but it is better to immediately make permanent structures. Very often, seedlings are grown in a greenhouse. Monitor the temperature, it should be comfortable for crop growth.
If frost occurs
If there is a threat of night frosts, the tomato greenhouse needs additional heating. To keep warm during cold nights, you can use the following methods:
- Biofuel. It includes plant and animal products that produce heat under certain conditions. A warm bed is laid in a greenhouse using manure, leaves, and straw. All components are mixed and placed on a bed under a layer of soil. The mixture is buried to a depth of 50 cm, a layer of earth 30-35 cm high is poured on top. Heat is released in such a bed for 60-70 days.
- Water heating. Along the perimeter of the greenhouse you can place plastic bottles filled with water.
The water heats up during the day and releases heat at night. Once you cover the greenhouse with film at night, the heat from the water will maintain the temperature until the morning, and your tomatoes will not freeze. - Warming watering. If there is a threat of a cold snap at night, you can use a warming watering technique.
The soil in the greenhouse, heated during the day, is watered in the evening and immediately covered with film. The heat released during watering will preserve the plants, since the temperature inside the greenhouse will remain until the morning.
Growing tomatoes in a greenhouse is a process that requires compliance with certain rules. Only strict adherence to them will allow you to get a rich harvest on your site.
How to make frames
The easiest way to build a greenhouse is made of several frames connected to each other. The design is suitable for forcing seedlings and growing adult tomatoes. To create a frame, logs or bars are required. The foundation can be made of brick, see photos with examples. Buy self-tapping screws for fastening the structure, knock down or buy ready-made frames. The structure must be durable.
Before starting work, determine the design and dimensions of the building. It all depends on how you feel most comfortable taking care of your plants. The length of the greenhouse can be any, it depends on the number of bushes that you have prepared for planting and on the size of the frames. The height of the building, like its width, depends on the size of the frames. Their choice is influenced by the age of the seedlings. For tall plants you will need an appropriate greenhouse.
Installation stages
Before you start assembling, make sure you buy the same size frames. Assembling a greenhouse with your own hands is very simple, follow these steps:
- Cut the timber or boards to the required size. Paint them with stain or mastic. Take the bricks and lay them around the perimeter of the building, and then lay the timber on top of them.
- Attach the boards with self-tapping screws so that there is a gap between them. It should be slightly smaller than the width of the frame.
- Attach boards to the verticals on the outside. Then install the rafters.
- It is best to make a triangular-shaped greenhouse, then the water will quickly run off the roof.
- Secure the frames with self-tapping screws; part of the frames should open. You can make loops on one side of the frame and install hooks on the other.
Greenhouse frames can be made of metal. A metal corner is best suited for this; it is possible to make a greenhouse from steel pipes. The structure can be prefabricated, but many summer residents make permanent structures from welded parts. You can choose the most convenient design option from the photo. The top of the greenhouses is covered with film. Such structures are ideal for planting plants.
In recent years, cellular polycarbonate has become very popular; it can be used to cover a greenhouse. This design has many advantages, but it has one drawback - high price. The supports for the greenhouse are made from wooden blocks or metal corners.
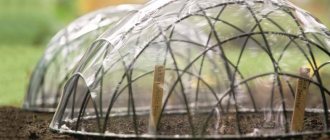
Arched structures and buildings made of wooden lattice are very popular. Such structures are erected very quickly; the main purpose is to grow seedlings. Unlike arched ones, lattice ones are more stable. You can build them with your own hands. It is very easy to make a greenhouse from arcs; it is covered with a polyethylene film. Then it is pressed to the ground, using bricks to fix it.
Tomatoes do well in protected soil because the temperature is ideal for growing crops. If you are going to drive out seedlings in a greenhouse, insert arcs at a distance of 50 cm from each other. Attach horizontal slats to them on top, this will increase the strength of the structure. As a result, the greenhouse will keep its shape.
You can practice growing tomatoes in permanent greenhouses that are made from boards and bars. In order to build them, buy building materials. The dimensions of the object are arbitrary.
Installation of a greenhouse frame for tomatoes
The most accessible and cost-effective method of construction is a type of greenhouse in the form of an arc, which looks like a tunnel.
For this method we will need: plastic fittings or a metal-plastic arc from a bent pipe:
- We plunge the edges of the resulting arcs into the soil, placing them at a distance of approximately 50 centimeters from each other and with a height of 80 to 1.5 centimeters.
- We cover the resulting frame with regular or reinforced polyethylene film.
- We secure the edges of the film by pressing them to the ground with bricks. This is how quickly and easily the greenhouse is ready for use.
- As practice shows, this type of greenhouse will successfully last one season.
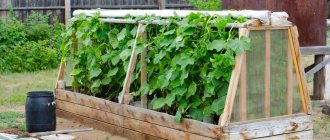
Let's consider a more durable triangular one (like a house)
The design of a greenhouse in the form of a house.
Greenhouse method made from wooden beams or boards:
- This method also does not require any special construction skills.
- Installation of this greenhouse is as simple as in the case of an arc-shaped greenhouse, only more durable and stable and can be used for several seasons.
The greenhouse will be triangular, we will need a beam as a stand and several wooden boards:
- We pre-paint the wooden parts with paint or polish to increase the service life of our greenhouse frame.
- We drive a beam into the ground, the height of which should be from 1 to 1.5 meters, and two inclined boards are nailed to the top of the beam.
- One edge resting on the ground (the cross-section should form an isosceles triangle).
- We make one more, or several such blanks at a distance of up to 1 meter from each other.
Now we cover our greenhouse with film or lutrasil and fix the edges of the film, pressing the film with bricks to the ground. Our greenhouse for tomatoes is ready.
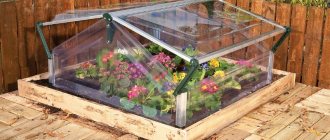
Greenhouse for tomatoes from old window frames
The design of a windowed greenhouse is more labor-intensive, but at the same time just as simple.
We will need:
- Several old glazed window frames.
- A couple of boards.
- Bars.
- Nails or screws.
First, we determine the size of the greenhouse and begin installation:
- The width and length of the greenhouse will depend on the size of the window frames used.
- You need to choose frames of the same size, several small ones or one large frame.
- The wooden parts of the greenhouse frame must also be pre-treated with paint.
- Boards are attached to wooden beams about 1 meter high or more with nails or self-tapping screws.
- Next, the resulting frame is buried 15-20 centimeters into the ground, and glazed window frames are attached to the hinges on top of the frame box.
- In principle, the greenhouse is ready. The side parts of the greenhouse can also be assembled from narrow window frames and timber.
The advantages of such a greenhouse are in glass, since glass transmits sunlight better than plastic film, which tomato seedlings will certainly like.
Greenhouse sizes
Since in a greenhouse the plants are served from the outside, its width is chosen so that it is comfortable for you to process plants planted closer to the middle. You determine this experimentally: sit down and try to reach some area with your hand. Measure the distance. You get the width of the greenhouse with a one-sided approach. This is if the greenhouse is located in such a way that it is impossible to get to it from the other side (near a wall, for example). If you can approach from both sides, you double this result.
It is important to be comfortable at work
The distance is different for each person: height and physical condition affect. You should not chase savings by making it wider than necessary. You will have to spend a lot of time weeding, loosening, fertilizing, and other work. A couple of hours in an uncomfortable position, and there is no strength left. Therefore, it is better to make the greenhouse a little narrower, but to make it convenient to work: while enjoying your work, you spend less effort.
And the length of the greenhouse is chosen based on the layout of the site. It's arbitrary.
Choosing a location and solving other issues
Before you go to the barn to assess the availability of materials and tools or to the store to purchase them, you need to inspect the garden plot and choose the place where the greenhouse will be built. Of course, the structure can be portable, but most often it is made stationary. In addition, the size of the structure will depend on the choice of location and the availability of free space, and this factor greatly influences the amount of materials required for construction.
Greenhouses made of arcs with covering material
The location for the greenhouse should be selected according to the following principles.
- This should be a flat piece of land. Installation of the structure on steep slopes is unacceptable. If there are snags and stumps in the area allocated for the greenhouse, then they must be uprooted and all holes filled with soil.
- Growing and fruiting plants need good lighting. That is why a greenhouse is not installed where shadows from trees, shrubs, greenhouses, houses and other buildings fall on the ground. Lack of light will negatively affect both seedlings and adult crops.
- It should be convenient for the gardener to carry out all the work in the greenhouse. Therefore, you need to try to calculate the location in such a way that there is sufficient passage around the structure and the greenhouse can be easily opened.
It is important to be comfortable at work
- It is best to orient the direction of the greenhouse from east to west. In this case, the sun's rays will illuminate the plants in the structure as efficiently as possible. But if there is a desire to ensure that the plants receive the sun in excess only in the morning and evening, then the greenhouse is installed from north to south. In this case, the plantings will be protected from the scorching heat at noon.
A simple wooden greenhouse is very convenient and practical
On a note! If the greenhouse is planned to be used for permanent cultivation of plants, for example, tomatoes, then care should be taken to build a second greenhouse, if space allows. The fact is that it is undesirable to grow the same crops, especially tomatoes and cucumbers, in the same place year after year. Usually the plantings are swapped. In this case, a second greenhouse would be very useful.
A greenhouse doesn't have to be big
The optimal time to build a greenhouse is mid-spring. The snow has already melted, but the plants are not growing much yet. Although if there is nowhere to rush, then you can build a greenhouse at any time of the year, except winter. In winter, it is very difficult to carry out any construction, not only because of the cold, but also because of the hard ground.
Greenhouse box
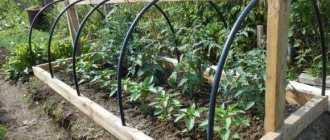
A simple greenhouse made of arcs under film or spunbond
This greenhouse is made of several boards, knocked down to the required dimensions, arcs of PVC pipes, which are attached to a wooden base. The tops of these arcs are connected at the top by a beam or the same pipe. If it is a timber, it needs to be well processed, rounding the edges so that the film does not tear.
A simple greenhouse made of boards and PVC arches
How to secure the arches
How to attach arcs of PVC pipes to a greenhouse frame. They are most often secured using metal perforated tape. Take a small piece of it about 5-6 centimeters, screws and a screwdriver. And they are secured on both sides. To be on the safe side, you can do it twice.
This fastening can be repeated twice
In exactly the same way, you can fasten them from the inside to hold them tighter by adding bars.
The greenhouse arcs are fixed inside the frame
Another option: drive in pieces of reinforcement near the frame, place pipes on them and only then secure them with clamps to the frame boards. This option is more reliable.
How to attach the film
You can attach the film to PVC pipes using double-sided tape. But only if inexpensive polyethylene film was used: it is impossible to tear it off without damaging it, and polyethylene lasts no more than a year. So for a seasonal greenhouse this is a “cheap and cheerful” option. The second method is special clips for fixing films and anything that can replace them - a piece of an old hose cut lengthwise, a clamp for pipes that are used for installing pipelines, office binders, etc.
How else can you fix the film on the meadows of a greenhouse or greenhouse?
It also makes sense to secure a block on both sides along the edges of the film. To do this, the film is cut to a length greater than necessary, a block is wrapped in the excess and the film is secured to it. Now you have a piece of film with bars attached to its short sides. Leave one on one side, throw the second on the other. Now you don’t need to press the film to the ground with stones: the block holds it well. It is also convenient to open the greenhouse for ventilation; wrap the film and place it on top.
A block wrapped around the edges of the film makes the work easier
You can use small nails to attach the film, but place washers under the caps. It is faster to work with a construction stapler with staples. To prevent the film from tearing at the attachment points, it is padded with something. You can use thick braid or just a strip of fabric, and hammer fasteners into it.
Methods of attaching the film to the bar and to the arcs
More powerful option
If there is a need to make a greenhouse with PVC arches more reliable, wooden posts are nailed to the board base in the center of the short side. A board is attached to them on the edge, in which holes are pre-drilled with a diameter larger than the outer diameter of the pipes.
This greenhouse can be used not only for growing peppers or eggplants. Having grown the side posts if necessary, you can tie up cucumbers or tomatoes
During installation, the pipe is threaded through the hole. You can fasten it on the sides as suggested above, or you can do it another way: first install pins in the bars and put the pipe on them.
How to secure a longitudinal beam in racks
The simplest greenhouse
The good thing about PVC pipes is that they are easy to bend. Also because they weigh little. An ideal option for a lightweight, portable greenhouse, especially if combined with spunbond. This material can be sewn. Take a piece with a density of 30 kg/m2 and make drawstrings in it in increments of 50-60 cm. For the drawstring, stitch across a strip of the same material about 10 cm wide (it is stitched on both sides). Insert pipes cut into the required lengths inside.
This is what you should get: a covering material with arches threaded through the drawstrings
Now all this can be installed on the bed: stick pegs in two rows on one side and the other of the bed, and place a pipe on them. You immediately get a ready-made greenhouse. And what’s more convenient: you open and close the plants simply by collecting or straightening the spunbond on the arc. This is a very convenient temporary greenhouse: as soon as it is not needed, it can be removed and folded in a couple of minutes.
Greenhouse - it couldn't be simpler
Selection of seeds, their germination and sowing
To effectively grow tomatoes in a greenhouse, you need to decide on varieties and hybrids, including those intended for indoor soil. This planting scheme has proven itself well: determinate (low-growing) varieties are planted along the edges of the greenhouse, and indeterminate (high-growing) varieties are planted in the center. With this arrangement, it is convenient to tie up climbing plants, and bush tomatoes located along the edges do not reduce the illumination of the greenhouse.
Among the determinate tomatoes, the following varieties grow well in greenhouses: “Doll Masha”, “Chaika”, “Spring of the North”, “Pink Honey”, “Azhur”, “Eleanor” and “Bourgeois”. The following tall tomatoes grow well in greenhouses: “Happiness”, “Major”, “Sprut”, “Mikado”, “Biysky Rozan”, “Dream”, “Major”, “Russian Happiness”, “Cardinal”, “Orange” miracle". In addition to the above-mentioned varieties and hybrids, there are many others that can be selected based on early maturity and other parameters.
Tomato variety Cosmonaut Volkov: description and characteristics
Landing rules
Growing tomatoes in a greenhouse begins with planting seeds and caring for seedlings. The productivity of tomatoes is determined by how strong and developed the seedlings were. In order for sowing to be successful, you must follow a step-by-step approach and know some of the peculiarities of growing. Let's take a closer look at them.
- Prepare seeds by immersing them in a solution of Fitosporin M and keeping them there for a third of an hour. After this time, you need to move the tomato seeds into a container with a growth stimulator. After soaking in the last liquid, sowing is carried out in prepared containers.
- Planting period is from February to the last days of March. Late varieties are sown in February, early varieties by the end of March, and mid-season varieties by the middle of the first month of spring. The depth of the sowing container should be at least 6 and no more than 7 cm.
- The soil mixture is prepared with your own hands by mixing equal parts of peat, humus and turf. After combining the components, the mass is moistened and superphosphate (1 tbsp), the same amount of ash (wood) and a liter of sand, preferably river sand, are added. Additional components are indicated per 10 kg of soil mixture. If desired, you can purchase ready-made soil in specialized stores.
- The prepared soil is poured into the prepared containers and lightly compacted. Make 1.5 cm depressions on the soil surface and water with dissolved potassium humate, after which the seeds are sown.
- Sprinkle the furrows with a small layer of soil mixture and place in a bright place with a temperature of 22C. To speed up the appearance of sprouts, the containers can be sealed with cling film.
Seedling care and picking
In the first 20 days after germination, the growth of seedlings is almost imperceptible; in the future, its growth will noticeably accelerate. After the next month, the leaf mass will begin to increase at a rapid pace. We list what you need to consider when caring for seedlings:
The air temperature in the first week after germination should be within +18/+15C. To prevent seedlings from stretching in one direction, turn the container with opposite sides towards the light source every day. Strictly observe the frequency of watering. Grown seedlings are watered at the root 2 times a week. After the seeds hatch, a one-time watering is carried out, the next one - after 10-15 days.
It is important to use water at room temperature (20 degrees).
How to grow healthy and productive tomatoes in a greenhouse? You can't do this without hardening. In the room where the tomato seedlings are located, it is necessary to open the windows. If the weather is warm outside (+12C), it is advisable to take the plants outside during daylight hours. In the future, containers with tomatoes can be left outdoors overnight.
It is important to cover them with film
When hardening, it is necessary to ensure soil moisture, otherwise the seedlings will dry out and its leaves and stems will acquire a dark lilac hue. In this case, growing and planting may become a futile exercise due to the death of plants or their weakness, which will negatively affect the yield.
10 days after sprouting, tomatoes have two true leaves. During this period, it is necessary to plant each plant in a separate pot. On the day of transplantation, seedlings are not watered.
It is important that the soil at the time of picking is not compacted and has some moisture from the previous watering. The sprouts are dug up using a flat wooden stick: they dig up with it and remove the plant with a lump of earth
It is important not to touch the leaves with your hands, but to hold the seedlings by the stem near the roots.
What is a tomato - a vegetable, berry or fruit?
Triangular greenhouse made of boards
This greenhouse is good for seedlings, but you can make it for peppers and eggplants. A stand is nailed in the middle of the base. There are two inclined boards attached to it. The cross section results in a triangle. If you need a long greenhouse, the same structure is installed approximately every meter. All tops are connected with a long bar or pipe. This greenhouse has a simple and convenient design.
Cucumbers are grown with it only until they begin to curl. Under the cucumbers, the covering material is removed, posts are nailed (screwed) to the sides, and twine is pulled between them.
Triangular greenhouse made of boards
Here's how to remake such a greenhouse for cucumbers
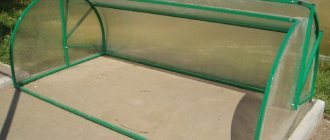
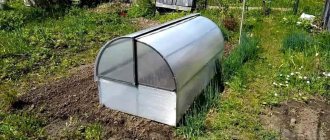
Greenhouse “Breadbox” and “Butterfly” - photo
This design is called a “bread box” because it looks exactly like a plastic bread container. Its lid also rises upward, hiding behind the second half. If you look at the photo, you will understand everything.
You can weld such a greenhouse-breadbox with your own hands from a profile pipe
There are two types of such products: opening on one or both sides. If it is shallow, you can work with a lid that opens on one side. If the width is more than a meter, it will be easier to work if there is access from both sides. This design with two opening sides has its own name: “Snail”.
A film or spunbond is stretched over the manufactured frame, but polycarbonate is more popular for this design.
The second design differs in the type of door opening. Its vault is also made on arches, but opens on hinges upward (see picture).
Butterfly greenhouse: when open, the lids resemble wings
They can be installed directly on the ground or on a prepared foundation made of bricks or timber. In some cases, the lids do not open immediately from the ground, but there is a small side of 15-20 cm.
From scrap materials
Turning unnecessary things into useful products - our people have no equal in this. They make greenhouses from things you would never even think of.
For example, you can easily make a greenhouse with your own hands from old window frames. When replacing windows, do not rush to throw them away. They can be used to make an excellent greenhouse. Moreover, the designs may be different. The simplest is a body made of boards, to which a window frame (with glass, of course) is attached on top as a lid.
A simple frame greenhouse: a wooden frame to which an old window frame is hinged
To ensure that the plants receive maximum light, one side of the frame is made higher (which faces south or east). There are different frames, any of them can be used for these purposes. As proof, here is a photo gallery of greenhouses made from frames that were made with their own hands by zealous owners.
They make greenhouses out of barrels. Cover with an old umbrella made of transparent film or cut-off plastic water cans.
Greenhouse from an old barrel
Way to grow cucumbers
A homemade greenhouse can be made from a plastic or foam box. Although “do” is a strong word. All you need to do is stretch the film.
Everything ingenious is simple
Do you have a plastic box? Can be adapted for seedlings
What is it used for?
City dwellers who love wildlife set up greenhouses for their balconies. This way they manage to recreate a piece of wildlife in the apartment. A design in the form of a cabinet or rack will help save space on window sills and prepare seedlings for planting in the country.
A glass loggia, balcony or veranda with heating in winter and special lighting is already a typical greenhouse. Sufficient moisture and temperature control will help create ideal conditions for growing heat-loving plants at any time of the year.
If you plan to grow a large number of seedlings or plants that require special conditions, experts recommend acquiring mini-greenhouses. These are small boxes with glass or polymer transparent walls and a removable lid.
There are simple and automated models. The latter are equipped with sensors to monitor temperature and humidity parameters.
Summer residents will appreciate collapsible portable structures. You can keep house plants in them in winter, prepare seedlings in early spring, and install them in a suburban area in summer and grow individual plant crops.
Mini-greenhouses for seedlings
For those who grow seedlings for their own vegetable garden or flower garden, large volumes are useless. We need small greenhouses. Moreover, many grow seedlings on balconies. All of the above designs can be used for a balcony in reduced sizes. For very small plantings, you can even take plastic egg trays. On one side there will be a container for soil and a lid instead of a shelter. Look at the photos for other ideas.
You can assemble a greenhouse with your own hands in a few hours. There is no need to build any complex structures. Everything is very simple, economical and practical.
Tomato is a healthy product that is loved by both adults and children. You can grow it in open ground, and by building a greenhouse for tomatoes with your own hands, you can increase the yield of tomatoes on your plot several times. Considering the difficult weather conditions in different regions of our country, this will protect the seedlings from frost and temperature changes.
Making your own shelter will significantly save your home budget, since the options made in factories are very expensive. It is possible to make a structure of the required dimensions and take into account all the nuances and difficulties inherent in a particular plot of land only by making a greenhouse yourself. Tomatoes love warmth, so the yield of homemade tomatoes in a shelter will be significantly higher than in open ground.
Shape selection
Before you make your own greenhouse for tomatoes, you should decide on the shape of the structure. It can be very different, since the shelter for tomatoes is a smaller copy of the house, and the roof of the buildings can be simple, gable, hip and hipped, semicircular or arched.
There are rectangular and combined forms of greenhouses for tomatoes. Most often, due to ease of installation, a simple gable and semicircular structure is used on sites.
Main advantages of the design
A greenhouse for tomatoes is an extremely easy-to-make small structure that protects the future harvest from negative environmental influences.
Its main advantage is that with a relatively small size (a structure 150 cm high is sufficient for tomatoes), it provides natural heating of seedlings or adult tomato bushes temporarily placed in a greenhouse in early spring, using only the energy of sunlight and the heat generated by fertilizers during the oxidation process. Greenhouses that use heating quite often require additional heating costs. A greenhouse for tomatoes does not have these disadvantages.
Many gardeners believe that a do-it-yourself tomato greenhouse is more effective than a self-made greenhouse. It is difficult to agree with this, because the main differences and at the same time advantages of the latest product are its compact size, energy independence, ease of manufacture and relatively low costs. Greenhouses are much taller and larger. In addition, they require constant maintenance costs.
Preparing soil in a greenhouse for tomatoes in spring
If for some reason it was not possible to carry out the preparatory work in the fall, then you can do it in the spring.
First of all, you should definitely remove what is left from last year - weeds, crop residues or tops need to be urgently eliminated.
Then remove the top layer of soil, about 5-6 centimeters. It is in this layer that all pathogenic spores and pest larvae overwinter.
Disinfect the soil from possible pests. To do this, water the soil with a solution of potassium permanganate and copper sulfate.
How to quickly fertilize the soil
The easiest way is to sprinkle the soil with ash and humus. It is also worth digging up the soil, choosing the roots of weeds.
Freshly cut grass is another method of fertilizing the soil. The main thing is that it is mowed before flowering, otherwise it will cause future weeds. The greens need to be laid on top of the ridge and dug up.
If you plant green manure a month before planting tomatoes, then dig it up and you will get an excellent fertilizer.
Necessary materials
Before you make a greenhouse for tomatoes with your own hands, you should familiarize yourself with the list of necessary building materials that are used in the manufacture of the structure.
The main selection criterion is their low cost and ease of use, so it is advisable to use available devices. The difference between reliable home-made structures and the so-called self-made ones lies both in the quality of the work and in the materials used.
Tomatoes are very finicky plants that require careful care and good climatic conditions. For a good harvest, this vegetable requires a greenhouse, frequent watering and fertilizing. For example, varieties such as Samara, Honey Drop, Labrador are only greenhouse varieties and require a certain microclimate for a good harvest. And for this you need a high-quality greenhouse.
Although tomatoes are heat- and light-loving, before planting them in a greenhouse, you need to grow the seedlings, harden them and accustom them to the sun.
Important! Unprepared plants in a greenhouse will begin to get sick, burn in the sun and may die.
Greenhouse for tomatoes
Hardening is carried out using open windows, and then taking the seedlings out into the fresh air into a temporary greenhouse or onto a balcony, but at the same time you need to strictly observe temperature standards.
Before moving fully grown tomatoes into the greenhouse, you need to reduce the amount of watering.
Reviews from gardeners
Experienced gardeners and gardeners recommend fertilizing the soil with potassium, calcium and using organic fertilizers and compost in equal proportions.
They also advise adding sand to the soil - they claim that it is sand that makes the soil loose and maintains the desired level of moisture.
Planting experts say that one of the rules for a good harvest is the correctly selected variety (more information about the best varieties of tomatoes for greenhouses). It is worth paying close attention to this part of preparing the future harvest.
Tomatoes must be planted on narrow ridges, 60-70 centimeters and in one row. This will ensure not only a good harvest, but also make it easier to care for the garden bed.
Some gardeners speak well of adding eggshells to the soil, claiming that it enriches the soil with calcium.
Greenhouse options for tomatoes
Several types of homemade greenhouses for tomatoes are common among people. Each design provides plants with warmth, light and the right climate for good development, growth and harvest. To fully perform all the necessary greenhouse functions, you can combine several structures into one.
Types of greenhouse construction:
- Film on the ground. The simplest design, but unreliable and does not perform all the functions of a greenhouse.
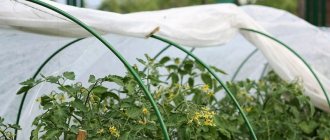
- Film arched tunnel greenhouse. The film is stretched over metal rods bent into an arch shape. A simple, convenient and inexpensive greenhouse for tomatoes.
- A greenhouse is a house. Old window frames with glass are knocked down in the shape of a house. Multifunctional, inexpensive option.
- Greenhouse - butterfly. Instead of glass window frames, wooden boards and film are used for construction. An excellent option for a mini-greenhouse for tomatoes. Due to the fact that it opens from the top, it is convenient for weeding and watering.
- A greenhouse is a bulk house. The shape of the building does not differ from a butterfly greenhouse, but the soil inside is in a wooden box with fertilizer.
- Polycarbonate homemade greenhouse. Construction made of polycarbonate sheets mounted on arcs (metal, polyurethane) or boards.
On a note! Making such greenhouses requires a lot of time and effort; for durability, it is better to use purchased material rather than improvised material.
How to make a greenhouse with your own hands
To save money, you can make a greenhouse for tomatoes yourself. The main thing is to take into account all the nuances, choose the right material and place for it. How to make a nursery for tomatoes correctly?
First you need to decide on the type of structure and calculate its dimensions (sufficient height, width, diameter and length of pipes or boards, amount of material).
A simple do-it-yourself nursery
Film arched tunnel greenhouse
To make a regular tunnel greenhouse you will need:
- 6-meter metal rods or thin bendable polypropylene pipes.
- Boards for the box.
- Film.
A wooden box is placed on the ground at the required length and width, nailed together or screwed together. Pins are stuck along it from the outside for putting on frame pipes, or metal rods are simply stuck in with a distance of 60-80 cm between them and covered with a film that is folded under the box or sprinkled with earth.
Greenhouse-house
In order to assemble such a structure, you will also need strong old windows so that when opened they do not fall on crops or people. The frames are placed side by side and secured with nails or screws, but carefully, otherwise the glass may fall off. The top in the form of a roof must open, so you need to make a wooden frame on which the opening frames will be fixed with hinges.
For support while the greenhouse is opening, you can use a rail that is fixed between the open part and the ground.
Greenhouse - butterfly
The frame is the same in shape as in the greenhouse-house, but the materials are different. You will need boards and film. A box is assembled from wood and covered with film. The top shutters need to open, so they are hinged to the frame board in the center. In order for them to be fixed in the open state, most often gardeners use an additional rail, which is used to support the open sash and fix it to the ground.
Greenhouse bulk house
The design of the greenhouse itself is no different from a regular house, but the film or window frame is attached not to the ground, but to a high, insulated ridge. This ridge is built from boards, like a box, and inside it is earth with humus and sawdust, laid out in layers.
Note! Such a greenhouse provides additional nutrition and a warm climate for the roots, and retains moisture well.
Manure is placed in the box in a first layer of 30 cm, after which sawdust is placed in a thin layer (5-10 cm), followed by fertile soil in a layer of 20 cm. Due to the layers, the height of the wooden box will be 60-70 cm, the width can be made to any size, but at the same time take into account the distance between the bushes, the convenience of watering and weeding.
How to make a polycarbonate greenhouse for tomatoes with your own hands
Polycarbonate greenhouse
The greenhouse will be no worse than the factory model without any extra costs.
To do this, you will need to buy polycarbonate sheets and metal or plastic arcs, but the best way to save money is to replace them with wooden posts that can be found on the farm.
On a note! If you attach polycarbonate to a wooden frame, you need to treat the frame with water-repellent impregnation, then coat it with an antiseptic and prime it.
A polycarbonate greenhouse requires a foundation! This is the first stage of constructing such a greenhouse yourself.
The simplest and most cost-effective foundation will be made of timber. On flat, compacted ground, fasten a box of timber with a cross-section of 50 by 50 mm (more is possible) and install it on supports in the corners and in the center (these are bricks or blocks of the same height). Cover the box with drying oil for protection.
A brick foundation will last longer, but it will also take longer to install. For such a foundation you will need a cement pad and brick, the amount depends on the size of the box. Brickwork can be in one row or several rows, depending on the volume of the greenhouse. Basically, bricklaying is done in 2-3 rows, and such a foundation can withstand any volume and weight.
To build a frame, it is best to purchase a metal pipe or polypropylene pipes measuring 20 by 40 by 2 mm and a profile for the racks (42 or 50). There is a distance of 50 cm between the sheathing pipes for frame strength.
Installation tool - grinder or metal saw, welding machine (for corners), screws or rivets for fastening.
First, a profile is mounted for racks and joints of polycarbonate sheets, along which metal pipes are already bent and secured, giving the greenhouse a round or any other shape. After that, polycarbonate sheets are attached to the finished frame, which are bent only across, since a sheet bent lengthwise will burst.
It is advisable to mount the sheets on the end profile (on top of the frame), but if they are short, installation is also possible on the edge on the side. There should be no gaps between the sheets to prevent rainwater or drafts from entering the greenhouse.
Making a nursery for tomatoes is very simple when an additional diagram is offered when purchasing the material.
Features of planting and growing seedlings
To properly grow seedlings, you need to know some of the features of planting them.
How to choose a suitable place for a greenhouse
The main thing to consider when installing a greenhouse is good lighting of the area. If you plan to place it near the house, then it should be on the sunny side.
Optimal design location:
- the location of the bed is on a hill;
- if you need to install it in a lowland, then the soil must be drained;
- the orientation of the structure is from east to west;
- to protect from the wind, build a hedge or install a barrier up to 150 cm high and at a distance of 7–10 m;
- for a convenient approach, make paths of stone or gravel.
Preparing soil mixture for a greenhouse
At the selected location, you should dig a small pit 50–70 cm deep. Cover its bottom with layers of crushed stone (10 cm) and sand (10 cm) to create thermal insulation. Place humus or straw on top. The last layer is biofuel (manure). Install a greenhouse on this pit and fill it with light soil with added minerals and organic matter. The soil must also be water- and breathable. It is best to use the following mixture: peat, turf soil, forest leaves, humus (3:1:1:1).
Timing for planting seedlings
The exact timing of planting seedlings depends on the type of crop. But in general, you need to focus on the warming of the soil and air. The average air temperature should be +15...+18°C, soil temperature should not be lower than +15°C.
Seedling care
The most important thing in caring for seedlings is watering, fertilizing, loosening, and weeding. The schedule of watering and fertilizing depends on the crop, since some of them are more moisture-loving than others, and each plant has its own needs for nutrients. The main thing when watering is to carry out irrigation procedures with warm water and in the morning or evening. For fertilizing you need to use organic matter and mineral complexes.
Weeding and loosening of the soil must be done after each watering.
Did you know? The ancient Romans were the first to use greenhouses. These structures were mobile; they were taken out on carts to sunny places to better warm the plants.
Pros and cons of a homemade greenhouse
A do-it-yourself tomato greenhouse has a significant advantage: it is mainly made from scrap materials and does not require serious expenses.
Disadvantages of such designs:
- require a lot of time and effort;
- due to the fact that the materials used are not new, they sometimes have to be replaced with purchased ones;
- not a very strong design if you don’t have experience in assembly.
In the end, you still have to spend money on material and devote a lot of time to construction, but this is still more economical than ordering a ready-made greenhouse and paying for its installation.
The most economical option is an insulated box with manure, a frame made of film and rods or boards. The material can easily be found in home bins. The design is not very time-consuming and labor-intensive, but it will only last one season.
Preparation for construction
Like any construction, the construction of a greenhouse on a personal plot requires a thoughtful approach and preparation.
Place
The first thing to do is determine the place where it will stand. If the terrain of the site is difficult, it is better to choose a place on a hill. Swampy places are not suitable, as the plants will die from excess moisture. The place must be level so that the greenhouse is stable and does not collapse from the wind. There should be no trees or buildings nearby that provide shade, otherwise its inhabitants will lack light.
If you plan to have a heated greenhouse for year-round use, it is better to build it next to the house so as not to conduct communications - water and electricity - to the other end of the site.
Useful video about a homemade greenhouse for tomatoes with your own hands: https://www.youtube.com/watch?v=h92Troh9V1c
Type
Before making drawings, decide what you will grow in the greenhouse. Its size depends on this
In addition, it is important whether it will be permanent or collapsible. A foundation is required for a capital foundation; a collapsible one made of polycarbonate is mounted directly above the beds.
Foundation
The foundation under a capital greenhouse performs several functions:
- gives stability to the structure;
- separates the walls from the outer layer of the earth for greater thermal insulation;
- blocks the path of garden rodents.
Foundations vary depending on the type of greenhouse:
- block foundation for a greenhouse made of polycarbonate. It protects against excess moisture in the soil, so it is well suited for areas located in low-lying areas;
- a concrete-brick foundation is good for greenhouses that will be used in the spring and summer, because it does not protect the beds very well when the soil freezes;
- strip foundations made of timber are laid for temporary greenhouses for 2-3 years due to the fact that the wood begins to rot and collapse;
- a concrete monolith foundation is poured under permanent greenhouses for winter growing of vegetables. Such a foundation perfectly protects against cold weather, pests and excessive humidity. But it is expensive and is recommended for areas with moving soil.