The yield from a garden plot can be either high or low. 90% of failures in growing crops are caused by the farmer himself. Reason: incorrect start of work from the moment of sowing. And this concerns not only the processing of seed material, but also the further care of the future plant.
Sowing directly into open ground is an irrational use of one’s strengths and capabilities. Therefore, you should start with germination, which means you need a greenhouse or a special room for seedlings.
What is it needed for
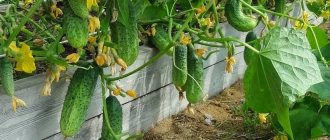
Mini-greenhouses are used for growing cultivated plants not only in a summer cottage, but also within the walls of a city apartment. It is suitable for planting whimsical and heat-loving varieties.
- Protects young plants from winds, drafts and precipitation.
- Provides the necessary climatic conditions for plants.
- Young seedlings do not get sick when transplanted into open ground, as adaptation occurs slowly and gradually.
- Caring for plants is quite simple.
- They are easy not only to install, but also to store.
Most summer cottages are small in area. Installing a full-fledged greenhouse is impossible. Since such structures occupy most of the site.
You may be interested in:
How to make a greenhouse with your own hands Building a greenhouse with your own hands is not the easiest task. But today there are tips on the Internet...Read more...
Features of planting and growing seedlings
To properly grow seedlings, you need to know some of the features of planting them.
How to choose a suitable place for a greenhouse
The main thing to consider when installing a greenhouse is good lighting of the area. If you plan to place it near the house, then it should be on the sunny side.
Optimal design location:
- the location of the bed is on a hill;
- if you need to install it in a lowland, then the soil must be drained;
- the orientation of the structure is from east to west;
- to protect from the wind, build a hedge or install a barrier up to 150 cm high and at a distance of 7–10 m;
- for a convenient approach, make paths of stone or gravel.
Preparing soil mixture for a greenhouse
At the selected location, you should dig a small pit 50–70 cm deep. Cover its bottom with layers of crushed stone (10 cm) and sand (10 cm) to create thermal insulation. Place humus or straw on top. The last layer is biofuel (manure). Install a greenhouse on this pit and fill it with light soil with added minerals and organic matter. The soil must also be water- and breathable. It is best to use the following mixture: peat, turf soil, forest leaves, humus (3:1:1:1).
Timing for planting seedlings
The exact timing of planting seedlings depends on the type of crop. But in general, you need to focus on the warming of the soil and air. The average air temperature should be +15...+18°C, soil temperature should not be lower than +15°C.
Seedling care
The most important thing in caring for seedlings is watering, fertilizing, loosening, and weeding. The schedule of watering and fertilizing depends on the crop, since some of them are more moisture-loving than others, and each plant has its own needs for nutrients. The main thing when watering is to carry out irrigation procedures with warm water and in the morning or evening. For fertilizing you need to use organic matter and mineral complexes.
Weeding and loosening of the soil must be done after each watering.
Did you know? The ancient Romans were the first to use greenhouses. These structures were mobile; they were taken out on carts to sunny places to better warm the plants.
Differences between greenhouses and greenhouses
All gardeners know that there are two irreplaceable structures on a personal plot for growing not only seedlings, but also adult plants. But there are significant differences between them:
- Height no more than 0.5 meters.
- It has no windows or doors.
- The greenhouse is heated naturally. For this purpose, sunlight and biofuels are used.
- You can change their location.
- These are temporary structures that are used mainly only for the summer season.
- Year-round use is possible in indoor conditions.
Choosing a place
The place should be as protected from the wind as possible and at the same time as open to sunlight . The shade from the trees will interfere with the germination of seeds and the growth of seedlings. Plants in such conditions will stretch and weaken.
You should choose the site that was first free of snow . When the optimum air temperature arrives, the soil in this place is already warmed up better than in other places, which means it will be easier to bring it to the level required for planting. It is also necessary to build a greenhouse at the highest place so that there is no access to melt water.
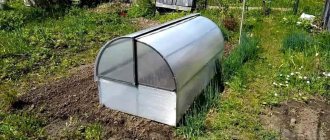
Kinds
There are many types of miniature greenhouses. They may differ in size, shape and covering material. We present to you several popular types that can often be found both in the apartment and on the site.
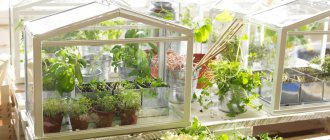
"Home"
The design is small in size. Fits on any windowsill. Used for growing seedlings at home. The design is similar to outdoor greenhouses, but in miniature. Installation in several levels is possible. You can construct it yourself or purchase it at a gardening store.
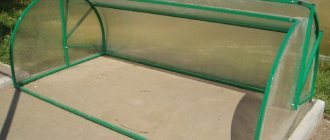
Portable plank structure
It is a box-shaped structure that does not have a bottom. Polyethylene film or glass is used as a covering material. Its convenience lies in the fact that, if necessary, it can be installed anywhere on the site. Its main use is to protect plants from frost.
"Belgian"
To build this model you will need to dig a ditch. Build ridges with fertile soil in it. Cover the top with polyethylene, framed glass or a polycarbonate sheet.
Important!
It is best to construct this type with a pitched roof. You save space on your site.
Model "Butterfly"
Named after a small feature, which is the opening of the doors on both sides. They are visually similar to a butterfly. The main advantage is access to the plants, which is possible from both sides. It can be of any size, but in most cases they use small structures that do not take up much space on a personal plot.
Model "Breadbox"
It has one sash that rises completely to the top. The roof is semicircular. The sash is opened by sliding it behind the main part of the roof. Access to plants is easy. Doesn't take up much space on the site.
"Shelf"
To build this type of greenhouse, an unnecessary rack or cabinet is suitable. The cabinet is left without a back wall and covered with polyethylene or covered with polycarbonate. Instead of doors, they use frames with the same covering material that covers the back wall. Visually, this design resembles a shelf from a store. Easily installed on any balcony or loggia of a city apartment and used all year round.
Model "Wall"
This miniature structure is installed near the walls of outbuildings or a house. Compact. Great design for small areas. The roof is mainly of a pitched type. There is a minus, but not significant. In winter it is necessary to constantly clear the snow.
What is it used for?
Good harvest quality is a troublesome matter. At the first stage of development, you will need to create comfort for the seedling. And you need to start with an abundance of light, with the right climatic conditions. At home, this is not always possible if there is no mini-greenhouse for seedlings.
Such portable structures are suitable for balconies and can be installed on a windowsill or garden plot. But first, let's define the difference between a greenhouse and a greenhouse. This will help to understand why the first version of the structure can be installed in an apartment, and the second exclusively on a plot of land.
The main difference is not in size or shape, as many people think. The difference is in the creation of microclimate and biorhythms. In greenhouse conditions they are brought as close as possible to natural ones.
This helps the plant feel comfortable during the growing season and develop in accordance with the stages of growth. This is how strawberries are grown in winter, producing juicy fruits.
A greenhouse is necessary to create an exceptionally warm climate. In this case, oxygen saturation occurs during the day, and carbon dioxide saturation occurs at night. The only food for the plant is soil.
The soil is quickly depleted; regular feeding with useful microelements is required. Due to constant additions of heat, the crop grows intensively. But a greenhouse is useful not only for germinating seedlings. It will be useful for:
- create an optimal microclimate for heat-loving crops;
- obtain more than one harvest during the growing season;
- speed up the fruiting process;
- protect the crop when frost occurs on the soil;
- get an early harvest of greens, potatoes or other popular crops;
- warm up the beds in early spring.
But in order for all these points to be accessible, the gardener needs to carefully consider the type and shape of the structure and what material it will be made from. You can also buy or make your own greenhouse for seedlings.
From scrap materials
A good solution for arranging a personal plot would be small greenhouses that do not require any financial investment. And they will take up very little space on the site.
Plastic bottles
To build this mini-greenhouse you will need a simple bottle of 5 to 10 liters. Making a greenhouse out of it is simple:
- Cut a rectangular hole. There is no need to cut one side. This will be the door of the future greenhouse.
- Fill the bottle with nutritious soil.
- Plant seeds are planted.
- After pipping and rooting of the seeds, the greenhouse is opened.
Important!
Don't forget to make several holes in the side of the bottle that is parallel to the door. This is a drainage system to remove excess moisture.
Old tin barrel
From an old barrel that has not been used for a long time, you can make a mini-greenhouse. This process is simple and consists of several steps:
- Cut several holes from the sides of the barrel.
- A dense covering material, for example, double folded polyethylene film, is attached to the upper edge of the barrel.
- The holes should be located at a level at which it will be convenient for you to monitor the plants.
- Fill the barrel with soil and plant plants in it.
Window frames
A mini-greenhouse made of this material is installed once and should not be moved again. Old window frames are heavy and massive. To install them, you will need to build a foundation. Further, construction is carried out as follows:
- Window frames are cleaned of old paint and coated with a product to protect the wood from rot and insects.
- For the frame you will need a stand (1 piece) and a pair of straps.
- The floor is concreted.
- The roof is made of a gable type.
How to properly place plants in a greenhouse
The interior arrangement of the greenhouse comes down to the formation of beds, passages, installation of racks and shelves. It is advisable to map out the placement of plants and flowers in advance, which will facilitate a more harmonious layout on site.
Standard layouts of beds and plants are as follows:
- flower beds are made high;
- allocate parallel beds for flowers of the same type;
- Partitions are installed between different types;
- the construction of racks and shelves creates the possibility of placing plants on floors;
- tall plants are placed on the north side of the room, and low ones on the south;
- hanging plants are placed higher than human height;
- for climbing plants, it is advisable to stretch the wire or twine;
- The brackets for the flower pots are firmly attached to the frame.
Did you know? On 1 m² of greenhouse space you can plant two dozen daffodils, tulips, hyacinths or 100 daisies.
When starting to grow flowers year-round, you should prepare for constant care for them. Plants in a greenhouse require constant replanting, crop care, pruning and gartering, application of mineral fertilizers and fertilizing. It is necessary to monitor the microclimate in the room, ensure correct heat and light conditions, regular watering and spraying.
Flowers make us happy both on weekdays and on holidays. No celebration is complete without flowers. The right choice of greenhouse, construction and equipment of the greenhouse, and careful selection of varieties for growing flowers throughout the year will help turn an exciting hobby into a profitable business.
Materials for production
Construction of a mini-greenhouse is a process that is based on the use of improvised means. It can be created from anything. Mainly used:
- plastic;
- metal profiles;
- wooden bases;
- plastic film;
- polycarbonate sheets;
- glass.
If the design of your mini-greenhouse has an arched shape, then its construction requires the installation of a flexible frame. Common materials for such bases are plastic and metal profiles. Wood can be used, but it is highly susceptible to rotting. An indispensable, modern covering material is polycarbonate. It is also possible to use plastic film and glass.
Glass makes the structure heavier and therefore, first of all, you will need to take care of strengthening the frame or installing the foundation.
Professional gardeners use a certain covering material for certain models of mini-greenhouses:
- Polycarbonate sheets are suitable for the “Butterfly” and “Breadbox” models.
- Polyethylene - for those structures that will be located in an apartment, house, or on a balcony.
- Glass - for stationary greenhouses on a personal plot.
Main disadvantages
Like any design, a mini-greenhouse has not only positive aspects, but also negative ones. These include:
- do not tolerate strong winds well;
- the range of plant varieties grown is narrow, since the height of the greenhouse is small;
- It is difficult to replace the covering material if it is damaged, since the attachment to the frame is complex.
Greenhouse-breadbox
This type of greenhouse is so called because of its clear resemblance to a bread box. The double-leaf design allows you to care for the planted crop without any hassle. A greenhouse bread bin can be assembled from any material, but most often profile pipes are used as a frame.
Polycarbonate is used as a coating. In the greenhouse, as mentioned earlier, there are two doors, and they should open towards each other.
How to choose a design
Each garden, country house or other plot of land is unique. It may differ in the landscape features of the area, its size and, of course, the composition of the soil. In order to create ideal conditions for plant growth, you should carefully choose the design of a mini-greenhouse. To do this, you need to consider:
- individual characteristics of the land plot;
- what area will be allocated on the site for it;
- what lighting will be used;
- what volumes of seedlings or plants will be grown.
Taking into account all of the above, you can choose the desired type of mini-greenhouse for your plot and seedlings.
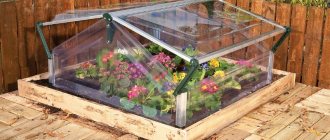
What flowers to choose for growing
It is impossible to unequivocally answer the question of which flowers are best to choose for growing. Each variety is unique in its own way, and demand in the flower market is constantly changing. Profit from the flower business depends on the season - summer demand for flowers is lower than in winter. It is necessary to distinguish between flowers that are grown for cutting into bouquets and growing flower seedlings.
Let's dwell on just some of the names of colors from the whole variety:
- Roses - flowers easily tolerate greenhouse cultivation, but they need good lighting and a sufficient amount of moisture. Roses should be planted at a distance of 30 cm from each other for good ventilation of the plantings. Propagated by cuttings.
- Tulips - the quality of flowers depends on the seed: the larger the bulb, the larger the flower.
- Lilies - the most commonly grown varieties in greenhouses are the tiger and royal varieties. Lilies require nutritious, well-moistened soil, and drainage is required. They reproduce by bulbs.
- Crocuses are corms of various colors that symbolize the onset of spring.
- Chrysanthemums delight with flowering until late autumn, and in a greenhouse, flowering increases up to three times a year.
- Daffodils - can be planted in late autumn after frost.
- Asters can be grown as either annual or perennial plants.
- Dahlias delight in their abundance of shapes and colors and look very attractive in any bouquet.
- Hyacinths - can be grown both for cutting and in pots for sale.
Important! Tulip bulbs must be cooled before planting, otherwise they will not germinate.
Nasturtiums, pansies, marigolds, petunia, and snapdragons are suitable for selling flower seedlings. The greenhouse complex allows you to grow indoor plants for further sale - palm trees, oleanders, ficus, potted flowers. It is advisable to buy seed material and seeds in specialized flower shops to avoid counterfeiting and not to make a mistake with the chosen variety. Seasonal flowers can be planted alternately and combined with other plants.
Installation of different types
Mini-greenhouses, depending on the type of supporting structures, can be built using several different methods. For greater clarity, let's start step-by-step construction recommendations with a mini-greenhouse that does not have a frame.
Such a greenhouse consists of beds covered with plastic film or other identical material. Sow the seeds and cover them on top with covering material, and press them along the edges with bricks and wooden slats.
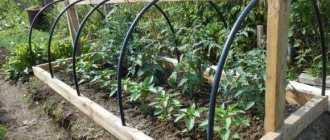
Arched mini-greenhouse, instructions
To build an arched greenhouse you will need to follow the following instructions:
- For construction, you need 5-6 arcs made of plastic or metal profile, plastic film, a couple of meters of wire and about 20 clamps.
- Arcs are made with your own hands or bought in a store.
- They are installed at a distance of 35–45 centimeters from each other.
- To strengthen the frame, wire is pulled between the arches.
- Cover the resulting structure with film. Then they attach it on one side with clamps.
- On the other side, the film is attached to a wooden batten. It is from this side that your greenhouse will open.
- The sides of the structure are also covered with pieces of polyethylene and pressed to the ground with a brick or wooden beam.
Portable polycarbonate, instructions
To build a portable greenhouse from polycarbonate leaves, a more labor-intensive, but no less interesting process. To do this you will need:
- wooden slats;
- self-tapping screws;
- awnings;
- lever.
Instructions that must be followed when building this mini-greenhouse:
- They make a base frame. It should resemble a box with a slanted top.
- A frame is assembled from slats. It is used to create a greenhouse roof.
- A piece of polycarbonate sheet is inserted into the frame.
- A support for the frame - the roof - is constructed from a wooden block.
- Attach a hook to the lid to secure the frame to the block.
These construction methods are very simple to install, but they provide seeds and seedlings with optimal climatic temperatures and humidity for germination and further growth.
How to make a greenhouse for seedlings with your own hands
In order to build a home greenhouse yourself, you need skills in creating simple drawings (make a sketch of the structure) and skills in working with carpentry tools (saw, hacksaw, screwdriver). The manufacturing process itself is very simple.
Materials and tools for making a greenhouse
Each greenhouse requires its own list of materials, but in general it looks like this:
Materials:
- wooden beams, boards;
- metal pipes;
- polyethylene film;
- polycarbonate;
- window frames;
- horizontal slats;
- bitumen mastic.
Tools:
- hammer;
- saw;
- construction stapler;
- shovel;
- hacksaw;
- screwdriver;
- nails;
- self-tapping screws;
- roulette;
- scotch;
- construction cutter
Video: How to make a greenhouse for seedlings with your own hands
Step-by-step manufacturing instructions
We will describe in detail the process of constructing an arc greenhouse made of polycarbonate, wood and glass, and window frames.
Polycarbonate structure
Let's look at the simplest design. The optimal width of the greenhouse is 145–150 cm, the length can be absolutely any. Let's assume it is 6 m.
Important! Polycarbonate has honeycombs, so it needs to be bent not along, but across their direction, so that the material does not crack.
We begin work on the construction of a greenhouse:
- Cut a polycarbonate sheet (6 × 2.1 m - standard dimensions) using a conventional construction cutter into 4 parts so that one has a length of 90 cm, and the rest - 170 cm.
- Place the finished polycarbonate parts aside and begin constructing the frame.
- For the frame, you need to take 20 m of wooden beams (50 mm) and make 2 guides 6.4 m long (6 m is the length of the greenhouse, and 20 cm on each side for easy transportation of the structure).
- From the remaining timber, cut 4 slats (stiffening ribs) with a length equal to the width of the structure.
- Attach polycarbonate (sheets 170 cm long) to the frame guides using self-tapping screws and a screwdriver, with the reflective side facing out. Screw in the screws at intervals of 10–15 cm. Lay the sheets overlapping.
- Seal the joints of the sheets with tape to prevent moisture from evaporating from the future structure.
- Attach two stiffening ribs at the ends using self-tapping screws in the places where the polycarbonate ends. Place the remaining 2 ribs at intervals of 150 cm from the sides.
- Cut out the end parts from a sheet 90 cm long. They are also attached using self-tapping screws to the beam, and using tape - in other parts.
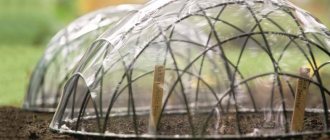
Arc greenhouse made of film
This type of design is the simplest for a summer residence. To build it, you will need metal arcs with sharp ends and film. It is optimal to take 10 arcs. The finished arcs must be installed in a row on the selected bed with an interval of 100–180 cm. Above the ground, the arc should rise 120 cm and have a width of 150 cm. Stretch the film on top and fix it at the base using available materials (stones). This is the simplest construction option.
There is a more complex and, accordingly, more reliable type of arc greenhouse. The arcs here are made of fiberglass reinforcement.
Step-by-step instruction:
- From wooden blocks of any thickness, assemble a structure base measuring 3x1.5 m. Connect the bars with bolts for greater rigidity.
- On the side edges of the frame, drill holes with a diameter of 6–8 mm at intervals of 50 cm.
- Insert fiberglass reinforcement with a diameter of 6 mm into the holes. 7 rods are used for the specified dimensions of the greenhouse.
- Stretch a film over the reinforcement and attach it to the beams using a construction stapler. The beams must be wrapped in film to insulate them from moisture. The film needs to be stretched from the ends as well.
A simple greenhouse made from windows
The dimensions of this structure will depend on how many window frames you have and what size they are (width and height).
Important! In order to have free access to the plants in such a greenhouse, it is advisable to make one of the frames open. To do this, you need to attach it to the hinges.
- Cut boards and beams taking into account the dimensions of the window frames. Treat the wooden parts of the product with bitumen mastic.
- Lay out the perimeter of the structure in the garden bed with bricks.
- Place timber on top. Attach boards vertically to it from the inside using self-tapping screws. The interval between them is slightly less than the width of the frames.
- On the outside of the boards, fix more boards vertically so that their edges coincide.
- Attach the roof rafters to the ends of these boards in a “house”.
- Secure the window frames to the wooden frame using self-tapping screws.
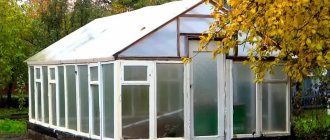
Wooden greenhouse with glass
This design option is stationary.
To build it you need:
- Assemble a rectangular box from boards or beams of the desired size. Its front wall should be slightly lower than the back - so that the roof has a slope of 45°.
- The wooden frame is dug into the ground.
- The roof is made from a window frame.