The greenhouse is small in size and most often mobile. As a rule, it is used only from mid-spring to autumn; mainly seedlings and seedlings are grown in it. A greenhouse is a different structure. It is larger in size and is installed for a long time. You can grow plants in it all year round, because heating and lighting are sometimes provided inside. In a greenhouse, a crop can go through its entire development cycle (from sowing seeds to fruiting). Both designs are not cheap in specialized stores. However, you don’t have to spend money on them; you can make them yourself. A well-built greenhouse or greenhouse made from window frames with your own hands is not inferior in characteristics to purchased ones. The material for construction will be quite cheap.
Types of greenhouses and greenhouses made of window frames
There are different design options.
Single-pitch
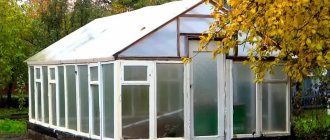
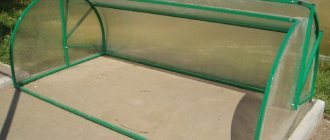
In the case of a greenhouse, this is an attached structure, i.e. one of its walls is adjacent to another building (barn or house). Thanks to this, it is possible to save space in the garden. However, this type also has a significant drawback - lighting is only on one side. Because of this, the plants will be in the shade for most of the day. This will not be a problem if you grow shade-loving crops in such a structure. As for the greenhouse, it is often made with a single slope; its small size allows it to be built separately.
Single-pitched greenhouses:
Construction of a wall-mounted greenhouse from window frames:
Gable
This is a classic option; greenhouses of this type have a house design with a ridge on the roof. And the greenhouses of a small house. Greenhouses are quite easy to install and convenient to operate, but they have a significant drawback - they are stationary. A greenhouse of this type is quite simple to make.
Gable greenhouse and possible design option:
Gable greenhouse:
Polygonal
Only greenhouses are built of this type. These are structures with six or more sides. Typically, such a structure is used for greenhouses and gazebos, which are always warm. Making one yourself will be quite difficult.
Polygonal greenhouse option:
Design Features
Double-glazed windows have gained their popularity among gardening enthusiasts due to their high performance characteristics. This building structure consists of several sheets of glass installed in a metal-plastic frame. Between them there is an air layer, a moisture absorber, so that the surfaces do not fog up or freeze from the inside.
There are several types of double-glazed windows:
- Single-chamber, having 2 glasses.
- Two-chamber, consisting of three glass surfaces, between which there are air gaps. They are great for building a greenhouse where plants are grown throughout the year. They have good heat retention properties, but the structure itself is heavy.
- Three-chamber, which have 4 glasses and 3 air layers.
- Five-chamber ones - they are not very profitable to use for creating a greenhouse due to their high cost and weight.
To build a greenhouse from plastic windows with your own hands, it is not necessary to order new double-glazed windows; used ones are quite suitable for these purposes. In terms of working qualities, they are in no way inferior to them.
A greenhouse can be made from double-glazed windows in almost any configuration; in the standard version it has a rectangular design with a gable roof. If you attach a greenhouse to the wall of a building or outbuilding, then it can be a lean-to one. Double-glazed windows are also used for it, but an option from polycarbonate sheets and other suitable materials is possible.
Advice! In order for the greenhouse to be as reliable and functional as possible, it is worth using double-glazed windows for both the construction of walls and the roof.
A greenhouse made of double-glazed windows allows you not only to effectively grow crops on your personal plot, but also to decorate it
When choosing double-glazed windows for the manufacture of a greenhouse complex, one should proceed from the tasks that this structure must perform. If you plan to grow crops not only in summer, but also in winter, then it is better to give preference to two- or three-chamber windows. If the greenhouse is needed only for summer use, then single-chamber double-glazed windows will be sufficient. But here it is advisable to carry out planting work in stable warm weather.
When planning a greenhouse, it is recommended to take into account its height; it can be anything. The tall one is made for cultivating tall plants. Particular attention should be paid to the presence of vents; if there is stagnation of air in the greenhouse, there is no air circulation, then the crops grown will be in a depressed state and are often exposed to pathogenic microorganisms.
Calculation and drawings of greenhouses and greenhouses made from window frames
It is necessary to count the number of frames and measure their dimensions. It is desirable that they be the same, then they will not have to be aligned in height. Only after this is it recommended to start drawing up a design diagram. You can come up with it yourself and make a drawing on paper or take a ready-made one, for example, one of the following options.
Drawing of a gable greenhouse:
Based on the exact dimensions of the frames, make adjustments. For example, if it is necessary to increase the height, it is recommended to place the windows in a horizontal position at the top.
An example of a lean-to greenhouse diagram:
At this stage, you need to decide on the type of foundation. If you plan to use the structure for a long time, it is better to opt for a strip one. If the greenhouse will stand for several years, you can use timber insulated with roofing material or treated with an antiseptic. For a greenhouse, you don’t have to make a foundation at all. Below we will provide step-by-step instructions for building different types of greenhouse foundations using window frames.
You need to think about the roof in advance. It can be single-pitch, gable, as we have already said in the types of structures. There are also greenhouses with a flat roof, but for most regions of Russia this is not the best option, because... Snow will accumulate on it, under the weight of which the roof may simply not withstand.
It is not recommended to construct a roof from window frames. In winter, they may not be able to withstand the weight of snow. It is better to use polycarbonate or boards.
Before installing the roof, you also need to draw up a detailed drawing of it and think about reliable fasteners.
Two drawings of greenhouses made from window frames:
Drawing of a recessed and lean-to greenhouse made from window frames:
Advantages and disadvantages
A few words about the positive and negative aspects of using plastic windows as a material for making a greenhouse.
Large double-glazed greenhouse from
The advantages of this design:
- beautiful appearance;
- excellent thermal insulation;
- resistance to wind and snow loads;
- ability to retain moisture in the required amount;
- simple and easy repairs;
- excellent resistance to various physical activities, including impacts;
- durability;
- ease of care;
- environmental friendliness;
- fire resistance;
- possibility of arranging a winter garden;
- fungi and plant pathogens will not be able to live on plastic.
A double-glazed greenhouse has more advantages than disadvantages
Disadvantages of a double-glazed greenhouse:
- very high cost;
- impossibility of installation without a foundation;
- heavy weight of the structure;
- difficulty in moving the greenhouse from one site to another.
Be that as it may, the main disadvantage of building a greenhouse from double-glazed windows is the high cost of the material. Not every summer resident can afford to spend so much money on a greenhouse alone. At the same time, you should order plastic windows only from trusted manufacturers who supply quality products. And, of course, their goods will be more expensive. But when purchasing cheap plastic, remember a simple truth: the stingy pays twice.
Plastic window
Prices for double glazed windows
double glazed windows
How to choose windows and prepare them
In order for wooden frames to last a long time, you need to carefully choose them. If they have darkened, their paint is peeling, this indicates decay. It is not advisable to use such windows. If the defects are minor, the frames can be used in construction, but will not last long. The presence of damage must be taken into account at the drawing stage.
It is advisable that the damaged part is located at the top, under the roof itself. Thanks to this, less moisture will enter this area, and a DIY greenhouse made from old window frames will last longer.
Preparatory work:
- remove unnecessary fittings;
- clean the paint;
- treat the surface with an antiseptic to prevent rotting and insect activity;
- remove the glass so that it does not break if a hammer and nails are used during installation;
- seal the windows with tape so that they do not open and interfere with assembly;
- hammer in unnecessary sashes.
Important! Frames should not be too old, because glass has its own service life. Once it has expired, it may crack due to subsidence or even strong winds.
Construction stages
Before starting construction work, it is necessary to consider the optimal location of the window frames so that during installation the greenhouse will be level and symmetrical. It is advisable to use frames of the same height, because this will simplify the preparatory work (there will be no need to adjust the dimensions).
DIY greenhouse from old windows
Next you need to calculate the width of the greenhouse. To do this, you need to draw up a drawing of the future structure. When creating a drawing, do not forget to take into account the number of beds and their location. The standard width of beds in greenhouses is 100 centimeters, and the width of the passage is 50. The width between the beds should be selected so that a person can easily move between them with a small wheelbarrow.
Video - The simplest greenhouse made from window frames
Construction of the foundation
This process begins not with digging a pit, but with finding a suitable location.
When choosing a location for the foundation, you must adhere to the following requirements:
- protection from strong winds;
- good lighting of the area;
- no shading due to tall trees or buildings;
- location (it is desirable that the greenhouse be located from north to south).
Important! Soil also plays an important role when choosing a location. Wet or swampy soil will lead to subsidence of the building, so dense and dry soil is necessary for construction.
Concrete and brick foundation for a greenhouse
It’s great if there is a sand layer under the earthen layer. If it is missing, you can make a pillow for the foundation yourself. To do this, it is necessary to evenly cover the clay soil with a layer of gravel. After this, apply a layer of sand on top - no more than 20 centimeters. Before construction, it would be a good idea to check the location of groundwater. If they are located at a depth of one and a half meters or less, find another place to build the greenhouse.
Step-by-step construction of a strip foundation
Step 1. Dig a shallow trench according to the drawing. Its depth should be about 40 centimeters.
Foundation trench
Step 2. Make the formwork. To do this, you need to place the boards along the edges of the dug trench, securing them with wooden pegs. You can also secure it using conventional electrodes bent in two. It is advisable to cover the boards with film so that they do not stick to the cement.
Wooden formwork
Step 3. If possible, lay reinforcement along all dug channels. If there is no suitable wire, place large stones at the bottom of the trench.
Laying an armored belt in the formwork of a strip foundation for a greenhouse
Step 4. Fill the trenches with the prepared cement mortar, adding a little crushed stone to it. Make sure there are no voids in the foundation. The cement grade M-200 or M-300 is suitable for the solution.
Pouring the foundation
Prices for sand concrete M-300
cement m300
Important! It will take you approximately 14-20 days to build a foundation for a greenhouse, so you need to calculate the time frame before starting work.
Step 5. After the cement has hardened, you can remove the formwork. Then, using roofing felt, perform waterproofing.
Step 6. If small cavities have formed along the edges, they need to be filled with wet sand and compacted well.
Tamper - tool
Homemade wooden tamper
Construction of the foundation has been completed. Now all that remains is to wait two weeks until it dries completely.
Point version of the foundation. Metal pipes are placed in the ground, and beams are driven into them to secure the beam
The lower crown is made of timber, assembled on a point foundation
Preparation of building material
Completing the preparatory work will strengthen the frame of the future greenhouse and facilitate further construction. It is likely that in the process of preparing the material you will have to remove some parts of the frames if they are broken or rotten.
Preparing old wooden windows
To give unattractive window frames a “fresh” look, you need to:
- get rid of handles and hinges that you don’t need;
- remove old layers of paint; to do this, use a grinder or a regular scraper;
- treat the structure with an antiseptic (this will protect the wood from rot, mold or small pests);
- remove all glass for safety;
- fix the windows with tape or self-tapping screws.
It is necessary to prepare the window frames taking into account the fact that the height of the walls of the planned greenhouse will reach 1.7 meters.
Flooring
Before laying the floor, it is necessary to resolve the drainage issue. Otherwise, there is a risk of water accumulating in the structure, which can lead to rot. To perform drainage, you need to dig a trench no more than 15 centimeters deep, then fill it with crushed stone or gravel. A dense layer of sand is applied on top of the gravel.
Forming beds in a greenhouse
We arrange the beds
Careful and competent design of the interior space of the greenhouse will improve its appearance. When creating passages, it is advisable to fence them off with low plastic borders. This will prevent the fertile layer of soil from getting onto the path.
To decorate the floor of greenhouse paths, in addition to concrete, the following materials are used:
- sawdust;
- wooden boards;
- porcelain stoneware;
- brick.
This variety will allow you to design the inside of the greenhouse to suit every taste.
Sawdust paths
Porcelain stoneware paths in a greenhouse
Path made of boards
Let's consider each material separately.
Table. Materials for design of greenhouse paths.
| Material | Advantages | Flaws |
| Sawdust | Excellent moisture absorption. Pleasant to the touch. Sawdust is a very cheap material. | It is difficult to move large items along sawdust paths. The material quickly spreads throughout the greenhouse. Needs regular cleaning. |
| Porcelain tiles | A wide variety of shapes and shades, easy care. | Installation takes a lot of time. The material is quite fragile. High price. |
| Boards | The material can last for a long time. Easy to install. | Additional treatment with antiseptic agents and varnish is required. The material is large, so when working with it additional difficulties arise. |
| Bricks | The material is very strong and durable. Beautiful appearance of the finished path. Easy to install. | The bricks are quite heavy, so a special vehicle is needed for transportation. High cost compared to sawdust or timber. Only solid bricks will do; broken pieces will ruin the appearance of the greenhouse path. |
What exactly to use as the main material for laying the floor is up to you. After selection, the material is laid on a pre-prepared bed consisting of sand and gravel.
Construction of the frame
It is recommended to use boards for this purpose. This is an excellent material with a huge number of advantages. The thickness of the boards used should not exceed 5 centimeters. The harness is built from them (its upper and lower parts).
Making the base
When creating the lower perimeter of the structure, it is advisable to lay two rows of boards - this will increase the height of the future greenhouse.
Greenhouse frame made from window frames
For vertical posts you also need to use 5 cm boards. Window frames located vertically to the ground are attached to them. Self-tapping screws are used for fixation. Polyurethane foam is suitable for treating gaps formed at the joints of structural elements. For reliability, you can strengthen the window frames from the inside using additionally installed support beams (their thickness can be less than 5 cm).
Racks
To make the structure more stable, you need to make vertical supports. They are fixed in cement mortar and attached to the posts using nails or self-tapping screws.
Vertical posts attached to the base
All holes and cracks formed during work must be treated with polyurethane foam. Pay special attention to this, since there should be no draft in the finished greenhouse. The only entrance for the outside wind is the vents that you left for ventilation.
Finished wooden frame
Upper harness
Floors
Fastening old window frames
Erection of the roof
Initially, you need to decide what type of roof you prefer - gable or single-pitch. It is worth noting that to erect a gable roof you will need much more prepared parts.
Construction of a gable roof
Options for connecting rafter legs in a greenhouse
The roof is covered with plastic film
Prices for polyethylene film
polyethylene film
This type is considered the most suitable for all types of structures. Moreover, the material for the roof does not play a big role. Installation of a gable roof is quite simple: nail the frame blanks and cover them on top with a plastic or wooden ridge. At the same time, watch for the appearance of cracks. They will provoke the formation of an unhealthy microclimate inside the constructed greenhouse, so they all need to be sealed. The coating material used is polycarbonate or greenhouse film. Glass is the leader in quality and properties, but it is very expensive. In addition, during installation you can easily break everything.
DIY greenhouse from old frames and wooden frames
Another option for arranging the roof (Mittleider greenhouse)
The complete process of building a greenhouse using wooden windows
If you do not have enough material to build a roof, you can choose a lean-to type. The procedure is practically no different from the previous one, with the exception of one thing - the roof will not rise in the center, but only on one side.
The construction of a greenhouse does not require large investments; for this you just need to approach the matter wisely. And you will definitely succeed!
Greenhouse made of window frames and polycarbonate
Below is another option for building a greenhouse from old wooden windows.
Building a greenhouse from old windows. Part 1
Building a greenhouse from old windows. Part 2
Do-it-yourself greenhouse made of PVC pipes
In this article you will find detailed step-by-step instructions for building a greenhouse from PVC pipes! In addition, we recommend reading the material about the dimensions of a polycarbonate greenhouse (with drawings).
Preparation of building material for the greenhouse frame and greenhouse from window frames
The calculation of the material is made on the basis of the drawn up drawing. Standard frames have dimensions of 1.2 * 0.9 m. Then the length of the structure will be 90 cm, height 120 cm + base and top. The optimal width is 2.7 m, that is, 3 frames. Then the beds will be 1 m wide, and the distance between them will be 0.4-0.6 m.
In addition to windows, the production will require:
- door;
- beams for the frame;
- base material;
- anchors, screws;
- bars;
- roof.
You need to think about all this in advance so that you don’t have to go to the store while working.
DIY foundation for a greenhouse made from window frames, if needed + photo
If the greenhouse will be used only in the summer, then the most economical option is a foundation made of beams. It must be clean and dry, without signs of rotting or insect damage. The cross-section of the beams depends on the size of the greenhouse (the larger, the larger it should be). The best option is larch material treated with an antiseptic. If it is not treated in advance, then you need to do it yourself, otherwise the foundation will rot and insects will infest it.
How to build a foundation step by step:
| Illustration | Process |
| Make markings so that each angle is 90 degrees. Remove the top layer of soil. Dig a trench around the perimeter. For timber 10*10 cm, a depth of 15 cm is sufficient. In this case, the width of the trench should be 7-8 cm greater than the thickness of the timber. | |
| Place roofing material on the bottom. | |
| Place the beams on top. | |
| Fasten with corners. | |
| Level the foundation to the spirit level. Minor deviations can be corrected by adding gravel or sand |
A strip foundation is more reliable, but its construction will also be a little more complex. Step-by-step instruction:
| Illustration | Instructions |
| Make a marking and dig a trench along it 30-50 cm deep and 15-20 cm wide. If the greenhouse will be used in winter, then you need to dig deeper, just below the soil freezing level. | |
| Make formwork from boards. Strengthen if necessary. Lay the film so that the cement does not stick to the boards. | |
| Make a belt from reinforcement. If there is no metal, then pour 20 cm of sand or at least 5-10 cm of gravel onto the bottom and compact it. | |
| Pour the concrete in one go to avoid uneven hardening. Wait about 20 days until completely hardened. Then remove the formwork. |
If the structure is light in weight and used only in the summer, you can build a columnar foundation:
| Illustration | Process |
| Make markings, place pillars (piles) in the corners and along the perimeter at a distance of 0.7-0.9 m. Make a trench about a meter deep between the pillars. | |
| Lay roofing material at the bottom, which will become formwork and waterproofing. | |
| Make a frame of 2-3 reinforcements. | |
| Pour concrete. |
Above were only the simplest methods for installing a foundation; there are other options.
Frame preparation
First, you should check the frames and remove rotten or damaged parts. To prepare structures for installation, you need:
- remove excess handles and hinges that will not be used later;
- remove the peeled paint - the main part using a scraper or an ordinary knife, the remaining part - with a grinding machine;
- treat the wood with an antiseptic to prevent rotting, fungal infection, and protect against insects;
- For additional protection, the frame can be painted;
- remove the glass from the frames so as not to break it during installation;
- Fix the windows so that they do not interfere (adhesive tape, self-tapping screws, nails will do).
After that, all that remains is to adjust the frames in height - it depends on the height of the future greenhouse.
Step-by-step instructions for constructing a greenhouse from window frames on a foundation with photos
Detailed step-by-step instructions for erecting the main part of the greenhouse:
| Illustration | Process |
| Cover the foundation and base with roofing felt sheets for waterproofing. | |
| Mount beams for the bottom trim on top of the anchors. Connect with corners. | |
| Make markings for vertical supports. | |
| Install the corner posts, checking their level. Install intermediate supports. | |
| Using bars, make a temporary fixation so that the supports do not warp. They can be removed only after completing the entire installation. Build a harness on top. It will prevent the racks from tilting. | |
| Attach the frames to the frame using self-tapping or ordinary screws. This will prevent damage to the glass that may occur when using nails. Seal all cracks with foam. | |
| Build a roof. | |
| Install doors and caulk gables. You can use film or polycarbonate on the roof. |
Note! If the structure is long, intermediate posts will be necessary to ensure the structure is secure.
Installation and Installation
Installation of a double-glazed greenhouse begins with the foundation, which in our case is already ready. After 3 (or better 4) weeks, when the concrete has hardened, begin creating a frame, which consists of three types of parts - upper/lower frames and racks.
Construction of a double-glazed greenhouse
Step 1. Saw off pieces of wood equal to the sides of the greenhouse (according to the drawing).
Wooden blocks 50*50 mm
Step 2. Place the pieces of timber on the previously made foundation, having previously laid waterproofing (for example, roofing felt). Check with a level and a cord how correctly and evenly the timber lies.
Step 3. Connect the structure at the corners with self-tapping screws and metal corners.
The strapping is connected at the corners with self-tapping screws and metal corners
Advice! You should not use nails to connect frame parts, as they can cause cracks to form in the wood over time.
Step 4. Cut out the racks from the bars between which you will install double-glazed windows. The frame posts are fastened using the “half-wood” technology; for reliability, they can be fixed with a metal corner. In addition to the corner, the racks are fixed with bevels.
Step 5. Install double-glazed windows in parallel with installing wooden racks on the bottom frame.
Double-glazed windows must be installed parallel to the racks
Greenhouse glazing
Step 6. Sheathe the bottom frame with boards to close excess gaps and make the frame even stronger and more stable.
Step 7. At the top of the frame, make the top trim, fastening the parts with corners and self-tapping screws.
Example of installation of the top trim
Step 8. After the frame and double-glazed walls have been assembled, fill all the cracks with polyurethane foam for better thermal insulation and fixation of structural parts.
All cracks must be filled with foam
Greenhouse glazing photo
Step 9. Proceed with roof installation. According to the drawing, make the roof frame from timber. Assemble the ridge on the ground and install it separately.
Example of a finished wooden roof frame
On a note! The more often the cross beams are located, the easier the roof will bear snow loads in winter.
Options for roofs with layered and hanging rafters
Step 10. The easiest way is to cover the roof with polycarbonate. Cut the sheet into the required pieces and attach them to the roof frame with self-tapping screws and thermal washers.
What fasteners are needed to cover a greenhouse with polycarbonate?
Step 11. Cover the joint of the polycarbonate sheets on the roof (if it is gable) with a corner.
Step 12. Finished doors and windows are installed after installing the main parts of the greenhouse. However, provide for their presence (doors and windows) at the design stage. Remember that plants need fresh air just as much as water.
Glass greenhouse
Creating a glass greenhouse begins with choosing its design. There are several options that vary in complexity and have certain features. Read more here.
In a similar way, you can make a greenhouse based on a metal profile. You just need a welding machine and welding skills.
Prices for timber
timber
Do-it-yourself greenhouse from window frames: step-by-step instructions with photos
If there is not much space, then the structure can be made in a mini format; such a greenhouse can even fit on a balcony. The walls of the structure will be made of wooden planks, and the roof will be made of window frames. During the day it can be opened for ventilation. The width of the frame must correspond to the size of the greenhouse. It is more convenient if it has the shape of a rectangle.
If the greenhouse is installed in an open area, then installation proceeds as follows:
| Photo | Manufacturing |
| Make markings and dig wooden blocks in the corners. Make shields from boards. | |
| Attach the top layer to the lower shields, which should be higher on one side of the structure and lower on the other. Thanks to this, the roof will have a slope and moisture will not linger on it. Secure the panels to the supports with nails. | |
| Position the frames at a 90 degree angle to the high side. Secure the windows to it with hinges. | |
| Attach a rail between the windows so that there is no hole between the frames and one frame rests on this rail.. | |
| Mount handles on the roof to make it convenient to open and close. | |
| Install clamps on the short side. Build a small plank that will serve as a support for the open frames. |
This completes the construction of the mini-greenhouse. The work usually takes a maximum of 2-3 hours.
What is double glazing
A double-glazed window, which is popularly called a plastic window, is a building structure made of several sheets of glass and a metal-plastic frame. The glasses are located close to each other, and all the free space between them is filled with dry air. It turns out to be a kind of “package”, hence the name.
Important! A double-glazed window retains heat no worse than brick.
Double-glazed windows are used for various purposes, as they are durable, not afraid of frost, do not allow noise or drafts to pass through, and are completely sealed. They produce several types of windows:
- single-chamber;
- two-chamber;
- three-chamber.
The greater the number of glasses in the package, the better the quality of the window. Two-chamber and three-chamber structures are used to create winter greenhouses. The thermal insulation properties of such double-glazed windows are much higher than conventional ones.
Do-it-yourself in-depth greenhouse from window frames: step-by-step instructions with photos
This type of greenhouse is perfect for those who live in regions with cold climates. It has natural heating + it can be additionally insulated with straw from the outside. Early seedlings are often grown in such a greenhouse. Here's what you'll need for construction:
- straw as insulation;
- wooden boards for the frame;
- old window frames;
- manure or droppings for natural heating.
Approximate diagram of an in-depth greenhouse:
| Illustration | Description |
| If the top layer of snow has already melted, it’s time to start building a deep greenhouse. Mark with pegs and dig a trench 60 m deep and 100 cm wide. The length can be any, at your discretion. By the way, if the soil is too loose, it must be additionally strengthened with boards. | |
| The next step is to lay manure mixed with straw or rotted sawdust (1:2) 30 cm thick. This should be done 2-3 weeks before planting. Sprinkle 20 cm of fertile soil on top and cover it with a small layer of straw to protect against weeds. | |
| Build a box and insulate it with bales of straw. Having made a frame from boards for the roof, place it at an angle, placing one side on the straw and the other resting on the ground, you will get a lean-to in-depth greenhouse. | |
| Attach the window frames to the frame of the recessed greenhouse. | |
| After all the work you need to warm up the greenhouse. To do this, pour hot water over it and close the structure tightly. It makes sense to cover the top of the window frames with film while warming up. Afterwards you need to leave the greenhouse for 2-3 weeks, as we already wrote above. |
Forming beds
This is best done before installing the frames. The first layer (the so-called biofuel), approximately 2/3 of the height of the foundation, consists of cuttings of branches, mowed grass, and manure. The mass is compacted and watered generously.
On top is prepared soil. The soil extracted while digging a trench for the foundation is used. If you first sift the soil and remove the roots of the weeds, then later you will have to weed the beds much less often.
Heavy soil can be mixed with sand and peat. Proportions are selected depending on what crop is planned to be grown in the greenhouse.
Also read: Flower beds and flower beds with your own hands at the dacha that bloom all summer
The level of the beds should be 15 cm below the base. The remaining soil can be collected in bags and used for filling after subsidence.
How to make a mini-greenhouse from window frames with your own hands
Of course, such a greenhouse will not fit on a windowsill, but it can be placed on the site and it will not take up much space.
Step-by-step assembly instructions:
- From the windows, form a square frame with outer parts 2 by 4. You should get a box, closed on all sides, incl. below. Leave the top open.
- Nail the legs to the corners like a table.
- Strengthen the structure with horizontal bars, sawn at an angle of 45 degrees. Place them around the perimeter of the greenhouse.
- Cover the top of the box with wooden boards or polypropylene.
- For attractiveness, you can build a gable roof from frames.
Fertile soil is poured inside such a mini-greenhouse and plants are planted in it. This structure is more of a decorative nature and it is recommended to place several specimens of flowers (even indoor ones) in it, rather than vegetables.
Tips for interior design and decoration
The success of a mini-greenhouse farm will depend both on the quality of the structure itself and on its internal contents. A properly equipped greenhouse will make it possible to work easily and comfortably, while maintaining a positive mood. And this, as you know, is half the success in any business.
One of the most important stages in the construction of a greenhouse is the construction of beds. If the site is located on fertile soil and is not subject to flooding, then it is enough to install fences and pour a mixture of humus, peat and chernozem inside. If there is a danger of flooding, as well as in places with high groundwater levels, paths and beds are made only after drainage has been installed on the floor.
Arranging beds in a greenhouse
For these purposes, soil is removed to a depth of 20 cm, after which the floor is covered with a 10-centimeter layer of fine crushed stone or granite screenings. The remaining space is filled with sand and compacted thoroughly. After this, the beds are formed by installing a border strip or strips of flat slate along their perimeter, creating frames from boards or making brickwork. The internal space is filled with a fertile mixture. Its thickness must be sufficient for growing selected garden crops, so this parameter is not standardized. For some, a layer of 20–30 cm is enough, while others prefer not to bend over, creating so-called raised beds up to 70–90 cm high.
The paths inside the greenhouse can be covered with crushed stone or sawdust - this will effectively remove moisture. The disadvantage of such a coating is that it creates difficulties when moving greenhouse equipment and complicates cleaning. It is best to spend a little money and lay out the paths with paving slabs, concrete or make a boardwalk. In the latter case, oak logs and hardwood boards are used. Before laying, the supporting elements of the structure must be tarred, and the platform itself must be treated with an antiseptic and coated with oil paint.
In a properly equipped greenhouse, work is a pleasure
To ensure that the greenhouse is not only a functional unit, but also has a finished appearance, all wooden parts should be painted inside and out. This will not only make the structure more attractive, but will also make it more durable.
Do-it-yourself mini-greenhouse on the windowsill from photo frames
If you want to make a small greenhouse for growing seedlings on a windowsill, it is best to use photo frames for this rather than large window frames. They are very inexpensive, and the finished greenhouse will be not only functional, but also very beautiful.
| Illustration | Process |
| It is best to use wooden frames. You will need:
Before use, they must be polished to remove paint. |
| First of all, the frame is assembled. The 28 x 35 frame is combined with the 20 x 25 cm frame so that their 28 and 25 cm sides touch, the back side of the 25 cm frame must be pressed against the outside of the 28 cm frame. |
| Source: www.countryliving.com | You need to connect the frames by drilling a small diameter hole through the inside of the larger frame and going through to the middle of the smaller one. Then fasten the frames using a screw that matches the diameter of the drilled hole. |
| Continue connecting frames until you have a rectangle formed by the four largest frames (two 28 x 35 cm frames and two 20 x 25 cm frames). | |
| Source: www.countryliving.com | The next step is to assemble the roof. You need to connect four small frames with dimensions of 13 x 18 cm. Connect them in pairs and fasten them together, making a triangular roof. Attach a hinge so that you can open the greenhouse and water the plants. Place two 13 x 18 cm frames side by side so that their short sides touch. Connect them using 5 cm strip steel plates, screwing it to both parts. To make your task easier, you can drill a pilot hole. Repeat for other 13 x 18 cm frames. Connect the structure of small frames, placing them at a 90° angle along the long boards and secure it with corner brackets. |
| Source: www.countryliving.com | The next step is to attach the roof to the main structure using inch hinges, placing them on the connecting boards at equal intervals. |
| Afterwards you need to seal the triangular hole in the roof; you can use a piece of plywood. It can simply be nailed to the frame with small nails or screwed with screws. |
| Paint the finished frame with wood paint before installing the glass. |
| Insert glass. The greenhouse is ready! |
Nuances of the greenhouse installation process:
- To fasten a double-glazed window with a frame, they rely on special elements or locks;
- Due to the high strength of double-glazed windows, they can withstand atmospheric pressure and exposure to precipitation. Therefore, you should not add stiffeners;
- The glass unit should be carefully secured. Fastening elements should not touch the glass, as it can crack under high mechanical pressure, which is especially dangerous in winter;
- The fastening seams are treated with sealant.