Building a greenhouse with your own hands is a completely feasible task that even people with minimal construction skills can cope with. However, in order for the structure to be technologically correct and symmetrical, it is necessary to carry out some calculations even before the start of its construction.
Calculating the amount of material needed and calculating the size of a future building is a rather complex process that requires extreme care. The reliability of the building and its ease of use will depend on this. In this article we will look at the basic calculations that must be carried out before building arched and domed greenhouses from various materials.
- Dome
Advantages and disadvantages of the design
The advantages of the “arch” are obvious and undeniable:
- its installation will cost less and take less time than installing a “house” type greenhouse;
- good lighting . An order of magnitude higher than, for example, pitched greenhouses;
- stability and reliability . If the structure is correctly secured to the foundation, neither strong winds nor heavy rainfall will damage its integrity;
- if necessary, the greenhouse can always be extended by adding the missing sections;
- Both polycarbonate and film can be used as a covering material . The installation process of the latter takes a minimum of time;
- This leads to another advantage - the minimum number of seams ;
- the ability to independently assemble the frame according to preliminary sketches or drawings;
- easily moved to another piece of land if necessary.
Of course, this design also has disadvantages And it’s better to know about them in advance:
- limited choice of covering materials . As mentioned above, these are polycarbonate and film. Theoretically, glass can also be used. But it will be difficult to install it technologically, hence another disadvantage - higher installation costs;
- in an arched greenhouse, the angle of inclination of the walls may vary slightly in relation to the sun's rays. And when light is reflected from the surface on clear days, plants do not receive the heat they need to grow , as well as the energy.
Important little things
- If you take a thick SPC (thicker than 4 mm), you need to find out its bending radius, since thick plastics bend worse.
- If the greenhouse is straight-walled, a house or a lean-to, do not forget about the projections above the walls (eaves).
- If there is an arch, do not forget about the straight section of the wall.
- And it’s always better to have a backup sheet in stock.
We looked at calculating how many polycarbonate sheets are needed for a 3x6 and 3x4 arched greenhouse, as well as the data that will be needed to calculate the need for polycarbonate for greenhouses and greenhouses of other sizes and shapes.
What frame can I use?
Frames for arched greenhouses can be classified according to the type of material used , namely:
- aluminum _ They are characterized by a long service life and ease of maintenance, since they do not rot or rust. No additional coloring is needed;
- wooden _ Recently, they have been used less and less, since the material itself needs to be further processed before use, in particular - impregnated with special compounds against fungi, rotting, etc. If you make racks from wood with your own hands, they need to be covered with waterproofing material before burying, in otherwise, the structure (arched greenhouse) will quickly become unusable and simply fall apart;
- from PVC . Just like the aluminum frame, it is not susceptible to rotting processes, the negative effects of acids, chemicals, as well as other alkalis and fertilizers. Plus, it has an attractive, aesthetic appearance;
- other metal frames.
The latter can be classified into the following groups:
- frames made of profile pipes . An arched greenhouse made from a profile pipe, built with your own hands, is reliable (withstands large amounts of precipitation in the form of fallen snow, rain), is assembled quickly, and does not require special care;
Note! If you are building arched greenhouses and using a non-all-welded frame made of profile pipe, the maximum load on it will be significantly less - up to 40 kg/m. sq. snow.
- from a hat profile . Durable, strong, and resistant to corrosion. Convenient to transport: polycarbonate sheets 2.1 m long are easily rolled into a roll. But such a frame may not withstand heavy rainfall;
- from the corner . Very durable, withstands snow pressure up to 100 kg/m2. The only drawback can be considered the high cost.
How much does a 20 by 20 profile pipe cost?
Prices for profile square pipe 20x20
| Name | Unit change ? | Price? |
| Pipe 20x20x1.2 | t kg m | 78 RUR/m |
| Pipe 20x20x1.35 | t kg m | 90 rub./m |
| Pipe 20x20x1.5 | t kg m | 98 RUR/m |
| Pipe 20x20x1.75 | t kg m | 96 RUR/m |
Interesting materials:
What color does Jungkook like? Which color reflects ultraviolet light better? What color looks best on a blue background? What color do cats see better? What color is best for a small kitchen? What color goes best with pink? What color does a person see best? What color is the meat of rainbow trout? What color is the meat of the Char fish? What color is fashionable in 2022 for the New Year?
Choosing the material for making arcs for the arch
DIY arches for greenhouses must meet a number of parameters, namely:
- easy to install;
- have a long service life;
- be convenient to use.
In this regard, the following types of products are presented on the market:
- metal arcs for greenhouses. Very heavy, but reliable. Easy and quick to install. Guarantee high strength of the finished structure;
- plastic arcs for greenhouses. Very durable and resistant to various weather conditions (snow, rain);
- arches for a greenhouse made of PVC are an analogue of plastic models, although many experts try to separate them into a separate category and find single, non-overlapping characteristics. But, by and large, both in terms of price and quality they are identical.
Kinds
You can create structures of various configurations with your own hands from profiled metal, but I want to highlight several basic forms of frame greenhouses.
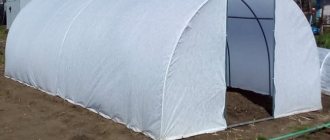
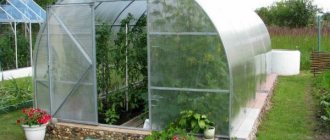
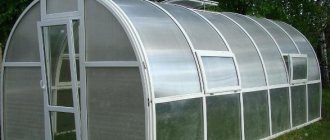
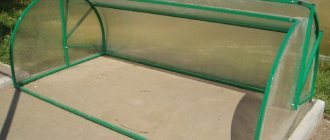
Arched
In greenhouses of this type, the lower parts of the wall frame elements are vertical, and the upper parts are bent into an arc, closed by an arch. These elements are connected to each other into a single structure by horizontal ties. Arched greenhouses (pictured below) are more resistant to wind loads and can be quickly assembled with your own hands. They let a lot of light into the interior space, so they are more suitable for growing light-loving crops.
Lancet
The cross-section of a lancet greenhouse has the shape of a slightly curved arch, elongated in height and pointed at the end. A correctly calculated structure of this type is resistant to deformation like a classic arched greenhouse, but due to the elongated shape of the upper part it better resists snow loads. Snowdrifts do not accumulate on the ridge: the snow quickly rolls down under its own weight.
Pyramidal
A pyramidal greenhouse is a compact, unusual type of greenhouse with a lot of advantages. It is a structure whose walls are triangular in shape, inclined inward at a slight angle and converge at the top at one point.
The pyramid greenhouse is very stable. It will withstand strong gusts of wind and snowfall. Snow simply will not stay on its surfaces.
Due to the inclined position of the edges, the greenhouse has a special system of natural lighting. The sun's rays are almost not reflected from their surface in the morning and evening, but penetrate inside. During the midday heat, on the contrary, they reflect their direct hit, protecting plants from overheating.
Which type is better to choose
For year-round use, it is better to build an arched greenhouse with your own hands. Thanks to its streamlined shape, natural precipitation does not accumulate on its surface. It is resistant to gusts of wind, well lit, and has fewer connections. In addition, this configuration allows for better heat retention to additionally install doors and vents for ventilation.
A gable greenhouse with a house is more convenient for use in the spring and summer. It provides enough light, but in winter its roof needs to be cleared of snow.
The process of making arcs for the frame
Plastic arches
Method 1
- We drive stakes around the perimeter of the future greenhouse. Please note : they should protrude 13-16 cm above ground level.
- We install curved pipes on top.
Note! It is important to maintain the interval between the arches to prevent their possible sagging. The optimal distance is 0.5 m .
Method 2
- We select metal rods that fit freely into the pipes.
- Cut into pieces (0.6 m long).
- We drive 20 cm into the ground, and leave 40 above the surface of the earth.
- We place plastic pipes on metal rods.
Wooden arches
How to make wooden arches for a greenhouse with your own hands? It is most convenient to manufacture directly on the frame of the future structure or on a plane, according to a pre-selected template. Wooden arches must be carefully processed and not have knots on their surface. The optimal thickness is up to 12 mm . The photo below shows an arched greenhouse made of wood:
Wire arches
You can even use 10mm wire , which is most often sold in rings on construction markets. You can cut it into equal parts using a grinder.
PVC profile and fiberglass arches
- draw a bend on a flat surface or create a template, if possible, using simple wire;
- we heat up the profile using a hair dryer (recommended temperature is up to 180 °C);
- at the next stage, carefully bend the arcs according to the template.
Note! The profile can be bent without heating. But in this case it is important to ensure stable internal tension in it.
Arcs made of steel
Very durable and reliable , but relatively expensive. To make them yourself, you need to use a welding machine. The production of steel arcs for greenhouses should be carried out in the following order:
- we measure the half-arcs and select a pipe with a length twice as long;
- cut into 2 equal parts;
- We determine the pipe that will act as the top of the structure. We weld tees directly to it along the outskirts, and crosspieces along the length (maintain an interval of 0.5 m);
- We weld the elements cut off using a cross to the pipe going up;
- We weld two more tees to the arc where the doorway will be;
- We weld all the arcs provided for by the design, with the exception of the outermost ones, to the greenhouse walls;
- align the greenhouse along its length;
- we fix it using a transverse pipe and 2 tees for the door pillars;
- cover the frame with film.
Drawing of an arched greenhouse made from a profile pipe:
How to calculate the arc length for a greenhouse?
To calculate the optimal arc size for a greenhouse, first determine the width of the bed . For example, let's take 1m. You need to calculate the arc for an arched greenhouse in the following sequence:
- We equate the width of the future structure to the diameter of half the arc. In this case, the height of the greenhouse will be equal to the radius. That is: R=D/2=1m/2=0.5m.
- Now we calculate the length of the arc as half the length of a circle whose diameter is 1 m. L=0.5x*πD=1.57 m.
If, when starting the project, it turned out that the optimal length of the arc is not known, as is the part of the circle that it makes up, you can calculate the arc for the greenhouse using Huygens’ formula, which looks like this:
| p | ≈ | 2l | + | 2l – L 3 |
AB=L
AM=l
AB, AM and MB are chords.
The error in the result is up to 0.5% if the arc AB contains 60°. But this figure drops sharply if the angular measure is reduced. For example, for an arc of 45° the error will be only 0.02% .
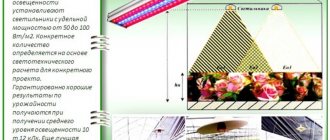
Calculation of greenhouse lighting
In addition to the direct construction of the greenhouse, certain calculations are also required for its internal arrangement. Since light and heat play a key role in growing plants in open ground, we will look at how to correctly calculate the lighting and heating of closed ground structures.
The importance of calculating lighting is explained by the fact that plants require a certain amount of light for full development. If the light is too dim, the crops simply will not grow, and if the light is too bright, they may burn.
When calculating lighting, they are guided by the area of the room and the power of the lamps that are used for lighting. For example, a lamp with a power of 150 W can illuminate an area of 60*60 cm, which is great for small home greenhouses. In industrial structures, as a rule, lamps with a power of 1000 W are used, since they are capable of illuminating an area of 250 * 250 cm. The calculations necessary for installing greenhouse lighting are given in Table 1.
Table 1. Calculation of the power of lighting devices for illuminating closed ground structures
Knowing the area of the greenhouse, you can calculate the required number of lamps of a certain power. At the same time, in small buildings it is not recommended to use too powerful lighting devices, as they can burn the plants. In addition, it should be taken into account that the lamps must be at a certain distance from the plants, and the higher the lamp power, the greater the distance should be. Therefore, in home greenhouses it is not recommended to use powerful lamps, from which the plants can simply burn out, and the optimal distance from the lamp to the beds must be determined gradually: first, hang the lighting fixtures at the maximum height, and if signs of light deficiencies are detected, the distance can be reduced.
Preparatory stage
Place on site . The greenhouse should be oriented from east to west : this will ensure that more sunlight reaches the plants. You can read more about the rules for locating greenhouses by following the link.
Foundation type . If you intend to use the greenhouse only seasonally, a lightweight structure without a foundation is suitable. For spring-summer - the best option. In all other cases, you can choose:
- strip monolithic foundation;
- strip point foundation;
- prefabricated strip foundation made of reinforced concrete blocks.
As for the laying depth, this parameter largely depends on the climatic conditions of your region.
Important parameters
Wrapping with stretch film is an easy way to update your existing greenhouse. A ready-made frame made of any type of material will be suitable. However, special attention should be paid to the choice of film. If construction has to start from scratch, it is necessary to choose the type of structure, its dimensions, and even the type of foundation.
Base and materials
A foundation for such a greenhouse is not required. If the frame is heavy, for example, wooden, solid, then it is permissible to make a small base from timber or brick. In this way, rotting of the main supports can be prevented. If propylene tubes are used as a frame, you can get by with a standard seal of the selected area. If the walls are large and the height is more than one and a half meters, it is necessary to securely fasten the greenhouse frame to the ground. The film will not be elastic after stretching, so the wind will affect the entire area. If the soil allows, you can dig the supports deeply; a more reliable option is to strengthen them with a lower frame made of heavy materials.
Step-by-step instruction
Let's consider the simplest method of how to build arched greenhouses with a frame made of PVC pipes and wooden elements under film with your own hands.
You need to prepare the following tools:
- screwdriver;
- drill;
- cord;
- scissors (although you can use a knife);
- welding machine;
- plumb line;
- axe, saw;
- chisel;
- hammer;
- wooden blocks;
- slats;
- nails;
- self-tapping screws;
- polyethylene film;
- level.
to start manufacturing the structure directly from the end walls :
- we knock down a wooden trapezoidal frame;
- we attach the PVC pipe to it using a screwdriver and self-tapping screws;
- We carry out the production of the ends in accordance with the selected design plan. For example, the optimal solution for a medium-sized greenhouse would be ends 3.5 m wide, 5 m long, 2.5 m high;
- similarly, the second end wall is made in the same sequence;
- We cover both frames with film. You need to cut it with a margin for fastening;
- We install the remaining parts of the structure. For this purpose, we drive reinforcement poles into the ground;
- We level the posts and attach the end frames to them;
- we pull the cord on both sides of the structure. This will allow you to install the side ribs evenly, without distortions;
- we drive in reinforcement along the sides of the end walls at intervals of 1 m;
- at the next stage we attach arches made of PVC pipes to it;
- We fix the structural elements using wire anchors and self-tapping screws;
- cover the frame with plastic wrap, securing the ends to a wooden plank.
Calculation of consumption Polyethylene film cut (200 microns / 1.5 m x 2 / 10 m / 30 m2)
Fast and inexpensive delivery, as well as unloading and lifting to the apartment on any floor.
Expert advice, assistance in selecting materials and calculating the required quantity.
Return within one month or extended return period until the end of the repair * for only 5% of the cost of materials.
All materials are stored in dry warehouses, have certificates and quality passports.
By clicking on the "Submit" button, you agree to the Privacy Policy
By clicking on the "Submit" button, you agree to the Privacy Policy
Cost of unloading and lifting
If there is a working freight elevator, the cost of unloading 1 ton of cargo, taking into account the lift to the apartment, is 1,200? regardless of floor.
In the absence of a freight elevator, the cost of lifting 1 ton of cargo to one floor is 1,200?.
The cost of simple unloading of vehicles without lifting to the floor is 1,200 rubles per ton.
The minimum cost for a loader is 300 rubles.
© M-Delivery, 2021
st. Mariupolskaya, 6, office 28. Moscow, 109382
We accept:
Source of the article: https://m-delivery.ru/expense_165.php