Useful tips
Many summer residents are trying to create drip irrigation, so they are trying to learn more about it, because, having installed such irrigation, you can leave the entire system almost unattended.
The main advantage of drip irrigation is that it works autonomously, and you do not need to stand with a hose or walk with a bucket filled with water to water the seedlings.
However, it is worth noting that ready-made drip irrigation, which is powered by a water supply system, is very expensive.
A good and inexpensive alternative to ready-made irrigation is drip irrigation from a plastic bottle. This option cannot be called completely autonomous, since you will have to add liquid to the bottles.
The benefits of drip irrigation
With all this, the creator of such irrigation will still have time for other activities.
Several important advantages of drip irrigation:
1. No need to purchase material - everyone has plastic bottles.
2. This type of watering is easy to make, even for inexperienced summer residents.
3. Drip irrigation saves time and effort.
4. This watering system is easy to use - just go to the bottle and add liquid.
5. The root system develops due to the fact that all moisture goes under the top layer of soil, thereby feeding only the roots, without spilling over unnecessary territory. It also strengthens the roots of the plants.
6. Water consumption is significantly less and swamps do not form.
7. The excess surface remains dry, which means there are no conditions for weed growth.
LiveInternetLiveInternet
—Categories
- AGROTECHNIQUES OF NATURAL FARMING (215)
- ALTERNATIVE TO GARDEN (260)
- Balconies and more (121)
- Home pond (25)
- Winter garden (29)
- Miniature gardens (97)
- DISEASE CONTROL (343)
- PEST CONTROL (579)
- FIGHTING GNUS (39)
- WEED CONTROL (81)
- IN THE FOREST, HIKE, FISHING, IN EXTREME SITUATION (89)
- VIDEO ABOUT THE GARDEN (538)
- WATER OBJECTS (196)
- =GENERAL TIPS= (32)
- Reservoirs (163)
- Imitation of a pond, dry stream (15)
- LAWN (55)
- COOKING AT THE COUNTRY (1623)
- Everything in a row (26)
- Desserts (139)
- Brazier, barbecue, grill, fire (187)
- Drinks (105)
- Pancakes, pancakes, pies, etc. (454)
- Main courses (631)
- First courses (108)
- Salads, snacks (199)
- Spirits (20)
- Storing food without refrigeration (10)
- MUSHROOMS AT THE COUNTRY (24)
- COUNTRY PHARMACY (0)
- COUNTRY HOUSE (771)
- Country house decor (185)
- MARINE STYLE (MEDITERRANEAN) (114)
- Interior (223)
- Furniture (163)
- Cute, cozy things (92)
- Original houses (103)
- Utilities (38)
- DECORATIVE SHRUBS (305)
- TREES (23)
- FOR CHILDREN IN THE GARDEN (166)
- PATHWAYS, SITES (136)
- LIVING GARDEN ASSISTANTS (127)
- PREPARATIONS FOR WINTER (1506)
- Jams, jams: OTHER (124)
- Preserves, jams: FRUIT (124)
- Preserves, jams: BERRIES (123)
- Wines, liqueurs, tinctures (162)
- Freezing – VEGETABLES (46)
- Freezing – FRUITS, BERRIES (18)
- Ketchups, sauces (61)
- Compotes, etc. (40)
- Vegetable caviar (43)
- Semi-fabricated products (129)
- Benefits for canning (31)
- Salads (318)
- Pickles: ASSORTED (26)
- Pickles: EGGPLANT (55)
- Pickles: PEAS, BEANS, CORN (32)
- Pickles: MUSHROOMS (37)
- Pickles: Zucchini, Squash, Watermelon (62)
- Pickles: CABBAGE (24)
- Pickles: CUCUMBERS (63)
- Pickles: PEPPERS (89)
- Pickles: TOMATOES (140)
- Pickles: CAULIFLOWER (9)
- Pickles: GARLIC, RADISH (14)
- Drying (94)
- Horseradish and savory snacks (25)
- HEALTH IN THE GARDEN (89)
- RECREATION AREAS (139)
- .DIFFERENT IDEAS (78)
- Hammocks, sun loungers (46)
- Privacy zone (14)
- Patio (21)
- COUNTRY DECOR IDEAS (730)
- INVENTORY (44)
- Other tools (30)
- Small mechanization in the garden (9)
- Fokina flat cutter (10)
- INTERESTING PLANTS OF THE WORLD (155)
- ROCKY SLIDE (101)
- =GENERAL TIPS= (62)
- Rock garden (58)
- PICTURES (5)
- COMPOST, FERTILIZERS (460)
- CURIOUS ! (51)
- LANDSCAPE DESIGN (284)
- MEDICINAL PLANTS AT THE COUNTRY (406)
- SMALL GARDEN (93)
- SMALL ARCHITECTURAL FORMS (280)
- Gazebos, pavilions, rotundas (54)
- Flowerpots (11)
- Fence, fencing, border (39)
- Swings (16)
- Wells (7)
- Stairs, retaining walls (17)
- Summer kitchens, barbecues, grills (10)
- Bridges (8)
- Pergolas, arches, trellises, trellises (35)
- Benches, benches (58)
- Garden sculpture (24)
- Lanterns, columns (10)
- MUSIC (33)
- VEGETABLE GARDEN (2333)
- .Other plants. (130)
- =BEDS= (84)
- =ORNATIVE VEGETABLE GARDEN= (82)
- =GENERAL TIPS= (280)
- =SOWING, SEEDLING, PLANTING OF VEGETABLE CROPS= (384)
- Watermelons, melons (27)
- Eggplant (48)
- Zucchini, squash, zucchini (38)
- Cabbage (114)
- Potatoes (186)
- Onions, garlic (236)
- Carrots (82)
- Unusual beds (7)
- Cucumbers (284)
- Peppers (98)
- Radish, turnip, radish (44)
- Beetroot (37)
- Salads, asparagus (6)
- Tomatoes (414)
- GARDEN ON THE WINDOW SILL (150)
- USEFULNESS (77)
- Devices (49)
- Conspiracies (13)
- Computer devices (6)
- GREENHOUSES, GREENHOUSES (100)
- SITE PLANNING (85)
- FRUIT TREES, SHRUBS, BERRIES (1151)
- =TRIMING, WHITESHING, CARE, FORMATION= (142)
- =FEEDING= (13)
- =LANDING, STRUGGLE= (97)
- =VACCINATIONS= (42)
- Quince (7)
- Actinidia (16)
- Grapes (74)
- Cherry, sweet cherry (38)
- Pear (22)
- Honeysuckle (25)
- Strawberries, strawberries (310)
- Irga (12)
- Cranberries, blueberries, lingonberries, etc. (24)
- Gooseberry (58)
- Schisandra (9)
- Raspberries, blackberries (154)
- Sea buckthorn (25)
- Peach (12)
- Rowan, chokeberry (4)
- Plum, sloe (24)
- Currant (125)
- Apple tree (97)
- WATERING (113)
- LANDING (2)
- SOIL, MULCH (129)
- HOLIDAY AT THE DACHA (170)
- Children's party (6)
- New Year (111)
- Easter (6)
- Picnic (31)
- Family holiday (28)
- SPICE BEDS (133)
- VARIOUS TIPS (391)
- DIFFERENT IDEAS (168)
- S A M O D E L K I (430)
- LINKS (70)
- GARDEN PLANTS (28)
- GARDENS, PARKS, FLOWER BEDS OF THE WORLD (455)
- SEASONS IN THE GARDEN (489)
- =LUNAR CALENDAR= (22)
- Spring (111)
- Winter (37)
- Summer (54)
- Folk signs (28)
- Autumn (263)
- ANIMAL)))))) YARD (91)
- SAVE THE HARVEST (102)
- GARDEN STYLES (105)
- CONSTRUCTION AT THE COUNTRY (703)
- Bath, sauna, shower, bathhouse, washbasin (95)
- Water on site (43)
- House (208)
- Fence, fencing, border (86)
- Well (11)
- Roof (12)
- Summer kitchens, barbecues, grills (85)
- Outbuildings (49)
- Garden lighting (37)
- Stoves, fireplaces (96)
- Repair (32)
- Toilet (33)
- TOPIAR ART (10)
- SELF-CARE AT THE COUNTRY (50)
- Beauty from the garden (38)
- LET'S LEARN FROM EACH OTHER! (107)
- F O T O (54)
- FLORISTRY (185)
- HVOYNIKI (97)
- FLOWER BEDS (720)
- =GENERAL TIPS= (83)
- Vertical gardening (127)
- Ideas for original flower beds (433)
- Mobile flower beds (85)
- Flower garden near the house (front garden) (38)
- Continuous flowering beds (25)
- Flower beds with conifers (13)
- Flower beds shade and partial shade (38)
- FLOWERS IN THE HOUSE (364)
- FLOWERS, CARE, ETC. (1583)
- .Trendy plants, vines. (99)
- .Perennials. (696)
- .Annuals. (205)
- .Primroses and bulbous plants (161)
- .Ground cover. (77)
- =DIFFERENT FLOWERS= (105)
- Alyssum (1)
- Amaranth (1)
- Pansies (3)
- Astilbe (8)
- Begonia tuberous (3)
- Whiteflower (1)
- Dahlias (18)
- Gladioli (26)
- Delphiniums (10)
- Doronicum (1)
- Calendula (1)
- Clematis (49)
- Cosmea (1)
- Cinquefoil (3)
- Daylily (13)
- Buttercups (2)
- Young (1)
- Montbrezia (4)
- Nasturtium (12)
- Sedums (4)
- Petunias (38)
- Peonies (24)
- Sunflowers (1)
- Primrose (6)
- Roses (179)
- Rudbeckia (2)
- Siberian irises (1)
- Tulips (34)
- Hosts (21)
- Chrysanthemums (13)
- Echinacea (3)
- Yasnotka (1)
Simple DIY drip irrigation
As already mentioned, this type of watering not only costs almost nothing, but it is also very simple to do.
1. Prepare several plastic bottles and make holes in the bottom of each of them through which water will leak.
* The volume of the bottle depends on the area of the site. The minimum volume is 1.5 liters.
2. Bury the bottles in the ground at a distance of 1 meter from each other.
3. Now simply fill the bottles with water.
* The speed of watering directly depends on the diameter of the holes in the bottles.
* Experts advise making sure that water flows into the ground slowly.
* If desired, you can dilute compost tea in water - it is believed that the water will become more beneficial.
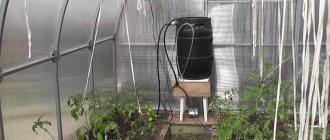
Greenhouse microclimate
If we compare polycarbonate greenhouses with film or glass structures, they have a number of advantages:
- compared to glass structures, polycarbonate ones retain heat up to 30 percent better;
- such material perfectly transmits light and at the same time protects tomatoes from sunburn;
- This greenhouse is more airtight, so the risk of drafts or sudden temperature changes inside it is minimal.
However, these advantages in some cases can become, on the contrary, disadvantages that negatively affect the microclimate of the greenhouse. For example, good tightness and thermal insulation of a structure can cause a strong increase in temperature and humidity.
Tomatoes grow best at a humidity level of approximately 50–60% and at a temperature of 23 to 29 degrees. And in such a greenhouse in the summer, if not properly maintained, the temperature can reach 45–50 degrees, and the humidity can rise to 90% or more. This has an extremely negative impact on the growth and development of tomatoes.
And in such conditions there is a high probability of developing fungal diseases. To avoid such problems, you will need to install a ventilation and heating system in the greenhouse; you can also resort to ventilation, but in this case the plants may suffer from sudden temperature changes.
In order for growing tomatoes in such a greenhouse to be successful, you must carefully monitor the temperature and humidity of the air, and also do not forget to carry out disinfections in a timely manner.
Do-it-yourself watering system for a summer residence
You will need:
- 2 liter plastic bottles
- screwdriver
- stationery knife.
1. Take a utility knife and make 2 cuts at the base and 2 more cuts in the middle of the plastic bottle.
2. Using a screwdriver or awl, make 2 holes at the bottom of the bottle.
3. Check how much water flows from the bottle. Ideally it should drip.
4. Make a small hole in the ground to place the bottle in.
5. Pour water into the bottle.
How to do watering yourself
You will need:
— 1.5 liter plastic bottle
- screwdriver or awl
— FUM tape
- clamp.
1. Using an awl, make holes in the side of the bottle. To make the process easier, heat the awl - it will penetrate the bottle more easily.
2. Insert the watering hose into the bottle. However, you should first wrap the end of the hose with FUM tape, thereby ensuring a tight connection between the bottle and the hose.
3. Use a clamp to tighten the neck of the sprinkler structure.
* You can also create vertical irrigation. You will need a small stake inserted into the ground. Attach the hose to this post.
4. You can improve the design using regular plastic handles. Use a 3 liter plastic bottle. Make holes in it slightly smaller than the diameter of the pen. Take the handles apart and insert the top half of each handle into the holes.
If necessary, seal the structure with FUM tape.
Make a hole in the lid and insert the hose adapter into it. It is advisable to treat this adapter with silicone glue to make it more airtight. This design will provide water to a large area of your garden and/or vegetable garden.
DIY drip irrigation from plastic bottles
This type of drip irrigation is best suited for plants with a small root system. It will not be able to feed long roots, but is great for watering shallow roots.
You will need:
– plastic bottle with cap (1.5 – 2 l)
- an awl, a small nail with a hammer or a screwdriver
- stationery knife or scissors.
1. Make several holes in the cap of a plastic bottle. This can be done using an awl or a screwdriver. It is advisable to preheat the instrument.
2. Make a small hole next to the plants. It should be deep enough to insert 1/3 of a plastic bottle with a volume of 1.5-2 liters.
3. Using a utility knife or scissors, cut the bottom of the bottle.
4. Insert the bottle into the hole, neck down. Use earth to secure the bottle in place. Place some rocks around the bottle to keep soil out.
5. Fill the bottle with water.
Make several more similar designs for the remaining plants.
Do-it-yourself drip irrigation for your dacha
You will need:
- plastic bottle with cap
- stationery knife or scissors
- an awl, a screwdriver or a small nail with a hammer
- thin fabric (cotton) or old nylon tights (to create a filter).
A fabric filter is needed to prevent soil particles or small debris from clogging the irrigation system.
The size of the bottle depends on the size of the plant for which watering is being prepared. For example, for one plant, a small bottle with one hole on one side is sufficient.
1. Make holes over the entire area of the plastic bottle. In this case, leave a little more than 2 cm to the bottom of the bottle. There is also no need to make holes in the lid. A 2 liter bottle should contain about 10 holes.
2. Make a hole next to the plant. Its size should be equal to the size of the bottle.
3. Bury the bottle, leaving its neck on the surface.
4. Attach a nylon stocking to the neck.
* The bottle can be closed with a lid, or left without a lid. The only difference is the rate of evaporation of water from the container.
Now just add water to the bottle when needed.
Manufacturing methods
You can make a microdrip irrigation system from plastic containers in different versions, choosing the most suitable one for your specific conditions. Homemade options are varied. The containers are dug into the ground, hung over the bushes, and placed near the plants. In this case, dispensers, watering probes and other devices are often used. The determination of a specific method is determined by practical considerations, convenience, type of soil, climate and type of crop grown.
To assemble such an irrigation mini-complex, some components and certain tools will be useful:
plastic containers from 1.5 to 5 l;
pieces of cotton fabric or unnecessary nylon products;
spatula for creating recesses for containers;
sharp metal rod or nail,
a lighter or other source of fire for heating the nail.
Before you start organizing the system, you should understand and decide on the volume of plastic containers planned for use. The specific choice will depend on the type of crop being grown, since the amount of watering varies for each crop.
It is important to take into account weather conditions here. In addition, the frequency of your planned visits to the dacha will also be a relevant factor.
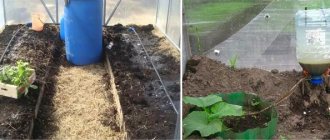
For irrigation from above
Suspended watering from above has proven to be excellent for greenhouses, when, for example, 5-liter containers are suspended directly above the plants. No pipe is needed here, but this method can be considered universal, since it is applicable both in the garden (above the beds) and in greenhouses, and it is not difficult to do it yourself. Advantages of the method:
the soil around the roots is not washed away - slow and targeted watering is implemented;
the water in the bottles has time to warm up;
In enclosed spaces, the optimal level of humidity is quickly achieved and a microclimate is formed.
The watering container is filled with water and attached to a support with a rope (for fastening) with the stopper down, before this a series of holes are made in the area where the bottle narrows. You don’t have to do them, but simply do not completely close the lid of the container, dosing the outflow of water in small quantities.
The disadvantage of this method is the need to mount special supports for securing the containers. Moreover, it is necessary to direct the fall of the drops so that they do not fall on the leaves of the plant, since this can cause sunburn on them. To avoid this, the bottle (5 liters) must be strengthened closer to the ground, or special devices must be used.
An original and excellent method of microirrigation was a method based on the principle of solar distillation. It performed excellently during dry periods, when it was really hot outside. Near the bushes, a part of a 1.5 liter bottle is placed on pre-mulched soil, and the top is covered with a 5 liter bottle with a cut out bottom. During heating, moisture turns into steam and water droplets. At first they settle on the walls, but then they begin to fall down. The hotter it gets, the more effective the humidification process is.
Now you always have the opportunity to add fertilizers to the soil, and the process of their assimilation will be carried out much more efficiently than with their typical placement in the ground. An excellent micro-irrigation method for small gardens.
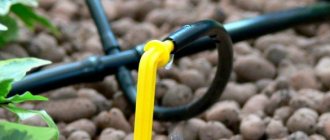
Automatic root watering
This type of microirrigation is organized through special dosing devices. They eliminate the work of digging holes and burning holes with a hot nail, since the store-bought dispenser screws (except for 5-liter bottles) onto the neck of the container. The container with the dosing device screwed onto it is placed with its end in the ground, not far from the roots of the plant. Such bottle structures with nozzles buried in the ground are good for long-term irrigation of indoor flowers.
There is a modernized and cheaper root method of irrigating plants - its effectiveness is due to the use of a simple ball rod, the writing end of which is cut off. To avoid the hassle of washing the rods, it is better to use cocktail straws.
One of the ends of the tube is closed tightly using a toothpick or a planed match. Stepping back about 2 cm from the closed edge, holes are pierced in it.
We make a hole in the bottle to insert the prepared tube (when inserting the tube near the bottom, step back about 10 cm from it), which we place in the bottle with the closed end on the outside. We treat the installation site of the tube with sealant. Then we pour water into the bottle and put it in place, placing the watering end of the tube above the watering point.
The advantages of the method are that moisture flows slowly and directly to the roots, and the irrigation speed can be adjusted by changing the width of the hole. So, with a volume of 2 liters, it is quite possible to create continuous irrigation for 5-6 days, provided that in 5 minutes. no more than 10 drops will drip from the container.
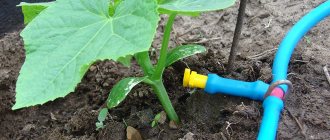
Do-it-yourself hanging drip irrigation from bottles
This type of watering is more suitable for short plants, including cucumbers or herbs. To make it, you need to make a frame in the shape of the letter P or G.
1. Bury the posts into the ground at both edges of the garden and attach a long stick to them, which should be parallel to the bed. The height should be such that the neck of the suspended bottle is about 50 cm from the ground.
* Bottle length - no more than 40 cm.
*The number of plastic bottles depends on the number of plants.
2. Using an awl or screwdriver, make several holes in the bottom of the bottle. Also make holes in the lid (their number depends on how much you want to water the plant).
3. Cut off the bottom of the plastic bottle, and next to the cut edges, make holes through which you need to insert a wire or strong rope and hang it upside down from the frame.
* Drops of water from the bottle should not fall directly on the plant, but between neighboring bushes.
* Now all that remains is to add water as needed.
Operation and maintenance of homemade products
For novice gardeners, some practical tips for maintaining drip irrigation systems will be useful:
- You can prevent clogging of irrigation holes from debris and soil using an unnecessary nylon or cotton rag. They wrap it around the vessel. Another method of protection is to line the container with straw so that it covers the holes.
- The number of containers used for micro-irrigation is taken in accordance with the number of bushes. The best option is 1 to 1.
- The number of holes through which water will seep is made depending on the type of soil - the more difficult it is to absorb moisture, the more punctures there should be. So, for sandstone the recommended value is 2-3 pieces, and for loams you will need 5-6.
- The volume of water for irrigation varies depending on a number of factors: weather conditions, soil type, schedule for visiting the summer cottage. For plants in open ground, during the growing season, 3-4 liters per week is enough. When flowering begins and ovaries form, up to 7 liters will be needed. With persistent heat, water consumption increases to 11-12 liters in 3 days. In greenhouses, the amount of moisture increases due to its intense evaporation.
- It is better to install micro-irrigation structures in the ground at the beginning of sowing.
- The vessels are placed at a distance of 15-20 cm from each other from the bushes, immersing them to a depth of 12-15 cm. The containers can be installed both vertically and at an angle (angle of about 40 degrees).
If the crop is not particularly demanding on watering, it is permissible to install one large vessel for 2-4 bushes. You just need to make more punctures.