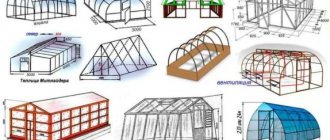
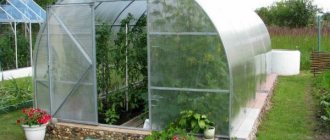
Many types of structures for growing vegetables and fruits are built by summer residents and experienced gardeners. Each design has its own advantages. Single- and double-slope structures are especially often installed in vegetable gardens. Some people find it beneficial to set up small structures for seedlings on their site, while others need large “vegetarian gardens”. Greenhouses with a gable roof deserve special attention.
More often, gable roofs of greenhouses are made of polycarbonate. This material is quite lightweight and reliable. It is better to find out detailed instructions for building such a structure. To understand the features of the structure, it is better to look at several photos of finished structures.
What is a greenhouse with a gable roof?
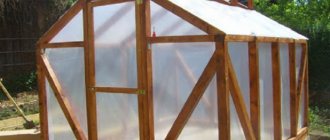
Greenhouses with a gable roof are essentially lean-to structures connected to each other. However, there is no wall inside the greenhouse to support the roof. It rests on special beams or on a ridge.
Greenhouses with a gable roof are divided into 2 subtypes:
- Summer ones - their frame is made of beams. Then it is covered with polyethylene.
- Winter - such structures are more solid. Their frame is made of a metal profile or wooden beam with a large cross-section. Such structures are covered with polycarbonate sheets or glass.
Simple greenhouses with a gable roof have standard dimensions - height 2.5 m, length 6 m, width 3 m. The design features of a winter greenhouse are of particular interest.
Selection of materials
To create a greenhouse that will last for more than one season, it is necessary to use high-quality materials. To work you need to prepare:
- Profiled timber. The elements must have a cross-section of 50x50 mm.
- Steel corner with galvanized coating.
- Self-tapping screws - for connecting structural parts.
If we talk about polycarbonate, in construction stores you can find sheets of different sizes, based on the area of your greenhouse. Typically the panels are 2, 6 or 12 m long. Their width is 2.1 m.
The thickness of polycarbonate is a separate issue. Its minimum value is 6 mm. Typically, such sheets are laid when constructing summer structures. Winter greenhouses are equipped with 15 mm thick panels. Sheets with such thickness are able to withstand the weight of fallen snow and at the same time bend perfectly.
Advice! You should not trust the seller without reservations. It is necessary to check polycarbonate for quality before purchasing.
Installation instructions
The instructions below on how to sheathe a greenhouse with polycarbonate step by step describe all the stages of work, the types and methods of fastening used.
Sheet cutting
If you bought a ready-made greenhouse, which you only need to install and cover with polycarbonate, then you will not have to cut it - all the parts in such kits are already cut to the size of the frame. In the case of self-production, this stage cannot be avoided; it will be necessary to cut out façade elements, doors, and vents from a single sheet.
First you need to install the frame, and then take accurate measurements and transfer them to the canvas. In order to rationally use the material and get as little unnecessary scraps as possible, it is best to make templates from cardboard and place them on a sheet. Or make a drawing to scale.
Drawing for cutting greenhouse parts Source awnings-canopies56.rf
The contours of all elements are transferred to the canvas without removing the protective film from it, so as not to damage the UV layer on the surface. They are cut with a fine-tooth hacksaw or an electric jigsaw, setting the speed to 3000 m/min. In straight lines, material laid on a solid and level base can be cut perfectly with a sharp knife.
Advice! Having completed cutting the polycarbonate, it is advisable to clean the sections from sawdust and small debris that have fallen into the honeycomb cavity using a vacuum cleaner.
Stages of greenhouse construction
Every owner of a suburban area should take into account that permanent greenhouses have an impressive weight. In this regard, a work plan is being developed:
- Foundation device. Since greenhouses are quite heavy structures, it is better to choose a strip foundation. The base is arranged with a section of 40x40 cm. It is necessary to build a foundation along the entire perimeter of the greenhouse.
- It is necessary to lay a strapping of beams on top of the base. The frame of the building is subsequently installed on it.
?Important! The timber must be treated with a primer or antiseptic compound.
- In some cases, installation of the sheathing frame is performed entirely. This means that you do not need to immediately secure its elements to the foundation. First, the frame is assembled and then transferred to the harness. This structure is secured with corners and self-tapping screws.
- Another option is to install vertical racks. They are installed around the entire perimeter of the greenhouse. The posts should be one meter apart from each other. They must be installed before pouring the concrete base.
?Advice! It is necessary to plan the frame in such a way that the cells in it are no more than 50x50 cm. In this case, you can be sure that the structure will be as reliable as possible.
- When the sheathing is done, you can begin installing the roof. Since it is gable, a transverse beam is welded in the center of the structure. It is fixed with self-tapping screws.
- Then the rafters and supports must be installed at a certain angle.
- Then all that remains is to cut the polycarbonate panels and fix them. The resulting seams must be covered with aluminum tape.
- In addition, the installation of a polycarbonate greenhouse should not be carried out at temperatures below +10 degrees. Otherwise, the sheets will be deformed when cutting.
Such construction stages must be taken into account when creating a greenhouse with your own hands.
Finishing the ends of cellular polycarbonate
Profiles and tapes are mounted in the same way on any ends. If the greenhouse has an arched structure, it does not have open channels pointing upward, so you will only need perforated tape on both sides of the structure.
Before closing the bottom of the greenhouse, the ends must be unscrewed from the frame or loosened. It’s even better and more convenient to finish them immediately after cutting, before installing the sheets on the frame. The work gets done faster and more accurately.
Preparation for installation
The only tools you will need is a narrow spatula, with which it is convenient to push apart the profile shelves and tuck the sheet into it. It is better not to use a knife or other sharp tools to avoid scratching or perforating the material.
You also need to prepare a drill with a thin drill bit to make holes in the profile for water drainage. But it can easily be replaced by an ordinary nail heated over a fire.
To prepare the cut sheets for gluing the tape, the cuts need to be made smooth by removing all burrs and burrs using sandpaper. Before this, the edges of the sheet are freed from the protective film.
There is no need to completely remove the film in order to determine the outer and inner sides of the sheet during installation. Source krepezhinfo.ru
Gable and arched roofs
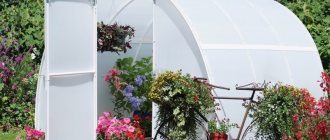
Which roofing option is best to choose for a greenhouse roof? There is no way to answer this question unambiguously. This depends on certain site parameters. Gable roofs of greenhouses are structures that are made with two slopes located at different angles. Their connection is carried out in the ridge. The slope of the slopes is usually 30 degrees. It is selected depending on lighting and climatic conditions. When constructing slopes, it should be taken into account that in winter snow should roll freely from the roof.
Such roofs have a standard width - from 3 to 3.5 m. In the case of heated greenhouses, this indicator depends on the chosen heating method. The matryoshka roof is one of the structures that is removed in winter. In some cases, only the central part of the greenhouse is removed after the season ends. The roof has an arch shape. It is covered with polycarbonate.
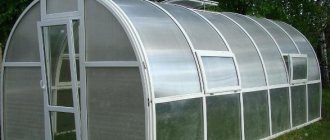
Arched roofs are quite popular. They can be used for structures of different sizes and heights. Such roofs are standard for many greenhouses. The construction of arched roofs is characterized by maximum simplicity. When installing them, there is no need to construct a complex rafter system. Typically, aluminum profiles are used for this, covered with polycarbonate sheets on top.
Mittleider roofs are quite interesting structures, having a gable roof in the shape of an arch. In the center, parts of the roof are fastened using a stepwise method. The northern slope of the roof is steeper. The rafter system of this roof is different from others. Support beams located at different levels are installed here.
The details of the northern slope are fixed on the ridge. For the southern one, the height of each element is 45 cm lower. Thanks to this, you can arrange a good ventilation system with the installation of vents. The construction of such a roof ensures that the greenhouse does not overheat.
Video description
These installation nuances are described in detail in the following video:
For reference! Plastic profiles do not have sufficient flexibility to create arched edges. Instead, you can use similar rubber profiles.
The elements are fastened only with self-tapping screws with special silicone thermal washers, which were described earlier. It is important to screw in the fasteners exactly at right angles to the plane of the coating.
The next step is covering the walls and roof or attaching the sheets to the arches. In the first case, you can handle the installation yourself, since the dimensions of the parts allow you to do this without an assistant. In the second case, you cannot do without it, since it is almost impossible to cover a semicircular greenhouse with polycarbonate with your own hands, especially in windy weather. A large and light canvas turns into a sail, and it is very difficult to keep it in the desired position. How to bring it to the place and throw it over the frame without damaging the surface.
An assistant is needed to cover arched greenhouses Source i.ytimg.com
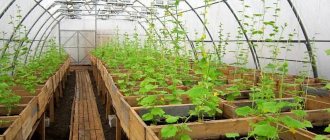
Benefits of creating a rooftop greenhouse
Many owners of suburban areas want to use their land more efficiently. Greenhouses also fall under this goal. Such buildings can have a fairly large area. Therefore, many gardeners decide to arrange them on the roofs of various buildings - garages and sheds.
Important! When choosing such a solution, some features of the operation of such structures are taken into account - loads on the foundation, maintenance features, waterproofing.
Installation of greenhouses on the roof of a house can be carried out using the following technologies:
- Use of pots. This method is one of the simplest. By choosing it, you can significantly reduce the area of the greenhouse. The design in this case is multi-tiered. A similar technology is used for ornamental plants. It can be used to grow peppers, herbs and tomatoes. The disadvantages of this method include the fact that when dividing the soil with pots, its structure is disrupted.
- Application of fertile soil. Thanks to this solution, conditions are created that are very similar to natural ones. However, such a layer of soil must have a height of at least 20 cm. In this case, it is important to carry out thermal and waterproofing work, as well as calculate the load and create a drainage layer.
- Hydroponics. This method is also not difficult. In this case, minimal plant care is required. However, there are also some disadvantages: quite a lot of mineral fertilizers are used, so the environmental friendliness of the technology is reduced to nothing.
When choosing such technologies, you can set up a greenhouse on the roof as simply as possible.
Ventilation and watering
When creating a greenhouse on the roof of a house, it is very important to pay attention to watering the plants. It is also important to properly arrange the ventilation system. Such structures must be equipped with drip irrigation systems. Thanks to this technology, plants receive enough moisture and the soil is not washed away. Water is consumed in a minimal amount. This is very important, because when creating a greenhouse project with a gable roof, you need to consider how to prevent water from entering through the ceiling.
This is ensured by creating a special roofing pie. The soil should not be moistened. Experienced gardeners install pressure and humidity sensors in greenhouses. Without them, it is impossible to optimally water the greenhouse.
The ventilation system is of natural or forced type. The choice is influenced by the shape and size of the greenhouse. The microclimate conditions in the greenhouse are also taken into account. Often, special automatic vents are used for greenhouses located on the roof. They open according to a given algorithm.
Let's sum it up
Polycarbonate is a material that has revolutionized the construction of transparent roofs. This is the only real alternative to glass not only for small buildings, but also for critical objects. Polycarbonate comes in three types:
- Monolithic is the most durable, even bulletproof, and durable, but expensive, heavy and difficult to install.
- Profiled - lightweight, very easy to install and quite durable, but it withstands impacts less well and practically does not prevent heat loss.
- Cellular is extremely cheap, very light and can withstand light impacts well, but transmits less light, is a short-lived and often unaesthetic material.
Polycarbonate is mainly used to make flat, single-pitched, gable and arched roofs of gazebos, terraces, galleries, verandas, greenhouses, and canopies.
To install monolithic polycarbonate, it is better to hire specialists, while profiled and honeycomb sheets can be installed on the roof yourself. How is written in detailed instructions in this article.
Greenhouse heating
Each capital greenhouse requires insulation. To solve this problem, you will need to learn several subtleties of arranging greenhouses. The premises located inside the building should not be allowed to overheat. Heating a greenhouse can be done in several ways:
- Using collectors and warm beds.
- Installation of wood stoves. Such designs are good for country and country houses, since they are ways to heat not only the greenhouse, but also living spaces.
- Placement of the greenhouse near the elevator charges. This place is warmer than other house designs.
- Use of recovery.
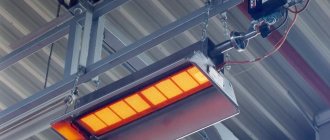
- Installation of electric and infrared heaters.
Using these tips, you can easily create a greenhouse heating system.
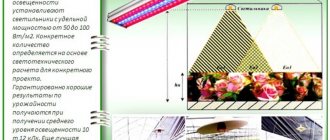
Lighting options
The required level of lighting can be provided for each greenhouse. Conditions for extending daylight hours may vary. They depend on the type of plants that are grown. For greenhouses that are mounted on the roof of a house, you should choose LED light sources. Such sources are controlled by certain programs.
The advantages of such systems when installed in greenhouses with a gable roof:
- The spectrum of such lighting is sufficient for most cultivated plants.
- Such lamps can last up to 11 years with continuous use.
- Installing LED lamps allows you to control the life processes of plants.
- Electricity consumption is reduced by 5-20 times compared to conventional incandescent lamps.
- Safety of lamps for humans.
- The case heats up to only 45 degrees.
- Such sources can be placed at a short distance from the plants. In this case, you don’t have to worry about the leaves drying out.
- There is no need to install suspension systems for lighting sources.
- Due to the small divergence of the light beam, high efficiency is achieved.
The housings of such lamps are made of impact-resistant and heat-resistant materials.
Varieties
The basis for the construction of the greenhouse is polycarbonate. It comes in several types:
- Monolithic. It has a dense structure without an air gap inside.
- Cellular, has partitions inside the leaf.
Based on the type of leaf, the following types are distinguished:
- 2H – two-layer panels with internal rectangular honeycombs. They bend easily, but are also fragile and susceptible to mechanical damage.
- 3N – three-layer material with straight stiffeners.
- 3X is a three-layer material with combined stiffening ribs, some of which are located vertically and others obliquely, which increases the strength of polycarbonate.
- 5W is a material consisting of 5 layers fastened with straight stiffeners. The sheet thickness is 16-20 mm.
- 5X is the most durable type of polycarbonate. It has combined stiffening ribs and a large thickness of 25 mm.
The choice of the type of main building material depends on the climate and the purpose of using the greenhouse. For example, for structures that operate year-round in northern latitudes, the most dense and durable polycarbonate is used. Thin sheets are suitable for seasonal greenhouses in the southern regions.
Where to place greenhouses
The roof of a house is often chosen as a location for greenhouses. However, these are usually low structures used by summer residents as temporary housing. However, such greenhouses can be placed anywhere.
When installed on a suburban area, the greenhouse can be placed on outbuildings and garages, extensions to the house. In urban environments, greenhouses are usually created on the roofs of public buildings, for example, schools.
Installing a greenhouse on the roof of a house can reduce heating costs. Thanks to this, the microclimate in the building under the greenhouse improves. In addition, it is much easier to install additional communications into the greenhouse.
conclusions
The features of creating greenhouses with a gable roof must be taken into account before constructing such a structure. This requires the correct choice of materials and taking into account some subtleties. For example, it is important to think through the parameters of the foundation and calculate the load on it. The lighting and heating features of the structure should be taken into account.
When choosing a roof type, you need to decide on the material and supports on which it will be installed. Typically, wooden beams are chosen as pillars. You can also install a reinforced frame made of metal profiles. Polycarbonate is a convenient material in terms of installation and operation. Therefore, it is often chosen when constructing greenhouses with a gable roof.
Recommended Posts
Inspection hole in the garage
How to get rid of fungus in the basement
Greenhouse frame made of profile pipe + drawings
House for a well + drawings, dimensions
DIY garage interior decoration + photo
Decorating the inside of the bath with your own hands
Applying a profile
The selection of material for arranging the profile is important, since its strength largely determines the type of greenhouse and the roof that is attached to it.
How to make a roof on a greenhouse with the best profile option? Let's look at possible forms:
- flat (relevant for greenhouses);
- arched (suitable for growing short plants, the load is distributed evenly);
- single-pitched (a ridge is required for the top of the roof - this will help increase the strength of the structure);
- gable (a ridge for the top of the roof is also required).