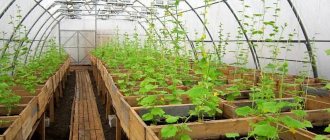
Some time ago, this approach was used mainly by farmers, but now ordinary gardeners are also actively interested in how to make heating in a greenhouse for the winter and spring periods. Moreover, today there are plenty of ways.
Each method has its pros and cons. But no matter which one you choose, you need to first consider a number of factors:
- greenhouse area;
- the climate of your region;
- seedlings need for heat;
- your financial capabilities.
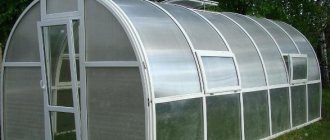
And another important factor that is worth remembering is the correct covering material. To cover winter greenhouses with heating, glass (at least 4 mm thick) or polycarbonate (8-10 mm thick) is most often used. Externally, these materials are very similar, but if you “dig deeper”, they differ greatly in their characteristics.
Glass has a high light transmittance (which is a definite plus), but at the same time it is several times heavier than polycarbonate and does not bend at all (which complicates installation). In addition, glass has a higher thermal conductivity compared to polycarbonate (which threatens sudden temperature changes during the day and night).
| Index | Glass 4 mm thick | Cellular polycarbonate 8 mm thick | Cellular polycarbonate 10 mm thick |
| Weight, kg/sq.m | 9,4 | 1,5-1,7 | 1,7-2,0 |
| Heat transfer coefficient, W/sq.m*S | 5,8 | 3,6 | 3,1 |
| Light transmission | 88% | 82% | 80% |
Now that you have decided on the covering material, it’s time to figure out how you can heat the greenhouse in winter. Let's look at the main options.
Infrared heaters
The latest developments in greenhouse heating include ceiling-mounted infrared heaters. They consume a minimal amount of electricity, plus the effect of their action far exceeds any other types of heating devices, including water radiators and even heated floors.
Infrared heaters
The heat from them does not rise upward, but spreads evenly throughout the room. Moreover, it is the soil that warms up most intensively, and not the air, which is very important for plants.
It should be noted that to heat greenhouses it is necessary to use only long-wave devices (preferably ceramic) with heating of the working fluid to 270-300°C. Unlike medium-wave emitters, which heat up to 1700-1900°C, they are not capable of burning plants.
Significant advantages of infrared heating also include:
- environmental friendliness and harmlessness: such heaters do not emit carbon dioxide and other combustion products into the air that are harmful to plant health
- infrared devices do not dry the air at all, since they do not heat it, but any objects and surfaces; no humidification of the room is required during their installation
- no heat loss - the efficiency of such heaters is 95%
- efficiency: since they heat the soil rather than the air, the required volume of thermal resources is reduced by 35%; Plus, such devices consume a minimum of electricity
- installation of systems is simple
- the risk of fire when using infrared devices is minimized
Underfloor heating system
Installation of heated floors
An ideal option for heating the soil in a greenhouse is also a heated floor system. After all, for successful plant growth, it is the roots that need to be warmed up.
Since heating a greenhouse with electric heating elements will cost a lot of money, it is better to install a stove or boiler in it. The heating system can be combined by installing radiators around the perimeter.
- It is better to use polyethylene pipes to heat the greenhouse. They are buried to a depth of about 40-50 cm in the drainage - a layer of crushed stone and sand
- It is not advisable to use metal-plastic for laying in the ground. After all, its fittings (connecting elements) require regular tightening. If you still decide to use such hard plastic, use compensation loops when laying the pipeline
- The first to be laid is a polyethylene film , which serves as waterproofing.
- Next, a layer of thermal insulation made of polystyrene foam or expanded polystyrene
- You can also reduce the thermal conductivity of the soil using compacted sand , which is poured over the heat-insulating layer to a height of 10-15 cm
- The distance between the pipelines should be 0.36 m. To ensure uniform heating, 2 collectors are placed along the edges of the greenhouse. Pipes are connected to them alternately
- To protect the pipeline from damage when digging the soil with a shovel or pitchfork, slate or metal mesh is laid on top of it
- The next 35-40 cm layer is fertile soil
Do-it-yourself potbelly stove
such heating for a greenhouse yourself. To do this you will need the following materials and tools:
- heat-resistant metal sheets;
- pipes of the same diameter made of cast iron, steel or ceramics;
- metal rods and corners;
- tape measure and plumb line;
- grinder or metal scissors;
- welding machine;
- bolts and couplings;
- baked brick;
- clay and lime mortars.
Structure, its location and foundation
One potbelly stove can heat a space of 15 m2 . There must be at least 30 cm between the heated structural elements and the walls of the greenhouse.
If the greenhouse is made of a material that can easily be melted (polycarbonate, polyethylene), then this distance must be doubled.
The heating structure consists of:
- fireboxes;
- chimney;
- chimney.
Fuel burning in the firebox emits warm smoke . It is distributed throughout the greenhouse using a chimney, heating the air, and then goes outside through the chimney.
Do-it-yourself heating of a greenhouse with a potbelly stove:
To do this kind of heating of a greenhouse in winter with your own hands, you first need to make a foundation . Thanks to it, the stove will not warp, its legs will not fall into the ground, and the risk of fire will be minimized.
- For the foundation, you need to prepare a pit 0.5 m deep. Its area depends on the size of the stove. If you plan to cover the finished stove with brickwork, this must be taken into account when digging a pit.
- A mixture of sand, small crushed stone and brick fragments must be poured into the finished pit. A layer of 15–20 cm will be enough.
- Now you can install wooden formwork : the boards need to be placed around the perimeter of the pit, and the gaps between them and the walls of the pit should be filled with sand.
- cement into the hole limited by the boards , and then lay a layer of roofing felt . This will provide additional waterproofing and the foundation will last longer.
- The final touch is laying the bricks . They are placed on roofing felt in two layers, secured with a clay-sand mortar.
Advice! To ensure that the structure is level, you need to check the plumb line after each step.
Designs:
There are different designs of potbelly stoves , but the simplest is the ordinary rectangular stove . It is better to install it so that the combustion hole goes outside. This will make the combustion process easier, and the possibility of smoke in the greenhouse will be reduced.
- The size of the stove will depend on the size of the greenhouse. Average parameters: width – 30 cm, length – 40 cm, height – 45–50 cm. Such a stove can heat 10–15 m2 of space. Taking these features into account, you need to draw a diagram of the future design.
- The firebox is made of any heat-resistant metal . You need to mark the sheets and cut out the structural elements (bottom, walls and roof) with a grinder or metal scissors.
- Now you should weld the bottom and three walls. inside, to a height of ¼ from the bottom . A lattice is placed on them.
- You can buy a grate in a store or make it yourself from metal rods. The rods are welded together in such a way as to form a lattice with holes of 1–4 cm2 . The size of the holes will depend on the future fuel. The grate will hold the fuel, and the combustion products - soot and ash - will pass down into the ash box.
- In the future roof of the stove you need to cut a hole for the chimney with a diameter of 13–15 cm . The roof can then be welded to the structure.
Important! If the chimney is placed underground, the hole can be made not in the roof, but at the bottom or in one of the walls.
- two holes on the front wall of the stove : fuel will be placed through one, and the second will be used as a blower. Through it you can clean the stove from ash. The doors for the holes must be cut out of a metal sheet and attached to the wall using hinges. Handles should be attached to the doors.
- Now you can weld the front part to the stove. If you intend to place the combustion hole outside, it must be covered with heat-insulating material . Otherwise, the heated metal in contact with the greenhouse parts will melt them.
- A short section of pipe needs to be welded to the hole in the roof, to which the chimney .
- Metal legs need to be welded to the bottom or ends of the stove and secured with a jumper. This will add stability .
- To reduce the risk of fire and increase heat transfer time, you can line the stove with brickwork . This material retains heat longer: thanks to it, the stove will have to be fired up less often.
Chimney
The chimney can be made either from a single pipe or from sections of pipes of equal diameter. If the greenhouse is small and air heating is sufficient, the chimney can be laid above the ground. If soil heating is required, an underground structure is suitable.
- The pipe sections for the chimney must be fastened together. To do this, you can use a welding machine or special couplings (clamps). In the latter case, the joints between the pipes under the couplings are coated with clay.
- The chimney must be connected to the stove using the same couplings or welding.
- If you plan to place the chimney underground, then you need to dig shallow trenches (25–40 cm) and lay parallel pipes in them. The distance between the pipes should be from 60 to 100 cm. The pipes are covered with expanded clay or small crushed stone, and their ends are brought outside the greenhouse. This design will be an ideal replacement for “warm floors” .
- If the chimney is above ground, it must be supported by supports. It is best to place it at a slight angle so that the end adjacent to the chimney is slightly raised. This will increase cravings.
- The above-ground chimney must be covered with lime or chalk. Any deformation or rust stains will be visible on the white surface. This will help you easily monitor the condition of the structure.
Chimney
This part of the structure will allow smoke to be removed outside the greenhouse.
- The pipe must be welded to the chimney and covered with heat-insulating material so that when it comes into contact with the roof of the greenhouse, the latter does not melt.
- a spark arrester on top of the pipe . You can buy it in a store or make it yourself.
To do this, you will need a piece of flexible metal grate or a regular tin can.
You need to make a lot of small holes in the jar, and simply twist the lattice into a cylinder.
- To prevent debris and sediment from getting into the pipe, it must be covered with a metal cone .
It can be made from a piece of tin or bought in a store. This structure can be secured to the pipe with thick wire.
- To regulate the draft, a metal damper . It is welded to a piece of thick wire. The ends of the wire are brought out from both sides of the pipe. By turning the ends of the wire, you can change the position of the damper and adjust the draft.
Advice! The damper can only be closed after the fuel has completely burned out. Otherwise, carbon monoxide may enter the greenhouse.
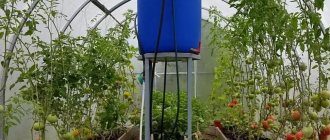
Water tank
a water tank next to or on the stove . It will allow you to water your plants with warm water all year round. In addition, water next to the stove will maintain an optimal level of humidity in the room, which will have a beneficial effect on the green residents.
Now you know how to make a heated greenhouse with your own hands. With the help of a warm greenhouse you can get an excellent harvest even in winter. You just need to choose the right heating method . For southern regions, any method is suitable, but residents of the north should give preference to electric heaters.
self-made greenhouse with heating will delight you with a tasty and healthy harvest all year round!
Heating with gas
Infrared burner
The disadvantages of such heating include the need for mandatory coordination with special services. Moreover, you will not be able to provide gas heating for the greenhouse - the design and installation of such systems is carried out only by specialists. Due to the high risk of ignition during operation, the operation of gas boilers will need to be constantly monitored. Due to the excess carbon monoxide generated during fuel combustion, ventilation .
But still, such devices have much more advantages. The cost of gas is not that high. You will only have to spend money on purchasing a boiler and equipment for it. Such designs ensure uniformity and rapid heating of the greenhouse, plus they are as easy as possible to maintain. But in order for it to heat up evenly, it is better to install heaters or connect several burners at once.
We list the main types of gas equipment used for heating greenhouses:
- convectors: industry produces special devices of this type specifically for heating greenhouses; built-in heat exchanger distributes heat evenly throughout the room; ventilation in it is provided using a coaxial (pipe in pipe) chimney
- heater with two open burners (the second of them serves as a spare) and a vertical chimney; the ventilation system is installed separately
- burners with infrared radiation: they are located in separate zones for local heating of certain types of crops or accelerating seed germination; equipped with a smoke exhauster that throws combustion products into the chimney; their operation does not require the installation of forced ventilation systems - natural is sufficient
In most cases, gas heating in greenhouses is combined with water heating . The principle of its arrangement is similar to that described above.
Heat gas gun
Heat gas gunsused for spot heating can be easily connected to both a gas main and a cylinder. Such structures are light in weight and quite mobile; they can easily be moved to any other place. The fuel in them burns completely, so the risk of carbon monoxide poisoning during their operation is minimal. Modern gas-fired heat guns are equipped with a temperature and even humidity control system.
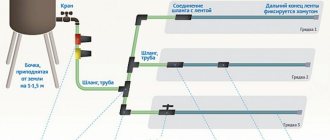
Which pipes to use
Here again there are two approaches:
- Use metal (for example, corrugated stainless steel) with high heat transfer. In this case, the installation step is made larger - the heat is transferred well. But here you need to be careful not to burn the roots of the plants.
- Use plastic or metal-plastic pipes. Their heat dissipation is much lower than that of metal, but for some cases this is not bad. For example, pyrolysis boilers do not work well at low return temperatures. In the case of metal-plastic or polypropylene, the temperature difference will be more or less comfortable for such a unit. If you lay metal, then almost cold water will reach the boiler, which will immediately lower the temperature and may disrupt its operating mode. If this situation repeats constantly, expensive equipment (pyrolysis machine) will simply fail.
At low supply temperatures (40°C and below), ordinary black polyethylene pipes can be used. But the reviews here are different. For some they work, others are dissatisfied because they constantly leak from under the fittings. In general, the situation here is this: which pipes in the region are sold cheaper from suitable materials, those are the ones they take. The length of the circuits for heating the soil in the greenhouse is quite large, so this approach is justified. All existing pipes for a warm water floor are also acceptable for heating the soil in a greenhouse (except copper ones, and only because of the price). The only question is cost and feasibility. Therefore, everyone chooses what they consider necessary.
You can use any pipes - the temperatures will obviously be low. Most often they buy those that are cheaper in a particular region.
The system can be organized in different ways. It all depends on volumes and needs. But it’s more rational to do it through a standard comb for a water floor with minimal bells and whistles. Just with shut-off valves and an air vent. Or make a similar design yourself.
Solar batteries
The principle of operation of a solar battery
Collecting and accumulating the heat given off by the sun's rays will help to get an early harvest in the spring. Heating a greenhouse using solar batteries can also be used as an additional option. For the winter period, the heat received only from them will not be enough.
To accumulate solar energy, the greenhouse must be installed in the most open place and located from east to west. It has been proven that arched polycarbonate structures are capable of “collecting” the maximum number of rays. Plus, the air in the cells of this material will serve as a natural heat insulator.
Solar batteries are divided into:
- water : the heat storage in this case is water containers (barrels or pools); Moreover, several small containers have a higher efficiency than one large one, because water always warms up better closer to the surface; they are distributed evenly throughout the room
- stone : this material is capable of retaining heat for a long time, so it makes sense to line the walls of the greenhouse with stone or cover it with a sufficiently large layer around the perimeter of the structure
- air : are among the most efficient battery devices (see photo); for efficient heating, heat exchangers are positioned perpendicular to the direction of the sun's rays; heated air enters the greenhouse through pipes; cold air is taken in through the second duct
When installing an air heating system in a polycarbonate greenhouse, it is advisable to use fans to ensure rapid air exchange. The inlet pipe of the air duct is located as close to the ground as possible. The pipe through which heated air enters the greenhouse is placed in the upper part of the room.
Owners' opinion
If you look at the reviews of owners of warm beds, you can see a truly rosy picture. A larger number of authors argue that growing seedlings in warm beds, and even in greenhouses, only has a better effect on the harvest. Those who use organic warm beds claim that in any climatic conditions the yield increases several times. They note the ease of formation of such beds, the possibility of early planting of seedlings and, accordingly, earlier harvesting. Many also point to the cost-effectiveness and durability of this method. On any site there will always be the ingredients to create this type of beds. And even a woman can build it with her own hands.
Owners of electric heated beds point to the ease of installation if you follow the instructions exactly, and the durability of such a structure. The only downside is that you can’t find such a system in stores everywhere. Some users order installation kits online. Increased productivity, early fruit ripening and full automation of this method are noted if you install a thermostat.
Many gardeners prefer the water method of heating beds. Among the advantages, in addition to high yield and early ripening, is the possibility of self-assembly of this type of heating. Any man is able to install pipes of the required size and diameter, connect a water pump and install a furnace to heat water. In addition, this method, as the authors note, is more economical than electrically heated beds.
Biological heating
Biofuel (self-heating substrate) has been used to heat plants since ancient times. Any summer resident knows that cucumbers get sick less and grow better not in open ground, but in warm manure.
Biofuel can also benefit a greenhouse. It can be used not only manure, but also plant residues, household organic waste (paper, rags, plant food residues), sawdust, leaves, straw. Later, when it completely rots and turns into humus, it is used as fertilizer. The best biofuel is obtained by mixing cow manure (1 part) with peat (3 parts). The mixture of conifer bark, sawdust and droppings heats up more slowly, so its heat lasts for a long time.
Biological heating
To heat a greenhouse using this method, it is necessary to remove the top layer of soil, lay a 15-centimeter layer of biofuel, and pour warm water over it. After a few days, when the organic mass begins to generate heat, it is again covered with removed soil and the beds are arranged.
When using straw, bales are placed in shallow ditches so that it rises slightly above the ground. To start the rotting process, the substrate is spilled with water, infusion of manure or chicken droppings. The seedlings can be planted after 2-3 days, when the temperature begins to rise.
How to heat a greenhouse with candles and bottles
This method can be useful in the event of return frosts. It allows you to increase the room temperature by several degrees in a short period of time.
When the temperature drops slightly below 0 °C, 4 candles are enough to heat a 6x3 m room . To prevent heat from immediately escaping upward, they must be covered with metal buckets, leaving a small gap between it and the ground for oxygen to enter. Buckets heated with a flame will begin to quickly heat the air.
You can replace metal buckets with ceramic pots, inserted one into the other and strung on a metal bolt. It will serve as a heat conductor.
Heating with a candle
You can also use regular water bottles to heat the greenhouse. Experienced gardeners stock up on large plastic containers and use them throughout the season. During the day, the bottles heat up in the sun, and at night, when the temperature in the greenhouse drops, they begin to release the accumulated heat into the air. Plus, in hot weather, containers with cold water save plants from excessive overheating and burns.
The best designs for greenhouse heating systems can be easily found online. For example, the author of the following video shares his own experience of heating such premises:
Which boiler to use
Since it is important to maintain a constant temperature in the greenhouse, the best option is automatically controlled boilers paired with a thermostat inside the greenhouse. But it's a matter of means. All these units are not cheap at all. However, if possible, buy automated ones. In addition to maintaining a stable temperature, they also save fuel. How? They produce the amount of heat that is currently needed to maintain the set temperature. That is, they will not allow your plants to freeze (if there is fuel) when the temperature suddenly drops, delivering their maximum power. But they will not produce excess heat during an equally sudden warming. In this case, they will simply switch to circulation mode and drive water through the pipes without heating (or with minimal heating - depending on the type of fuel) until the temperature drops below the set one. Then the active mode is turned on again, but only until the specified thermal mode is reached.
If you are going to heat with wood or coal, pay attention to pyrolysis boilers. Although they are expensive, wood in them burns for up to 8 hours, and coal lasts for 24 hours. And you don’t need to “live” in a greenhouse or keep a stoker.
Boilers with automated controls performed best in the greenhouse, and you need to choose any fuel that is available and at the same time inexpensive
How to calculate the boiler power for a greenhouse? In general, the surface area of the greenhouse is multiplied by the heat loss coefficient for the material with which the greenhouse is covered, and all this by the required temperature difference.
The temperature difference is considered to be between the minimum during the heating period outside and the required one in the greenhouse.
For example, we will be heating from February to April. The lowest temperature, even -18°C, will be maintained inside at +20°C. Total delta (difference) 38°C. Now let’s calculate the boiler power for such conditions in a greenhouse 10 x 5 x 2.5 m. Covered with double film. The area of all “film” surfaces of the greenhouse is approximately 150 m2, the coefficient of heat loss through the double film is 3.5. Total we get: 150*3.5*38=19950W. Rounding up we get 20 kW. For reliability, you can take a slightly more powerful boiler, approximately 24-25 kW (in case of expansion or abnormal cold).