Home » Building a house » Do it yourself
Alexander Korovaev 06/12/2019
33451 View
Tired of running around with a watering can, hauling gallons of water every day? Organize drip irrigation in the greenhouse yourself. Such a system will not only help you significantly save energy and time. A gradual drip of water will also be beneficial for plants.
System advantages
The drip irrigation method was first used in Israel in the 1950s - in a similar way, scientists tried to cope with water shortages. Later it was found that when serving it in small portions, not only water and labor resources are saved. Drip irrigation allows you to get earlier harvests.
With normal irrigation, water penetrates into the ground to a depth of 10 cm. Its gradual drip entry allows the root system to be more saturated with moisture. The roots grow much faster, which means they extract more nutrients from the soil.
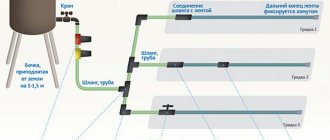
Installation diagram of a drip irrigation system
Since the rest of the soil remains dry, the likelihood of waterlogging is reduced. This has a beneficial effect on the health of plants - after all, most of such dangerous diseases as powdery mildew, white rot, gray rot, blackleg, bacterial spot develop precisely in conditions of waterlogging.
Since water is supplied to the root, the likelihood of plant burns, which usually occurs when moisture gets on the leaves, is significantly reduced. This is due to the lens effect of the small droplets.
Plus, since irrigation is carried out only in the root zone, weeds that do not receive enough moisture spread at a slower rate. This system also prevents soil erosion.
The drip irrigation system for a greenhouse is simple, but with its help you can increase plant productivity by 30-40%. This irrigation method allows you to accurately calculate the time and intensity of watering for each type of plant.
Initially it was used only in greenhouse conditions. Later, this method began to be used when growing plants in open ground.
Drip irrigation systems for greenhouses
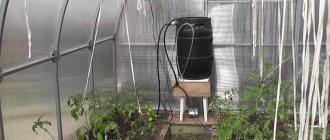
The structure is a network of water pipes through which moisture flows to the roots of plants. Operating principle:
- Water for irrigation is stored in a barrel.
- The submersible pump creates pressure and gravity watering occurs. The distance between the barrel and the ground also helps here - the container is raised above the surface by 1-2 meters, increasing the pressure.
- The main line through which the water flows is connected to this reservoir through a filter, and pipelines are led from it along the length of the beds.
- There are holes made along them where droppers (nozzles) are mounted - from there the liquid drips.
The principle of the drip irrigation system
The peculiarity of drip irrigation is that the water goes directly to the roots of the plants. This way they are better saturated with moisture than with standard watering. Advantages:
- The risk of soil overmoistening is reduced. This saves plants from powdery mildew, white or gray rot, and black leg.
- Soil erosion is prevented.
- There is no risk of plant burns. Water does not reach the leaves, so the lens effect from the sun is eliminated.
- Weeds grow less intensively. They simply do not receive enough moisture - it only enters the root zone of plants.
The disadvantage of this system is the mandatory control over it. The barrel will have to be regularly filled with water, and the holes in the pipelines will have to be cleaned. They clog quickly due to their tiny diameter, but this can be solved by blowing out or flushing the system. Inaccurate calculations will lead to waterlogging of the soil, excessive water consumption and crop loss.
Drip irrigation in greenhouses can be automated using a special controller. This is how plants receive moisture at a given time with the required intensity. Gardeners even create separate modes for different crops, setting several timers.
Disadvantages of drip irrigation
The main disadvantage of do-it-yourself drip irrigation systems for greenhouses is the mandatory control. After all, if the calculation is incorrect and there is an excess of moisture in the area, in addition to excessive water consumption, you will simply destroy the plants. You will need to regularly check the filling of the barrel - it will need to be constantly topped up.
The simplest irrigation system
The disadvantages of drip irrigation include the need to periodically clean the holes - due to their small diameter, they often become clogged. However, this is not difficult to do - just rinse or blow out the system.
It is not recommended to increase the size of the holes, since water will immediately pour out at the beginning of the hose, and simply will not reach the very last nozzle holes.
To protect the system from contamination, a filter is installed at the inlet (that is, at the beginning of the hose located in the barrel). You can even use an ordinary piece of foam rubber as it.
Cleaning the system will become much easier - all you need to do is remove and wash the foam rubber. It is necessary to protect the barrel itself, as well as the receiver-distributor, from debris and insects - they will need to be covered with lids.
How to calculate the footage of drip tape
Attention! You can make drip tape yourself. To do this, you will need a hose with a thickness of up to 200 microns and a diameter of 16 mm. You need to make holes in it with an awl at a distance of 20 to 50 cm. Water will seep into the soil from the holes you made.
The downside of drip tape is that the holes need to be periodically cleaned of particles of earth or sand. In addition, when using it without individual taps, it is difficult to regulate the water supply to a particular sprout.
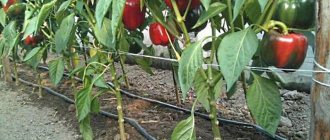
Drip tape is laid next to each ridge
You need to decide how to lay the drip tape. If in the form of sleeves for each plant, then the number of seedlings must be multiplied by the distance from them to the main tape. For example, if you have 10 seedlings, and you need to lay 50 cm of tape to each, then you will need 5 meters of tape. Better - with a reserve.
You can lay one strip along the bed if you only have two rows. Then its length will correspond to the length of the greenhouse.
Another option is to lay tape under each row. For example, for 10 rows of 10 m each, 100 m of drip tape will be required.
Operating principle
We will describe in detail the device of drip irrigation in a home greenhouse. With this method, water is supplied using dispensers-droppers (nozzles). Its simplest version is a hose with 3-8 mm holes made in it and the main spout plugged with a plug.
To ensure pressure, a tank filled with water with a hose lowered into it is raised to a certain height. Depending on the required pressure, it can be from 1 to 10 m. More complex systems are automated, but we will talk about this below.
Drip irrigation scheme
Drip watering should only be done under the roots of plants. When water is supplied between the rows, there will not be enough moisture for the roots, and the crops will develop worse. At the same time, the soil around it will become compacted and loosening will be required. Plus, wet soil under the rays of the sun will overheat, which will adversely affect growth.
The source of water does not have to be a tap or a barrel. They can serve as a well, a well or a reservoir. To do this, you will need to connect a pump to the system.
But in any case, the mandatory installation of a filter is required - otherwise the pipeline will quickly become clogged. When drawing water from an open source (reservoir), it is first necessary to install a coarse filter, and only then a fine filter. In other cases, a single fine filter is sufficient.
But still, to water a greenhouse or vegetable garden, it is better to heat the water in the sun before watering. For this purpose, containers (barrels) of suitable size are used. When it is raised to a certain height, water will flow into the system by gravity.
The pump will only be needed to draw water if there is no water supply or its pressure is low.
Instructions on how to connect correctly with your own hands
Installation of drip irrigation begins with the installation of a barrel. It is located at a height of 1 to 3 m. A stand is built for this purpose. It is better that the barrel has a lid that protects it from debris, with holes to provide oxygen. If there is no lid, the top of the tank can be covered with gauze to protect the system from debris.
The water in the barrel can be heated naturally from the sun's rays or using a heating element located in the container. The latter method is used if water enters the tank from a well or borehole.
Classical
For classic system assembly you will need:
- barrel;
- filter;
- pipeline;
- coupling;
- ball valve;
- droppers.
Step-by-step connection steps:
To ensure better ventilation in the container, we make 3-4 holes in the lid.- At the bottom of the barrel we make a hole for the ball valve.
- We install a ball valve on the coupling.
- Connect the filter.
- We assemble the pipeline.
- We make holes on the hoses for droppers.
- We install droppers.
Tape
For a strip irrigation system you will need the following materials and tools:
- hose;
- tap;
- stub;
- filter;
- barrel;
- awl;
- union.
Step-by-step installation steps:
- We cut the hose along the length of the beds.
- We lay the hose over the garden bed and secure it.
- We place a tap and a plug at the beginning and end of the hose.
- We connect the hose together and connect it to the tank.
- Drill holes in the hose.
- We install droppers.
- We make a hole in the barrel corresponding to the diameter of the fitting.
- Install the filter.
- We connect the barrel with the hose.
To see the water level, it is better to attach a transparent pipe to the hose and barrel, into which to lower a bright plastic ball.
Auto
For automatic watering you will need:
- submersible pump;
- main pipe with a diameter of 16 mm;
- drill;
- fitting;
- stub;
- dropper;
- drip tip;
- timer.
Step by step installation steps:
We install the submersible pump on a container of water.- We connect the main pipe.
- We drill a hole with a diameter of 16 mm in the barrel and insert a seal.
- We pass the main pipe.
- We route the main pipe through the greenhouse using fittings.
- At the end we install the plug.
- We make a branch from the main pipe to the plants.
- We insert the dropper into the outlet.
- We make a branch from the dropper to the plant, and install a drip tip at its end.
For automatic watering, it is better to purchase adjustable drippers.
Types of droppers
Drippers are devices with small tubes at the end that cut into each of the holes in the hose or pipe to regulate the volume of water supplied.
Depending on the type of crops grown, the size of the plot and material capabilities, you can choose one of the types of drip systems.
Compensated drip
They are divided into:
- uncompensated and compensated: in the first case, the water supply at the end of the bed will be lower than at its beginning; compensated drippers, equipped with a membrane and a valve, are capable of dispensing water in doses even at different pressure levels; such devices are ideal for areas with height differences
- devices with a fixed volume of liquid supply (the manufacturer indicates it in the instructions): from 1 l/h
- with manual water flow
- equipped with an anti-drainage (compensated) system : they do not allow water to be completely removed from the system even when its supply is turned off; the pressure in them never drops to zero, so when switching on again there is no time required to displace air
- with spider-type dispensers: more expensive devices with drip irrigation for several plants at once
Whatever type of dropper you choose, always pay attention to the possibility of disassembling it. For such structures, the cover must be removed to clean the device from clogging.
Components and layout options
Drip irrigation systems can be organized using any water source. A well, borehole, river, lake, centralized water supply, even rainwater in tanks will do. The main thing is that there is enough water.
A main pipeline is connected to the source, which supplies water to the irrigation site. Then it goes along one side of the irrigated area and is muffled at the end.
Opposite the beds, tees are inserted into the pipeline, to the side outlet of which drip hoses (pipes) or tapes are attached. They have special droppers through which water is supplied to the plants.
The drip irrigation scheme from a barrel can be easily implemented with your own hands
It is advisable to install a filter or filter system between the outlet of the source and the first branch onto the bed. They are not needed if the system is powered from the home water supply. If you pump water from a lake, river, rainwater tank, filters are required: there can be a lot of contaminants and the system will clog too often. The types of filters and their number are determined depending on the condition of the water.
How to purify water from wells and boreholes is described here.
Drip hoses
Hoses for drip irrigation are sold in coils from 50 to 1000 meters. They already have built-in water flow points: labyrinths through which water flows before entering the outlet. These oozing hoses provide the same amount of water throughout the entire line, regardless of the terrain. Due to this labyrinth, the flow rate at any irrigation point is almost the same.
They differ in the following characteristics:
- Tube stiffness . Drip hoses can be hard or soft. The soft ones are called tapes, the hard ones are called hoses. Hard ones can be used for up to 10 seasons, soft ones - up to 3-4. Tapes are: Thin-walled - with a wall thickness of 0.1-0.3 mm. They are laid only on the surface, their service life is 1 season.
- Thick-walled tapes have a wall of 0.31-0.81 mm, service life - up to 3-4 seasons, available for both above-ground and underground installation.
Watering can be organized using tapes or hoses
- Diameter. Affects performance and maximum line length. The internal diameter of hoses can be from 14 to 25 mm, tapes from 12 to 22 mm. Among the tapes, the most common size is 16 mm.
- Water consumption . Selected depending on the required irrigation intensity. Hoses can deliver 0.6-8.0 l/hour, thin-walled tapes - 0.25-2.9 l/hour, thick-walled tapes 2.0-8.0 l/hour. This characteristic is the flow rate through each dropper.
- Distance between droppers. It can be from 10 to 100 cm. It is chosen depending on the required amount of water and how often the plants are planted.
- IVs may be with one or two exits. Water consumption remains stable. Only the depth and area over which the water spreads changes. With one outlet, the area is smaller and the depth is greater; with two outlets, the irrigation area increases and the depth decreases.
One or two exits. Selected depending on the root system of the plant - Laying method : above-ground, underground, combined.
- Operating pressure. Varies widely depending on the manufacturer: from 0.4 Bar to 1.4 Bar. You choose depending on whether you have a gravity-fed system, use pumps to supply water, or whether everything is connected to the water supply.
The maximum length of the irrigation line is determined so that the unevenness of the water output at the beginning and end of the line does not exceed 10-15%. For hoses it can be 1500 meters, for tapes - 600 meters. For private use, such values are not in demand, but it is useful to know)).
Droppers
Sometimes it is more convenient to use droppers rather than tapes. These are separate devices that are inserted into a hole in the hose and through which water is supplied to the root of the plant. They can be installed in arbitrary increments - put several pieces in one place, and then several in another. This is convenient when organizing drip irrigation of shrubs or trees.
Separate drippers that are installed in a hose are more convenient to use when watering shrubs, grapes and trees
There are two types - with standardized (constant) and controlled water release. The body is usually plastic; on one side there is a fitting, which is inserted with force into the hole made in the hose (sometimes rubber rings are used for sealing).
There are also compensated and uncompensated droppers. When using compensated ones at any point in the irrigation line, the water release will be the same (approximately), regardless of the terrain and location (at the beginning or end of the line).
There are also spider-type devices. This is when several thin tubes are connected to one output. This makes it possible to simultaneously water several plants from one water outlet point (the number of droppers is reduced).
Spider-type dripper - you can water several plants from one water distribution point
You can read how to make a small greenhouse here. And how to make a garden beautiful is written here.
Main pipes and fittings
When creating a system for laying a main pipeline from a water source to an irrigation zone, plastic pipes and fittings are used from:
- polypropylene (PPR);
- polyvinyl chloride (PVC);
- polyethylene: high pressure (LDPE);
- low pressure (LPP).
All these pipes tolerate contact with water well, do not corrode, are chemically neutral and do not react to the application of fertilizers. For watering a small greenhouse, vegetable garden, or lawn, a diameter of 32 mm is most often used.
Main pipes are plastic. Choose any specific type: PPR, HDPE, LDPE, PVC
In places where the lines are drained, tees are installed, to the side outlet of which a drip hose or tape is connected. Since they are smaller in diameter, adapters may be needed, and their outer diameter should be equal to the inner diameter of the hose (or be slightly smaller). You can attach tapes/hoses to fittings using metal clamps.
Bends can also be made through special fittings, which are installed in a hole of the required diameter made in the hose (as in the photo above).
Sometimes, after the tee, a tap is installed on each water distribution line, which allows you to turn off the lines. This is convenient if drip irrigation is used for moisture-loving plants and those that do not like excess water.
If you are reluctant to choose components and select sizes and diameters of fittings, you can buy ready-made kits for drip irrigation from various manufacturers.
Distance between droppers-nozzles
The water supply in drip irrigation for a greenhouse made by yourself must be carefully adjusted. With low pressure, only those plants located at the beginning of the bed will be provided with water.
Excess water is also undesirable - the plantings will suffer.
For most crops, the distance between droppers is 30 cm
The types of droppers and dispensers and the distance between them should be selected depending on the type of plants being irrigated.
After all, there are no universal devices for watering:
- “spider” dispensers with a large distance between dispensers; they are best used for irrigating perennial greenhouse plants; do not use for open ground and watering seedlings, in this case a smaller distance between the droppers is required; water conduits for “spiders” are made only suspended
- for watering most crops, the distance between dispensers should be 30 cm
- droppers with a pitch of 20 cm are used for watering root crops - carrots, onions, etc.
- for melons and melons, the distance between the droppers is 1 m
Barrel selection
In order for everything to function as it should, you must choose the right barrel or tank. The main requirement is opacity. This will prevent the appearance of single-celled algae - they quickly render the filter unusable and clog the holes in the drip tubes.
It is better to install the barrel in the shade - overheated water is undesirable for plants. As an option, wrap it with foil thermal insulation. Make sure that the lid of the container is tightly screwed on and has small holes for air to escape. Dust and microorganisms will enter into an open barrel.
The exit is arranged at a height of 15 centimeters from the bottom - this will make it possible to settle the water before watering. The accumulated sediment is periodically scooped out.
Calculation of water volume and duration of irrigation
To make homemade drip irrigation, you should first draw up a plan indicating the length of the beds and the location of the plants on it. Next, a drip irrigation diagram is drawn, which indicates the location of each of the pipelines and the container for collecting water (barrels).
A detailed plan of the system is needed not only to determine the total length of the pipes, but the number of droppers, as well as adapters, tees and other parts.
For cucumbers, the norm is 2 liters of water per bush.
Next, you will need to calculate the volume of water consumed, that is, the size of the required container (barrel). For example, to lay a pipeline 10 m long with a distance between droppers (nozzles) of 30 cm, 34 of them will be needed. If each of them “gives out” 5 l/hour, then 34 droppers will pass through 170 l/hour.
If the length of the system is longer, then too much capacity will be needed. Therefore, it is better to split the drip system into two or use a constant source of water.
Drip irrigation can be used for any type of planting. Only the scale and type of equipment changes. In addition to greenhouse plants, it can be used to water vegetables and fruits in the open ground, as well as flowers, trees and shrubs.
Water consumption for drip irrigation for moisture-loving plants such as cucumbers is 2 liters per bush, that is, several times less than the usual norm. Drip watering of tomatoes in a greenhouse with already formed fruits is carried out once every 4 days.
Each plant will need 1.5 liters of water. Cabbage and potatoes will need 2.5 liters per day. Thus, when supplying water from a dropper at 3 l/hour, it will take a little less than an hour to water cucumbers, about 30 minutes for tomatoes, about an hour for cabbage and early potatoes.
FAQ. Frequently asked questions about drip irrigation
Does drip irrigation affect soil compaction?
Yes, there is a slight decrease in level, a decrease in volume. To provide air access to the root system, you can use a pitchfork to puncture the soil. And in the fall, dig up the area.
Should the tape be buried for watering seedlings? What pitch between holes is required?
It does not matter where exactly the water source will be located. As for the step, it depends on the length of the row and the structure of the soil. If the soil is sandy, then the required step is 10-20 cm, if it is medium-grained, then 30 cm. If the planting row is long, a distance of about 40 cm is maintained.
Why does a tape with emitters water poorly?
In this case, you need to check how high the water tank is above the ground. Its optimal height is about 1.8 m.
How to store drip tape?
During operation, we recommend avoiding excessive pressure and mechanical damage. In winter, you need to wind the hose onto a reel, but so that it does not bend or break. Store in a room with temperatures above zero.
Phytosporin in the greenhouse: we treat beds, walls, plants
Criteria for building the best greenhouse: what to look for?
DIY greenhouse: review of popular designs
Rules for organizing watering of various crops in a greenhouse
Required materials
To set up a permanent irrigation system that will be used year after year, it is better to purchase more durable PVC pipes rather than hoses. Since moisture must enter the system slowly, the diameter of the tubes is selected to be minimal - up to 10-16 mm.
It is better not to use transparent pipes or tapes - algae will grow inside them. Metal pipes will not last long - rust will quickly clog the dropper nozzles.
Drip tape
Manufacturers also offer ready-made irrigation systems in the form of polyethylene drip tapes with built-in drippers. With their help, it is easier to dose watering - the micropores inside resemble a labyrinth in which the direction of water flow is controlled.
The wall thickness of the tapes can vary from 0.127 to 0.381 mm. However, such systems do not last more than one season. In the spring you will need to purchase new ribbons.
In addition to distribution and irrigation pipes, you will need:
- a pump that comes complete with a filter (such systems are called master blocks) to supply water at a certain pressure (up to 1.5 bar)
- droppers (we described their structure and types above)
- stands for strengthening dropper dispensers at plant roots
- taps (switches) for adjusting the flow force and shutting off the system in individual modules
- fum tape or tow for sealing joints
- plastic couplings
- adapters
- tees
- plugs: they are located at the ends of pipelines
When drawing water from a well, you will also need a filter. You can buy a regular mesh or disk one. To install automated stations, you will also need a control unit (timer) and a battery.
Parts from medical droppers with a diameter of 1-2 mm can be used as nozzles (droppers).
Selection of components
The simplicity of the design of drip irrigation from a barrel allows you to use almost any available materials for its arrangement. However, there are a number of important points to take into account.
- It is highly undesirable to use galvanized pipes as pipelines. They rust and are difficult to clean. The best option is PVC or HDPE pipes with a diameter of 16-20 mm.
- When choosing droppers in a store, you need to pay attention to their design. They are available in two versions: compensated and uncompensated. The former have a valve that allows them to withstand a given flow of water, regardless of its pressure. The latter do not have such capabilities.
- If finances do not allow you to purchase ready-made droppers, you can use a homemade option. To do this, take tubes from a medical dropper and make holes in them. In this case, it is important to experimentally select the optimal diameter of these holes. They should not be too large to avoid waterlogging of the soil. But not too small, which slow down watering and quickly become clogged with dirt.
In addition, it will be necessary to select a set of pipe connectors, angles, tees and plugs. Their number is determined according to a pre-prepared irrigation system diagram.
To piping the tank, you will need two ball valves (for the water main and for supply to the irrigation system), as well as a filter. As a budget filter option, you can use a piece of foam rubber inserted into the pipe.
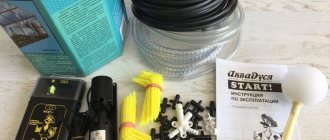
Accessories for drip irrigation
Set of drip irrigation from a container
System assembly. Main stages of work
Assembly diagram
Making drip irrigation in a greenhouse with your own hands is not difficult:
1To install the system, you will need a 100-200-liter barrel, which is raised to a height of about 1-2 meters. If there is a lid, holes are prepared in it for air intake. If there is no lid, it is better to cover the container with gauze.
2To insert the hose, a hole is prepared at the very bottom of the barrel with a tap-tip installed in it.
3Each of the tubes or hoses is laid with a slight slope of 5 cm per meter of length. They are secured to small pegs stuck into the ground.
4You should not pull pipelines that are too long - they will require very large containers. It is much more profitable and convenient to use several systems independent of each other.
5PVC pipes are cut with a hacksaw, pipe cutter or miter saw. To obtain tight joints, the cutting angle must be precise and equal to 90 degrees. Therefore, it is better to clamp the pipes in a vice.
6 Small 2mm holes must be made in hoses or plastic main pipes. In a simple do-it-yourself drip irrigation system in a greenhouse, the droppers can be replaced with pieces of ordinary wire, along which drops of water will descend and be supplied to the plant.
7You can make holes in the hose with an awl or a nail held with pliers. In PVC pipes it is more convenient to do them with a small diameter wood drill.
8When using a pipeline in the form of ready-made strips, they are carefully laid out over the area. To avoid damage, pulling or dragging them is strictly prohibited.
9Pay attention to the marks on the tape in the form of colored lines. Sprinklers are located on this side. The system must be laid with the colored lines facing up.
10Next, the main main hose is secured using a clamp. A plug in the form of a wooden plug is inserted into its outlet (spout) hole.
11When connecting taps, fittings (tees and adapters), to perfectly seal the joints you will need fum tape or tow.
12Before inserting the plug, the system must be flushed to remove any plastic shavings that fall into the pipes during drilling.
13The last stage is checking the system. After starting the water, you need to make sure that water reaches each drip, including the last one in the garden bed. The soil near them should be moistened evenly
.
When installing drip irrigation, adapters, tees and droppers must be inserted with force, quite tightly. A hair dryer will help simplify the process. The heated holes will expand under the influence of heat, and the work will go faster.
Irrigation system design
First of all, it is necessary to draw up a detailed diagram of the future drip irrigation system. The beds are marked out on it and it is determined in what exact place certain crops will be grown.
Drip irrigation connection diagram
The configuration of pipelines and characteristics of dispensers will depend on the characteristics and needs of plants for water. Most often this is done as follows:
- divide the greenhouse area into three zones;
- in the first, large crops (cabbage, tomatoes, pumpkin, etc.) are planned for planting. Here the dispensers are placed at a distance of 40-45 cm from each other;
- in the second there will be crops that require slightly denser planting. Here the distance between the droppers should be about 30 cm;
- the third contains root vegetables and herbs. Such crops require abundant watering, so the step between drips should be reduced to 10-15 cm.
Next on the diagram, water mains are optimally laid. In this case, it is advisable to strive to keep the length of the pipes, as well as the number of turns and connections, to a minimum.
Automated irrigation systems
When installing a controller (timer), the system is fully automated. That is, it will not be controlled by a person by turning a crane, but by special equipment. At the specified time, it will turn the water on and off.
Automatic watering timer
Large enterprises install systems with a high degree of automation - such devices are capable of monitoring soil moisture, ambient temperature and even humidity.
To install automatic watering on a private property or in a country house, it is enough to purchase a simple device that allows you to set up watering at a given period of time. That is, at a certain time the tap will open and water will be supplied to the system. After it expires, watering stops.
Installation of such equipment is not difficult. The timer, equipped with fitting couplings on both sides, is inserted anywhere in the pipeline. It can also be connected to a pump to control water intake.
Tips for organizing drip irrigation yourself
Even a novice farmer can most often design drip irrigation for beds, but for many this process takes quite a lot of time.
The following tips will help speed up the installation of irrigation lines:
- when designing a system, it is imperative to take a realistic plan to scale;
- You shouldn’t skimp on components, since the durability of the entire structure most often depends on them;
- when choosing the type of main tape, it is necessary to take into account the type of soil, as well as the need to dismantle the structure at the end of the season;
- the diameter of pipes and other components should not be selected with a reserve: this will not increase the efficiency of irrigation, but will have a rather serious impact on the final cost of the structure;
- the system should be carefully adjusted before starting, during operation the soil should be moistened evenly, and an even wet strip should remain in the area along the highway;
- Errors made during installation are quite difficult to eliminate, so you should not rush when designing an irrigation system.
We recommend that you learn how to insulate a greenhouse for the winter with your own hands.
Drip irrigation is one of the most modern systems for caring for plantings of cultivated plants, which allows you to obtain maximum yields with minimal consumption of resources. Today, there are several options for arranging artificial irrigation, including homemade installations. They are not inferior in efficiency to factory ones, but at the same time have a lower cost and minimal costs for subsequent care.
Subsoil irrigation
This type of irrigation differs from conventional drip irrigation only in the depth of the water supply. A similar method has been known since ancient times - pottery pipes were used for this. Today it is used both on large farmlands and small summer cottages.
Installation of an underground irrigation system
Water is supplied to the roots of the plant using tubes equipped with holes. Since the top layer is practically not moistened, a crust does not form on it, and the soil does not require constant loosening.
Another advantage of the method is that it minimizes the loss of moisture used in the evaporation process. Subsoil irrigation allows you to maintain a more favorable air and thermal microclimate in the beds.
1Same as in the previous case, to install the system you will need a storage tank (barrel) with a tap to shut off the water. To create pressure, it is installed at a height of 1-2 m.
2You will also need 20-40 mm PVC pipes and connecting elements (tees and adapters).
3 In the pipeline, round holes of 2-3 mm or slot-like holes of slightly smaller width (1-2 mm) and a length of 5-10 mm are made every 20-40 cm.
4Water consumption should be small - 0.1-0.3 liters per day. This requires minimal pressure.
5To protect against small particles of debris that can clog the system, filters are installed at the beginning of the pipeline (inside the barrel). You can use either mesh, sand or gravel.
6The depth of laying the pipeline in the ground is 20-30 cm. The minimum distance between them is 40-90 cm. It is not worth laying the pipes higher, otherwise water will seep out and the soil will quickly become crusty.
7Since on heavy loamy soils water flows both into the depths and to the sides, the distance between adjacent pipelines can be made a little larger. On loose sandy soils, when moisture passes mainly deep, the distance between adjacent pipelines should be minimal.
8This parameter largely depends on the type of crops being irrigated. So, for strawberries, whose roots go shallow, the distance between the pipes is 40-60 cm. For watering trees, it is 70-90 cm.
9The distance for specific crops can be determined experimentally. Bury one or two pipelines next to the bed and after a couple of days dig with a shovel in 2-3 places. The soil in this place should be slightly moist.
10On dry sandy soils, so that precious moisture does not go to great depths, a film 10-20 cm wide is laid under the pipes.
11Water must be supplied to the humidifier pipes under low pressure at a water flow rate of 0.1-0.3 l/s.
12To prevent the holes in the humidifiers from becoming clogged with debris, soil particles or silt, you need to supply water to them through mesh, gravel or sand filters.
13 Just like a conventional drip system, an underground (subsoil) irrigation system can be equipped with a pump and timer to provide automatic water supply at a given time.
When using underground irrigation systems, it is advisable to use special herbicide-impregnated hoses. It does not allow plant roots to penetrate the entrance holes.
Installation
First of all, you will need to install the barrel. For a small greenhouse, it is enough to raise it above the ground by 1 meter or a maximum of one and a half. Further:
- we connect water supply to the top of the tank;
- to the bottom we attach a short piece of PVC pipe and a filter with a tap;
- from it we lay a highway to the greenhouse, placing it along the end of the bed;
- We attach pieces of drip tape to the pipe, one for each row of bushes;
- We jam its opposite ends in any convenient way.
Use of plastic bottles
To water small areas, you can make a simple device consisting of a plastic bottle with a small piece of tube inserted into it, suspended with the neck down. It is more convenient to use an empty ballpoint pen.
In addition to the main hole for the tube, you will also need a second one through which air will escape. If the tube is too wide, another, thinner tube or piece of wire insulation, called a jet, is inserted into the main tube to reduce the flow rate of water.
You can do it even simpler. Puncture 8-12 holes in the bottom of a plastic bottle. Their number depends on the type of soil. A minimal number of holes are made on light sand.
Moisture seeps into clay soil more slowly, so the number of holes is increased. However, their size should be minimal, otherwise the water will pour out of the bottles very quickly. It is better to do this with a regular needle.
The simplest bottle watering system
The bottle is filled with water, closed with a lid and buried in the ground, leaving the neck uncovered. As the container empties, you will add water through it. Since it may shrink as water flows out of the bottle, it is better to also make a small hole in the lid.
When the bottle is buried in the ground, the plants will be supplied with water using underground irrigation. The top layer of soil will not be wetted, so the usual crust on it, which needs to be constantly loosened, will not form.
When drip watering tomatoes in a greenhouse using this method, one liter bottle is enough for 5 days. This volume will be enough to water one bush. A 5 liter container will provide them with water for 10 days.
Clay soil can quickly clog small holes. To prevent this, use regular nylon stockings. They are pulled over corks or parts of bottles with holes made in them.
Another method of protecting against blockage of holes is often used - drainage. Before burying the bottle in the ground, throw some hay or a piece of burlap at the bottom of the hole.
Of course, it will be difficult to use such systems for irrigating a large number of plants. But in some cases, for summer residents who rarely appear on the site, this can be a life-saving solution.
It is better to bury the bottle in the ground at an angle of 30-45 degrees so that the water pressure is minimal. In this case, the rate of water flow will decrease.
What happens?
Along with the sprinkler irrigation system, which requires high pressure, drip irrigation is also widely used. Water flows by gravity into the pipes from a barrel raised above the ground and seeps in doses through droppers installed near each plant.
Compared to a sprinkler system, this system has many advantages:
- high pressure, as was said, is not required; a pump or water supply is used only to fill the barrel. Because of this, the requirements for the strength of materials are reduced, and hence the cost of the system;
- water consumption is reduced. With sprinkler irrigation, a huge amount of moisture evaporates from the leaves; with drip irrigation, it is immediately absorbed by the soil;
- the development of weeds is hampered. Water flows only to cultivated plants, the rest of the space remains dry and therefore unsuitable for the growth of weeds;
- You can water at any time. It is impossible to water using the sprinkler method during the day because drops of water, like lenses, focus the sun's rays on the surface of the leaf and the leaf gets burned. Night watering is undesirable because the plant remains wet all night and this risks getting sick. Obviously, with drip irrigation such problems do not occur;
- The water collected in the container is preheated in the sun. This is important if the water is extracted from underground and therefore has a low temperature. If you immediately apply it to plants, they may get sick;
- It is possible to apply fertilizers dissolved in water with irrigation. This method of feeding is recognized as optimal: microelements are better absorbed, and plant burns from contact with fertilizer crystals are avoided. When irrigating using the sprinkler method, you cannot mix the fertilizing mixture into the water.
To automate drip irrigation, it is enough to purchase a control device and a solenoid valve compatible with it. It is designed like a regular faucet, only it is actuated by applying power to a solenoid or servo coil. There are two types of control devices: timer and controller.
There are two types of timer:
- mechanical _ The simplest and cheapest. By turning the handle, the spring is charged, and while it unwinds with a characteristic ticking sound, power is supplied to the valve. Activator washing machines are equipped with the same timer. This option is far from perfect: setting the timer at the right time requires the presence of the user;
- electronic _ The device not only turns off the irrigation system after a specified time, but also starts it itself at the moment specified by the user in the settings. If you automate the filling of the container, and kits with such a function exist, the gardener’s participation is not required at all.
In electronic timers, you can set multiple modes for different days. After checking the weather forecast, you can set the device accordingly for the whole week and leave until next weekend. There are multi-channel devices. Each channel controls a separate segment of the irrigation system through its own solenoid valve. The mode for each channel is also set separately.
The controller, through a set of sensors, determines a number of environmental parameters:
- soil moisture;
- presence of rain;
- the volume of water supplied to the system (there is a flow meter);
- water temperature in the tank;
- pressure in the water supply (for pressure systems).
The controller waters the plants not at a set time, but when it is really necessary. But it costs much more than a timer.
A number of manufacturers produce kits that include everything necessary for organizing drip irrigation: hoses, drippers, fittings, control device, solenoid valve, filters, etc.
Electronic timers and controllers are battery operated, so they can be used in non-electrified areas.
Drip irrigation for indoor plants
A device like this will come in handy during your vacation. There are many ready-made drip irrigation systems on sale in the form of flasks that look like enemas, capillary trays, wicks, “smart pots”, etc.
Manufacturers also suggest using hydrogel, a polymer that can retain moisture and then release it to plants over a certain period of time, when leaving home for long periods of time.
Automatic watering can for indoor plants
If you decide to do drip irrigation for indoor plants, before going on vacation, be sure to check the functionality of the system. If water flows out of it too quickly, during the first couple of days, in the remaining time the plants will become without water and simply die.
To assemble your drip irrigation system, you will need a large plastic bottle and an old medical dropper or one or more thin, food-grade silicone tubes. They can be found in medical supply stores.
In hardware stores that sell moonshine stills, you can purchase tubes of a slightly larger diameter. The outlet end of such tubes can be closed with a plug, and several holes can be made in the tube itself for irrigation.
Assembling a wick irrigation system is even easier. To do this, place a large container of water next to the flower pot. One end of the wick is lowered into the container, the second is buried in the ground.
Just keep in mind that this method can only be used in loose soil. Water will not seep into dense soil. You should not use wick irrigation for tall plants with large roots - there will not be enough moisture for them.
Elements
There can be many options for arranging drip irrigation from a barrel in a greenhouse. There are options that differ in the materials used for pipelines and droppers, and in the methods of laying pipes (in the ground or on top of the soil).
Filter
It is installed immediately after the main shut-off valve on the water container. Necessary to prevent clogging of droppers with debris from the barrel. For greenhouse conditions, simple oblique filters with mesh filter elements are most practical.
Water container (barrel)
The barrel can be placed both inside and outside the greenhouse.
The first option is convenient for protecting the container from dust and flying garden debris. However, a large barrel eats up a significant amount of space in the greenhouse. In addition, if the ceiling is low, it will not be possible to raise the container sufficiently to create sufficient water pressure. Therefore, more often the barrel is placed outside the greenhouse. In addition to saving space, this makes it easier to fill the water and empty the container of debris. Drip systems are extremely sensitive to the purity of the supplied water. Therefore, when installed outdoors, the barrel should be equipped with a tight-fitting, but not airtight, lid.
The material for the barrel can be any: plastic or metal. Plastic containers are more practical because they are easier to clean and do not develop rust.
The volume of the barrel must correspond to the daily water requirement for all plants in the greenhouse. One root requires about 1-2.5 liters per day. Accordingly, to find out the volume of the container, you will need to multiply the water requirement by the number of plants. For reliability, it makes sense to multiply the result by a factor of 1.25.
Pipe system
It consists of three elements: a common main pipe, a distribution manifold and outlet lines that supply water directly to the beds.
The collector and the common line are made of pipes of increased diameter (25 -32 mm). Branch lines can be made either with pipes with a diameter of 16 mm or with special drip tapes.
Pipelines are assembled from metal, polypropylene or polyethylene (HDPE) pipes:
- The metal pipeline is reliable and durable, but is susceptible to corrosion.
- Polypropylene is cheap and does not change its properties during temperature fluctuations. However, removing a large welded structure from a greenhouse can be problematic. In addition, polypropylene is destroyed under ultraviolet rays, so it is only suitable for in-ground drip irrigation systems.
- HDPE pipes are comparable in characteristics to polypropylene pipes. Their advantages include a collapsible design and ease of modernization of the irrigation system. The only negative is the need to use compression fittings, which increase the cost of the entire project.
Droppers
Serve to supply water to the roots of plants. They exist in two versions: uncompensated and compensated. The latter are equipped with a membrane that allows for the same flow of water throughout the entire irrigation line. When using uncompensated drippers, the soil may become waterlogged at the beginning of the line and insufficient watering at its end.
Expert opinion
Kuznetsov Vasily Stepanovich
It is advisable to choose droppers with an adjustable flow. This will allow them to be used to provide watering for plants with different daily water needs.
In addition, it would not be superfluous to equip the common line with a device for supplying fertilizers to the irrigation system. Fertilizers that reach the roots along with water are better absorbed by plants.
Tips for use
Drip irrigation of tomatoes
Despite the simplicity of the design, the drip irrigation system requires constant maintenance.
To extend its service life, follow these rules:
1Metal under the influence of water will quickly become covered with rust, the smallest particles of which will constantly clog the pipeline. Therefore, it is better to mount the system from plastic. It is not advisable to use metal barrels and pipes.
3Don't forget to protect the pipeline with filters. They can be purchased at any hardware store or made yourself from a piece of foam rubber inserted into the supply pipe located at the entrance to the barrel.
4The filter needs to be cleaned more often, at least once a week.
5 Only clean or settled water should be poured into the barrel.
6Using the irrigation system, you can also apply fertilizers. To do this, they are first dissolved in water. After such watering, for cleaning you will need to run ordinary clean water through the pipeline for 10-15 minutes.
7If the pipeline is damaged during operation, the pipe is cut and connected using an adapter (coupling). Before starting repairs, be sure to rinse the contaminated area with water.
8In autumn, water is drained from the system. The pipeline is completely disassembled and stored in the utility room. Otherwise, in the autumn-winter period the nozzles will be completely clogged with dirt. Yes, and digging up beds next to the pipeline will be difficult.
Comparison with drip irrigation from a water supply
The principle of operation of drip irrigation systems from a water supply system and a barrel is the same, but there are quite significant differences that must be taken into account.
Features of irrigation from a barrel:
- Designed for low pressure water supply systems.
- There is a special adapter for connecting the structure to the tank.
- No timer.
- Designed for watering crops with water at ambient temperature.
Features of the water supply irrigation system:
- It is designed for high system pressure.
- There is a timer that controls the frequency of irrigation.
- Provides cold water, which is important to consider when watering plants.
The main difference between structures that supply water from a barrel and a water supply system is the pressure in the system and the ability to water plants that have different water temperature requirements.
Types of barrels
Before you begin assembling the irrigation system, you should pay special attention to the barrel into which the water will be collected.
The fact is that an ordinary steel barrel will not work, as it will quickly begin to rust, and algae very quickly accumulate and develop, especially on uneven, corroded walls.
For this reason, it is worth considering options for barrels made from the following materials:
- Plastic. The barrel is lightweight, very durable to clean, and the plastic does not lose its qualities over time.
- Stainless steel. The barrel will never rust, but it is expensive.
- Carbon steel. The price is not too high, but you will have to paint it often, since without painting there will be many pockets of rust formation.
Self-assembly
Having figured out how drip irrigation works in a greenhouse, you can move on to choosing a ready-made kit or assemble the system yourself from individual components.
Drawing up a diagram and calculations
Regardless of the decision made, you first need to draw a diagram, indicating the location of the beds, their length, location of the water source and other details.
On this diagram, the main and distribution pipes are drawn in order to calculate the length of each and determine the number of connecting elements - couplings, angles, tees, plugs, etc.
Approximate diagram Source idei-dachi.ru
When choosing from ready-made kits, it is necessary to take into account the pressure for which the system is designed, the number of droppers in the set, as well as the distance between them. As for their assembly, detailed instructions are included with each kit.