Climatic conditions are not always suitable for growing flowers and vegetables in open ground. That is why almost every site has a greenhouse or greenhouse. These two types of structures differ markedly from each other both in design and purpose. To understand whether a greenhouse is needed at your dacha, it is useful to know about its features. It also doesn’t hurt to have an idea of its varieties in order to choose the most suitable option.
Dome greenhouse
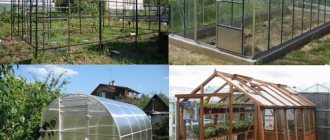
The dome-shaped greenhouse has an elegant design. This design is just beginning to gain popularity. It is a frame frame in the shape of a hemisphere. The base is a metal bent pipe that forms a circle. The remaining frame parts are connected segment by segment in such a way as to form a dome vault.
Advantages of the dome type of greenhouse frame:
- the ability of the frame to evenly distribute snow wind loads;
- stability of the frame on the surface of the earth;
- the strength of the frame structure, achieved due to the presence of a large number of supporting segments;
- improved removal of precipitation from the roof, without its delay and accumulation on the roof covering.
The disadvantages of this greenhouse and greenhouse design include the impossibility of installing boxes with straight shapes against the walls. To use the entire area of the room inside, you need to arrange cells in a circle for growing vegetation.
Voting for the best greenhouse for a summer residence
Which greenhouse would you choose or recommend?
greenhouse "Square"
9.09 % ( 1 )
"KINOVSKAYA PRIMA"
0.00 % ( 0 )
"PC Harvest"
0.00 % ( 0 )
"Novator 5"
0.00 % ( 0 )
"Kinovskaya" made of polycarbonate
0.00 % ( 0 )
"Dachnaya Strelka"
9.09 % ( 1 )
"Kremlevskaya Lux"
0.00 % ( 0 )
"Dachnaya Treshka"
18.18 % ( 2 )
Greenhouse "Agronomist"
36.36 % ( 4 )
"Bastion Premium"
9.09 % ( 1 )
"Dachnaya Optima"
0.00 % ( 0 )
greenhouse "Reinforced"
9.09 % ( 1 )
Pyramid greenhouse
The pyramid-shaped greenhouse has compact dimensions and an aesthetic appearance. The base is a square frame. In the corners, racks are installed with an inward slope. They should form an abutment in the center of the room to form a pyramid. To strengthen the structure, diagonal braces are fixed to the frame. They strengthen the frame and serve as supports for securing the roofing to the greenhouse.
The advantages of this type of building include:
- compactness;
- high strength;
- possibility of self-installation.
The disadvantages of the pyramidal type of greenhouses and greenhouses are expressed in the limited space inside. Due to this, a small number of plants are grown in it. As the dimensions increase, the structure will also have a greater height, which will reduce performance: strength and reliability.
Comparison of greenhouses and their characteristics based on 10-point ratings
| Name | Foundation | Frame | Corrosion protection | Translucent coating | Assembly (excluding base preparation) | Dismantling and re-installation | Price | Product service life (taking into account design features and warranty) | Reviews (ratio of positive and negative) | Delivery, assembly |
| 6 | 10 | 10 | 7 | 6 | 10 | 8 | 7 | 10 | 5 |
| 6 | 10 | 10 | 7 | 6 | 8 | 8 | 7 | 10 | 5 |
| 8 | 6 | 8 | 7 | 6 | 8 | 8 | 7 | 8 | 5 |
| 8 | 8 | 6 | 7 | 6 | 8 | 8 | 7 | 7 | 5 |
| 6 | 8 | 10 | 7 | 6 | 6 | 8 | 7 | 7 | 5 |
| 6 | 8 | 6 | 7 | 6 | 6 | 8 | 5 | 7 | 5 |
| 6 | 6 | 6 | 7 | 6 | 6 | 8 | 7 | 7 | 5 |
| 6 | 8 | 6 | 7 | 6 | 8 | 3 | 7 | 7 | 5 |
| 4 | 1 | 10 | 3 | 10 | 10 | 10 | 2 | 8 | 5 |
| 6 | 8 | 6 | 7 | 4 | 6 | 5 | 7 | 7 | 5 |
| 8 | 10 | 8 | 7 | 1 | 6 | 1 | 10 | 7 | 3 |
| 1 | 10 | 6 | 8 | 4 | 8 | 1 | 10 | 8 | 5 |
| 1 | 10 | 6 | 10 | 1 | 1 | 1 | 10 | 8 | 3 |
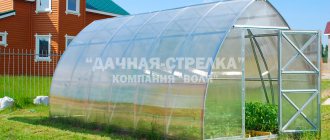
All structures considered have a maximum length of 8 meters. Greenhouses of this size are convenient for seasonal use on garden plots measuring 6 - 10 acres: they do not clutter up the area and at the same time the exploitable area of the greenhouse is sufficient to provide a garden household with seedlings and a good harvest of heat-loving vegetables.
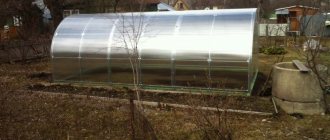
Switch greenhouse
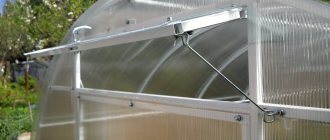
The arrow type of greenhouses is one of the most popular. It is a frame structure, the vertical posts of which are bent in an arc only in the upper part. Due to this, an increase in usable space and a comfortable stay for users inside is achieved.
The arrow design of the greenhouse has the following advantages:
- you can make a structure of any height, length and width;
- smooth curves of the walls do not interfere with the flow of precipitation, do not allow snow to linger and form a large layer on the roof;
- ease of use.
One of the disadvantages of the switch structure is poor aerodynamic streamlining. And the higher the walls, the more the structure will be affected by the air flow from the wind. Therefore, such buildings should not be installed in windy areas.
What is a greenhouse and how does it differ from a greenhouse?
A greenhouse is a small closed structure with a transparent roof in which conditions favorable for cultivated plants are created. It differs from a greenhouse in several ways:
- Size. The greenhouse occupies a smaller area and has a small height - up to one and a half meters, and often only 50–60 cm. The height of greenhouses starts from 2 m.
- Design features. Greenhouses do not have doors or windows. They are ventilated by raising the roof or removing the film from the wall. In greenhouses there is both.
- Optional equipment. Special technical devices for ventilation and heating are not installed in greenhouses. In greenhouses, such equipment is used quite often.
- Mobility. Greenhouses can be portable, but greenhouses are always stationary. And also many types of greenhouses can be easily disassembled and then assembled in another place. Relocating a greenhouse is not so easy, and usually involves great inconvenience.
- Price. Greenhouses are cheaper than greenhouses.
- Possibility to do it yourself. Greenhouses have a simpler design, they are much easier to make independently and alone.
- Purpose. Greenhouses are used mainly in the spring for growing seedlings and early greenery, and greenhouses are used mainly for cultivating heat-loving plants throughout the growing season.
- Ease of use. Due to its small size, the gardener cannot be inside the greenhouse, so he carries out all the work while remaining outside. In rainy weather this is quite inconvenient. In a greenhouse, a person can fit freely and can carry out all the necessary operations, being protected from bad weather.
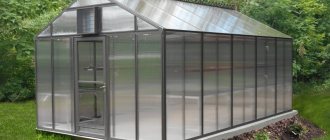
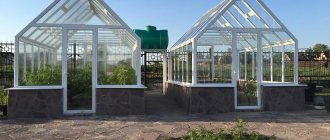
Gable freestanding greenhouse
A greenhouse in the form of a house is a classic one. Straight walls provide space inside the greenhouse. This allows you to arrange a space for planting any plants. These greenhouse models come in different sizes. Due to this, it is possible to purchase a suitable greenhouse design for installation on a plot of any size.
The advantages of free-standing gable greenhouses are as follows:
- ease of assembly and installation of the coating;
- the possibility of simply installing windows and vents for ventilation;
- production of slopes at any angle of inclination and with the required wall height;
- the ability to build a frame in closed ground using metal pipes, profiles or wooden beams.
Among the disadvantages of gable greenhouses, we should highlight the need to arrange a foundation for the manufacture of large and heavy structures. In most cases, these are stationary models that cannot be altered or moved if necessary.
How to warm the soil in a greenhouse
The oldest and most proven method of warming the soil is to apply large amounts of manure. Moreover, it is believed that if the harvest from the greenhouse is intended for food, then it is worth using exclusively horse droppings. This is due to the fact that any other heats much worse and also oversaturates the soil with nitrates. People noticed that these substances have a bad effect on health a very long time ago. However, now there is a big problem associated with the low availability of horse manure.
Horse manure is often used to heat soil in a greenhouse Source dhoz.ru
But there is an alternative. “Greenhouse soil” is available for sale at any hardware store. It is made from animal waste and dead plants. An important result of processing raw materials is that such soil does not emit nitrates and does not contain parasites or pathogens.
There are several schemes for heating the soil using manure or greenhouse soil:
- A steam comb is the simplest but least effective option. It is most often used in greenhouses, where the substrate is already quite warm, as well as when growing seedlings.
- The steam furrow uses all the heat of the fuel more efficiently. It can be done using cow manure, but crops that almost do not accumulate nitrates should be planted next to it.
- The steam ridge is distinguished by the fact that it almost does not pollute plants with nitrates. It warms the furrow better. It is advisable to use film or solid covering material to create it. However, this option has a significant drawback: since nothing can be planted on the ridge itself, a large amount of space remains unoccupied.
This is what a steam bed for heating the soil looks like Source omsk.kz
- A warm furrow is characterized by the fact that it heats weakly, but for quite a long time. Therefore, it is most often used for growing onions or herbs.
See also: Catalog of companies that specialize in the installation of canopies, greenhouses and other small forms for a country house
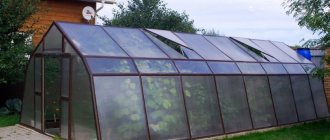
Single-slope wall greenhouses
The type of greenhouse with a pitched roof is designed for wall-mounted installation of an extension to a private house. The supporting wall of the facade is also part of the greenhouse structure. The roof slope is fixed to the load-bearing wall on one side and mounted on the frame supports on the opposite side. During installation, a slope is formed towards the ground from the house.
Lean-to greenhouses have the following advantages:
- ease of assembly;
- located near the wall of the building, they are characterized by increased reliability and durability;
- more convenient to use in the cold season, as a winter greenhouse;
- occupy a minimal amount of territory on the site.
The disadvantages of such extensions include the need for additional waterproofing of the adjacent facade of the building. Also, due to the solid wall of the house, the illumination of the interior space deteriorates. This feature makes it possible to install the structure only on the south side. The greenhouse should be installed in a place where there are no barriers to sunlight, such as trees, fences, or other buildings.
Polycarbonate greenhouse
Nowadays, most greenhouses are made using polycarbonate as a light-transmitting coating. After all, such material was initially developed for the needs of agriculture, and only later it turned out that it is well suited for the construction of canopies and gazebos.
Polycarbonate is a good material for building a greenhouse Source teplica-spb.ru
True, a PC has some properties that are worth mentioning right away:
- Polycarbonate is sold only in whole sheets of 2*6 or 2*12 m, so greenhouses from private manufacturers are often more expensive due to excess material consumption.
- The most inexpensive polycarbonate costs about the same as agrofilm , so it can easily be replaced with it.
- A polycarbonate greenhouse requires that its structure include a lot of accessories, for example, thermal capacitors, edging profile, aluminum tape and filter tape for the ends. Otherwise, the entire structure will last no more than five years.
- Installation of polycarbonate sheets is carried out by tensioning each segment, so the frame of the greenhouse under the PC must be reinforced.
This all suggests that building a polycarbonate greenhouse is a rather difficult and responsible task, and if you have never done this, then it would be better to buy a ready-made greenhouse so as not to waste a lot of nerves and time on independent construction.
Arched greenhouse
Of all types of greenhouses, the arched form of structures is the most popular and in demand. To support the roofing in this design, arched racks are provided. After installation, a vault is formed in the form of an arch.
This type of greenhouse can be used as a summer or winter model. The main thing is to choose the right coating material. Basically, these are collapsible structures that are easy to assemble and disassemble. They can be installed as a temporary or permanent greenhouse on the site.
What kind of soil should be used in greenhouses
There are different recipes for soil mixtures that are used for different crops.
For general purpose:
- 6 parts peat soil
- 1 part garden or leaf soil
- 2 parts humus or compost
- 1 part calcined river sand
- 3 kg of slaked lime for each cubic meter of mixture
The future harvest largely depends on the quality of the soil mixture Source optolov.ru
For bulbous crops and root crops:
- 5 parts sawdust
- 1 part wood ash
- 1 part straw chaff
- 3 parts peat soil
- 20 g of potassium sulfate and 30 g of superphosphate per 1 cubic meter of soil
Self-heating soil for seedlings:
- 2 parts almost matured peat
- 1 part horse manure
- 1 part straw chaff
- 300 g of urea per cubic meter of mixture
Before planting plants, you must prepare the soil in the greenhouse Source homeli.ru
Design features of greenhouses
There are several types of greenhouses based on their design:
- Stationary. These are structures installed on the site by welding metal parts and forming a monolithic concrete base around the frame. Such modifications of greenhouses are difficult to manufacture and require skills in working with various equipment. After installation, it will be impossible to change the configuration or move the greenhouse.
- Prefabricated. The greenhouse is delivered disassembled and consists of several profile guides. Frames made of this material are easy to erect. When ordering greenhouses of this type, the manufacturer makes and supplies profile systems exactly according to the specified dimensions. All that remains is to choose a location on the site and install using the step-by-step guide. If necessary, you can disassemble, move, and quickly repair parts by replacing only some parts.
Greenhouses made from scrap materials
Window frames are often used to make homemade greenhouses, because they transmit light well and can also be opened. Most often, small greenhouses are installed on personal plots, so usually 2-3 windows are enough. But such a structure must be single-pitched, and also oriented to the south. The lid itself is also hinged so that you can access the beds at any time. It is important to note that in no case should there be any cracks in the walls of the greenhouse, otherwise all the warm air will quickly escape and the plants will be hit by the first frost.
It is convenient to grow seedlings in a small greenhouse made from window frames Source chadakhbar.info
There is another option for those who are wondering what greenhouses are made of: a good frame can be built from the remains of industrial wood, for example, beams or slats. Using this material, you can set a fairly steep angle of inclination, which will allow you to use sunlight most efficiently. Another advantage is that by leaving small gaps in the covering material, proper and effective ventilation can be ensured.
Any craftsman can build such a greenhouse from scraps of industrial wood. Source arhivach.ng
Also, a good and effective greenhouse can be built from polyethylene terephthalate, from which all plastic bottles are made. They are usually strung on steel wire, and then a solid fabric is created from such “threads”.
Attaching film to different types of frames
We already know that frames can be different. Let's look at how to attach film to various materials.
Wooden frame
Attaching the film to a wooden frame is carried out in the following ways:
| Illustration | Methods |
| You can use a stapler, but to reduce the breakthrough of the film, it is worth making a gasket, for example, cutting a tape from old linoleum or from any other strong material. It is better to use reinforced film so that it will last longer even if it is pierced with nails during fastening. | |
| You can secure the film using a strip nailed at the ends. The first method involves fastening the film, that is, piercing it, on the sides and on the roof. With the help of slats, we fasten only from the ends. |
If the film is not reinforced, it is more susceptible to breaks at the attachment points. The rack (second) method reduces cases of film damage.
Metal and PVC pipes
To secure the film to plastic pipes, special clamps are required. They can be purchased in special stores, they are not expensive.
You can make the clamps yourself. Plastic tubes are cut and the side of the same plastic tubes is cut out. To avoid tearing the film, the edges of the homemade clamps are ground off.
If metal clips are used, a gasket made of any material is placed under them so that when heated in the sun it does not spoil the film.
Office clips are used for fastening on narrow frames.
Using a greenhouse or greenhouse in winter
For those who are planning to use their greenhouse in winter, we offer a list of crops that can be grown at this time:
- green lettuce: lettuce leaves, in the right conditions, can grow throughout the year, providing a continuous supply;
- potatoes: when planting tubers in early February, potatoes can be harvested in April;
- parsley: in a polyethylene greenhouse, the seeds of this crop are planted in November;
- spinach: the seeds of this plant are sown in October or November and harvested in January or February;
- radish: it is sown in October. It is necessary to cover seeded beds to maintain moderate temperature and humidity. After germination, radish does not require special care;
- carrots: this crop is sown in December and January. The entire growing cycle must be maintained at a high level of humidity in the greenhouse. It is not advisable to feed carrots with nitrogen fertilizers;
- garlic: cloves are planted in September. When the outside temperature drops to -10 ° C, crops need to be covered. Garlic is harvested in December.
Foundation and frame for a greenhouse
Some gardeners build greenhouses without a foundation, but it is still recommended to do so. It will protect the structure from being demolished by gusts of wind and will allow you to move it to the right place without difficulty. Building a foundation takes very little time.
It is constructed in this way:
- The necessary materials and tools are prepared: a 12x12cm wooden beam, special screws for wood, a tape measure, roofing felt, a hacksaw, an antiseptic, a shovel.
- A hole is dug around the perimeter , making it 5 cm wider and deeper than the size of the timber.
- I lay roofing felt in the dug trench .
- Then the timber is cut into pieces of the required size and treated with an antiseptic.
- The boards are placed in the hole , and the roofing material is wrapped on the side of the foundation; if necessary, it is secured with a construction stapler.
- The beams are fastened using self-tapping screws.
For a greenhouse, just a solid foundation is enough Source kroystroy.ru
Choosing a location for a greenhouse
To provide the necessary conditions for plants to grow and develop, and ultimately get a high yield, you need to start by choosing a location for the greenhouse. This factor also influences what size greenhouse will be needed.
It is recommended to consider the following:
- it is better to choose the sunniest part of the site - the greenhouse should be illuminated most of the day;
- plantings should not in lowlands , water accumulates there and the plants will hurt and rot;
- the greenhouse is installed, focusing along the length of the structure from north to south;
- if the groundwater on the site is located close to the surface, then a deep greenhouse is made on a high embankment , or it is completely abandoned, giving preference to other types of structures.
Building a greenhouse - step-by-step instructions
In our case, a greenhouse with a warm bed will be created. What kind of bed is this? This is a box made of boards, inside of which there is fine organic matter, compost and fertile soil. The first two components in the bed undergo a decomposition reaction and, as a result, produce heat that warms the plant roots and soil, promoting faster growth of crops. In addition, with such a greenhouse, you can start the summer season and plant seeds for seedlings even earlier.
As an example, a sketch of a greenhouse with a warm bed
Let's present the creation process in the form of step-by-step instructions.
Step 1. Measure and cut the boards to the width and length of the greenhouse. It is advisable to treat them on the inside with an antiseptic or cover them with polyethylene so that the wood box does not become damp.
Step 2. At the end of the long board, drill three holes for self-tapping screws.
Drilling holes
Important! Additionally, you can use a small crown to drill holes in the boards for the fastener heads.
Creating a recess for the fastener head
Step 3. Connect the first corner of the box with three self-tapping screws.
Connection of the first corner of the box
Step 4. Attach a bar stand to the corner from the inside, which is necessary to ensure a more reliable and strong connection of the box.
Fixing the strengthening post
Step 5. From the side of the short wall of the box, tighten two self-tapping screws, connecting it to the corner bar installed earlier.
The short wall is screwed to the bar
Step 6. The box for the warm greenhouse bed will be equipped with small sides. To hold them securely, attach wooden supports along the boards at some intervals.
Attaching a wooden support
The box for the warm bed is almost ready - all that remains is to install the sides
Step 7. Place edging boards on the long sides of the box. Fasten with self-tapping screws on corner posts, walls and supports.
Side boards laid
The boards are fastened with self-tapping screws
Step 8. After installing the sides, check the box for compliance with the diagonal dimensions. If there is no difference or it is minimal, everything is fine. Otherwise, the box and the greenhouse itself will be skewed.
Checking the diagonals of the box
Step 9. Install the sides according to the width of the future greenhouse. Make the fasteners in the same way as always - with self-tapping screws on the walls and supports.
Fastening the sides along the width of the structure
Step 10. It's time to fill the box with material for the warm bed. But first, cover the bottom with cardboard.
The bottom of the box is covered with cardboard
Advice! If rodents are common in your summer cottage or garden plot, first place a fine wire mesh on the bottom of the box, which will prevent pests from reaching the warm bed and plant roots.
Step 11. Now fill the box made of boards with a layer of fine organic matter, add compost and fertile soil on top.
Backfilling the box
Ready box with a warm bed. The next stage is the assembly of greenhouse arcs
Step 12. At intervals of 50-80 cm, drive metal rods inside the box that can be cut from reinforcement.
Metal rods are driven inside the box
Step 13. Cut a PVC or other flexible polymer pipe along the length of the future arches.
Step 14. Bend the pipe sections and install them in this form on rods driven into the ground.
Installation of greenhouse arcs
Step 15. Install a horizontal tie on top. To connect it to the arcs, you can use wire, angles and screws or, as in this example, steel staples.
The horizontal tie is connected to the arc with a steel bracket
Step 16. Cover the finished greenhouse frame with plastic wrap on top.
The greenhouse frame is covered with film
Step 17. Attach the film to the frame. Some people use slats for this, stuffed onto nails or screws on top, while others use a piece of rubber hose and clamps. Also, to hold the film, it is “propped up” with bricks and other heavy objects.
Attaching the film to the frame
The brick “props” the film
Important! When creating more permanent and durable greenhouses, it makes sense to secure the film to the frame using a construction stapler. But this complicates access to the plants and the ability to change the “covering” without much time.
Ready-made greenhouse with a “warm bed”. Remember to monitor the temperature inside so that the plants do not overheat
Prices for edged boards
edged boards