A high-quality greenhouse at the dacha is the key to a rich harvest not only in the first, but also in subsequent years of operation. Choosing a greenhouse is not so easy, especially for a beginner, because the modern range of such structures is very wide. The Tsarskaya greenhouse is an excellent option, which also has several variations in shape.
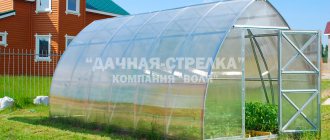
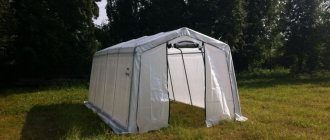
Greenhouse "Tsarskaya"
Reinforced frame of the Tsarskaya greenhouse
How to choose a greenhouse
First, let’s find out by what criteria experienced summer residents choose a greenhouse. After all, newcomers to the world of gardening are completely unfamiliar with this area, and choosing the right greenhouse for them can be a very difficult task. And an incorrectly selected design can not only upset a novice summer resident, but even harm all his work, failing to live up to expectations.
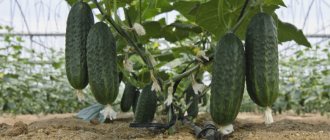
First of all, a novice gardener must decide what crops he will grow. After all, some people don’t want to get involved with capricious plants and prefer to cultivate radishes, onions and potatoes, while others don’t look for easy ways and immediately go to buy the most mysterious and rare plants. Although even ordinary tomatoes will not be easy for a beginner in the world of gardening to cope with.
Optimal dimensions of a greenhouse made of cellular polycarbonate
Examples of bed layouts, sizes and their arrangement
It is the types/varieties of crops that have the greatest influence on the choice of greenhouse type and its size. If you plan to plant tall cucumbers or tomatoes, then you will need a fairly high arched or straight-walled greenhouse with a width from wall to wall of at least 3-3.5 m. Drop-shaped greenhouses, by the way, are also suitable for cultivating tall varieties, but it is recommended to place such plants in a garden bed, equipped in the middle of the structure, since the highest point of the structure is located in the ridge part.
Drop-shaped greenhouse
It is also very important to pay attention to what the greenhouse is made of, including the frame. It is on this that the service life of the structure, its strength, ability to withstand the onslaught of the elements and thick layers of snow on the surface of the coating largely depend. Remember that a greenhouse with a wooden frame is more environmentally friendly, but is very demanding to maintain and constantly needs attention. A PVC frame is not afraid of either rust or rotting, but it is perhaps the weakest frame. So the plastic base has very few advantages - it’s not worth spending money on it.
A metal frame for a greenhouse has many advantages
The metal profile frame is in great demand due to its high strength and durability. It costs more, but provided the material is sufficiently thick, it is not afraid of either wind or snow. The frame can be painted or galvanized (the latter option is better, since galvanizing does not peel off or peel off).
On a note! To ensure that a painted metal frame lasts as long as possible, carefully inspect the coating for damage. If the paint peels off the frame, these places are carefully cleaned with sandpaper and repainted.
You should also evaluate what the structure is covered with. Polyethylene film is the most short-lived and fragile material. Every season it has to be removed and re-stretched, it breaks from the slightest physical effort and even with careful use it quickly becomes unusable. Glass has excellent qualities - it is durable, not afraid of temperature changes, and transmits light well. Its main drawback is its fragility (it breaks even after minor impacts).
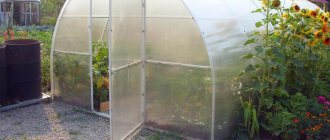
Film greenhouse
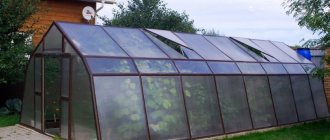
The best option for covering a greenhouse is polycarbonate. It retains heat perfectly, is quite durable, is not afraid of sudden temperature changes, and is easy to install. And the price of the material is reasonable if you compare it with the quality. Therefore, it is recommended to choose a greenhouse made of polycarbonate and a galvanized or painted metal profile. The greenhouses of the “Tsarskaya” series belong precisely to these.
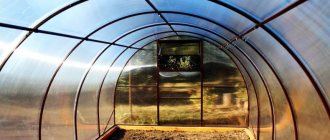
Greenhouse "Tsarskaya", view from the inside
Polycarbonate prices
polycarbonate
Features of the design of the greenhouse “Kremlin Fairy Tale”
The appearance of the Kremlin Fairy Tale greenhouse on the market caused a real stir. First of all, it is distinguished by its shape, as well as special parameters that make it possible to create not only a solid, but also a fairly aesthetic structure. This makes it possible to use the greenhouse in any conditions, and also fit it perfectly into the garden landscape.
Advantages
Thanks to the serious approach of the developers, the design of the “Kremlin Tale” received many unique technical solutions.
- This made it possible for the structure to acquire the following advantages:
- increased strength of the roof and walls;
- the ideal combination of lightness and reliability (thanks to the use of polycarbonate);
- all components contain a minimum of elements, which allows assembly with a minimum set of technical skills;
- can be installed without a stationary foundation;
- maximum free space inside the structure;
- straight walls allow the installation of side shelves along the entire length;
- “The Kremlin Fairy Tale” has several air entry points, which creates optimal air circulation and microclimate;
- high mobility, the structure can be instantly assembled and disassembled;
- guaranteed service life of at least 30 years.
Flaws
Despite the abundance of positive characteristics, “The Kremlin Tale” also has some disadvantages.
- These include the following:
- the arches of the roof arches may not meet; the problem can only be solved manually, but this will require not only a specialized tool, but also a lot of effort;
- often the manufacturer does not complete the greenhouse with fastening elements, which requires additional costs;
- some models can be supplied with thin profile pipes - this reduces the cost of the greenhouse, but negatively affects its strength and durability.
Important! To protect yourself from the disadvantages described above, you should avoid products of questionable manufacture. Greenhouses from reputable and trusted companies are almost always free from such problems.
Main characteristics
A series of Russian-made greenhouses under one general name “Tsarskaya” was created on the basis of experience and previously identified shortcomings of other designs. These country houses were designed to become stronger and more reliable than the previous versions, which were the prototype of the heroines of the article. What are the features of the “Royal” greenhouses?
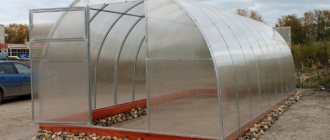
Construction of the "Tsar's House" greenhouse
Construction of the Tsar's Arrow greenhouse, 2.7 meters
The first and one of the main points is a special reinforced frame. It is made of a galvanized closed profile pipe with a square section of 2*2 cm (and a square profile is much stronger than a V- and U-shaped one) or 4*2 cm. This size is quite enough to withstand high snow and wind loads, taking into account the fact that that the arcs of the arches are solid. For the manufacture of the profile, high-quality steel with high strength characteristics was used. It is designated in the literature by the code 03X13AG19.
Galvanized profile pipes 2*2 cm
This steel is practically not afraid of rust and is highly alloyed, that is, austenitic class. It has the highest strength at room temperature. Steel is used in cryogenic engineering for the manufacture of parts that experience extremely high loads. So there shouldn’t be any doubts about the strength of the “Tsar’s” greenhouses. By the way, the arches in the “Tsarskaya” greenhouse are usually double, one is located under the other, which also provides additional reinforcement.
Greenhouse "Tsar's House"
On a note! The snow loads that the Tsarskaya greenhouse can withstand are about 500 kg.
Covering greenhouses can be done with either film or polycarbonate. But polycarbonate is preferable. The fact is that the film will have to be removed annually during the winter period, otherwise it will crack and tear. And in general, polyethylene is a short-lived material, and even if it is used very carefully, it will quickly become unusable. Polycarbonate, on the contrary, can be left in place for the winter. It is protected from ultraviolet radiation itself and will protect your plantings from it, as it has a special protective coating. In addition (compared to glass and film), polycarbonate is less fragile, is not afraid of impacts, and is not afraid of temperature changes. And most importantly, it is better than any other material at retaining warm air in the greenhouse due to the cells that are in its structure and filled with air.
Technical characteristics of polycarbonate
On a note! Although some recommend removing polycarbonate for the winter, it is better to do so. The fact is that unnecessary movement of material from place to place, constant tightening and unscrewing of bolts can also negatively affect polycarbonate - it can begin to crumble and crack. Moreover, it is not recommended to store it rolled up and it is unlikely that you have a room where polycarbonate can spend the winter, lying quietly on a flat surface, since the size of the sheets is very large.
The Tsarskaya greenhouse has two doors and vents in the end parts of the structure, due to which the ventilation process in it is optimal for all plants. In addition, you can purchase a thermal drive that will open and close the doors itself as needed.
Thermal drive as an ideal automatic ventilation system in a greenhouse
By the way, despite such strength characteristics (let’s return to the paragraph about the frame), “Tsarskaya” is not such a heavy structure and can easily be installed even without a foundation. But it is still advisable to equip it too - for greater stability, as well as to avoid subsidence of the greenhouse on very soft soils. And if the greenhouse is not fixed to the foundation, then it can be easily moved from place to place with the help of several people.
What is included in the package of one Tsarskaya greenhouse? This is a frame, which for the convenience of the buyer comes disassembled (otherwise it would be very inconvenient to transport the purchase), various accessories, including handles, canopies, fastening material (it includes a “smart” crab fastener). Also, manufacturers have not forgotten about the required number of 4 mm thick polycarbonate sheets for the cover of the greenhouse, although if you wish, you can also stretch the film. And to make the assembly process as fast and simple as possible, each greenhouse comes with fairly detailed instructions that anyone can understand.
crab mix
Greenhouse "Tsar's Star"
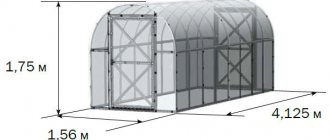
The dimensions of the “Tsarskaya” are as follows:
- height – 3 m;
- width – 2.1 m;
- length – from 4 m.
Polycarbonate greenhouse dimensions, drawing
The size of the greenhouse is selected based on the area of the plot, the budget for construction and the goals that the owner of the personal plot sets for himself. All greenhouses, except domed ones, have the shape of an elongated rectangle. Read more here.
Indicator table
Some gardeners remove polycarbonate in winter. However, this measure is a mistake, since constant mechanical stress can lead to relaxation of the joints and delamination of the material.
Royal star
In addition, it is strictly forbidden to store polycarbonate in rolled rolls. Therefore, it is almost impossible to find a room in which large sheets will lie on a flat surface.
Advantages
To summarize the above, it should be noted the main advantages of the Tsarskaya greenhouse:
- long service life - “Tsarskaya”, with careful operation, can last for 50 years with periodic replacement of polycarbonate;
- ease of installation thanks to clear instructions;
- ability to withstand critical snow and wind loads thanks to the most durable frame made of high-alloy steel;
- the possibility of attaching film or polycarbonate as a covering material;
- the possibility of increasing the length by installing additional inserts;
- it is easy to move around the site, which means there is no need to change the soil inside it - just rearrange it;
- the strength of the structure is also greatly influenced by the presence of double frame arches (in almost all models);
- does not require annual anti-corrosion treatment;
- Thanks to the double frame arch, plants can be easily tied directly to the greenhouse itself.
Double frame arches are one of the advantages of the design
Prices for the Tsarskaya Dream greenhouse
greenhouse royal dream
Tips for the care and operation of the greenhouse
To ensure long-term and uninterrupted operation of the Kremlin Fairy Tale greenhouse, you need to resort to the following measures:
- during the off-season, it is mandatory to carry out a preventive inspection of all technical components and connections;
- periodically check the strength of all bolted connections;
- at the end of the season, remove all remaining vegetation and other pollutants from the structure and its surfaces;
- if possible, open the roof dome for the winter or dismantle its cladding; this will almost completely protect the structure from damage by snow masses;
- Once every 1–3 years, treat metal elements against corrosion.
Did you know? The first modern greenhouse
was built in 1240 by the German scientist Albert Magnus.
Its creation was timed to coincide with the visit of King William of Holland to the city of Cologne, where it was built. “The Kremlin Tale” is an excellent option for professional and private farming. It allows you to create a multifunctional, durable structure that can surround the plant with the microclimate necessary for successful growth and productivity. However, first you need to carefully select and prepare a place for the greenhouse, since its efficiency and durability directly depend on this.
Types of greenhouses of the Tsarskaya series
“Tsarskaya” is the name of a series of greenhouses that combines 5 types, differing in the shape of the frame and some characteristics. Let's look at these types in more detail.
Table. Models of Tsarskaya greenhouses.
| Name | Frame shape | Characteristic |
| Greenhouse "Tsar's Tale" | Straight-walled | It has a width from 2.5 to 5 m. The height of the structure is 2 m, the length is from 2 m (subject to a multiple of 2). It has a cross-section of the upper arc 4*2 cm, the lower one – 2*2 cm. A distinctive feature is the presence of two ridges, straight walls and a semicircular roof. The distance between the arcs is 1 m. It has the ability to withstand extremely high snow loads - up to 750 kg/m2. |
| Greenhouse "Tsarskaya Strelka" | teardrop-shaped | Width from 2.7 to 3.5 m. Height – 2.4 m, length from 2 m (subject to a multiple of 2). Single arcs and separated in the ridge area with a cross-section of 4*2 cm. The distance between the arcs is the same as in the previous type of greenhouse, however, the snow load is somewhat less - up to 650 kg/m2. |
| Greenhouse "Tsarsky House" | Arched | Width 3 m. Height – 2.1 m, length – from 2 m (subject to a multiple of 2). It has single, but solid and durable arches with a cross-section of 4*2 cm. The maximum snow load that the “Tsar’s House” can withstand is 450 kg/m2 |
| Greenhouse "Tsar's Dream" | Arched | Width from 2.4 to 4 m. Height – 2.1 m, length – from 2 m (subject to a multiple of 2). Equipped with double arcs with sections 4*2 cm and 2*2 cm. Maximum snow load - up to 750 kg/m2. |
| Greenhouse "Tsar's Star" | Arched | Width 2.5 and 3 m. Height – 2.1 m, length – from 2 m (subject to a multiple of 2). The frame arc is double and solidly bent with a cross-section of 2*2 cm. The snow load of the “Tsar’s Star” is up to 450 kg/m2. |
| Greenhouse "Tsar's Baby" | Arched | The tiniest variation of the “Tsar’s” greenhouse. Its width is only 2 m. Height is 2.1 m, length is from 2 m (subject to a multiple of 2). The frame arcs are single, but solid (4*2 cm). Snow load - up to 250 kg/m2. |
Prices for the Tsarskaya Strelka greenhouse
Tsar's Arrow greenhouse
Assembly and installation of a straight-walled greenhouse
Let's look at the step-by-step process of assembling a greenhouse with straight walls.
Greenhouse disassembled
Step 1. Assemble the end part of the greenhouse. To do this, place one of the ends of the greenhouse on a flat surface and place the door itself and the window directly into the doorway, screw them to the ends using canopies and bolts (two canopies on the window and two on the door).
Fastening the door and window to the end
Step 2. Carry out preparatory work to install the handles. To do this, drill holes in the right place with a 10 mm drill, but first make them with a drill with a smaller diameter to make the work easier.
Drilling a hole for installing a handle
Step 3. Install and screw the handles on the window and door.
Step 4. Attach locks to the back of the handles.
Fastening the lock
Step 5. The previous steps were done so that after them it would be more convenient to attach the handles. But now remove the handles in order to attach the polycarbonate. Unfold the sheets of covering material and spread one of them on a flat surface. Remove the film.
Removing protective film from polycarbonate
Attention! Don't forget to remove the inner film before installation, as leaving it un-removed can cause a lot of problems later.
Step 6. Using a screwdriver and a 4 mm drill, make technological holes on the end frame at approximately the same distance.
Step 7. Place the polycarbonate sheet at the end as shown in the figure and screw it along the technological holes with self-tapping screws with a rubberized head. Do not screw too tightly. Screw the polycarbonate to the vertical door post using self-tapping screws with a yellow head.
Polycarbonate is applied to the end of the greenhouse
Sheet fastening scheme
Step 8. Trim the polycarbonate along the edge of the end. Repeat the previous steps on the other side and with the second end.
Trimming polycarbonate
Step 9. Install the remaining piece of polycarbonate on the door, dividing it exactly in half. Attach it to the door frame. Don't touch the window yet. Reinstall the handle on the door.
The second piece of polycarbonate is installed on the door
Step 10. Cut holes between the door and the window.
Cutting polycarbonate between the door and the window
Step 11. Attach the remaining piece of polycarbonate to the window. Install the handle. Trim the unnecessary polycarbonate along the contour of the window.
Drilling a hole for the handle
Step 12. Start assembling the frame. Take the arc and secure the cross joints as shown in the picture. The bolt head should face outward. Repeat this procedure at 6 more points on the arc.
Cross connection fastening
Step 13. Proceed to install the jumpers using a 10 mm wrench and a screwdriver. Insert the jumpers into the cross connections perpendicular to the arc and screw.
Jumper installation
Step 14. Having installed 7 jumpers, install a second arc on top of them with crabs already attached. Fix it by lightly pressing on the crosspieces so that there are no gaps between the parts. Install the remaining arcs in this way, placing the frame horizontally.
Two arcs connected to each other
Advice! To ensure that there are no gaps between the parts, when installing a horizontal frame, ask an assistant to lightly push the greenhouse toward you.
Step 15. Install the last row of jumpers and T-joints at their ends.
Installing a T-junction
Step 16. Install the ends.
End installation
Step 17. Install the corners on the bend of the arc and vertical post.
Fastening the horizontal angle
Step 18 If you used a foundation for the greenhouse, then it's time to secure it to it with self-tapping screws.
Attaching the frame to a wooden foundation
Step 19. Cover the greenhouse with polycarbonate. First, make technological holes in the frame.
Technological hole in the frame
Step 20. Place a sheet of polycarbonate on the roof of the greenhouse so that there is a small canopy over the end. Fix it with self-tapping screws on the upper arches.
Polycarbonate fastening
Step 21. Now make a fold of polycarbonate on the skates. To do this, lightly press on the hanging sheet, then, starting from the center, hit the polycarbonate in the corner area with a little force with your palm. Screw the polycarbonate onto the walls. Cover the entire greenhouse with polycarbonate. The greenhouse is ready.
Polycarbonate is pressed onto the frame
Video - Assembly of the Tsarskaya arched greenhouse
How to assemble a greenhouse with straight walls with your own hands: step-by-step instructions
Assembling a greenhouse often does not cause any difficulties. Each model of the “Kremlin Tale” is a pre-fabricated structure, so its construction will require only a few hours of hard work. In this case, the entire installation process should be divided into several successive stages: creating a base (foundation), assembling the frame and covering the walls and roof.
Did you know? Temperate House, located in the Royal Botanic Gardens in Great Britain, is considered the oldest operating greenhouse in the world. The construction was founded back in 1859 and has an area of 48,000 m².
Choosing a foundation
The construction of any structure necessarily requires a foundation. It will support the bulk of the greenhouse, protecting its integrity. Traditionally, the foundation is prepared in the form of a monolithic concrete structure, up to 50 cm deep and 20–30 cm wide. As an alternative, brickwork or foam concrete blocks, as well as dense wooden beams, are used.
You can do without a capital foundation: “The Kremlin Tale” can be supplied with special supports made of metal pipes. They are fixed to the corners of the lower part of the walls and installed directly on the ground.
They can be replaced with small concrete, brick or wooden columns. The main advantage of such a structure is the minimal labor required to install the greenhouse, as well as the possibility of disassembling it at the end of the summer season.
Read more about the features and choice of foundation for a greenhouse.
Frame assembly
The assembly of a greenhouse is practically no different from the construction of other temporary structures from profile pipes:
- First, they sort all the necessary components of technical units into elements of the roof and side walls, after which they begin to assemble them.
- The sides are installed first - to do this, you need to connect the elements of the longest walls and install them parallel to each other, connecting them with spacers.
- After this, you should assemble the end walls, then attach them to the previously installed sides.
- As soon as the bottom panels are assembled, longitudinal and transverse beams and additional reinforcement elements can be installed along their perimeter: crosses, corners, etc.
- Finally, the roof arches should be installed: they are pre-assembled, and then sequentially attached to the base and connected to each other by horizontal profiles.
- After assembling the frame, you should build a doorway, and then install the door frame on it using metal curtains.
Frame covering
Sheathing of the frame is carried out upon completion of installation of the structure. As mentioned above, glass, polycarbonate or all kinds of films can be used for these purposes. A polycarbonate greenhouse is considered the best choice, while films are used in the construction of one-season or temporary structures.
Important! The distance between the perpendicular and horizontal posts should be no more than 60 cm, otherwise the strength of the greenhouse will decrease significantly.
They begin the process by sheathing the roof, and then gradually move on to upgrading each side. The door leaf is often sheathed last, but this rule is unspoken; this can be done at any stage of the construction of the structure. Polycarbonate is secured using a roofing screw with a rubber washer; for this purpose, holes are first made in the profile pipe of the frame and in the plastic. The joints of the sheets are sealed using a connecting strip.
The polyethylene film is attached in the same sequence as polycarbonate, and it is connected to the base using a special zigzag clamp or small self-tapping screws with a rubberized washer. When sheathing a house with spunbond, the material is attached only to the sides, while the roof is made of polycarbonate or transparent polyethylene.