Greenhouse / Industrial greenhouses
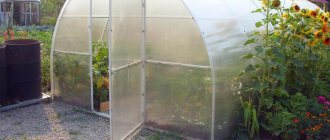
Photo of the standard greenhouse “Perchina”
Every year many types of greenhouses of a wide variety of models and configurations enter the market. One is superior to the other in certain parameters, and at the same time inferior to the third. Therefore, a reasonable question arises in the minds of even the most experienced summer residents: which greenhouse is best suited for their garden plot? And are all these newfangled advantages and “exclusive” types of greenhouses really necessary?
- 1 Greenhouse “Perchina”, what is it?
- 2 Technical specifications
- 3 Advantages of the Perchina-M PLUS greenhouse
- 4 Recommendations for assembling the greenhouse 4.1 Recommendations for installing and securing the greenhouse on the ground
Design features of the Perchina greenhouse
The Perchina greenhouse is a product produced from the city of Dubno, Moscow region. It is based on a frame made of galvanized profile 0.8 mm thick.
Advantages
- The advantages of this greenhouse are:
- it is easy to assemble and disassemble, no professional is needed for this;
- light weight and compact dimensions allow you to easily change its location;
- no truck required for delivery;
- a minimum set of tools is sufficient for assembly;
- all necessary parts are included in the delivery set;
- the latest model protects well from the cold thanks to the sealing profile;
- stable, reliable and durable;
- withstands up to 0.25 m of snow (for polycarbonate coating);
- can withstand winds up to 24 m/s;
- There are different models, differing in size, coating, price;
- can be installed without a foundation;
- the covering for the greenhouse can be purchased along with it or ordered from another supplier;
- there is an opportunity to buy additional devices;
- does not require any maintenance effort;
- easy to maintain due to its comfortable dimensions;
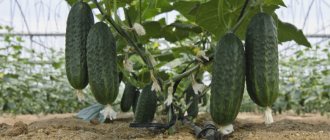
- suitable for growing various types of crops;
- the presence of doors facilitates ventilation;
- its appearance can fit into any type of landscape design;
- has small dimensions.
Did you know? Cellular polycarbonate was invented in 1976 in Israel specifically for covering greenhouses, after which this method of growing plants became widespread there, and the country began to be called an oasis in the desert.
Flaws
The Perchina greenhouse has practically no drawbacks, but it must be emphasized that its installation and operation must be carried out in strict accordance with the instructions, and care must be taken during installation so as not to damage the parts. In addition, it is recommended to remove the covers for the winter so that the layer of snow does not damage it.
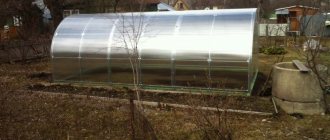
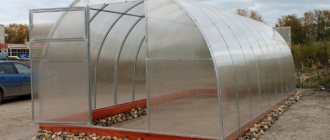
Arched varieties
Arched ones are distinguished by the fact that they are installed relatively quickly. They do not require a foundation and are supported by lugs buried in the ground, which are most often played by ordinary sections of 10 or 12 reinforcement bars. If someone doesn’t like the height of the purchased greenhouse, you can always raise it onto a plinth, simultaneously replacing the sections of reinforcement that serve as lugs with longer ones, or you can even mount the frame on a recessed base (a kind of foundation), which will firmly hold the greenhouse when strong wind.
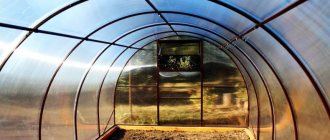
In general, reviews about carbonate greenhouses are different. In most cases, people complain that the covering of the arched vault reflects the bulk of the sun's rays, which is why crops suffer from a lack of light and artificial lighting has to be added. Nevertheless, 85% of all greenhouses sold annually are arched.
Choosing the optimal greenhouse size
produces greenhouses of this type in 3 versions:
- “Perchina” is a film tunnel 156 cm wide, 480 cm long, 175 cm high, weighing 21 kg. Under it you can cover 7.5 m² of soil. The frame is made of galvanized steel profile. Supplied in 2 sets of parts: straight ones measuring 125×10×5 cm and arcuate ones measuring 120×25×5 cm. In the set you can purchase a film from Desnogor with a thickness of 150 microns measuring 6×6.5 m.
- “Perchina-M” is a modernized version for polycarbonate with the same dimensions in width and height, and a length of 418 cm, weighing 30 kg. Under it you can cover 6.5 m² of soil. The frame is made of galvanized iron. Supplied in 3 sets: straight parts with instructions measuring 125x10x5 cm, arc-shaped parts 125x22x5 cm, necessary elements for assembling the frame measuring 65x10x10 cm.
- "Perchina-M plus" — an improved model for polycarbonate, 412.5 cm long, weighing 33.1 kg, the length and width are the same. Under it you can cover 6.4 m² of soil. The frame is made of galvanized iron. Supplied in 4 sets: straight parts and instructions measuring 125.5x13x5 cm, arc-shaped parts measuring 125x22x5 cm, assembly elements measuring 65x10x10 cm, sealing profile measuring 35x30 cm.
How to assemble a Perchina greenhouse with your own hands
Assembling a greenhouse includes the following steps:
- Selecting a location for installation.
- Frame assembly.
- Assembly of the end sides.
- Installation on the ground.
- Door installation.
- Securing the coating.
Important! The larger the greenhouse, the more space there is for plants and people, the more stable the temperature, the greater the yield, but at the same time more covering material is required.
Assembly is carried out according to the numbering of parts in the instructions and the arrows indicating the direction of installation into the prepared holes on the parts.
Frame assembly
To assemble the frame:
- Connect the posts (1) to the supports (3) using screws in 2 places, tightening them well (18 pieces).
- Connect the parts of the longitudinal connecting (2) (3 pieces each).
- At the right end of the resulting longitudinal connecting piece, attach the outermost part of the longitudinal connecting piece (2K) so that you get 1 straight line. Repeat for the next 4 parts from 3 pieces of longitudinal connecting (2) according to point 2.
- Attach the free end of the outermost part of the longitudinal connecting piece (2K) at the bottom to the stand (1) perpendicularly, repeat at the top.
- Moving along the fastened longitudinal connecting (2), attach 3 more posts (1).
- Perpendicular to the outer part of the longitudinal connecting part (2K) attach the outer arc (4K) to the post (1), it should become a continuation of the post.
- At a distance from the outer arc (4K) between the longitudinal connecting (2) and the outer longitudinal connecting (2K), perpendicular to them and parallel to the outer arc (4K) attach the arch (4) to the stand (1).
- Moving further along the longitudinal connecting (2) attach 2 more arcs (4).
- To the free end of the extreme arc (4K) perpendicularly attach the extreme part of the longitudinal connecting (2K) from the part made in step 3. Attach the free ends of 3 more arcs (4) further along this part perpendicularly.
- Attach the outermost arc (4K) and 3 more arcs (4) perpendicularly to this structure, forming an arch.
- Attach perpendicularly to the free ends of the arcs (4K, 4) a piece of longitudinal connecting parts (2K, 2) according to point 3.
- Continuing the line of arcs (4K, 4), attach 4 posts (1) perpendicular to the longitudinal connecting ones (2K, 2).
- Connect the lower parts of the racks with a piece of longitudinal connecting parts (2K, 2) according to point 3.
- Set aside the resulting part of the frame.
- Make 1 more part of the frame by repeating steps 2–13. In step 3, attach the outermost part of the longitudinal connecting piece (2K) to the left side of a segment of 3 longitudinal connecting pieces (2).
- Connect the 2 resulting parts of the frame, fastening together the longitudinal connecting parts (2). The distance between the arches at the attachment point will be greater than in other places.
- At the junction of the parts on both sides of the longitudinal connecting (2), located in the center of the arch, attach the middle arch (4C) so that the resulting arch is parallel to the others.
- Attach the lower ends of the middle arc (4C) on both sides to the posts (1) in one line with them and perpendicular to the longitudinal connecting (2).
- Attach the posts (1) to the longitudinal connecting rods (2) perpendicular to them in the upper and lower parts on both sides.
- The frame is ready.
Important! Do not tighten the screws until you have completely installed the greenhouse frame on the ground (except for attaching the supports). When installing profiles, direct their side flanges outward towards the covering.
Assembly of the end sides
To assemble the end sides:
- Install the right upper post of the opening (9-2P) perpendicular to the ground surface, connect at the top with the outer arc (4K) using a screw.
- Attach the end tie (8) with one end perpendicular to the right upper post (9-2P), and the other end to the longitudinal connecting part (2K) located at the top right, so that they are in the same plane and at the same time perpendicular to each other.
- Install the left upper post of the opening (9-2L) perpendicular to the ground surface, connect at the top with the outer arc (4K) using a screw.
- Attach the end tie (8) with one end perpendicular to the left upper post (9-2L), and the other end to the longitudinal connecting part (2K) located at the top left, so that they are in the same plane and at the same time perpendicular to each other.
- Connect the lower post of the opening (9-1) with the right upper post of the opening (9-2P).
- Connect the lower post of the opening (9-1) to the left upper post of the opening (9-2L).
- Attach the opening tie (10) perpendicular to the lower opening posts (9-1).
- Attach the end tie part (8) at the bottom with one end perpendicular to the lower post of the opening (9-1), the other end to the longitudinal connecting part (2K) located at the bottom right, so that they are in the same plane and at the same time perpendicular to each other .
- Attach the end tie part (8) at the bottom with one end perpendicular to the lower post of the opening (9-1), the other end to the longitudinal connecting part (2K) located at the bottom left, so that they are in the same plane and at the same time perpendicular to each other .
- The opening tie (10) and the end tie bars on the right and left (8) should form 1 straight line.
- In the same way, assemble the end on the opposite side.
In the Perchina-M model, it is necessary to install additional parts to strengthen the racks at the ends.
Choosing a foundation
This greenhouse can be installed without a foundation; you just need to level the soil so that the doors open freely and the edges of the covering are lightly sprinkled. To secure the “Perchina”, it is enough to bury the special ends of the frame; for this you need:
- In the area where the greenhouse will be installed, make markings for the frame supports (3).
- Using a cord, check whether the diagonals are equal, otherwise you will not get a rectangle.
- In the marked places, dig holes to the depth of a spade bayonet so that there is an equal distance between the frame arches and they are parallel to each other.
- Insert the assembled frame with supports (3) into the holes so that the lower parts of the longitudinal connecting parts (2, 2K), the lower parts of the end ties (8) and the opening ties (10) rest against the soil.
- Check the equality of the diagonals again, make sure that the upper and lower longitudinal connecting parts (2, 2K) are in a straight line horizontally and parallel to each other. If necessary, pour a little soil into the hole or, conversely, deepen it.
- Fill the holes with soil and compact them.
- Cover the edges of the greenhouse with soil.
- Tighten the screws until they stop.
- Attach the large door diagonal (15) at a right angle to the center of the small door diagonal (14).
- Along the horizontal edges of the door (13D), attach 1 piece of the vertical door (12D) perpendicular to it.
- Connect the central points of the door verticals (12D) with the door horizontal part (13D).
- Attach the upper ends of the fastened small (14) and large (15) door diagonals to the upper corners of the resulting part. As a result, they form the letter X, the lower ends of which must be attached to the center of the door verticals (12D) - in the place where the door horizontal (13D) is attached to it.
- Connect the lower ends of the door vertical (12D) with the door horizontal (13D).
- Repeat point 8.
- Attach the upper ends of the fastened small (14) and large (15) door diagonals in the center of the vertical door (12D). As a result, the letter X is formed, the lower ends of which are attached to the lower ends of the door vertical (12D). The places where the door diagonals (14, 15) are attached to the vertical (12D) are located in the corners of the horizontals (13D).
- Assemble 1 more door following steps 8–14.
- Attach hinges to the doors and door frame.
- After the covering is secured, hang the doors.
- Level the ground in front of the doors and check if they open freely.
Frame covering
The frame can be sheathed:
- film - in the “Perchina” model;
- non-woven covering material - in the “Perchina” model;
- polycarbonate - in the Perchina-M and Perchina-M plus models.
Important! The site for installing the greenhouse must be at a distance of at least 1 m from trees, buildings and structures so that snow or ice falling from there does not damage it.
Instead of film, you can use non-woven covering material or combine both materials. It is recommended that the top and exit end be covered with film in a piece of 6x4.7 m, and the rear end with a piece of non-woven covering material in a piece of 1.8x2 m. Then light will penetrate to the plants from above and rain will not penetrate, and fresh light will penetrate from behind air. In places where the film comes into contact with the frame of the greenhouse, it is recommended to place pieces of old film or non-woven covering material to prevent the coating from rubbing due to friction.
How to cover the frame of the Perchina greenhouse:
- Cut pieces of film or covering material. If the width is 6 m, then a piece 6.5 m long is cut out of it - 4.7 m to cover the top and output end, 1.8 m to cover the rear end. If the film width is different, the sizes of the pieces change accordingly. In any case, when purchasing film, you need to take into account that it is laid with an overlap.
- Place the 4.7 m side across the tunnel, and the 6 m side along it. Lay from the rear end, leaving the end of the film hanging over the entrance.
- Install arc clamps on the outer arcs (4K), and straight clamps on each of the posts (1).
- If the shelter is cut from pieces of a different size, install the arch clamps on the middle arches (4C).
- Cover the rear end with another piece of film and install clamps on its stands.
- Insert hooks from the thread into the holes at the upper ends of the posts, which will hold the upper edge of this piece of covering.
- Cover the bottom edge of the shelter with soil.
- On the entrance side there are folding slats with pins that you stick into the ground when you open or close the entrance. Attach the film with thread with hooks.
Other models are covered with cellular polycarbonate. Before attaching the covering, make sure that the frame is well leveled, the arches are parallel to each other, the longitudinal connecting ones are parallel to the ground, otherwise the edges of the polycarbonate will not lie parallel to the arches. In order to cover the Perchina-M plus greenhouse with polycarbonate, 2 sheets measuring 2.1 × 6 m and 4 mm thick are needed.
Tips for the care and operation of the Perchina greenhouse
To increase the effectiveness of “Perchina”, we can offer the following recommendations:
- Make a semblance of a foundation from available materials - timber, brick, foam blocks, etc. This way it will last longer.
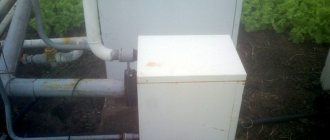
- Install a heating system - a potbelly stove, a gas burner. This way you can get an earlier harvest.
- Be sure to ventilate. This way you can prevent the development of pests and pathogens.
Did you know? Shigeharu Shimamura from the Japanese city of Kashiwa, by installing purple lamps in a greenhouse and placing lettuce on 16-tier racks, increased its yield 100 times.
Thus, the Perchina greenhouse not only has a large number of advantages during operation, but also will not cause any trouble during installation. It is an excellent choice for small plots; it can be chosen by those who are just starting to grow produce in greenhouses. However, please remember that installation and use must be carried out in accordance with the instructions.
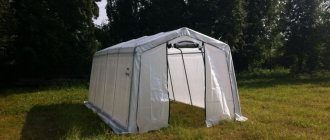
Houses and wall varieties
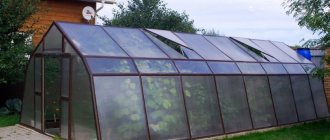
Houses often have a more complex and stronger frame, which is why they cost more. But there are no problems with a lack of lighting due to the smooth slopes of the roof.
Wall structures with a pitched roof are less in demand. They also, due to their simple design, are quickly installed and are held on the ground with the help of lugs, but it is unlikely that anyone would think of attaching them close to a residential building. Rather, it should be an outbuilding, but even in this case, nothing significant will be able to grow in it if the owner of the foundation of this very building is dear to the owner. In most cases, they are used for seedlings or growing plants in containers that are placed in a similar greenhouse.