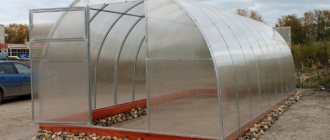
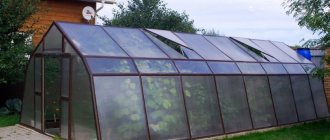
The Uralochka greenhouse was created to provide favorable conditions for your gardening plants in your summer cottages.
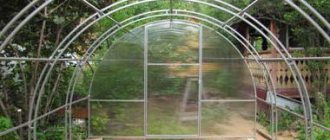
Due to the one-piece arches made of steel profile pipes with a polymer coating, the frame has increased strength. Polymer painting ensures the formation of an impact-resistant anti-corrosion coating; this painting provides reliable protection from all kinds of atmospheric influences.
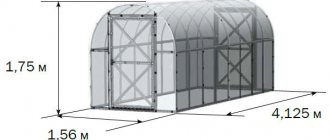
Uralochka (standard) for greenhouses with a width of 2, 2.5 and 3 meters. The pitch of the arcs is 1 m (base profile pipe - 40x20 mm, arcs - 20x20 mm). The greenhouse structure is designed to be covered with cellular polycarbonate. Strength has been tested in practice by gardeners. This design is designed to withstand snow and wind loads that are typical for central Russia. Greenhouse sizes are available: 3×4, 3×6, 3×8, 3×10. Height - 2.00 m and 2.50 m. The doorway is wide enough, it provides free access with inventory, and the windows effectively ventilate the entire greenhouse. The door and window are located on both ends of the greenhouse.
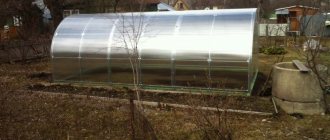
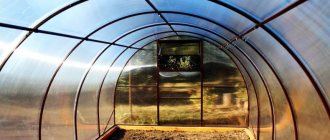
The coating material is cellular polycarbonate, it is light in weight, allows gentle sunlight to penetrate, does not ignite, and also protects against the penetration of ultraviolet rays and retains heat for a long time.
To install the frame, you do not need a foundation, you just need a flat surface of the ground; you can secure the frame with reinforcement pins, which are included in the delivery set.
Advantages of Uralochka greenhouses
— high strength: a minimum set of parts, arcs, all-welded gables, as well as the use of a steel profile pipe in the design give the greenhouse the highest strength
— ease of assembly: a minimum set of parts and the principle of their composition allow you to assemble a greenhouse in a short time with a minimum amount of tools
— versatility: the greenhouse can be installed both on the foundation and directly on the ground
— unique design: the external components of the frame are made flush, thereby ensuring a tight fit of the covering sheets to the frame.
Greenhouse dimensions: Width x Length x Height - 2.5x4x2, 2.5x6x2, 2.5x8x2, 2.5x10x2, 3x4x2, 3x6x2, 3x8x2, 3x10x2, 4x4x2.5, 4x6x2.5, 4x8x2.5, 4x10x2.5.
For the Uralochka greenhouse, we offer a set for tying up plants “Helper”, which includes: 2 mm steel cable (4 threads), talpers and cable clamps. Also, for Uralochka greenhouses, we can offer you a winter conservation kit consisting of 1-4 telescopic stands, which increases their snow load in winter by 6-8 times and saves you from unnecessary hassle and problems.
Why do you need the right greenhouse and how to choose it
Before we begin reviewing the characteristics of the “Uralochka Reinforced” greenhouse, let’s figure out how to choose the right greenhouse in general and what parameters this design should have. As you know, a greenhouse or greenhouse on a personal plot is needed in order to be able to grow heat-loving plants. The same tomatoes and cucumbers of some varieties cannot be planted in open ground in all regions - their fruits simply do not have time to ripen. What can we say about such plants as, for example, watermelons and melons. But you really want to enjoy the fruits from your garden in the fall.
The greenhouse will not only extend the warm “season” for your plants, but will also protect them from accidental frosts - for example, in Siberia they (frosts) can come absolutely without warning even in the middle of summer and can easily ruin all the work on growing fruit crops.
The greenhouse extends the warm season for plants
By the way, few people think about it, but a greenhouse is also a protector from birds that can spoil plants by feeding on succulent shoots. Birds can also cause harm at the sowing stage - they like to select seeds from the ground. Even cats living in the country are not a panacea for birds, since they do not always hunt them.
Greenhouse "Uralochka"
On a note! If you compare a greenhouse and a greenhouse, then the first option is more convenient. The fact is that to work in a greenhouse you have to constantly raise and lower the film. You can just walk into the greenhouse and immediately go about your business.
How to choose the best greenhouse option? After all, you want it to serve for many years, not require constant modification, and retain heat well. First, decide what you want to cover the greenhouse with. The best option is polycarbonate.
Polycarbonate is the best material for creating a greenhouse
Polycarbonate prices
polycarbonate
Compared to other materials, it has many advantages, including:
- strength;
- excellent thermal insulation;
- durability;
- resistance to temperature changes;
- no need for annual modifications;
- ease of installation;
- UV protection;
- ease of operation.
Properties of cellular polycarbonate
Cellular polycarbonate: properties and characteristics
Another important aspect is the choice of material for creating the frame of the greenhouse. Its strength and durability will depend on the material. For example, previously slats and timber were used for this, but in reality they can hardly be considered the best option - wood quickly becomes unusable.
Also, the labor cost factor has always been important for the buyer - the easier it is to do something, the better. Fortunately, technology has long stepped forward; ready-made prefabricated greenhouses are now sold, which are easy to assemble yourself. As a rule, the base is a metal profile, and the outer covering is made of polycarbonate.
Density of polycarbonate
One of the main properties that you should pay attention to when buying polycarbonate is its density. If we explain this concept from a physics point of view, it is the ratio of the weight of a material to its volume. Read this article for more details.
Cellular polycarbonate
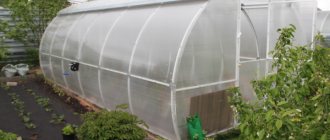
And it is precisely such structures that “Uralochka Reinforced” refers to. It has long been in demand among summer residents, because it is always easier to buy a ready-made structure, install it once and then use it for many years, than to update an ordinary greenhouse made of glass, polyethylene and wood every spring.
Greenhouse "Uralochka - Standard"
(arc 20x20 mm, base 40x20 mm, metal thickness 1.2 mm, frame painting - anti-corrosion polymer powder, white)
| Name | Width, m. | Height, m. | Length, m. | Interval between arcs, m. | Snow load, kg/m2 | Price with polycarbonate, rub. | Assembly cost, rub. |
| Uralochka (standard)-2 | 3 | 2 | 2 | 1 | 120 | To order | 4 000 |
| 0,67 | 180 | To order | 4 500 | ||||
| Uralochka (standard)-4 | 2/2,5/3 | 2 | 4 | 1 | 120 | To order | 4 000 |
| 0,67 | 180 | To order | 4 500 | ||||
| Uralochka (standard)-6 | 2/2,5/3 | 2 | 6 | 1 | 120 | To order | 4 500 |
| 0,67 | 180 | To order | 5 000 | ||||
| Uralochka (standard)-8 | 2/2,5/3 | 2 | 8 | 1 | 120 | To order | 5 000 |
| 0,67 | 180 | To order | 5 500 | ||||
| Uralochka (standard)-10 | 2/2,5/3 | 2 | 10 | 1 | 120 | To order | 5 500 |
| 0,67 | 180 | To order | 6 000 |
Greenhouse "Uralochka - Lux"
(arc 40x20 mm per edge, base 40x40/20 mm, metal thickness 1.2 mm, frame painting - anti-corrosion polymer powder, white)
| Name | Width, m. | Height, m. | Length, m. | Interval between arcs, m. | Snow load, kg/m2 | Price with polycarbonate, rub. | Assembly cost, rub. |
| Uralochka (luxury)-4 | 3 | 2 | 4 | 1 | 220 | To order | 4 500 |
| 0,67 | 380 | To order | 5 000 | ||||
| Uralochka (luxury)-6 | 3 | 2 | 6 | 1 | 220 | To order | 5 000 |
| 0,67 | 380 | To order | 5 500 | ||||
| Uralochka (luxury)-8 | 3 | 2 | 8 | 1 | 220 | To order | 5 500 |
| 0,67 | 380 | To order | 6 000 | ||||
| Uralochka (luxury)-10 | 3 | 2 | 10 | 1 | 220 | To order | 6 000 |
| 0,67 | 380 | To order | 6 500 |
Greenhouse "Uralochka - Drop"
(arc 20x20 mm, base 20x20 mm, metal thickness 1.2 mm, frame painting - anti-corrosion polymer powder, white)
| Name | Width, m. | Height, m. | Length, m. | Interval between arcs, m. | Snow load, kg/m2 | Price with polycarbonate, rub. | Assembly cost, rub. |
| Uralochka (drop)-4 | 3 | 2 | 4 | 0,67 | 200 | To order | 5 500 |
| Uralochka (drop)-6 | 3 | 2 | 6 | 0,67 | 200 | To order | 6 500 |
| Uralochka (drop)-8 | 3 | 2 | 8 | 0,67 | 200 | To order | 7 500 |
Choosing material for a greenhouse
Having decided to install a greenhouse on his plot of land, each owner is faced with a choice - which material to choose for construction. Since the greenhouse will need to last a long time, the material must be of high quality and durable.
Very often, film (in the form of a covering) and timber (in the manufacture of the frame) are used to construct a greenhouse. However, more durable are structures made from a rectangular or square metal profile (for the frame) and cellular thermoplastic, which is superior to polyethylene in terms of endurance and strength.
Note : Representatives of durable greenhouse buildings include the reinforced polycarbonate greenhouse “Uralochka”. This model is reinforced with an additional number of vertical arcs.
Greenhouse "Uralochka - Zinc"
(arc 20x20 (25x25) mm, base 20x20 (25x25) mm, frame - galvanized steel)
| Name | Width, m. | Height, m. | Length, m. | Interval between arcs, m. | Snow load, kg/m2 | Price with polycarbonate, rub. | Assembly cost, rub. |
| Uralochka (zinc 20)-4 | 3 | 2 | 4 | 0,67 | 180 | To order | 4 500 |
| Uralochka (zinc 25)-4 | 0,65 | 240 | To order | ||||
| Uralochka (zinc 20)-6 | 3 | 2 | 6 | 0,67 | 180 | To order | 5 000 |
| Uralochka (zinc 25)-6 | 0,65 | 240 | To order | ||||
| Uralochka (zinc 20)-8 | 3 | 2 | 8 | 0,67 | 180 | To order | 5 500 |
| Uralochka (zinc 25)-8 | 0,65 | 240 | To order | ||||
| Uralochka (zinc 20)-10 | 3 | 2 | 10 | 0,67 | 180 | To order | 6 000 |
| Uralochka (zinc 25)-10 | 0,65 | 240 | To order |
Assembly instructions for "Uralochka reinforced"
Installation of this greenhouse is simple - all the parts come with instructions that will help you assemble the structure quickly.
You may also need some tools for this:
- Phillips screwdriver;
- screwdriver;
- shovel;
- construction level;
- hammer;
- long ruler;
- roulette;
- rope;
- construction knife;
- wrench.
Fasteners
Let's start assembling the “Uralochka reinforced” greenhouse.
Stages of assembling the “Uralochka reinforced” greenhouse
Step 1. Select a location on the site where the structure will be located. It should be well lit. Carefully level the ground surface, remove stumps and hummocks.
Choose a suitable site
Advice! All uneven areas in the area where the greenhouse will be installed should not exceed 5 cm in height.
Layout of the greenhouse location on the site
Step 2. Unfold the sheets of cellular polycarbonate, placing the rolls on a flat and hard surface, and using a construction knife using a ruler, cut two sheets of polycarbonate, each 2.02 m long, and one sheet 1.96 m long. Measure the required distances using a ruler. The total length should be 6 meters.
Marking
Cutting polycarbonate with a circular saw
Step 3. Start assembling the ends of the greenhouse. Unpack them and place one of them on the ground so that the door and window can be opened upward.
Ends
Step 4. Take a sheet of polycarbonate 2.02 m long, remove the protective film and place it on the end face up (it is marked on the film). The sheet should completely cover the right side of the end, the window and the door. Place the material face up with the honeycomb facing vertically.
Removing protective film from polycarbonate
A polycarbonate sheet is laid on the end
Step 5. Using a screwdriver, secure the resulting pieces with self-tapping screws with a diameter of 5.5x25 at the end. Holes for them are provided on the profile.
Step 6. Using a ruler, use a construction knife to cut out the window and door.
The window is cut out
Advice! To ensure that the door opens well, carefully cut out holes for the hinges. Also cut away the damaged honeycomb from the edge of the polycarbonate.
Step 7. Take a 1.96 m sheet, remove the film and lay it end-to-end with the first sheet, right side up. Secure with self-tapping screws. Cut off the excess along the arc of the end.
Sheet fastening 1.96 m
Attention! The remaining piece will be useful for the other end.
Step 8. Cover the second end by completing steps 3 to 7. Perform step 8 using the remaining 1.96 m sheet.
Step 9. Attach the hooks that come with the kit. Attach the wind hooks using 5x20 mm screws and staples. One hook is designed for a door or window. That is, two hooks and 4 staples are attached to one end.
Attaching hooks
Hook
Step 10: Install the handles. Insert the “wrapper” into a special hole in the door or window so that the inserted handle then fits into it. Secure the handle with 4x30 mm screws and M4 nuts.
Handle installation
Step 11. Start assembling the frame. Take connecting plates and M6x50 screws. Place the base pipe on the ground with the pins for the arcs up and inside the greenhouse, connect the sections of the base pipes using these plates (place them at the bottom of the structure) and screws. Tighten with a wrench and screwdriver.
Connection of base pipes
Step 12. Install the arcs by placing them on the base pins.
Fastening the arches
Arcs are installed on base pins
Step 13. Take the ties for fixing the arches and secure them on the inside of the arches with M4x55 mm screws.
Fastening the ties
Attention! Don't forget to connect the ties together. And during assembly, do not forget to hold the frame - it can easily fall.
Step 14. Attach the base to the previously sheathed ends with M6x50 mm screws. Use the connecting plate from below.
Connecting the base to the ends
Installation of the greenhouse “Uralochka reinforced”
Step 15. Using a level, check how level the greenhouse is. At this stage, the frame can still be trimmed.
Step 16: Start lining the top of the greenhouse. Using a tape measure, measure the length of the frame arc along with the base from the outside. Set this measurement aside on a sheet of polycarbonate, add a small margin of about 8-10 mm to it and cut off a piece of polycarbonate.
The final stage of construction: covering the frame with polycarbonate
Attention! The polycarbonate honeycombs must be parallel to the frame arc!
Step 18: Remove the film and cover the frame with these sheets, right side up. Each sheet should protrude 50-60 mm beyond the end.
Step 19. Secure the sheet with galvanized self-tapping screws 5.5x25 mm, first along the arcs, then along the base. Similarly, cover the remains of the greenhouse with polycarbonate sheets.
Polycarbonate fastening
Step 20: Secure the greenhouse to the ground. The structure is ready.
Corner hole for fixing the greenhouse to the ground
The greenhouse is assembled
Video - Assembling the “Uralochka reinforced” greenhouse
Additional window
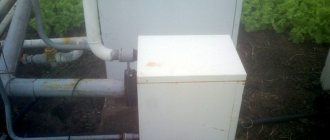
At the request of the buyer, additional windows can be installed in Uralochka greenhouses, designed to create a more favorable microclimate on hot days for growing garden crops. Each window can be equipped with a “Device for automatic ventilation of greenhouses.”
*The cost of an additional window is 1200 rubles
Advantages and disadvantages
What are the main pros and cons of the “Uralochka reinforced” greenhouse?
Pros:
- the structure can withstand significant snow and wind loads;
- easy to assemble and disassemble;
- installs quickly and directly on the ground (does not require a foundation);
- the heat inside the greenhouse is maintained well (if all the cracks are sealed, then even in extreme cold the temperature inside the structure will not drop below zero);
- protects plants from ultraviolet radiation;
- has a convenient location of windows.
But there are also disadvantages. The Uralochka greenhouse, even a reinforced one, is not always able to cope with a high snow load. Sometimes so much snow can fall that no structure, especially a greenhouse, can bear its weight. There have been numerous cases when the greenhouse sagged and broke, but this is more likely the fault of extreme weather conditions than the manufacturer. In those regions where such serious snowfalls are not uncommon, it is best to take a stronger structure or modify it yourself.
Finally, if the “Uralochka reinforced” still breaks down, then it can no longer be restored - you will have to buy a new one.
It is no longer possible to restore a broken greenhouse