Durable greenhouse - what should it be like? This question is asked by many gardeners who are not indifferent to the fate of their plants and who are accustomed to saving their money. The strength of the greenhouse is especially of concern to those summer residents who live in northern regions with harsh climatic conditions. The “Osnova” greenhouse, which is produced by , is one of those structures that are famous for their durability and ability to withstand severe weather tests.
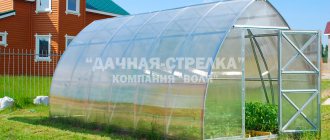
Greenhouse "Osnova"
Which greenhouse is stronger?
Before we begin a detailed study of the Osnova greenhouse, we suggest that you get acquainted with the basic rules that will help you choose exactly the greenhouse that will have the highest strength and will serve you for many years.
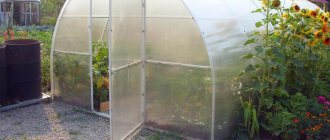
Photo of the “Osnova” greenhouse
To begin, soberly assess the climatic conditions in the region where you live and think about whether you need a heavy-duty greenhouse. The fact is that such structures, as a rule, cost much more than standard structures. If you live where strong winds are very rare and snow falls in negligible quantities, then there is no point in buying a heavy-duty greenhouse. However, since you are still reading this article, it means that you really need a design that can easily cope with increased snow and wind loads. So which greenhouse is the strongest?
- A greenhouse with a frame made of galvanized profile is worse than one made of painted pipe or plastic. The fact is that in structures made of galvanized metal, the supporting arcs are often collapsible and consist of several parts. And the thickness of the metal is weak. However, at the same time, it is not at all afraid of rust and copes well with conditions of high humidity, which often (or rather, almost constantly) arise in a greenhouse. But frames made of pipes are not afraid of testing by snow and wind, but they rust and deteriorate faster.
- And among collapsible structures there are quite durable types of structures. And they are stronger and more reliable the fewer parts they contain.
Types of materials for greenhouse frames: steel, aluminum, plastic, wood
- Pay attention to the thickness of the parts and their cross-section. The larger it is, the stronger the greenhouse. The strongest structures cannot have a cross-section of less than 20 mm.
- Estimate the thickness of the metal - it should be at least 1.2 mm (anything less is not suitable in your case).
- That greenhouse is stronger because it has a distance between arches of no more than 1 meter. Ideally, less. The more often the arcs are located relative to each other, the easier it will be for the frame to withstand high snow and wind loads.
- Choose dense and high-quality polycarbonate. Immediately discard options with sheet thickness up to 4 mm - they are no good and will fail in the first winter.
Consequences of using polycarbonate that is too thin
The greenhouse collapsed from the snow
On a note! Assembling greenhouses from solid arcs is much easier and faster than from those that have a lot of parts. And this is also their undoubted advantage. But collapsible structures are easier to transport.
And remember: you don’t need to save money if you want to buy a truly durable and reliable design. However, before purchasing, be sure to read reviews about the greenhouse options that you have already considered and choose the best one.
Prices for cellular polycarbonate
cellular polycarbonate
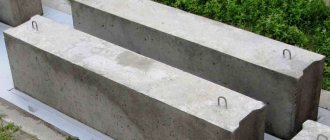
Advantages of a timber foundation
If we are talking about a structure for seasonal use, then a foundation made of bars is the best option. The main advantages of this design include the following:
- Small material and time costs.
- Possibility to assemble the greenhouse immediately after installing the base.
- Attaching the greenhouse frame to a wooden beam is quite simple.
- The wooden foundation under the greenhouse can be easily restored.
- If it is necessary to move the greenhouse, the structure is very easy to dismantle.
- Such a foundation is environmentally friendly and is perfect for a structure such as a greenhouse.
Of course, a timber foundation will last less than a concrete or brick foundation. But it will not damage the fertile layer. The minimum service life of such a foundation for a greenhouse is five years. However, in practice this period is much longer.
A few words about the manufacturer
The Osnova greenhouse, which we are talking about today, is produced. And I would like to say a few words about this company, which has been operating for many years in Podolsk, St. Petersburg, and Vologda. At the moment, it is considered one of the best manufacturers of greenhouses, producing polycarbonate and frames made from square profiles with a section of 20*20, 25*25 and even 30*30 mm. The polycarbonate produced by the company is made from foreign raw materials from SABIC Innovative Plastics and can have a thickness from 4 to 16 mm.
Galvanized profile for greenhouse
The company is very sensitive to quality control and compliance with all production requirements, and therefore can boast of a high-quality and sought-after product.
On a note! The company has a narrow specialization, due to which it is focused only on the production of greenhouses and does not waste time on trifles. And the quality of the product only benefits from this.
is extremely responsible for quality control
The company is developing dynamically and already has a huge network of warehouses throughout Russia. That is why if you ordered a greenhouse on the website, it will arrive to you quite quickly. And most importantly, all the company’s products are designed taking into account the special climatic conditions of Russia. The “Osnova” greenhouse is one of those structures that are not afraid of absolutely anything.
We select the foundation depending on the type of soil
First of all, it is worth choosing the type of foundation based on the characteristics of the soil on the site, and not on the budget allocated for the construction of the greenhouse. If this important factor is not taken into account, the base may “float” during snow melting or heavy rainfall.
| Soil type | Soil features | Type of foundation |
| Sandy | Does not retain moisture, freezes in winter, sag easily under heavy weight | Surface strip made of timber |
| Clayey | The earth is compressed, eroded, absorbs water well and freezes, which is why it is easily deformed | Recessed strip, columnar, pile, pile-tape |
| Rocky | Holds any structure well, does not blur, does not deform | Surface strip foundation |
| Clastic | Contains stones and gravel that prevent subsidence and deformation | Shallow strip foundation |
| Quicksand | Silty, loamy soil with high water content, very mobile | Slab foundation, monolithic concrete foundation, pile foundation |
Features of the “Fundamentals” design
The Osnova greenhouse is one of the strongest on the market. Its main feature is a special frame, which is assembled from solid welded ends, as well as solid arches. All these parts of the greenhouse are made of galvanized pipe with a cross-section of 25*25 mm. The metal thickness is 1.5 mm. These characteristics alone allow us to form a first opinion about how durable the Osnova greenhouse is.
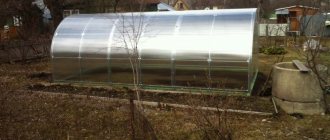
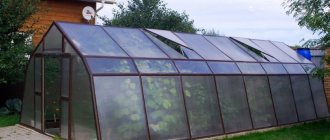
Greenhouse “Base” 3x6 m from painted profile pipe
Due to the fact that the frame metal is covered with a zinc coating 140 microns thick, Osnova is absolutely not afraid of rust, coping well with humid greenhouse conditions. In addition, the coating adheres very well to the metal, so there is no need to touch up the frame every year.
However, that's not all. The “Fundamentals” frame is reinforced with additional arcs and guides connecting them. In addition, the distance between the arches is very small - only 65 cm. Due to this, “Osnova” is not afraid of either snow or wind.
The distance between the frame arches is only 65 cm
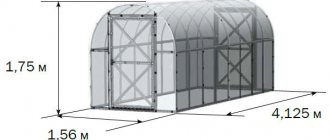
Table. Parameters of the "Basic" greenhouse.
| Greenhouse length, m | Height, m | Width, m | Soil cover area, m2 |
| 4 | 2 | 2,5 | 10 |
| 6 | 2 | 2,5 | 15 |
| 8 | 2 | 2,5 | 20 |
| 4 | 2 | 3 | 12 |
| 6 | 2 | 3 | 18 |
| 8 | 2 | 3 | 24 |
On a note! The “Osnova” greenhouse can be longer than 8 meters. But this parameter will necessarily be a multiple of 2.
The covering material of the greenhouse is polycarbonate, which has a thickness of 4 mm and a density of 0.8 kg/m2. It also has a coating that protects it from harmful ultraviolet radiation - this extends its service life. In this case, the polycarbonate is attached to the “Base” in a special way: using a special galvanized tape and self-tapping screws, due to which the covering material cannot be pressed through and damaged during installation. For the same reason, polycarbonate will not tear at the fastening points due to a sudden gust of wind. By the way, this method of fastening is a unique development of the Ready-Made Greenhouses Plant.
On a note! The “base” feels great on the site, without collapsing, for more than 10 years, and the warranty period is at least 3 years.
Advantages and disadvantages of the design, reviews about it
Alexander from Penza purchased a Narodnaya reinforced greenhouse in 2022. The summer resident used it to protect seasonal cucumbers from cold precipitation and low summer temperatures. He illustrated a photo of the assembled product and his version of its internal arrangement. I was pleased with the purchase - the harvest was a success. The price of a basic 4-meter greenhouse in retail sales starts from 15-16 thousand rubles. This distinguishes the model from many analogues that cost 5 thousand or more more.
Other advantages of the greenhouse:
- Increased strength. Achieved thanks to the increased number of arches and 5 longitudinal reinforcing beams.
- Stainless steel. The class of the galvanized layer is 140-180 microns.
- A fastening method that is safe for the integrity of polycarbonate is tape.
- High-quality cellular coverage.
- Possibility of self-installation of a greenhouse on your site. Detailed instructions with illustrations will tell you how to assemble it.
Identified disadvantages of the enhanced model:
- Tension tape holds polycarbonate sheets worse than self-tapping screws. In strong gusts of wind, the coating runs the risk of tearing off. Gardeners have gotten used to attaching it with self-tapping screws and washers on top of the tape. It’s more reliable this way, and it’s also harder to push through the material with fasteners.
- For the winter, experts advise additionally supporting the arches. If there is heavy accumulation of snow, the structure may not withstand it.
Equipment, pros and cons
The delivery set of the Osnova greenhouse contains all the necessary parts and elements for installing the structure yourself. In addition to galvanized arches and end parts, the package includes two doors and two windows, which after assembly will be located at opposite ends. Also, along with the frame parts, polycarbonate is supplied in the required quantity. The package must contain a set of fasteners and accessories (handles, bolts, screws, sash clamps, galvanized tape, washers, etc.).
Assembly and installation instructions
The greenhouse delivery package does not include only the foundation, which you will have to do yourself. As a rule, timber measuring 100*100 or 150*100 mm is perfect for this, however, the “Base” can also be installed on a strip concrete foundation or galvanized piles.
The greenhouse is distinguished by its simplicity of design and reinforced frame
Advantages of the Osnova greenhouse:
Reinforced fastening via galvanized tape
Osnova has plenty of advantages, but no disadvantages at all. After all, even the price of this greenhouse is quite acceptable.
Greenhouse "Kremlevskaya Lux"
The Kremlevskaya Lux greenhouse is perhaps the most durable arch-type structure on the greenhouse market. It can easily cope with significant snow loads. Read this article for more details.
A simple foundation for a small greenhouse
During active use, the basic strip version of a wooden foundation has acquired numerous varieties. Fundamentally, the design of its construction consists of connecting four sections of timber.
The optimal type of connection is considered to be a “toe-to-foot” connection, because it can be made without the use of metal fasteners. It is recommended to duplicate the “half-tree” notch with a bolt or smooth reinforcement driven through the joining area. The reinforcement is driven into a pre-drilled hole with a diameter slightly smaller than the pin being driven.
An inexperienced contractor who has decided to build a timber foundation for a country greenhouse for the first time with his own hands should not bother with the cutting. Frame parts can only be fastened with two anchor bolts screwed into the end of the beam, iron brackets or metal corners.
A frame assembled from timber can be installed on a pre-leveled platform without unnecessary fuss. In this case, the breakdown of the site is excluded from the work cycle without any qualms. Assembly accuracy is checked by measuring the diagonals. If the values of the diagonal dimensions coincide, it means that the strip wooden foundation is assembled impeccably.
All that remains is to secure the base by:
- driving reinforcement into the ground from the inside of each corner and through 1.0-1.5 m of the long walls of the greenhouse;
- screwing screw supports with a length of no more than 70 cm at the same points;
- fastening by driving reinforcing bars into the ground through areas of corner and linear connections.
Lengths of reinforcement and screw supports driven from the outside or inside of the foundation frame are screwed to it using metal mounting plates. Instead of reinforcing bars, wooden stakes can be driven into the soil. They do not need to be screwed, just nailed. The stakes are pre-fired and treated with tar.
After fastening, the wooden foundation is sprinkled with sifted coarse sand without foreign inclusions or gravel. The standard algorithm for the construction and installation of a wooden base with the assembly of a miniature greenhouse is demonstrated by a photo selection:
Let's consolidate our knowledge by watching a video about constructing a timber foundation for a domestically produced greenhouse:
Installation of the "Osnova" greenhouse
Due to the fact that the Osnova greenhouse kit contains enough parts, and the arches and ends are made of solid arches, installation of the structure is quick and easy. Let's look at an example of installing a greenhouse on T-shaped piles produced by the Ready-Made Greenhouse Plant.
Step 1. Assembling the “Fundamentals” frame begins with connecting the base parts using connecting tees and self-tapping screws. Assemble the side parallel parts of the base.
Assembling the greenhouse base
Step 2. Next, attach to the base of the pile. They are installed in a certain way: step back 10 cm from the edge of one long side of the base and attach the first pile, then attach the second pile in the middle of the first part of the base. Install the next pile at the junction of two parts of the base, then again fasten the pile in the middle of the part and at a distance of 10 cm from the edge. Make fastenings with self-tapping screws.
Attaching piles to the base of the greenhouse
Step 3. In the area where the greenhouse will be installed, dig holes for the piles. To find out where the holes should be, place the base of the greenhouse with the stilts on the ground in the same way as the greenhouse will stand, and use the ends of these parts as a guide.
Next you need to dig holes for the piles
Step 4. Place the foundation piles in the holes and drive them into the ground using a sledgehammer through a piece of wood. Check the levelness of the base using a level.
Piles are driven into the ground
Step 5. Install the second part of the base opposite the first - parallel, at a distance of the width of the greenhouse. Check the diagonals - they should be equal.
Installation of the second part of the greenhouse base
Step 6. On all arches, measure 30 cm up and down from the holes for the screws. This is necessary to ensure that the symmetry of the screws is maintained along the entire length of the greenhouse.
Arch markings
Step 7. Install all the arches onto the base, sliding them onto the pins.
Arcs are attached to the base
Step 8: Install the guides. Please note that these parts are not perfectly straight; they have slight tapers at one end. These narrowings are needed for the joints of two guides, and therefore should not be at the edge of the greenhouse, that is, do not attach them to the first arc. Secure the guides with self-tapping screws.
Guide connection
Attaching the guides to the greenhouse frame
Step 9. Lay out the polycarbonate sheets on a flat surface. Using a marker under the protective film, mark the side of the material where there is a layer that protects the material from ultraviolet radiation. Remove the film.
Next you need to remove the protective film from the polycarbonate
Step 10. Place the ends of the greenhouse frame opposite each other, as if opening them, and cover with a polycarbonate sheet, as shown in the figure. Attention: leave a small outlet of 7-10 cm at the bottom of the sheet and the edge of the end.
The ends are covered with a polycarbonate sheet
Step 11. Partially screw the polycarbonate to the ends with self-tapping screws. Trim off the excess.
Trimming polycarbonate
Attention! When covering the door, screw in the screws diagonally so that when opening them in the future they do not interfere with each other.
Step 12. Take the remaining polycarbonate and apply it to the unlined edge of the end. Screw it on and trim off the excess.
The remaining polycarbonate is applied to the unlined edge of the end
Step 13. Install and secure the end to the greenhouse frame. Insert first into the base, then into the guides.
The end is attached to the greenhouse frame
Step 14. Install T-shaped piles at the door post, digging them into the ground under the ends, two at each end.
T-Pile Installation
Step 15. Install handles on doors and windows.
Door handle installation
Step 16: Cut slits in the polycarbonate to allow doors and vents to open.
Polycarbonate is cut so that doors and windows can open
Step 17: Install hinges and hooks for the door.
Installation of door hardware
Step 18. Install locks on the door.
Door lock attachment
Step 19. Cover the frame with polycarbonate sheets. At the edges of the greenhouse, do not forget to leave canopies about 5 cm wide.
Sheathing the frame with polycarbonate
Step 20: Take the galvanized strips and throw them over the frame of the greenhouse. Place one tape on each arc of the frame and attach the polycarbonate through it (tape) to the frame with self-tapping screws, guided by the marker marks.
Polycarbonate must be attached to the arches through galvanized tapes
Step 21. Cover the ends of the polycarbonate with special tape to prevent dirt and moisture from getting there.
Sealing polycarbonate ends
Features of a timber base: installation technology
Speaking about the advantages of a columnar foundation, the following positive aspects are highlighted:
- simple technology and low cost;
- additional thermal protection is created;
- cannot be deformed due to the properties of wood.
A significant disadvantage of this design is its fragility.
The strip foundation has the following advantages:
- durability;
- can be used for the construction of winter spring greenhouses.
Minuses:
- high price and labor-intensive construction;
- If you need to move the greenhouse to another area, it is very difficult to dismantle the strip base.
Getting started right – preparation
Design calculations are a purely individual matter, but it is impossible to do without them. The wooden base must clearly correspond to the dimensions of the lower trim of the greenhouse being installed. There are no exact instructions where the greenhouse frame should be fastened: along the central axes of the timber frame, along the outer or along the inner edge.
It depends on the personal preferences of the master and on how it is more convenient for him to attach polycarbonate or polyethylene to the frame. However, this issue should be carefully thought through and carefully calculated in advance so that you do not have to resort to expensive alterations.
The timber for the foundation is selected depending on the installation method:
- material with an impressive weight of 150×150 mm (116 kg is the average mass of one coniferous element 6 m long), material with a size of 150×100 mm (the same criteria 77.47 kg) are purchased for the construction of shallow-buried wooden tape-type foundations. A large, heavy beam is used to ensure the stability of the greenhouse frame so that the structure does not overturn in gusty winds;
- lumber with a large cross-section is also preferable when building a large-sized greenhouse, if the length of the frame is more than 6 m and the height is more than 3.0 m;
- material measuring 100×100 mm (51.8 kg) and an even lighter material 100×50 mm (26.0 kg) are used to construct grillages attached to columnar supports. Because Since the main load falls on the supports, there is no point in using heavy, expensive timber.
Timber made from softwood is the cheapest and easiest to process. But it cannot be considered one of the most wear-resistant representatives of wood products. Larch will last the longest; underground and underwater structures have been built from it since ancient times, but its price is slightly higher than pine. Regardless of the species, the moisture content of lumber should not exceed 22%. Otherwise, the wooden frame will warp, and along with it, the frame of the greenhouse will be deformed. There should be no blue discoloration or other signs of damage on the purchased timber. It is not advisable to buy grade IV with numerous knots.
Before construction, it is recommended to protect the wooden foundation from destruction by fungal microorganisms and from the negative effects of ground moisture. A wide selection of bitumen mastics and antiseptic impregnations are now on sale. In addition to them, there are traditional methods:
- Copper sulfate. The prepared solution, often used in greenhouse farming, is impregnated with dry material and allowed to dry thoroughly. The timber will need to be brought to “condition” on an outdoor area protected from sunlight. It takes quite a long time to dry, at least two to three weeks, but then serves flawlessly. The readiness of lumber for laying is determined “by eye” and by touch;
- Firing with hot bitumen coating. The timber is first burned with a gas burner and then covered with heated tar. Particular attention should be paid to ends and knots. You can simply burn wood over a fire;
- Warm up working out. Cheap and easy to apply with a brush or rag. Used engine oil is not at all pleased with its environmental and fire-fighting benefits.
Greenhouse owners give justified preference to the first two of these methods. They will not upset the natural balance. However, the third option is also quite suitable for constructing a wooden foundation completely buried in the ground, installed in a trench with walls and bottom covered with roofing felt.
Next, we’ll take care of preparing the site. It is advisable to break it down before work, without relying too much on your own eye:
- According to the pre-calculated dimensions of the external outline of the frame, we will hammer in temporary pegs.
- We connect them with twine or fishing line at a height of approximately 40-50cm from the ground. We tie each pair of pegs with a separate piece of rope with a margin of 30 cm at both ends.
- Let's check the lengths of the diagonals and check the perpendicularity of the corners.
- If everything is correct, we will make a kind of cast-off. Let's kind of extend the imaginary lines of the foundation walls and hammer in two more at a distance of about 50cm from the existing peg.
- We will tie a fishing line or twine to the newly installed pegs so that the point of intersection of the two lines is directly above the planned greenhouse corner - i.e. over the first hammered peg. We do this 3 more times.
Casting for the construction of a foundation made of timber is an optional measure. Often they do without cutting at all, because the specifics of long-length lumber help to maintain dimensions. At first glance, the procedure itself takes time, but in reality it saves. After all, the master will not need to control the direction and dimensions dozens, and sometimes hundreds of times.
Tools and materials
In addition, to complete the work you will need the following tools:
- rope or fishing line;
- wooden stakes;
- building level;
- roulette;
- hacksaw;
- hammer;
- nails;
- shovel and bayonet;
- anchors for fastening the main structure.
It should be noted that this is not a complete list of tools and available materials necessary for arranging the foundation. Depending on the type of foundation chosen, you will need to add a hand drill (for a pile foundation), formwork boards (for laying a strip base), etc. to the list.
Forest selection
The base is made of hardwood timber, which is chosen very carefully. The lower part of the tree trunk (butt) is what is needed for these purposes. There should be no rotten or gray areas affected by fungus.
A greenhouse is a specific structure. The humidity there is always high, plus chemicals and fertilizers quickly render the structure itself unusable.
Therefore, the forest should have a humidity of no more than 20%, otherwise it will begin to deform over time.
Leading to undesirable consequences, subsidence, cracks and distortions of the entire structure, this is unacceptable for a polycarbonate greenhouse.
Treatment
When assembling a wooden frame base, one cannot do without special processing of such a foundation. Bioprotection with special solutions will provide excellent protection against insect pests. Antiseptics also need to be used; they provide protection against mold and fungi, which is very important when growing seedlings.
It is easy to apply it to the prepared timber with a roller and brush. If the polycarbonate greenhouse will be in a humid place, it is recommended to process the wood by immersion in a special mixture.
Making a soaking bath is not difficult. The galvanized sheet is bent so that it has two sides and a solid bottom. Then the edges are rolled. It looks like a trough.
But if you don’t have the right material at hand, use a shovel and thick plastic wrap. Dig a ditch and cover it with film. After pouring the solution directly into the hole, treat the timber by immersing it in the solution for 5 minutes. Then dry.
Moisture protection
Waterproofing with resin
When creating a wooden foundation for any greenhouse made of metal, wood or polycarbonate, you cannot do without protecting the base from moisture. Moisture is always present here, flowing down the inner surface of the polycarbonate or film.
Usually the beam lies on a concrete base, but sometimes it is laid on a compacted bed of crushed stone, laying a layer of waterproofing materials.
Oil is one of the wonderful remedies. Some impregnations contain different oils, from cottonseed to bitumen-based oils. By impregnating a timber foundation, you will significantly extend its service life. The treatment is carried out in two layers with a brush or roller with artificial bristles.
When carrying out such work, use personal protective equipment, masks, respirators, rubber gloves, an apron or a special work suit.
Marking
Having decided on the place to install the greenhouse, it is very important to correctly mark the future foundation. The use of prepared lumber greatly facilitates this process, since all elements of the base will correspond to the length and width of the structure being built. At this stage, it is important to set right angles and check the geometry of the rectangle along the diagonals. For these purposes, a measuring tape, wooden poles and twine are used.
Soil excavation
After marking the boundaries of the foundation, it is necessary to excavate the soil for lining the greenhouse. The depth of the trench is 10...15 cm. Next, along the entire perimeter of laying the timber, the sand and soil mixture is backfilled and compacted. The backfill should be 5...10 cm above the soil level. This will allow the base structure to be leveled perfectly in the horizontal plane.
If you plan to use point supports to tie the foundation of the greenhouse, then metal pillars with thrust bearings are screwed in along the marking line, or concrete blocks are laid on a sand cushion. In addition, pre-treated wooden posts can be dug into the ground. However, this option is not so popular due to the difficulty of aligning all the columns to the same level.
Laying
On a prepared and perfectly leveled base, the piping of the future greenhouse foundation is assembled. At this stage, each element is connected to each other. There are two ways to join corners:
- Connection in the paw;
- Half-tree connection.
If a greenhouse 6 meters long or more is installed, then the timber must be increased. In this situation, it is best to use a half-tree connection. Elements laid in width are built up in the same way if a greenhouse of non-standard dimensions is installed on the foundation.
Installing a wooden frame in a trench
If the area is prone to heavy winds, the above scheme is not suitable. A more complex, but much more reliable method is to install a timber foundation in a shallow trench. To form it, a breakdown is needed.
Digging a trench will not require much effort. The maximum depth of the groove is equal to twice the height of the beam, the width is equal to twice the width. A quarter of the bottom of the trench will be filled with sand or gravel. Opinions are divided regarding further actions:
- According to a large number of craftsmen, it is necessary to arrange something like a pallet made of roofing felt in the ditch in order to create a barrier between the wooden base and the external moist environment.
- According to their opponents, this is an unnecessary measure that can harm the wood. Water entering a “trough” constructed in this way will not infiltrate into the soil, which can cause the wooden frame to rot.
We admit that the second opinion is very reasonable. In addition, leveling the frame in a trench with roofing felt seems to be a difficult undertaking. And it is necessary to level it according to the spirit level readings, otherwise the skewed base will become the start of the construction of a skewed greenhouse.
The wooden base must be leveled in accordance with building codes using wooden wedges, scraps of timber, boards, etc. Minor deviations are eliminated by adding sand or gravel. If bricks or stones are used as a lifting element, there should be a spacer made of roofing felt, parchment or simply oiled paper between them and the wooden parts.
If the owner decides to build a more powerful wooden base for the greenhouse, the timber is laid in two or even three rows like well crowns. The rows are fastened together with wooden dowels or reinforcement sections. It is wiser to use reinforcement, because it will simultaneously play the role of rods driven into the ground. True, the service life of a foundation with a metal-wood combination will be reduced.
By the way, you can assemble the foundation according to the well principle, and according to it, bury the wooden foundation into the ground. First dig up the soil under the assembled walls approximately in the middle. Then place bricks or logs in the dug hole as temporary support. Then dig around the perimeter, after which these temporary supports must be removed. The foundation will settle on its own in its intended place.
Fixation
The final stage of constructing a foundation for a greenhouse is fixing the timber. All elements of the greenhouse base can be fixed relative to each other using self-tapping screws, threaded rods and metal brackets. In addition, the harness is fixed relative to the base. In one case, the frame is secured with anchors to concrete blocks. In another, they are fixed to the thrust bearings of screw piles.
When installing heavy greenhouses, a two-layer timber frame can be used as a foundation. In this case, each crown must be connected to each other with threaded rods. Using this type of connection will allow you to quickly assemble and disassemble the base structure.
If you decide to dig a foundation for a greenhouse made from wooden beams, refrain from laying roofing material in the trench. Its use will serve as a moisture storage device. In such an environment, the base frame will begin to rot very quickly.
The importance of a greenhouse foundation
When creating a foundation for the base of a greenhouse structure, it is worth highlighting the following advantages:
- the concrete foundation will firmly attach the building to the soil, then it will not be afraid of even hurricane winds;
- with a foundation, the greenhouse is located above ground level, and this makes it possible to save up to 10% of internal heat;
- moles, mice, insects, including harmful ones, will not reach green spaces;
- the base protects plants from precipitation, frost and other unfavorable factors.
If we consider what is most important when constructing a greenhouse, then the base plays an important role. The main qualities that the base of a greenhouse should have include:
- Reliability of the foundation. This characteristic is especially important during the winter-spring transition, when snow and water can destroy the greenhouse.
- Foundation stability. For the sake of economy, some gardeners, instead of a good foundation, build a pitiful semblance of it. Using plastic bottles filled with sand or other similar improvised materials instead of a solid base leads to the destruction of the entire greenhouse structure. Temperature changes and the influence of groundwater lead to the displacement of the greenhouse.
- The material and shape of the greenhouse must correspond to the dimensions of the base. Exact matching of dimensions will allow the structure to serve faithfully for many years.
Correctly selected materials and type of greenhouse foundation will affect the functionality of the greenhouse, the seedlings, and the future harvest.
Of course, a greenhouse can be built without a foundation. Each summer resident decides for himself whether a base for a greenhouse is needed or not. Therefore, let’s consider situations where it is impossible to do without a reason:
- The design is planned to be used both in the warm months and in the cold season.
- The site where the greenhouse structure is located has an uneven landscape.
- For winter use, it is planned to install a heated floor in the greenhouse.
- The building is being constructed using a greenhouse-thermos system.
- The climatic conditions in the region are such that there is a risk that the greenhouse will fly away or break.
- It is planned to grow vegetable or fruit crops on an industrial scale in the greenhouse structure.
How to choose polycarbonate for a greenhouse
To get the best greenhouses, it is worth choosing the optimal type of polycarbonate. It is important to note that you can now find many fakes and low-quality products on the market. Therefore, you should only buy material from trusted and reliable companies.
The material itself varies in density. So for colder regions, from a climate point of view, it is worth choosing the most dense parameters. And, conversely, for more southern regions of the country, lighter parameters will be sufficient.
All these characteristics, as a rule, can be seen either directly on what the material is supplied in, that is, on its packaging, or you can consult with a specialist. It is worth noting that low-quality goods do not have such indicators and, as a rule, are very poorly packaged.
How long did it take to install the greenhouse?
Watching how two specialists who had done this more than once set up a greenhouse, I realized that it would have taken me three times as long. This is the best case scenario. At worst, it could easily ruin some metal part or break a sheet of cellular polycarbonate in the wind.
It took the specialists almost 4 hours to be able to accept the work. So think about it, is it worth bothering yourself? Of course, there are people who don’t care about any task. Fortunately, my hands are growing from the right place, my head is cooking, all the necessary tools are available, and there is more than enough free time.
Well, the experience will come during the installation process. In principle, then it will be possible to do similar work to order, receiving 4,500 rubles for your work. in a day. Or even more, because if you’re lucky, you can install not one, but two greenhouses per day. True, it is still better to work together, and, therefore, the profit will have to be divided. But these are already details. The main thing is that an enterprising person always has the opportunity to prove himself and live quite decently.
Choosing the right greenhouse shape
How to choose the shape of a polycarbonate greenhouse? The choice of design for a future greenhouse depends on two main factors - monetary and climatic. The more snow and precipitation falls in winter, the narrower the vertical of the cone. Pyramid greenhouses are built in places where it is difficult to reach the greenhouse due to heavy snow.
Original pyramid-shaped greenhouse
Such greenhouses do not need to be cleaned; the snow itself will fall under its own weight. The disadvantage of such a greenhouse is obvious - in the upper part of the vaults the space is eaten up. The area, which is fully used in arched structures of smoother shapes, remains unclaimed in triangular ones. Typically, this type of construction is used not for greenhouses, but for greenhouses. More popular among gardeners are arched structures and greenhouse houses.
Greenhouse-arch Flower garden-tent
Greenhouse-house
Arch-shaped greenhouses are the most economical option. Their installation does not require a large amount of materials. To cover the span from base to base, one standard size polycarbonate sheet is enough.
FOR REFERENCE,
Standard size of polycarbonate sheet: 2.10 m×6.12 cm.
Arched greenhouses are used for planting small plants: tomato seedlings or flowers.
Arched greenhouse frame
And the remaining material can always be used in such a mini-greenhouse.
Arched mini-greenhouse
Advantages of arched greenhouses:
- Easy installation.
- Saving money.
- It can be placed on a lightweight foundation made of timber or bricks without cement.
- A spherical or arched roof has better aerodynamic performance. From such roofs the wind will not tear off the slab even during a hurricane.
Disadvantages of the greenhouse-arch:
- Limited space in the outer beds.
- Low functionality.
Greenhouse houses. The most common option is gable greenhouses made of polycarbonate or greenhouses with a straight roof. Thanks to their universal structure, such greenhouses can be built in different sizes and heights. You can increase the space due to additional sections and side rows.
Greenhouse house made of metal profile
Greenhouse-house with a two-level roof Greenhouse-house
There are other options for greenhouses: drop-shaped, tunnel-shaped, two-part, etc. Some of them can be seen in this photo.
Schematic representation of frame options of different shapes
Polycarbonate greenhouses: drawing
Before purchasing materials for constructing a greenhouse, you need to make a design or schematic drawing of it. It will save time on thinking about design details in the process and will allow you to purchase the necessary material in advance in the quantity that will be needed. Typically, the diagram indicates the number and type of supports for the foundation, the volume of required fill material, reinforcement and reinforcing materials for the base, as well as the number of polycarbonate sheets and arched blocks. Be sure to indicate the dimensions - this will help you correctly calculate all the necessary materials.
Greenhouse-house: drawing
Drawing showing connecting elements
Schematic illustration of a foundation with brickwork
The calculations should include elements such as:
- The number of windows, doors, vents, their sizes, as well as the number of fittings.
- Materials for covering the base: cement, perhaps sheets of plasterboard or even plastic bottles. Don't forget about the piles themselves. By the way, galvanized pipes can cope with this role.
- The length of the frame arcs should be 3,4,6,12 meters. This will help to better hide the joints of the sheets.
- When purchasing polycarbonate, you must take into account that the honeycombs run along the slope.
- On the drawing it is better to indicate the size of the doorway, its height, as well as materials for arranging the paths.
Area and dimensions
The dimensions of a polycarbonate greenhouse depend on many factors. After we have decided on the location, we need to look at the site and decide how much margin we need on the sides. It is important that the greenhouse does not clutter up the space, and that it is convenient to walk around it even with a garden wheelbarrow.
IMPORTANT
Leave space for paths around the greenhouse - at least 1 meter.
If we talk about height, it depends on the height of the person who will work in it most of the time. He should be comfortable being in the greenhouse at full height. It is also necessary to consider what specific plants will be in this greenhouse. If you plan to grow grapes, then the height of the greenhouse should be at least 3.5 m. And for growing medium-sized crops, greenhouses with a height of two and a half meters are usually used. Of course, we proceed from the capabilities of the person and the dimensions of the site. If a person decides to spend money on a good-quality greenhouse, then it is better to make it more spacious.
GOOD TO KNOW!
The smaller the volume of the greenhouse, the greater the chance of overheating the plant!
The choice of greenhouse area and its size should be approached as seriously as possible - this is a structure for more than one season. If the technology is followed, such a greenhouse can last at least 20 years. A standard greenhouse is usually 6 meters in length. To build such a structure, you need about 4 sheets of polycarbonate.
How much does it cost to install a greenhouse?
Of course, this depends on the specific model, the configuration, and the installation location. It is important to order the process in advance. If you come to your senses in early to mid-May, then you can only wait for your turn in the summer. Naturally, by that time all the seedlings will turn into baobabs and eucalyptus, which will create additional difficulties. True, this problem can be solved, but it is better not to take the situation to extremes.
In general, it is best to buy a greenhouse in winter or early spring. At this time, the majority of gardeners are still either deciding, or saving money, or even postponing the purchase until the very last moment. As a result, there are long queues at the company's offices in the spring.
But you and I are not like that. We know the proverb “Prepare your sleigh in the summer.” You can safely supplement it with the words “... and a greenhouse in winter.”
In our particular case, they asked for 4,500 rubles . Not so little, but the amount is not astronomical. Sometimes it’s really better to pay than to screw things up due to inexperience. Of course, this is my personal opinion. Yours may be different. Why not?
Now that everything is behind us, when I have followed the actions of the specialists step by step, many things no longer seem as scary as before. I think that I can try to assemble the second greenhouse myself. If only there was time and a second real handy man. After all, it is almost impossible to install a greenhouse alone.
The price of a polycarbonate greenhouse in the catalogs of leading manufacturers
The most popular models are presented in the table. The price of polycarbonate greenhouses today is on average 10% lower than the seasonal price. You can save from 1.5 to 2 thousand rubles on your purchase. We invite you to familiarize yourself with the average prices now in order to meet the new summer season fully armed.
| Photo | Manufacturer | Average price, rub. |
| LLC "Greenhouse Center" | 9 500 | |
| LLC "New Forms" | 19 700 | |
| 14 500 |
Determining the correct location of the greenhouse on the site
The right place for a greenhouse will save nerves, time and money in the future. First of all, you need to find out which areas of your garden may be flooded. To do this, you need to make test measurements in the spring using a drill and an ordinary thread with a pebble. This procedure is familiar to all summer residents.
It also happens that there are no other options for constructing a greenhouse. In this case, the structure must be equipped with a strong foundation. It can be installed on slabs or piles. Drainage ditches must be installed along the greenhouse.
Scheme of the site with a functioning drainage system
The place under the greenhouse should have maximum light during the day. This is usually the south side of the site. We immediately discard buildings that potentially create a shadow in the future.
Forbidden places for a greenhouse
It is best that there are no trees or tall bushes around the greenhouse. The entire space is cleared of weeds and debris. The type of soil is of great importance. The best option is when the soil is sandy. Clay or silt soil must be prepared in advance. Usually, a pit is dug at the site of the future greenhouse and covered with gravel. The next layer is sand, and the last layer is fertile soil.
Dumping a strip foundation
Low-lying places with strong wind blowing are not suitable for us. It is permissible to install a greenhouse with a slope, but only on a cement foundation on stilts. Such flower beds got their name - vegetarians. By type it is a wall-mounted greenhouse, but built in a certain way.
Vegetarian scheme and operating principle
Such greenhouses are very common in Holland and China. If the former use vegetarian gardens for flower beds, then our Chinese neighbors use them for vegetable crops. After we have determined the location, we need to select the shape of the greenhouse and make a drawing. This will help you calculate the costs of materials in advance.
Construction of a base for a greenhouse from scrap materials
Tires.
If you do not want to spend a lot of money on the foundation, then you can use available materials. For example, you can make it from old tires.
Tires will only be a good foundation if they are laid correctly.
This is done like this:
- First, a site for a greenhouse is prepared on the site. Wooden frames are installed on it, which will symbolize the body of the greenhouse.
- Then the tires are placed tightly together inside this frame.
- The cavities between them are filled with earth.
- Then they are filled with a layer of concrete on top. After this, wait until the poured solution hardens.
- Hardened concrete and tires will create a greenhouse effect, so the constructed structure will be very warm.
Metal pipes.
Iron pipes are sometimes used as a foundation for small buildings. They need to be laid around the perimeter of the building so that there is no free space between them. Then they are filled with cement mortar on top (should consist of sand and Portland cement).
Sleepers.
If you still have old sleepers after construction, they can be laid around the perimeter of the greenhouse being built. True, first they need to be cut to the required size. Soil is poured on top of the laid sleepers, and then a greenhouse is installed on the resulting base. Sleepers are also often used as piles.
We recommend studying: find out how to inexpensively make a greenhouse from polypropylene pipes with your own hands