Harvesting cuttings in autumn
The method of growing grapes from cuttings in winter has one drawback: berries will appear on such a shoot only after 2 years. Although cut shoots can be grafted onto an already mature grape bush and get a harvest earlier. At the same time, see what variety it is, how it behaves in the local climate, and whether it is worth growing.
If you harvest planting material in the spring, then it must be kept in a nutrient mixture until autumn, only then planted in the ground.
Another advantage of propagating grapes by cuttings in the fall is the minimal risk of infection with phyllocera, when protrusions in the form of warts form on the leaves. This insect is native to America, so European and Asian grape varieties are not immune to the pest. If someone else's vineyard is infected, it is immediately obvious. Taking cuttings for propagation is not recommended.
Timing of cuttings
Pruning of the vineyard in the fall is carried out after the sap flow in the vine has completely stopped: this time is from mid-November to early December. Before wintering, grapes accumulate a large amount of nutrients in their tissues in order to successfully withstand frost. Therefore, all cuttings have a great chance of germination.
The timing of cutting grape cuttings in the fall differs depending on the region and climate. In the southern regions, other methods of propagation are used, for example, by layering, but for the northern regions, where the temperature drops below 30 degrees, the optimal method is cuttings so that the planting material does not freeze.
On covering varieties, pruning is carried out 1 - 2 weeks earlier. Usually these are varieties of southern origin that do not have frost resistance. Uncovered species can be used for harvesting shoots all year round, even in winter.
It is not recommended to plant immediately in a permanent place, since any plant has natural phases - they need to be sustained.
After the cuttings are pruned in preparation for winter, they should then remain dormant before the next stage - awakening. In order for the awakening to proceed normally, and for the cuttings to remain suitable for growing, the following should not happen to them:
- damage by mold fungi;
- freezing;
- drying;
- damage to growth points - kidneys.
To do this, you need to observe the temperature regime: from 0 to 5 degrees.
Selecting a vine for cuttings
You need to choose a vine to root grape cuttings in the fall at home in the summer. Pay attention to those branches that bear fruit - they need to be marked and cut for harvesting. Fattening green shoots that have not formed berries are not suitable.
The branch should completely shed its leaves - be bare, and also:
- To be woody - a ripened grape stalk crackles when slightly bent.
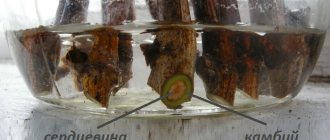
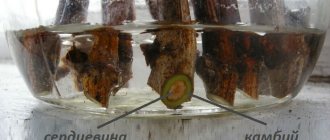
- The wood under the bark layer should be green. This can be checked by removing a little of the top layer from one side of the shoot.
- The cambium should also be green in cross section. A vine is considered non-viable if it is pale or white.
You should also check one upper eye: the leaf buds in it should be green. A brown color inside indicates the unsuitability of the planting material.
The mature vine for propagating grapes by cuttings in the fall is selected according to thickness - at least 6 - 7 mm - and hardness. The soft, wrinkled shoot is discarded - it still won’t take root.
Particular attention is paid to signs of fungal infection - an unpleasant odor and brown spots, softening of the wood. Until spring, the branches will rot and will be unsuitable for rooting.
Cuttings
There are two ways to cut grape cuttings in the fall:
- The length of the vine is 30 - 40 cm. There should be at least three buds on it.
- Length 60 – 80 cm with 6 – 7 growth points. This vine retains more moisture, so it has a higher chance of germinating.
To ensure that the grape cuttings remain suitable for rooting, you need to prepare a bucket of water and put all the cut shoots there. Those that end in stalks on both sides are more likely to be suitable. Such nodes have a transverse membrane that protects the vine from moisture evaporation. Between the membranes, fluid in the tissues will be retained.
You should not leave grape cuttings for the whole day in bright sun - then you can throw them away. When a third of the moisture evaporates from the tissues, the survival rate decreases by 50%.
After placing in a bucket of water, the shoots should remain in it for at least 8 hours - some advise keeping it for 2 days with daily fluid replacement. This way they will absorb more moisture, be better preserved and take root in the soil in the spring.
Disinfection
The gardener is faced with the task of how to propagate grapes with stems in the fall, without introducing infection into the tissue of the shoots and into the soil. For this purpose, they buy the drug “Phytodoctor” - a biofungicide that protects planting material from mold, bacteria, and pests.
The phytodoctor treats cuttings cut for rooting after they have absorbed moisture. The branches are taken out of the bucket, ventilated in the air for about 30 minutes, then sprayed or soaked for 2 hours in a biofungicide solution.
Next, the pipes are dried, wrapped in film, signed and brought into a cold room, where the temperature in winter does not rise above 5 degrees and does not fall below 0.
Treatment of grapes with remedies from a home medicine cabinet
Have you treated plants with iodine? I didn't have to! But when treating grapes, iodine is often used not only for treatment, but also as a prophylactic agent.
In cool and rainy summers, grapes are affected by mildew, and to prevent the disease, the vines are sprayed with an iodine solution. If you don’t spray, you’ll have to fight the disease later with chemicals, which will not benefit the grapes or your body.
Take note! Iodine is useful for grapes, it enriches the berries, and their taste only benefits from this. Many foods that people eat contain very little iodine; its deficiency has a bad effect on your well-being.
Still, you should not overdo it with spraying plants with its solution; the grapes will not benefit from such care. With an excess amount of iodine, grapes significantly slow down their growth. Please note! In everything we must observe moderation.
A preventive solution for mildew is prepared as follows:
- 1 liter of milk;
- 19 drops of iodine;
- 9 tablets of trichopolum;
- 9 liters of water.
Mix all the components and spray the grape bushes with this solution every 11 days.
Don't forget about baking soda. Its solution rejuvenates plants and fights diseases. Spraying the vines while the grapes are ripening increases the sugar content of the berries. In addition, a side effect has been noticed, do not worry, it is positive, weeds disappear in the tree trunk circle. Here are some recipes for treating grapes with soda.
Soda from oidium
Dissolve 4 tsp in a bucket of water. baking soda, 19 gr. soap, preferably baby soap, mix well. Spray before flowering, then at intervals of a week, 3 more times.
Treatment of grapes from gray rot
Apply the composition when the plant is slightly damaged. Take 70 grams per bucket of water. soda, spray the bushes with this solution.
Add 2 tsp per liter of water. soda, vegetable oil, dishwashing detergent, mix and spray with a spray bottle in dry, cloudy weather.
It will come in handy! These simple techniques are very effective in combating many grape diseases and should be adopted by gardeners. Who needs grapes stuffed with chemicals on their own table?
For personal consumption, interact with chemicals as little as possible. Take simple, affordable medications from your home medicine cabinet.
Storing cuttings in winter
There are several options for storing grape cuttings in winter:
- In the basement of a private house in wet sawdust. High-rise buildings are not suitable due to high humidity and the presence of condensation on walls and pipes. There is always mold in such places. The chubuks are placed in bags, but not tied tightly so that air can flow to the branches. The sawdust will need to be moistened periodically to prevent the planting material from drying out.
- In a refrigerator. Wrap the chibouks in damp cotton cloth and place them in a plastic bottle (preferably two, cut and inserted into each other). Make holes in the plastic for air access. Store on the bottom shelf. It is important that there are no moldy vegetable remains in the refrigerator. The fabric is sometimes dampened or changed.
- In the ground in the garden. For this purpose, an embankment is installed so that spring waters do not flood the area or lowland. Depending on the length of the pipes, a trench is made up to 1 m deep. At the bottom there should be a 10 cm layer of wet sand, then blanks in film (not paper), a 10 cm layer of sand, a 30 cm layer of soil. Build a canopy on top so that water does not flow to the cuttings.
After completing the storage stage by any means, the cuttings are removed and checked again for viability, as was the case before they were put away for the winter. There should be no spots on the branches, traces of mold, black or falling eyes. Next, the grape cuttings are prepared for germination.
How to store it correctly
One of the most important stages of such a process as growing grapes from cuttings is its proper storage. As a rule, before sending the collected material for wintering, it must be packed in oilcloth.
This process is carried out already in late autumn or even in the early days of winter. As for storing pipes, it is carried out using several methods:
- stored in a refrigerator;
- if a lot of chibouks are cut, then they are sent to the cellar or basement;
- Place the chopped sprouts in a container, and then bury the bottle with the cuttings in the ground.
If you choose one of the first two storage methods, you will need to check the material once a month for mold. And if any are found, immediately carry out rejection, otherwise you risk that all the pipes will deteriorate.
Rooting cuttings
Before sprouting roots, the vine is soaked again if it was dry at the time of removal from the shelter. Do this for 2 hours. Check with a transverse cut: if liquid appears on the cut, the shoot is ready. It is cut to its final length:
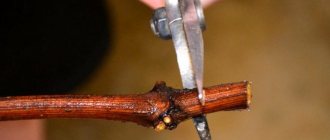
- 2 - 3 cm above the upper growth point with an oblique cut;
- the lower cut is made smooth, located 2 mm below the node, so as not to damage its tissue - roots will form here.
Treatment with Epin or another root growth stimulator is carried out as desired. After all the correctly carried out measures to prepare grape cuttings for germination, this is not necessary.
Important ! The middle buds must be blinded, that is, cut off so that they do not form branches.
In the sawdust
The sawdust must be prepared: they are poured with boiling water and left to cool, then squeezed out. Next, the sawdust is laid out in bags or plastic bottles. The cuttings are deepened so that the top layer of sawdust is 1.5 cm below the top bud, and the wood fits tightly along the entire length of the cutting. Air should flow inside, so excess moisture is not needed.
Fertilizers are applied here: complex fertilizers in liquid form, mullein solution. For the first 2 weeks, the seedling has enough of its own nutrients, then it is necessary to stimulate the growth of the branches and roots. After 2 months, the roots will be visible through the transparent walls of the bottle.
In water
You can root grape cuttings in water, but you must comply with the following conditions: the temperature for root formation must be at least 23 degrees, and the air temperature 15 - 17. To do this, place a jar of water on a heated floor or window sill, under which there is a radiator.
Take a jar with a volume of 0.5 - 1 liter, put gauze or cotton fabric on the bottom, pour 3 cm of water and place the pipes. After 2 - 3 weeks, roots will begin to appear. Next, the cuttings are transplanted into the ground and grown.
Advice ! To prevent the water in the container from blooming, add 1 grain of potassium permanganate and activated carbon.
In the ground
Before rooting the chibuki, prepare a mixture. The proportions of sand, soil and humus are the same. It is important to maintain humidity so that the cut has access to air, otherwise it will rot.
The shoot is deepened in the same way as in sawdust, so that the upper bud is 2 cm above the ground. After the bud has germinated, the process of root formation begins. In order for the green shoot to grow better, it is pinched and then 2 branches grow. This makes it more convenient to form a crown. When planting in the ground, the earthen ball is preserved so that growth does not stop, then the berries can be obtained the next year.
Compliance with cutting deadlines
At the time of cutting, all leaves should fly off the vine. On average, the dates are October - November. The exact date depends on the climate of the region. After leaf fall, grapes are usually prepared for winter. The vital processes of plants during this period slow down, the movement of juices is suspended, so pruning will not cause any harm to the shrub.
Planting cuttings in the ground
After the root system has formed, the shoot is ready for transplantation into open ground. When holding an event in the spring at the end of May or beginning of June, to avoid night frosts:
- Prepare a pit with fertilizers.
- Transfer the cutting, make a mound of soil, and water it.
- Mulch and cover with a jar to protect from direct sunlight.
In the dug hole you can put the remains of last year's leaves, green manure, humus from chicken droppings or mullein. In order for organic matter to break down faster, it is watered with a solution of EM preparations. If you add mineral fertilizers to the soil, some are mixed with the soil, and some are poured onto the bottom of the hole. Mature compost is also suitable for feeding.
After planting the seedlings, the soil layers are compacted and watered with 1 bucket of water. It is necessary to mulch so that the soil does not dry out. The organic layer prevents water from evaporating quickly.
It is recommended to lay a layer of clay at the bottom of the hole if the soil in the area is sandy. This helps retain nutrients in the top layer of soil. On clay soil, it is advisable to mix the soil with gravel, crushed stone or broken brick. This will increase aeration and allow roots to grow faster.
If groundwater comes too close to the area below, the grapes will develop and bear fruit poorly. You will have to build mounds of soil, fence them off to prevent them from being washed away by rain, and then plant planting material in them. If the pit is laid according to all the rules, the seedling does not need fertilizing for 2 years after planting.
Characteristics of the soil for planting
Before you start planting grape cuttings, decide on the location. In a plot with a large slope to the northwest or north, grapes cannot be planted. Salt marshes and wetlands are unsuitable for growing grapevines.
You have decided on the location, start preparing the soil. You need to start doing this in the summer. The future site for planting seedlings is cleared of debris and weeds and dug up to the depth of a spade bayonet.
The area is left alone until next time. The soil on the site must remain clean and loose throughout the entire time before planting.
The most desirable soil structure for grapes is fine-lumpy soil structure. The optimal ratio of heat, water and air conditions makes it ideal for the growth and fruiting of grapevines.
The coarse soil structure slows down the development of seedlings. Fruiting on such soils occurs much faster. The vine produces a cluster of small berries, very sweet, but with very little acid.
Floating soil, that is, alluvial soil, is unsuitable for vines. Such soil is usually in low areas, where water often stagnates. Grapes in such places usually become smaller and die.
Is it possible to plant cuttings directly into the ground in the fall?
Propagation of grapes by cuttings directly into the ground in the fall is possible only in warm regions. To do this, cut branches are immediately rooted in the ground. Before this, they are kept for a day in a Heteroauxin solution to stimulate the formation of roots. Natural honey is suitable instead of a purchased drug. The temperature of the soaking liquid should be between 30 and 40 degrees.
The cuttings are planted in prepared fertilized soil and covered with soil, leaving the upper growth point above the ground. As branches and leaves grow and form, the film is cut through and the plant is allowed to develop. Shoots of autumn propagation must be watered before frost so that the soil does not dry out until the root system is fully formed.
For the winter, the planted seedlings are covered with agrill, leaves, and other materials, providing protection from freezing. In the spring, with the onset of warmth, the shelter is removed.
Share
Choosing the right vine
In autumn, grapes are propagated by woody cuttings. Strong branches without signs of disease or mechanical damage are suitable as blanks. Typically, shoots for cuttings are taken from abundantly fruiting bushes. In this case, there is a high chance that young plants will produce a good harvest.
The thickness of the selected branch should be 8–10 mm. The middle part of the shoot is taken as a cutting. The harvest from the lower part may take root worse, and the top of the vine is often not mature enough.
Advantages and disadvantages of the method
The layering method has many advantages:
- ease of implementation - does not require special skill or special skills;
- minimal time and material costs;
- preservation of variety characteristics;
- high degree of survival (even for difficult-to-root varieties for which other methods are not suitable) due to high-quality nutrition and the formation of many adventitious roots;
- variety of reproduction options;
- obtaining a harvest for the next season;
- rapid increase in vineyard area;
- formation of the original shape of the bush (optional) to decorate the site;
- the opportunity to make a profit from the sale of seedlings.
But this method also has disadvantages:
- severely depletes the parent plant;
- Suitable only for those areas where there were no root diseases (phylloxera damage).
Direct planting
The method of propagating a grapevine through cuttings can be labor-intensive and painstaking. It involves the preliminary preparation of suitable cuttings and their proper storage during the winter season. In addition, the gardener needs to spend a lot of time rooting the crop several weeks before spring warming.
Naturally, the efforts spent are justified by good yields and the yield of an impressive number of healthy seedlings. But you can find a simpler solution, which is to plant seedlings directly into the soil. To carry out direct planting of cuttings in the ground, you need to perform the following steps:
- Prepare healthy planting specimens and make oblique cuts on their tops.
- The cutting is placed in a suitable recess (the optimal depth is 50−60 cm).
- When burying the cutting in soil, you need to make sure that one eye is visible above the soil surface.
- Next you need to dig in the planting material with fertile soil, compact it and water it. Before the onset of frost, the cuttings are thoroughly watered.
- Just before winter, the grapes are covered with spruce branches, straw, burlap or dry leaves.
- At the beginning of spring, the insulating layer is removed. It remains to wait for the first green leaves to form.
Important!
A significant drawback of the method is the low survival rate of seedlings. Of the total number of cuttings planted in the spring, only 60-70% wake up.
Such low rates force gardeners to use a little trick: 2 cuttings are placed in each hole. In this case, the likelihood of survival will be higher. If two planting materials take root at once, the weaker version will need to be removed.
Another simple option for growing grapes is to use layering. In any case, propagating vines using cuttings in the fall is the most relevant solution, which is characterized by a lot of advantages and features. If you follow the rules and follow the instructions, the growing process will be productive and the young vine will be fertile.
Methods of propagation by layering
To propagate grapes, various shoots are taken:
- perennial;
- lignified;
- green;
- air;
- arcuate;
- apical;
- horizontal, or Chinese;
- with stepchildren;
- katawlak.
Another method is hilling the grape bush.
Perennial shoots
A perennial sleeve containing several shoots is selected. Near the bush, make a ditch half a meter deep and pour organic matter into it, mixing it with the soil.
Several methods are used to deepen shoots:
- if one seedling is needed, then one shoot is deepened;
- if it is necessary to obtain several seedlings, then all the shoots are placed in a trench, pruned by 3-4 eyes.
Layers are watered regularly. When the vine grows, soil is added to the trench.
This method is used only for healthy plants that do not have wilted leaves and branches.
Lignified shoots
In the fall, they dig a ditch near the grape bush, 60 centimeters deep, and add organic matter into it, mixing it with the soil. The lowest woody shoot is placed in the ditch, leaving the top with three eyes above the ground.
Green layers
Green shoots formed this year, more than a meter long, are rooted. They are placed in a groove 15-20 centimeters deep and covered with earth, leaving the top sticking out above the ground. Reproduction occurs in early spring or late autumn.
The disadvantage of this method is the long cultivation time. The shoots can be separated only after a year (with other methods - after 3-4 months).
Air layering
In the spring, when grape bushes are pruned, a strong woody shoot is selected and the leaves are removed from it.
Then, at a distance of 20 centimeters from the top, a circular incision up to 5 millimeters wide is made on the bark, which stimulates the formation of roots. The incision site is wrapped with damp sphagnum moss and black cellophane.
Arc-shaped layers
For rooting, you can use both annual and perennial vines. They dig it in, forming a sine wave: they make a hole 5 centimeters deep, fix part of the vine in it with wire and cover it with earth, then leave part of the vine on the surface, bending it in an arc, then bury it again, after which they again form an above-ground arc.
Apical layering
The vine is stretched above the ground in an arc and the top is dug in. Thanks to this method, you can move the bush to another place. The longer the vine, the further away the “transplanted” bush will be.
Horizontal layering
The horizontal layering method includes several stages:
- dig several ditches 25 centimeters deep, placing them in different directions from the bush;
- humus is poured onto the bottom of the grooves;
- On the bush, annual shoots located close to the soil are selected and placed in ditches, secured in several places with wire;
- cover the shoots with soil, leaving the buds uncovered, and water;
- After green shoots appear, the layering is completely covered with soil.
To get high-quality seedlings, you need to take into account several nuances:
- dig in cuttings early in spring;
- cut off the top of the vine;
- slightly tighten the base of the shoots;
- in August, pinch the shoots to slow down their growth and speed up the ripening of the wood.
