It’s easy to grow a grape seedling yourself; you don’t need any special conditions or equipment for this. Even a beginning winegrower can fully provide himself with planting material during the warm season without any financial investment.
Growing seedlings with your own hands is convenient and profitable in all respects:
- Varietal chibouks cost a mere trifle compared to ready-made planting material.
- Rooting cuttings allows you to obtain a viable seedling in early summer, while cuttings in open ground only in September. In fact, in 1 season the cutting manages to go through a 2-year cycle and begins to bear fruit 1 season earlier.
- The winegrower is not tied to seasonal supplies of planting material to the market - he has the opportunity to independently and completely free of charge grow any number of seedlings of excellent quality.
- After autumn pruning of the vines, you can get so many shanks that they are enough even for the production of seedlings on an industrial scale.
The useful ability to grow planting material with your own hands will always be useful for repairing, expanding or starting a new vineyard.
A little theory that an ordinary summer resident cannot do without
All the rules for cutting vines for harvesting chibouks have a scientific basis. Without a clear understanding of the structure of the vine, cutting cuttings turns into a set of sequential monotonous actions to fulfill strict and completely incomprehensible requirements.
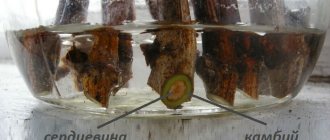
All operations for harvesting grape cuttings will seem simple and understandable if you understand the structure of the vine segment. Nodes and internodes - the entire grape vine consists of them.
The easiest way is with internodes . Their main purpose: transit of nutrients and water, by analogy with human blood vessels. The outer cover (bark) protects the wood from damage and moisture loss. Under the bark is the cambium , a thin layer of tissue responsible for regeneration processes. If we continue to draw analogies with the human body, cambium is an analogue of stem cells, which, under certain conditions, give rise to any organ. In the case of grape propagation, it is the cambium cells that develop into the root system of the seedling.
For the successful transformation of cambial tissues, a supply of nutrients and moisture is required. in the core , which support vital processes during winter storage and feed growth processes during rooting.
The second mandatory component responsible for metabolic processes is water. The distribution of water reserves in the vine (and the cut cuttings) depends on the nodes, which can be simply described as a regular membrane.
There are 2 types of nodes (see picture):
- The core channel is blocked to a large extent - the outflow of nutrients is significantly slowed down. Most nodes on vines are of this type. They are responsible for the outflow of nutrients at the end of the season from the leaves to the roots and sleeves.
- The internode forms an almost blind membrane, which maximally retains the flow of water and nutrients. Type 2 knots on the vine are easy to find - just find a knot with a tendril .
The most promising units for preparing pipes can be easily determined by eye:
- evaluate the difference in the thickness of the vine and the diameter of the node and select a section of the vine according to the principle “the thicker the node, the stronger the growth bud”;
- For the lower (heel, root) part of the cutting, select nodes with remnants of a tendril, i.e., with a developed internal partition.
After such a “lyrical digression,” there should be much fewer questions about the rules for cutting cuttings.
Comparison of grape cutting methods: choose simple and reliable
Gardeners of the Central region are accustomed to autumn planting, which invariably shows good results in the survival of fruit seedlings in the month of September. Currant cuttings are traditionally planted in greenhouse “schools” in late autumn in order to obtain a strong young bush during the season.
Unfortunately, the benefits of autumn rooting do not apply to grape seedlings. The result does not live up to expectations - the yield suitable for further cultivation is unpredictable (no more than 20%).
Reason 1
The cutting must go through a period of rest - the tissues responsible for the development of roots and fruit vines must ripen within 3-4 months. It only seems that the cuttings “sleep” in winter. In fact, unhurried metabolic processes are taking place: the rudiments of all plant organs are developing. Without this phase it is impossible to obtain a strong seedling.
You can try to hurry up nature and root green grape cuttings in the summer. Be prepared to spray daily, monitor temperature and light conditions. The slightest miscalculation and violation of the regime leads to rot or drying of plants. Even if everything worked out, the cutting took root and began to grow, it is strictly forbidden to plant it in open ground.
Reason 2
The vines of an adult bush easily tolerate frosts of -15...20 degrees (some varieties - up to 35). The root system dies at -10...12 degrees. Rooted cuttings are planted to a depth of 20...30 cm. The young seedling is doomed - its roots freeze out, the plant will not survive until spring.
Interesting fact
Winegrowers of the southern regions, despite the relatively warm autumn and winter, prefer to root chibuki in the spring at home in cups or a little later - in shkolkas. The experience of many generations confirms that such chibouks easily form roots and shoots, and in the summer they are completely ready for planting in a permanent place.
The only requirement: high-quality cuttings are needed - cut on time, properly stored and prepared for rooting. Autumn planting of cuttings in a schoolhouse does not give guaranteed results even in the Southern region
Picking grapes
Kilching is the process of creating a temperature difference in the lower and upper parts of the chibuka: below is warm, above is cool. Kilching increases the chance of rooting.
When sprouting, the problem arises of bud sprouting earlier than root growth. There are times when greenery appears on a seedling and, before it has time to take root, it becomes exhausted and dies. It is kilching that can solve this problem. At home, in practice, it is carried out in the following ways:
- Containers with cuttings are placed on a radiator or in a special keel for bottom heating (temperature from +20 to +27 degrees). The temperature in the upper part should be from +5 to +10 degrees. To create such conditions, the culver must be placed in a cool room. In the absence of a piercer, the containers are kept on the battery, while a protective curtain-screen is constructed between the warm air of the room and the cool window;
- High productivity is achieved by upside down kilching. The moistened material is placed at the top, which is covered with a heated lid. This method prevents the bud from blooming before the root system.
Harvesting cuttings
To cut cuttings, you need to prepare a sharpened pruner.
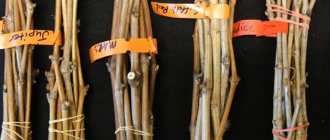
In the case of harvesting chibouks from bushes of different varieties, be sure to prepare waterproof tags in advance.
When to take cuttings
Grape chubuks are harvested only after the vines have ripened: late in the fall - during the period from leaf fall to frost. By this time, the cuttings have accumulated the maximum amount of winter reserves: photosynthesis products, various sugars.
Geographically, the timing of autumn pruning varies greatly. In the Central region this may be the end of October, in the south - November or even the first days of December.
It is much easier to navigate not by calendar dates, but by weather signs that exactly correspond to the biorhythms of plants.
Helpful advice
It is better to be late with pruning grapes than to rush and trim the bushes too early.
On time - at the first signs of winter:
- steady weather with night frosts;
- daytime temperatures are just above zero degrees;
- thin ice in the morning along the edge of the reservoir, etc.
For pruning vines and harvesting shanks, you should choose a dry, clear day.
How to properly cut vines into cuttings
Even in the summer, the best bushes for propagation should be noted: in terms of yield, presentation of the bunch, size and taste of the berries. It is best to harvest the stems in parallel with pruning, immediately setting aside promising sections of the vine separately.
Unripe tops are cut off immediately.
- A mature vine is easy to determine literally by touch : in addition to the characteristic crunching sound when bending, the mature area seems warm compared to the cool, unripe top of the vine.
- For cuttings, vines from 8 to 12 mm in diameter are suitable : those that are too thin take root worse and produce weak, sickly seedlings; thick “fatty” shoots are unsuitable for another reason: their underdeveloped “eyes” practically do not form fruitful branches.
- For the lower (heel) part of the cutting, choose nodes with a tendril - such cuttings take root much better.
The lower 1/3 of the vine is considered the best for cutting pipes. This area always has time to ripen well and contains the maximum amount of nutrients. Ideally, it is advisable to put this entire segment for storage.
On a large farm with a large vineyard, it is justified to leave such long cuttings for winter storage. They are buried in a trench. At home, especially in a city apartment, you have to shorten the vine sections to a reasonable size :
3-4 buds + at least 1/2 the length of the internode.
Even when cutting 2 varieties of grapes, the cuttings should be labeled. The shade of the bark can change during storage, and all sorts of “memory nodules” after 3-4 months only cause bewilderment.
Dimensions and cutting of cuttings
The length of the cutting is measured not in centimeters, but in the number of eyes (buds) located on it.
The most commonly used are two-eyed and three-eyed, although one-eyed and four-eyed are also suitable. When cutting branches, the stepsons, tendrils and remaining foliage are cut off. It happens that long vines (50-100-170 cm) are stored in winter, and cutting is carried out before rooting.
The upper cut is made straight, the height above the upper bud is 2-4 centimeters. The lower cut is made obliquely under the lower bud, and the indentation should be small. At first, novice gardeners cannot determine where the top part is and where the bottom part is. It is by the method of cutting that this issue can be resolved.
Chubuki are tied into bundles and tied in two places. Tags indicating the name of the variety are attached to the tied bunches. After this, the bundles should be stored for several months. Before this, they are processed.
What determines the preparation of cuttings for storage?
Already on the day of pruning, you should deal with the delayed cuttings. Left outdoors, they immediately begin to lose moisture, so valuable for planned rooting.
The optimal way to store harvested vines is in a trench, where they will definitely not dry out or rot. In the Central region, during winter, at a depth of 60...70 cm, the temperature remains around 0 degrees.
For colder regions, rotting organic matter is placed on top of the trench to prevent soil freezing. This method is good for everyone, except for one thing - until the soil thaws, it is impossible to remove the cuttings.
So it turns out that the method of storing grape cuttings depends on how soon they will be needed in the new season.
- For the needs of a large vineyard, a large number of cuttings are prepared, which, when warmer weather arrives, are planted in a schoolyard. Such cuttings are most often stored buried in a trench, where they definitely will not dry out. It is quite enough to disinfect the vine sections with vitriol.
- Owners of small vineyards often store material for propagating grapes in the basement or cellar. Some of the cuttings wait until it gets warmer, others are taken out in February and rooted to produce a full-fledged seedling by the beginning of summer.
- Summer residents usually harvest cuttings in small quantities and store them in the refrigerator or cellar. It is important for gardeners to be able to monitor the condition of the vine during storage and take appropriate measures if necessary. To obtain seedlings early, rooting begins in winter, in February.
Let's look at how to properly prepare cut vines for storage at home in more detail.
Planting seedlings in school
A shkolka is a pre-prepared area of soil where grape seedlings are planted. This should be an area well lit by the sun. Boarding at school is carried out as follows:
- In the spring, the soil is dug up to a depth of 40 centimeters;
- One bucket of humus, two of sand and a scoop of wood ash are added per square meter of land;
- The soil is dug up again;
- Make small mounds in which the seedlings will be planted, after waxing the buds.
Preparing pipes for storage
All the troubles that can happen to cuttings during winter storage are associated with excess or lack of moisture:
- if there is a deficiency, they will dry out;
- if there is an excess, they will rot or die from a fungal disease.
When stored in an accessible area (cellar, basement, refrigerator), the lack of moisture can be easily corrected. For example, compensate by spraying. But remember! That waterlogging is much more dangerous for cuttings, because... this threatens the development of rot and fungal diseases, which are much more difficult to cope with. Diseased cuttings will be of no use.
Online and printed publications strongly recommend “soaking” harvested vines in cold water for 2 days. This necessary precaution is intended to restore the water balance of cuttings that have already dried out for a day or two. Freshly cut vines do not require additional soaking before storing.
“It’s easier to prevent a disease” - a common phrase about prevention is ideal for plant diseases. Treatment with 3% copper sulfate will help cope with dormant fungal spores.
- Copper sulfate does not dissolve well in cold water, so to prepare an effective solution, you need to pour 30 g of copper sulfate (2 tablespoons) with 1 liter of hot water and wait until the solution cools to room temperature.
- It is enough to immerse the cuttings in the solution for 15-20 seconds, this will be enough to prevent such a dangerous fungal disease as mildew.
- Long cuttings are treated sequentially on both sides if it is not possible to disinfect in one go.
After such treatment, the pipes should be left in the open air to wait for the remaining water from the disinfectant solution to evaporate.
, waxing of cuttings is also used . The ends of the pipes are momentarily dipped into paraffin melted in a steam bath with the addition of garden varnish: for 1 candle, add about 1 teaspoon of varnish, which gives the mass plasticity.
A thin layer of melt instantly forms a protective waterproof film. You can use both white and colored paraffin for decorative candles.
Attention
Only completely dry cuttings can be waxed. Random moisture or plant juice from an undried cut is a breeding ground for the proliferation of microorganisms. Checking the condition of the cuttings once every 2 weeks during the winter is a sufficient measure to control humidity.
Preparation of a mixture for waxing cuttings
During the process of rooting grape cuttings, the upper eye and internodes are paraffinized to prevent them from drying out and slightly delay bud opening. Pure paraffin is of little use for this, as it does not hold well and falls off quickly.
For waxing cuttings, it is better to use mixtures:
- paraffin and technical petroleum jelly - 9:1;
- paraffin and bitumen 3 - 4:1;
- paraffin and garden pitch - 3:1.
The components are heated in a water or sand bath and mixed until a homogeneous mass is obtained.
Dry cuttings are dipped into a mixture heated to 70 ºC for 2 seconds, then the waxed part of the cutting can be immersed in cold water to quickly harden the mixture.
Storing cuttings
Depending on the planned method of obtaining seedlings and the real capabilities of the vineyard owner, the optimal method of storing the chubuks is chosen. Let us dwell on the recommendations for amateur gardeners. There is no point in digging trenches to store several dozen chibouks harvested for repair or expansion of the vineyard.
There are simple and affordable methods that allow you to periodically check the condition of the vine, and start growing seedlings on the eve of spring.
Basement, cellar
A dark, cool place without temperature changes is ideal for wintering chibouks.
For the basement/cellar there are 2 simple ways to store cuttings
Gardeners practice the “in the sand” method in 2 variants:
- In a spacious box, the cuttings are placed horizontally and sprinkled in layers with a large amount of slightly damp sand. It turns out to be an analogue of storage in a trench.
- Most often, bulky dishes (buckets, pots) are filled with raw sand and the pipes are stuck in with the heel down.
In a refrigerator
The lack of a cellar is not a reason to refuse to harvest cuttings for the winter. Even in a small kitchen refrigerator there is always room for cuttings.
The optimal temperature for storing pipes is +2...+6 degrees, on the bottom shelf or vegetable compartment of the refrigerator.
Depending on the capacity of the refrigerator, gardeners practice various options for packaging cuttings - in polyethylene, PET bottles, etc.
Any of these methods requires mandatory monitoring of the condition of the cuttings. You need to check your bookmark at least 2 times a month. Both excess moisture and drying out are detrimental to cuttings.
Caring for planted seedlings
During the growing season, you need to fertilize 3-4 times with diluted mullein (1 liter of fresh mullein per 10 liters of water). Among fertilizers of mineral origin, Kemira or Harvest are ideal, but they should be used carefully - they can cause rapid growth of the crop. At the beginning of August, watering should be stopped and fertilizing should not be given at all, so that the vines ripen better.
When 9-10 leaves appear on a plant, its top must be pinched to stop growth, as well as better ripening of shoots and buds. During growth, such pinching is done 2-3 times. To prevent the growing shoot from falling, it should be tied to a vertical support. This could be a thin wooden pole, 6 mm wire, etc. All stepsons, except one, the lowest one, must be broken off at the very beginning of their growth. Over the summer, such a plant grows up to 1.5-2 m and is distinguished by good root growth.
Attention!
Seedlings grown in this way take root before winter and will survive the winter with little shelter.
Caring for seedlings involves regular watering and spraying.
When caring for them, you should follow the following rules:
- Provide moderate soil moisture.
- Control emerging weeds.
- Use complex fertilizers to feed seedlings. After a week, feed the planted plants with potassium and wood ash.
- Observe lighting conditions.
- Carry out periodic pest control.
Correct rooting is indicated by the development of the root system before the appearance of foliage. If the process is reversed, then you are doing something wrong.
Humidity and watering
Care rules include ensuring high humidity. Therefore, spraying with warm water (20-25°) is recommended up to five times a day. Starting from 10-12 days, when root buds appear, reduce the number of sprayings to three per day.
Watering is carried out as the soil mixture dries (1-2 waterings per week). It is produced through a tray to avoid root rotting.
Temperature
To germinate cuttings in water, the temperature outside should be approximately 20°C, and inside the jar - no more than 38°C. At high temperatures during storage of germinated cuttings, the intensity of nutrient consumption increases. This may cause loss of viability by the time of rooting. And very low temperatures lead to freezing and drying out of the eyes. The optimal temperature for preserving cuttings is 0-5°C.
Light for cuttings
Containers with pipes should be kept in a bright place, but direct penetration of UV rays is not permissible. They can cause burns on grape leaves.
Hardening of seedlings
Before planting grapes in the ground, they are pinched and gradually hardened off in the fresh air over 5-10 days, and the planted ones are still shaded from direct sunlight.
Rooting cuttings
The chibuki remain in the cellar, basement or refrigerator at least until the New Year. It is simply not advisable to take them out ahead of time and root them: there is more hassle, the result is worse.
The end of winter - it's time to get out the pipes
Growing seedlings itself has a specific goal: to provide a time advantage compared to seedlings from an open-air school. This is how gardeners in the southern regions (Kuban) reason. For other winegrowers, early rooting of chubuks at home is the only real way to get a strong bush during the season that can survive the winter.
The absence of a period of biological rest affects plants as negatively as lack of sleep affects humans. 2-3 months of winter sleep is a necessary development phase that increases the plant’s immunity. It is better not to disturb the cuttings cut in November until mid-January, since metabolic processes do not stop during sleep, and the rudiments of growth shoots are formed in the eyes.
The second objective reason why chibuki should not be germinated before the New Year is the length of daylight hours. During the first stages of rooting, sunlight is not necessary, because only heat matters for the formation of root primordia. Lighting will be needed only after 1.5 months for the development of escape from the bud. Just in March, daylight hours begin to noticeably increase and the need for artificial additional illumination of the seedling disappears.
Preparing for germination
It is not advisable to place the stems for rooting directly from the cellar or refrigerator; first you need to start the metabolic processes: prepare the vines for rooting. This is a responsible process, errors in which affect not only the quality, but also the quantity of seedlings obtained.
Final cutting of the vine into planting cuttings
1. Using sharp pruning shears, cut the vines into cuttings:
We make the lower straight cut at a distance of 1/2 cm from the bud directly below the node with traces of the tendril. It is at this node that there is a diaphragm, the presence of which guarantees good rooting.
We make the upper oblique cut 2-3 cm above the top node . The cutting plane must be chosen in such a way that water can flow away from the side of the peephole.
- In order not to distract the vitality of the cutting from germinating roots, experienced winegrowers recommend plucking the eye from the lower node . The rule is applicable only for cuttings with two or more internodes; cuttings with one node do not need such an operation.
- Furrowing. A traditional gardening technique is designed to activate the cambium. Shallow cuts and scratches applied to 1⁄3-¼ of the lower part of the cutting trigger regenerative processes and cambium cells turn into root rudiments.
Cuttings treated with paraffin are cut and furrowed in the same way; the procedure is no different. Water will flow through the updated cut. The remains of the protective layer do not interfere with the rooting process at all.
Soaking is the final stage of preparation
The cuttings prepared in this way are soaked in cold water for a day or two: it is better to take rainwater or settled tap water. To stimulate root formation, experienced gardeners recommend using bee honey in the amount of 1 tablespoon per bucket of water. It contains all the necessary microelements and enzymes. The bucket with the cuttings is left in a cool place for no more than 2 days; if soaked for longer, the cuttings may suffocate.
After a day or two, the cuttings are completely ready for germination; weak ones can be additionally treated with root formation stimulants (Kornevin or heteroauxin according to the instructions).
Cuttings according to Radchevsky
A very simple and yet effective method of rooting cuttings at home was proposed by the famous winegrower Pyotr Radchevsky. All you need are cuttings and a regular glass jar:
- Cut the vines (as mentioned above) and soak in cold water with the addition of one spoon of honey per bucket.
- Pour 2-3 cm of water into a glass jar and install the prepared cuttings. Thermal insulation must be organized - a stand (cardboard, board, polystyrene), it is necessary so that cold air does not cool the water in the jar.
- For storage, it is advisable to choose a south-facing window. If there is a lack of natural light in gloomy weather, it is advisable to install additional lighting. Under the influence of rays, on day 10-15 the eyes on the cuttings will wake up and sprout.
- The root primordia become visible only 1 week after the formation of shoots. This is fine. The cuttings feed on water and their own supply of nutrients.
The tiny roots are very fragile and, when grown, do not tolerate transplantation well. For rooting in the ground, barely noticeable roots (no more than 5 mm in length) are enough.
Germinating grape cuttings in a jar of water
To grow a dozen seedlings in a city apartment, there is a simple, proven method - in an ordinary glass jar.
- Place a layer of cotton wool (about 2 cm) on the bottom of the jar (the volume does not matter) and pour the same layer of boiled water (2 cm). It is advisable to add a few crystals of potassium permanganate and a couple of tablets of activated carbon to the water for disinfection.
- Place the cuttings in a jar and place the jar itself on the windowsill. It is advisable to mark the water level with a marker so that you have something to compare with.
Further care involves monitoring the water level. If desired, you can put a plastic bag on top of the jar so that the water evaporates more slowly. You will get an impromptu mini-greenhouse.
The buds bloom first, the buds of roots at the site of scratches (furrows) appear 2 weeks later (sometimes even longer - it all depends on the quality of the vine).
Growing and cultivating cuttings
It happens that a second green shoot begins to sprout from the upper eye, but the roots have not yet formed. It is necessary to break off the first strong shoot so that it does not draw juices from the cutting. The supply of nutrients for 2 shoots and roots may simply not be enough.
It is imperative to pinch off the rudiment of the inflorescence - you definitely won’t need it. There is no need to be afraid that the bush will grow weak - the replacement shoot is not inferior in strength to the zero one.
Kilchers are used to germinate a large number of vines. The device is a chamber with bottom heating. It turns out that the “legs” of the germinated cuttings are warm, and the “head” is cold. With such a temperature difference, roots form faster, and green shoots are in no hurry to grow.
The video shows how you can trim grape cuttings before planting for further germination.
Growing seedlings
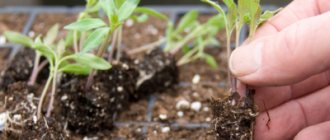
Cuttings with barely noticeable roots up to 5 mm should be planted in the ground; cups or cut PET bottles will do.
Planting cuttings
It is better to prepare containers and soil for germinating cuttings in advance, so that when the roots appear, the stems can be planted for rooting immediately. The soil requirements for rooting cuttings must be considered as a separate item to avoid common mistakes.
The soil
When growing seedlings (or seedlings from seeds), the main task is to create conditions for good root growth. The development of the root system determines the rapid survival of the seedling in a permanent place and its subsequent growth. With the best of intentions, gardeners provide the most fertilized soil and thereby do a disservice: with an excess of nutrients, the roots almost do not grow, since they have no need to penetrate the volume of soil in search of everything they need.
To germinate cuttings, it is best to use loose soil with a moderate amount of organic matter , in equal parts:
- sand,
- garden soil,
- mature humus or compost.
The mixture is prepared at optimal humidity. Use the rule: soil, squeezed in your hand, forms a lump and does not stain your palm. This is the state of the soil that should be adhered to and should not be over-moistened under any circumstances.
You should be prepared for the fact that the roots of even chibouks of the same variety will not hatch at the same time.
Planting chibouks
Disposable plastic cups with a capacity of 0.5 liters look neat and attractive, but their volume is not sufficient for the development of the root system of a seedling. To plant grape cuttings for rooting, larger containers are required - approximately 1 liter.
Cut PET water bottles are well suited for this purpose.
- It is convenient to use 1.5 liter bottles without a neck; their capacity is just over 1 liter.
- Stagnation of water is strictly contraindicated, so drainage holes are required.
- To avoid stagnation of water, drainage is laid at the bottom. You can use a layer of expanded clay, pebbles, crushed stone, etc.
- To prevent the top layer of soil from clogging the drainage channels, a piece of agrofibre is laid on top of the expanded clay.
- Pour 2-3 cm of prepared soil.
- Install the cutting and gradually carefully fill the container with loose soil, shaking a little to compact it.
As a result, the cutting should be buried 10-12 cm into the soil. It is watered and placed in a well-lit place.
Preparation of planting material
The length of the cuttings for planting should be at least 20 cm. The optimal cutting thickness is 8-10 mm. It may have 1-5 buds.
Preparation of planting material includes the following steps:
- Cutting cuttings.
- Storage.
- Preparing for landing.
When preparing cuttings for planting, special attention is paid to their storage. For planting, cuttings of only those grape varieties are selected that are intended for cultivation in the area planned for growing the plant.
Strong seedlings from cuttings - what you need to know
Even at home it is possible to obtain viable seedlings. Oddly enough, it will be necessary to minimize the manifestations of excessive “care”. It is enough to create optimal conditions for the manifestation of the plant’s potential:
- Roots require warmth to grow: a window sill above a radiator is ideal.
- The cool air from the cold glass helps inhibit the growth of the green shoots of the vine. This is necessary to maintain a balance between the development of underground and aboveground parts.
- Do not overuse watering ! Water only when the soil dries out. It is best to use bottom watering through a tray, so the grapes will take exactly as much water as they need.
- 2 weeks after planting for rooting, seedlings should be fed with complex water-soluble fertilizer such as Master or Kemira according to the instructions (1 teaspoon per 2 liters of water).
Such fertilizing is practiced at intervals of 2 weeks, until the seedlings are planted in a permanent place in open ground.
When to plant seedlings in a permanent place
Planting of vegetative seedlings in prepared holes is often carried out from the first ten days of May (if there is no risk of return frosts) until the first summer month, while it is advisable not to destroy the clod of earth and preserve the fragile root system.
During the summer, it is necessary to provide proper care for young grapes; it is important that by winter the bush has a good root system and several well-ripened buds, otherwise it will not survive this season.
Questions from mail
Marina, 42 years old, Tver.
Please advise the easiest way to propagate wild grapes at home. It’s so beautiful at the neighbors’ dacha both in summer and autumn.
Ornamental wild or, as it is also called, “maiden” grapes take root without any stimulants with almost 100% probability.
- In May-early June, when last year's shoot began to grow, it is cut into chibouks with 2-4 nodes. It is best to choose areas where there are already root primordia in the nodes (see photo).
- Practice has shown that it is most convenient to care for a seedling growing in an individual container. For cuttings of virgin grapes, this is a pot with a volume of 1.0-1.5 liters.
- For rooting, use a mixture of peat and sand in a ratio of 4:1.
- For cuttings without leaves, the lower node or the entire “heel” with last year’s wood is buried.
A seedling in a pot can overwinter even under snow. They are planted in a permanent place using the transshipment method in the spring, before the leaves bloom.
Nikolay, 49 years old, Tambov.
I want to grow Isabella grapes for juice, wine, and compotes. In our area it spends the winter without shelter. They advised me to cut grape cuttings in the fall and root them. Can I plant cuttings directly into the ground?
The Isabella grape variety is an unusually hardy vine that is not afraid of frosts down to 30 degrees, does not suffer from traditional fungal diseases and, what is very important, tolerates waterlogging without the formation of foci of rot. This is the only mid-latitude grape variety that can be propagated by planting directly into the ground.
You can’t count on a large yield of suitable seedlings (no more than 50%), but the lack of hassle with storage and rooting adds to the attractiveness of the autumn rooting method. When pruning the vine, you get plenty of cutting material - planting can be planned “with a reserve.”
In order for the planted chibuki to overwinter without problems, it is necessary to cover them for the winter with dry leaves, straw, spruce branches and cover them with burlap or spunbond.
Ruslan, 38 years old, Lipetsk.
I sprouted autumn grape stems every year, everything worked out well. For the first time I decided to try to root green cuttings and nothing worked, although I did everything according to the rules
The technology for rooting green (summer) and autumn woody grape stems differs significantly. The main difference is the requirements for environmental humidity:
- autumn chibouks require a minimal amount of water to form roots;
- green summer chibouks evaporate water from their entire surface and constantly require moisture, which is difficult to control in the summer.
Propagation of grapes by cuttings in summer requires constant attention. Controlling temperature and humidity in a greenhouse-school takes a lot of time; even professional winegrowers prefer to harvest chibouks in the fall.
Rooting chibouks in soil or sawdust
In a large planting box (or greenhouse), chibouks with root rudiments are planted according to the same principle:
- install carefully;
- covered with filler;
- watered;
- fill to the top.
The distance between the stems must be at least 10 cm, otherwise they will become entangled with roots and it will be impossible to plant them without damage.