The climate in most regions of Russia does not allow growing vegetables beloved by many in open ground - the risk of temperature changes is too great, which leads to the death of plantings. Cucumbers, tomatoes, tomatoes and other crops love warmth and stable temperatures, which can only be achieved by planting them in a greenhouse. In this article we will look at how you can make one of the simplest structures - a greenhouse made of wood - with your own hands and cheaply.
Advantages and disadvantages of a wooden greenhouse
Wooden boards and bars are best suited for building reliable and durable greenhouses. Wooden structures have a number of undeniable advantages:
- Easy to assemble. Wood is pleasant and easy to work with; the boards are easily sawed off and fastened together without much difficulty.
- Environmentally friendly material. The tree allows oxygen to pass through perfectly and does not emit substances when heated that can harm the plantings.
- Low cost. As a rule, boards can be found at any summer cottage. Even if there are not enough of them, you can purchase wooden boards and bars at any hardware store for a relatively low cost.
- Reliability. When assembled correctly, a wooden greenhouse is not afraid of gusts of wind or heavy rain, and the durable frame can withstand absolutely any covering material - from film to glass.
- Long service life. The pre-treated wood from which the greenhouse will be assembled will serve gardeners for a very long time - up to 7 years. And if all repair work is carried out on time, the period can double.
- Independent choice of area. A wooden greenhouse can be built according to purely individual dimensions, which depend on the scale of the site and the planned plantings.
Like any material, a wooden structure for a greenhouse has a number of specific disadvantages:
- Sensitivity to moisture. The tree does not tolerate regular exposure to moisture, so it needs additional processing. In addition, its direct contact with the soil is undesirable; it is better to make an additional foundation for the frame, raising the greenhouse at least 10 cm from the ground.
- High biosensitivity. The wooden elements of the greenhouse frame easily become victims of rot and mold, especially on the inside. Careful processing will help solve the problem, as well as the correct choice of wood if you purchase it specifically and do not use what is left after repair work.
- Regular processing. Wood requires special care and treatment must be carried out regularly; fortunately, stores offer a wide selection of various specialized products.
- The need to use narrow boards. If, after repairs, you still have too wide boards, then a frame made from them will provide too much shade, which can adversely affect the quality of growth of planted crops.
- The difficulty of creating arches. If you are planning to assemble an arched greenhouse, then wood is the least suitable for these purposes - it is impossible to bend the boards at home, so the arch can only be put together from small bars, which complicates the assembly process and makes the structure more vulnerable.
What to use as a covering material?
This is an important point, since the covering material performs the task of thermal insulation, that is, thanks to it, the appropriate temperature must be maintained in the structure. This promotes good plant development and creates optimal conditions for a high-quality and quick harvest. You can use a film that is lightweight and still gets the job done
Some people prefer to use glass, but you will need to pay attention to installing a reliable support. Or buy polycarbonate, which will have to be a little tricky, since you need to cut it into plates of the required size and attach it correctly
Choosing wood
If you use boards from leftovers at your dacha, then choose the smoothest ones for the frame without chips or cracks. The optimal size is 50 by 50 for the main elements and 100 by 100 for the frame. Make sure that there are no signs of rot on the boards; one damaged element will subsequently lead to serious repairs to the entire structure.
If you plan to purchase wood in a specialized store, then choose industrial varieties, which include, for example, larch and pine. There is no point in spending a lot on beech or oak - they are more difficult to work with, and their service life is not much longer than that of other species. Pay attention to the humidity indicator - it should not be higher than 22%.
But even if you purchased the freshest wood, which, at first glance, does not need additional processing, still pre-plan it and impregnate it with a special composition. The finished greenhouse structure will need to be painted or impregnated with drying oil.
Foundation Features
The advantages of a wooden base are very convincing:
- mobility - you can dismantle the structure at any time and move it to a more suitable site;
- environmental friendliness - wood will not cause harm to health both during construction and after laying the foundation;
- minimum number of parts and necessary consumables;
- overall speed of construction - the wooden foundation is ready for installation of the greenhouse frame on it immediately after assembly;
- manufacturability of the material - fastening the foundation parts to each other and to the frame is carried out without difficulty;
- maintainability - a section of the foundation damaged by insects or moisture can be replaced by lifting the entire structure with a simple jack;
- ease of working with the material - the timber has smooth edges and precise dimensions, so you can easily calculate the required amount of wood.
Choosing a construction site
The main rule for choosing a place for a greenhouse is not a centimeter of shadow! The structure should be located away from the main buildings and tall trees that can create additional shadow. It can be destructive for many plantings, even if it covers them for only an hour a day.
Another important rule is that the door to the greenhouse should be located on the side that is least exposed to winds; in no case should it be made on the north side of the site - the plants will constantly freeze and die when ventilated.
Garage made of timber - we build it ourselves
There is nothing complicated in the technology of building “caravans” from timber. Drawings of such buildings are available in abundance on the Internet; you can choose the best option for yourself in just a couple of minutes. You can build a timber garage with your own hands, following the step-by-step instructions.
Set up a columnar foundation. You clear the area for the garage, remove the fertile soil layer from it, then carefully level the place where the new building will stand. Using twine and pegs, determine the installation points for the foundation for the garage, then make a sand cushion for the foundation. This process is simple - pour construction sand onto the ground, pour water on it, and tamp it. As a result, you should have a pillow approximately 20 cm thick. A layer of roofing material is placed on it. After this, the construction of brick or concrete pillars begins - in the corners and every 200 cm along the walls of the future garage. They are poured with concrete mortar and then waterproofed (after the mixture has set and dried) with bitumen-based mastic. Experts also advise laying two layers of roofing felt on the base of the building.
Place the foundation beam on the foundation supports. It performs the function of the lower harness. The timber is fastened at the corners using a plug-in or root tenon. You can use other methods of fixation, for example, “in the paw”.
You cut wooden joists into the bottom frame of the floor covering. These elements are made from 4-centimeter boards (sometimes bars are used), which are placed on the end. The distance between the lags is usually chosen within 50–100 cm
Please note that the areas where the boards are cut into the bottom frame need to be impregnated with a good antiseptic composition. It will provide high-quality protection of joints from moisture
Inserting wooden joists into the bottom frame of the floor covering
Lay all the next rows of boards on top of each other. They are fastened together with wedges made of hard wood. Such wedges are called dowels. They are inserted into holes in the bars, which are made using a brace
Here it is important to ensure that the holes in different products match. The wedges must be recessed a couple of centimeters into the timber. The need for this is due to the risk of gaps appearing when the wood dries out.
The need for this is due to the risk of gaps appearing when wood shrinks.
Insert the so-called “rafter legs” into the upper crown of the structure. The roof of the building can be mounted on them. For a garage that is not adjacent to a house or other building, it is recommended to have a gable roof. In other cases, a pitched roof is erected. Moreover, its slope should be on the outer wall.
It is advisable to cover the roof with the selected roofing material immediately after completing all the work described. If necessary, a temporary coating is laid - special waterproofing films that have good resistance to ultraviolet exposure and high strength.
But it is better to lay permanent materials - metal tiles, corrugated sheets, ondulin, slate and so on. These products are mounted on the lathing. They are attached to it with nails or universal screws.
Installation of ondulin on the garage roof sheathing
Garage flooring is most often made from tongue and groove floorboards. They are attached to the joists with the same nails and screws. Take the time to treat the wood on the floor with any fire retardant. It will reliably protect the coating from fire.
The construction of a “caravan” made of timber is completed by arranging the entrance to it. Here you don't even need complex drawings. You will need to mount 6 cm thick boards onto the support beam. The support itself is cut into the embedded lower beam at an angle of 30–45°.
Gates to a self-built garage can be made either automatic lifting or double-leaf swinging. The structure of the building can easily withstand both types of gates, as it is very strong and reliable.
https://youtube.com/watch?v=LWU_U2W-3fQ
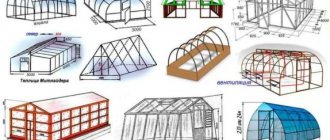
Types of structures
The most popular type of greenhouses are gable structures. But, in addition to them, with the help of wooden elements, if desired, you can build other types of greenhouses.
from left to right, top to bottom: arched, domed, lean-to, pyramidal greenhouses
Arched
An arched greenhouse, as we said above, is almost impossible to make entirely of wood in domestic conditions. For its installation, additional elements will be required in the form of metal or durable plastic arcs. Only a frame can be made of wood, which is created for ease of installation and reliable fixation of the structure. As a rule, low greenhouses are built using the arched method; they have excellent light transmission and do not require large time and material costs. But high greenhouses can also have an arched roof, this allows them to grow freedom-loving crops. The downside of such a structure is that it is practically unsuitable for growing seedlings, since it does not have enough maneuvers to carry out hardening of plantings. Another disadvantage of the arched structure is the need for additional cleaning of the roof from snow, which cannot roll off the arched roof on its own.
Domed
In central Russia, such a greenhouse will become an unmotivated luxury, since it involves a rather complex and costly installation process from triangular cladding elements. But in seismically unfavorable parts of our country, it is precisely this design that will become the safest and most resistant to earth vibrations. In addition, the domed greenhouse looks very stylish and fits organically into the exterior of any site. This design requires additional insulation and sealing due to the large number of joints.
Single-pitch
Lean-to greenhouses look like half a house. They are usually built for planting seedlings on the south side of the site. Mono-pitch structures are convenient because they can be attached to any existing structures on the site, be it a barn, garage or gazebo. The main condition is good lighting of the place. It is recommended to cover the roof slope with glass or plastic, which have good light transmittance.
Pyramid
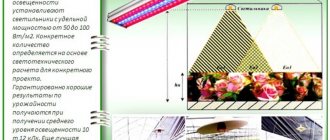
Since ancient times, the pyramid has been considered a mythical place of power. Many gardeners are confident that in such a greenhouse plants will grow and bear fruit better and more intensively. A square of the correct shape is used as a frame for its construction. Wooden beams extend upward from the base of each corner, intersecting at a single point at the top of the structure. The entrance to such a greenhouse, oddly enough, is best done from the north side. A greenhouse requires special precision in construction - for small garden plots, the optimal size is considered to be a diagonal of 2 m, a height of 3.2 m, and square sides of 1.42 m. These calculations are given in accordance with the rule of the “golden ratio”, a pyramidal greenhouse is built according to principle - the height of the structure should be exactly 1.57 times less than the side of the square of the base frame.
Measuring tools
Water level
Water levels allow you to control the height of the foundation. It is easy to use and does not require special qualifications. The water level consists of a tube with two glass cylinders with marks every 1mm and a hose. For better visibility, tinted water is poured into the tube.
Tip: To color water, use ink or another water-soluble dye. “Potassium permanganate” loses its color after a while, and glass tubes made from potassium permanganate are difficult to clean.
The bubble level allows you not only to lay down and control horizontal lines, but also to control the verticality of structures. There are levels that have a rotating bubble with a dial and marked marks in degrees. This level allows you to control any angles. The levels are up to 3 meters long.
Bubble level
Size calculation
The wooden structure of the greenhouse allows it to be made in any size that is suitable specifically for your site. There are several calculation rules that should be followed when constructing a structure to increase its strength and reliability:
- Tall crops require a wall height of at least 2 m.
- Load-bearing beams require fixing in the ground by digging them to a depth of 50 cm; they should be placed along the perimeter of the future greenhouse at least every 1.5 meters.
- If you are planning to build a gable greenhouse, then it will need to be strengthened with the help of additional beams that are dug into the center of the greenhouse from the inside. Their height is approximately 3.3 meters, and the spacing is 2.5 meters.
- If you plan to use film as a covering material, then you need to make additional wooden fastenings along the end parts of the greenhouse.
- On top, along the entire perimeter of the frame, bars are attached, which will serve as a supporting structure for the future roof.
- Rafter pairs must be attached strictly to the supporting structures of wooden walls.
- If your greenhouse is small, then it is enough to make one door opening and a window, but in a large-scale building, for better ventilation you need to provide two entrances.
Roof installation
The gable roof of a greenhouse is a hanging rafter system supported on the long sides of the top frame. Depending on the size of the wall frame, this may be one of the following options:
- At a height of 2 m and above. At the front arches, the transverse beam of the upper trim acts as a low tightening. These two arches are first assembled in the form of an angle (without a lower base), then lifted onto the frame and secured vertically, supported by temporary spacers. The remaining trusses are mounted on the ground and installed already assembled.
- With a height of 2 meters and long runs. The arches are additionally reinforced with headstocks. Otherwise, the installation algorithm is similar to the previous option - the front arches are installed in a semi-assembled form, the rest are assembled on the “ground”, and then lifted and attached to the upper trim.
- At a height of up to 2 meters at one of the front walls, the upper frame is “torn” by the door frame. In this case, the crossbar of the box acts as a raised tie or bolt. All other arches are assembled in the same way.
After the supporting structure of the roof is installed and secured, the arches are connected with purlins, onto which the polycarbonate sheathing is attached. The distance between the purlins and sheathing slats depends on the roof slope, the thickness of the polycarbonate and the snow load standard for the region.
Polycarbonate is fastened traditionally - at the joint with a gap, which is needed to compensate for thermal expansion. The sheets are attached to the frame using self-tapping screws with thermal washers, through pre-drilled holes of a slightly larger diameter. Installation begins with the roof, continues on the gables, and ends with long walls.
The joints are covered with appropriate profiles - ridge, corner, connecting. The ends are covered with sealing tape and an end profile. At the last stage, the door and windows (windows or transoms) are made and hung.
dizlandshafta
Step-by-step instructions for making a wooden greenhouse with drawings and dimensions
So, step-by-step instructions for making a greenhouse with your own hands from wood. We will analyze the whole process step by step with drawings and photos.
Sizing
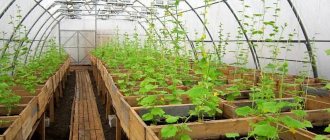
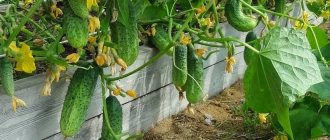
The size of the greenhouse must be determined in advance. It depends on many factors; most gardeners make the mistake of not taking into account the standard sizes of the materials used. For example, the optimal size of polyethylene film is a roll with a sleeve width of 3 meters. Based on this, the dimensions of the future structure are calculated. We propose to build a greenhouse measuring 2*5.4 m, where the height of the walls will be 1.5 meters. We will make a gable roof with rafters. To complete this project, you will need a reliable reinforced strip foundation.
In such a greenhouse you can grow vegetables from the onset of warm weather until the autumn cold snap.
Foundation preparation
Wood is a fairly heavy material; the planned greenhouse will have significant weight, so the foundation must be solid.
Having determined in advance the location of the future building, it is necessary to mark the foundation using pegs and threads. Next, a trench is dug around the entire perimeter, the depth of which depends on the quality of the soil. The optimal size is considered to be 55 cm. The trench, in turn, is filled with concrete mortar, after which, using formwork, the foundation is raised above the ground by another 25 cm. In order to make it more reliable and ready to serve for many years, it is necessary to use reinforcement and think over a waterproofing system; such a foundation can be used to build a greenhouse with any covering material; it will withstand both glass and polycarbonate.
Foundation for a greenhouse made of wooden blocks
At the stage of pouring the foundation, it is necessary to attach metal corners to it, to which the supporting beam will later be attached for mounting the frame.
Construction of the frame
The photographs below clearly show the frame diagram of the future wooden greenhouse.
Figure No. 1. Scheme of a wooden greenhouse frame
The trapezoidal design is the most popular greenhouse shape among gardeners.
Initially, the frame has a complete structure, but an additional structure for a window and a door will later be assembled in one of the end walls.
In the photo below you can see what the assembled frame of a wooden greenhouse looks like on a real garden plot.
Ready frame
Frame assembly
Step-by-step instructions for building a wooden greenhouse frame with your own hands.
Connection of the foundation with the supporting beam
In order for the greenhouse frame to stand level and strong, a beam of greater width than the base of the frame should be placed on the foundation. It should be the same length, and not consist of boards of different sizes, otherwise the greenhouse will not be as stable as we would like. It is attached to pre-prepared metal corners, which you installed at the stage of pouring the foundation. Before installing the support beam, place a fine mesh netting under the bottom along the entire perimeter of the greenhouse; it will help prevent the appearance of moles and other rodents that can harm the plantings.
Building walls
The key to easy work is correct measurements and strict compliance of all workpieces with them. Assembly of the frame begins with the side walls; they are the most massive and labor-intensive.
Figure No. 2. Side wall of the greenhouse
The figure shows the assembled side wall of a greenhouse 5.4 m long and 1.5 m wide. As you can see from the diagram presented, it is recommended to make grooves first; they will make the structure more durable and resistant to loads. You will have two such walls; to attach them to the rest of the structural elements you will need screws, clamps, a metal profile and corners.
Construction of the rafter system
The roof is an important part of the greenhouse; it must be resistant to winds and snowfall in winter, and there must be a sufficient number of support points for the film to fit tightly. A pitched roof requires a rafter construction system. It uses grooves into which rafter legs are inserted. The length of the rafter leg depends on your height. Usually a length of 1.27 meters is sufficient, but if the gardener is taller than average, then it is better to take bars 1.35 cm long. It is recommended to strictly observe these dimensions; they are based on the width of the covering film sleeve, which is 3 m. Accordingly, if If we unroll the roll, its width will be 6 meters. This is exactly the total length of the rafter leg and side post, so the film will not have to be cut and adjusted.
From two rafter legs, one rafter pair is obtained, which must be additionally reinforced with a wooden corner on top at the place of their connection and a crossbar, which are also inserted into pre-prepared grooves. The number of such pairs should correspond to the number of racks on the side walls. This is what a rafter pair looks like:
Figure No. 3. Rafters
Assembling the roof and installing wind boards
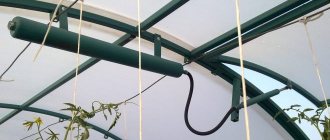
To assemble the roof you will need three long boards. Never use several small ones, this will greatly reduce the strength of the roof. The roof ridge and wind boards are inserted into the grooves of the rafter pairs. Before work, they need to be thoroughly sanded and treated with a special compound against rot and pests. The installation of wind boards is mandatory; they will prevent the film from being deformed by the wind and receiving mechanical damage.
In the picture below, the frame of the greenhouse is schematically drawn; we marked the roof ridge and wind boards in a darker color.
Figure No. 4. Location of wind boards and ridge on the roof frame
Door and window structure
The number of doors and windows directly depends on the size of the greenhouse. For a length of 5.4 meters, one door and a window are sufficient. To install them, you must choose the less windy side and do not do it from the northern part. After determining the end wall, using boards of the required size, make a base for the window and doorway. The door itself is made of four boards slightly smaller than the frame, and is additionally reinforced with a tie and corners. It sits on metal hinges that have been pre-treated with an anti-corrosion compound. A window is made in the same way; it should open outward, like a door.
Figure No. 5. Door and window
Covering a wooden greenhouse
The work of covering a wooden greenhouse begins with the roof. To do this, take a dense light-stabilized film with a sleeve width of at least 3 meters (100 - 120 microns). The first layer of film is fixed on top of the beams using cables tightly stretched from above. This allows you to further secure the structure and protect it from weather influences.
For the second layer of covering material, a film of less density (60-80 microns) is taken, which is tacked from below with nails and shingles. This is done not only to make the coating more reliable, but also to create a small air gap between the layers of the film, which will help better retain heat inside the structure.
Covering the finished frame with film
The work of covering the walls is carried out in the same way; the lower edge of the film is dug into the ground. The door and window openings remain at the end. The door is covered with film according to the same scheme.
The main thing is not to forget to additionally treat all elements of the wooden structure, because inside the greenhouse it will be hot and humid, which is detrimental to the wood. With proper treatment and proper care, such a greenhouse can serve you for at least 10 years.
How to build in a country house?
It is possible to build a wooden greenhouse with your own hands. To achieve a good result, you need to use materials that meet all requirements
In addition, it is important to adhere to all points of the step-by-step instructions. Let's consider step by step how you can build such a structure on the site yourself
A standard frame structure can be built with a base of 90x90 mm bars. In this case, purlins will be used to connect the racks at the top and bottom. A roof truss system with two slopes will run on top. The end walls will need to be supplemented with two doors. Between the racks there will be blank panels assembled from dense boards. In the future, they need to be framed. The upper part and roof of this structure can be decorated with glass. To bring this simple project to life, you will need the following components:
- bars with a cross section of 90x90 mm – 4 pcs. 4.2 m long;
- 4 things. with a length of 3 m;
- 12 pcs. – 3.6 m each;
- 38 pcs. – 1.8 m each.
You will also need a half-beam with a section of 54x90 mm:
- 2 pcs. 3 m long;
- 4 things. 4.2 m long;
- 24 pcs. – 2.4 m each;
- 28 pcs. – 1.8 m each;
- 34 pcs. – 1.2 m each;
- 102 pcs. – 0.9 m each.
You will also need 6 plywood sheets, nails, an antiseptic composition for wood, a roof cornice, metal handles and door locks, and door hinges. First, it will be necessary to create the foundation and foundation of the frame structure. For a greenhouse, it is permissible to prepare a strip-type foundation. First you need to assemble and lay out the lower part of the greenhouse frame on the waterproofing material. These components should be thoroughly coated with antiseptics. You will need to install wall racks on the foundation bars, the cross-section of which is also 90x90 mm.
Next, you need to assemble the frame bases of the gables using racks prepared from very dense boards. The ridge board should be placed under the rafter beams in pre-prepared nests. Thanks to this technique, the glass panels at the top will be much easier to install. The rafters must be assembled using construction nails, the length of which is 100-150 mm. Be sure to check the level of flatness of the slopes using a special lace. Carefully and thoroughly coat the entire wooden structure with an antiseptic solution.
Now you need to correctly install the panels and doors.
Let's look at how this can be done step by step.
First you need to make all the necessary parts. All frame elements must be connected at the same angle. The boards belonging to the panels will need to be inserted into the frames, having previously selected a quarter in their parts, that is, a special groove designed for installing the boards of the canvas. Then the workpieces will need to be cut at the required angles, starting from the required size. The upper frames should be prepared for fixing the glass. The panels must be assembled from well-dried boards.
Now we need to install the panels. This work must begin with the end floors. The parts must be installed on “finishing” nails with small heads. It is advisable to take fasteners with a length of 75-100 mm. The side walls must be assembled in the same way
During installation work, it is important to consider that the side panels will be wider than the end panels. The panels will need to be fixed between the racks
They will also need antiseptic treatment.
Now you can proceed to installing the door panels. Doors of a lightweight frame structure should be hung in the openings of the end walls. As for glazing, it can be either full or partial - up to half. The handle (preferably a metal part) must be fixed to the board in the door leaf. With the help of doors, ventilation in the greenhouse will be regulated, so they will not need to be tightened with mesh.
The next stage will be the glazing of the gable parts and roof. First, you need to install a glazing bead on the gable and supplement it with sealant. You will need to insert pre-sized glass into the prepared nests. In a similar way, fragile parts will need to be secured from the outside, and then secured with thin nails. Fix the glass on the roof in the same way. In this case, the support will be the rail that is nailed to the side bases of the rafter beam. The glass will need to be seated on a sealing compound and secured using glazing beads and thin nails.
Wooden greenhouse according to Mittleider + drawing
Jacob Mittlider is an American vegetable grower, agricultural consultant and expert, and a Doctor of Agricultural Sciences. He developed a special greenhouse design, which was named after him “Doctor Mittleider’s Greenhouse.” It is characterized by the strength of the frame, excellent ventilation, and the correct microclimate. You can also make such a greenhouse yourself, including from wood.
In the drawing you see a wooden greenhouse with transoms. The support beams are made of beams with a cross-section of 10*10 cm, the elements of the rafter system are 5*7.5 cm, the window transom frames are 5*5 cm. Film or polycarbonate can be used as a covering material.
The final part of the work
The simplest task is lining the greenhouse.
Craftsmen call polycarbonate the best material when it comes to such structures. Unlike polyethylene, it has increased strength, so it can easily cope with mechanical stress, resisting it. Polycarbonate is cut into plates, the dimensions of which must be indicated in the project diagram. The parts are secured using a sealing gasket, this will prevent damage to the material. Such work does not take much time and effort; the main thing is to prepare everything in advance, develop a project and follow the recommendations.
Briefly about the main thing
Wooden film greenhouses are gradually being replaced by polycarbonate structures, but are still used by many summer residents as the most economical and easy-to-make shelters for heat-loving plants.
In order for them to serve for a long time, you need to know how to make a greenhouse out of wood correctly. To do this, choose high-quality lumber and protect it from rotting with special means. The choice of film also matters: polyethylene is used as a temporary seasonal shelter, and winter greenhouses are covered with reinforced or polyvinyl chloride films.
Construction begins with the construction of a base, on which the frame is installed and covered with film, taking precautions and preventing breaks.
Special means against rot
Since wood structures are so common, the industry has developed various means to protect wood not only from rot, but also from various wood-boring beetles.
Wood protection is conventionally divided into two types:
- Chemical
- Biological
There are two types of chemical protection:
- Antiseptic
- Canning
Antiseptic treatment is the most popular and inexpensive method. Preservation of wood can only be carried out using special means using technological equipment. It is impossible to make canning at home.
- Water soluble
- Water repellent
- Combined
In addition to complex chemical impregnations, wood can also be primed and painted or varnished. If you cannot buy antiseptic compounds, you must use folk remedies to protect wood from rot.
Article on the topic: What is a timber harness
Folk remedies for protecting wood from rot
In order to reduce the cost of protecting wooden greenhouse structures, you can use waste oil from an internal combustion engine. To do this, you need to heat the oil to a temperature of 60-70 degrees Celsius and process the wood.
Where can I get used oil? From a neighbor, friends who have a car, or at a car service station. It is also available in large mechanical repair shops, transport companies, etc.
One of the ways to protect wood is burning it with a blowtorch. If bitumen is available, it can also be used for these purposes. To do this, you need to heat the bitumen and pour it in a thin stream into a bucket of diesel fuel. The bitumen will dissolve in diesel fuel and this composition can be used to treat the greenhouse structure.
Very useful advice: It is necessary to pour hot bitumen into cold diesel fuel, and not vice versa. Violation of this rule may result in severe burns from splashed bitumen.