To heat the greenhouse during frosts, it is recommended to use modern technical devices. The gradual onset of calendar frosts makes you think about the question of how to heat a greenhouse during frosts without damage to plants and the budget. The simplest way is to carry out additional insulation of the structure using film. If financial capabilities allow, then electronic systems are installed. Speaking about greenhouse insulation, gardeners urge you to abandon the common illusion. In fact, even frost-resistant plants need heat protection.
Cheap heating for a greenhouse. The cheapest and most efficient heating of a greenhouse in the off-season
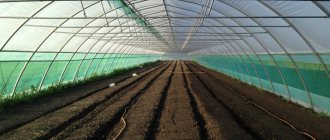
Gardeners and vegetable gardeners are no strangers to frosts in the off-season. If the greenhouse is not heated with electricity, you have to resort to additional means of protecting the seedlings from death. One of the simplest and at the same time effective means that has the right to exist is heating a greenhouse with a liquid candle. Perhaps this is the oldest and easiest way to help seedlings survive frosts. Making a candle is not difficult; its efficiency is quite high, and its cost is extremely cheap.
To create a liquid candle you will need:
- the thinnest possible candle with the thickest natural wax wick;
- sunflower oil (the oil should not be the cheapest, otherwise soot will form on the wick);
- any glass/iron container (jar, glass, etc.);
- for reliable fixation - alabaster (or any other building mixture).
Let's start creating a candle:
1. Pour alabaster or any other building mixture suitable for this purpose onto the bottom of the container. This is necessary in order to fix the candle in the glass/jar. Later, when the candle burns out, you can pour warm water, remove the candle and insert a new one. Thus, the action with alabaster is one-time.
Youtube | UNDERTHAL
Heating a greenhouse with candles is a simple and fairly common method. The heating structure is made independently from available materials.
2. As soon as the alabaster hardens a little, insert a candle and wait for maximum hardening. Next, add sunflower oil to the top. Do not use oil that is too cheap, as the wick may become sooted and have an unpleasant odor (or even go out).
Youtube | UNDERTHAL
Youtube | UNDERTHAL
3. Next, such a candle can simply be left on the table or placed in a bucket with holes drilled around the perimeter. Two or three of these buckets with liquid candles can heat a small greenhouse during the off-season frost. By the way, to save money, you can make one that will burn for more than 100 hours.
Instructions
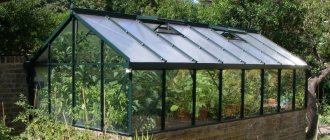
How to build a winter greenhouse made of polycarbonate with your own hands?
- Creating a foundation.
- Frame installation.
- Installation of communications.
- Installation of polycarbonate panels.
a strip foundation would be optimal . To install it, you need to dig a trench about 30-40 cm deep around the perimeter of the future building. A small layer of gravel and small stone (5-10 cm thick) is poured onto the bottom. Then the entire trench is filled with a layer of concrete.
When creating a solution, the best quality will be provided by a mixture of one part cement and three parts sand.
After the solution has hardened, you can begin installing the next layer . A layer of waterproofing is laid on the foundation layer (roofing felt is suitable). Then the base of the greenhouse is formed. A wall of small height is laid out of brick. The thickness of the walls is one brick. Not only new, but also previously used bricks are suitable for construction.
After creating the base and completely hardening the solution, you can proceed to the installation of the frame.
The simplest and most affordable option for creating a frame is a wooden frame. Its installation does not require any special knowledge or skills, or welding work. It is important to pre-prepare the wooden elements before installation.
First you need to clean the elements from dirt and adhering soil with a brush, then sand them with fine sandpaper. Then rinse with running water and let dry completely.
After this, you can proceed to applying paint and varnish coatings. The best paint for exterior use is one that is resistant to high humidity and different temperatures. After the paint has dried, you can apply a couple of layers of varnish on top.
A good way to protect wood is to impregnate it with epoxy resin before applying paints.
Now a beam with a section of 100x100 mm is installed along the perimeter of the foundation. To create a roof, you can use timber with a section of 50x50 mm. When building a roof, you must avoid areas without support larger than 1 meter. Also along the ridge you need to place several supports to further strengthen the structure.
To achieve maximum strength, you can also create a frame from boards.
The elements are attached using self-tapping screws and metal tape.
You can add a small vestibule at the entrance to the greenhouse. This will reduce heat loss when entering and exiting the greenhouse.
The next stage is associated with the installation of a heating system , lighting and other necessary communications.
Lamps sufficient to illuminate the entire room are installed along the roof ridge. For convenience, it is best to place all switches near the entrance.
When installing stove heating, a chimney is installed. It is important to remember that when the stove is operating, the chimney pipes become very hot and can melt the polycarbonate panels.
The final stage of creating a winter greenhouse is the installation of polycarbonate sheets. The sheets are fastened together using an H-shaped profile. A U-shaped profile is mounted on the panel at the ends. The sheets themselves are installed vertically, then moisture flows down them better.
Do not attach the sheets too tightly. Polycarbonate expands when heated, and installation that is too rigid can lead to cracks.
Polycarbonate is attached using self-tapping screws with a seal. The seal prevents moisture from penetrating through the holes. Before installation, holes are made on the sheets with a diameter slightly larger than the self-tapping screw. A special sealing tape is placed between the frame and the panels.
After this, the greenhouse is ready for use .
Creating a winter greenhouse is somewhat more complicated than an ordinary one, but anyone can do it and does not require any special skills.
In addition, the creation of such a greenhouse does not require serious financial investments. And the result in the form of fresh products throughout the year is worth the effort.
Heating the greenhouse with candles. How to heat a small room, tent, greenhouse with one candle?
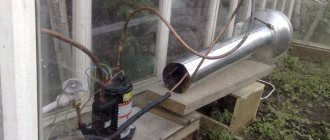
We all know how much heat it takes to warm a cold house on a winter day. However, modern inventors are constantly coming up with new devices that can significantly save resources and effort. An example of such an invention would be a miniature stove powered by a single candle.
Most likely, such a stove will not be able to heat a large room on a frosty day. Here you will need to organize a full-fledged heating system, for example, think through electric heating schemes. But for heating a tent during a hike or even a greenhouse, the power of this stove will be quite enough.
This amazing device was invented by a Californian named Doyle Doss. It is put on stream and is called “Candle Heater” or in the original “Kandle Heeter”. The heater is quite successfully sold on the American market for $25 apiece. You can do it yourself using the diagram below.
To create such a heater, you will need:
Candle base; Three ceramic flower pots of different diameters; Metal bolt and set of metal washers and nuts; Supports for pots; Candle.
So, the pots need to be placed one inside the other and connected with a metal bolt with washers and nuts threaded onto it as shown in the heater diagram. Place the candle on the stand and secure the finished structure to the supports above the candle. The heater is ready.
Now all the heat from the burning candle will not be wasted, but will serve to heat the room. By heating the metal rod and air in ceramic pots, the candle thus completely transfers its heat to heat the room. In the end, it turns out that there is a lot of it. Probably not enough for a room in a big house. But for a tent, greenhouse, hallway or bathroom - it’s quite enough. An additional bonus will be the absence of soot on the ceiling (it remains in a small pot and can be washed out), as well as the lighting of the room from candle light. A very convenient option during power outages.
How to save frozen seedlings
If you still failed to protect the tomato seedlings from spring frosts and they froze, then you need to take urgent measures to help revive them. The fact is that tomatoes are among the plants that regenerate well. And if they are properly processed and given good care, then the grown bushes will give a good harvest.
But the seedlings can only be saved if the frost was not lower than minus 3 degrees. If the bushes are covered with a crust of ice, then it is no longer possible to revive them.
Trimming
During freezing, tomatoes most often do not freeze completely. As a rule, only their upper part suffers, which becomes dark and droops.
To resuscitate damaged seedlings, you must adhere to the following action plan:
- The part of the stem that has been damaged by frost and turned dark must be removed. To do this, you need to use a sharp, pre-sterilized instrument.
- If the bushes have been very damaged by frost, they will need regular feeding with a solution of mullein or chicken droppings.
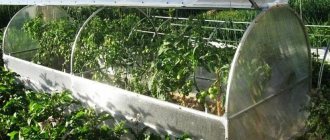
- During the first 7 days, while the plants have not yet recovered, it is recommended to build a small greenhouse over them, consisting of metal arcs and film.
Also, very often, Epin’s solution is used to save frozen tomatoes, which helps even in the most hopeless cases.
This adaptogen and biostimulant is very effective when seedlings freeze.
- Prepare the solution, strictly following the instructions on the package with the drug.
- Add a pinch of citric acid to the finished mixture.
- Late in the evening or early in the morning, spray the bushes with the resulting solution, after watering them.
- Treatment cannot be carried out during the day.
Pouring
To revive frozen seedlings, they need to be doused with cold water before the sun rises. You need to pour over each bush, trying to get the liquid on all the leaves and shoots. When the dousing procedure is completed, do not touch the bushes so as not to shake off drops of water from them.
This procedure will help restore lost moisture to plants, and it also helps stimulate sap flow.
How to heat a greenhouse with a candle. Why is heating used in greenhouses?
If you heat shelters for growing crops, this will help to significantly extend the period of harvesting, and will also allow you to harvest the earliest possible harvest. Well-established heating will allow you to grow plants all year round and get several harvests.
In this case, it is best to use a permanent greenhouse and install heating in it. In this case, it is necessary to organize automatic control or constantly monitor the process.
Such systems can help in growing heat-loving exotic crops in regions with harsh climates.
It will be important to install a heater in a cold greenhouse in climates with short summers or changeable springs with recurrent frosts.
Important! When choosing a heater for a winter greenhouse, you should take into account the parameters of the greenhouse and climatic conditions, the power and efficiency of the device, and the budget. We should also not forget that the cost of vegetables grown in shelters should not be higher than the cost of heating.
When and how to use
It makes sense to use heaters at such times:
- In the spring. It is used for earlier planting of seedlings or sowing seeds for seedlings, while taking into account the characteristics of the crops being grown. For example, the minimum soil temperature for tomato seeds to germinate is +10°C, but at +16°C they will sprout faster. For normal development of seedlings, the air temperature at night should not be below +15°C, and temperatures below +12°C are generally undesirable. Such heat-loving crops are planted when the soil warms up to +10...+12°C. And radishes and greens sprout already at +3...+5°C. In sheltered areas, the soil temperature is usually only a few degrees warmer than in open beds.
If you use heaters, then all sowing or planting work can be done earlier. As the weather warms up, heating can only be left on overnight. But you shouldn’t get carried away with it so that the temperature difference necessary for the crops remains. - In summer. Sometimes even in summer, in some regions temperatures drop to critical levels. But usually there is no need for heating at this time in protected ground.
- In autumn. When temperatures begin to decline and the nights become colder, heating at night becomes important.
- In winter. It is very important during the cold period to constantly maintain the required conditions for growing crops. The use of heaters makes sense in capital or well-sealed rooms with well-established lighting and the use of automation. Not every device can handle this.
Comprehensive preparation of a polycarbonate greenhouse for winter
At the end of the harvest, you need to think about proper care and preservation of the greenhouse for the winter. All manipulations must be completed before the onset of stable frost indicators.
- First, the entire frame is inspected, and if repairs are required, the load-bearing parts are restored.
- All fasteners are thoroughly inspected; if any screws have become loose, they must be returned to their place.
- The entire coating should be washed using special solutions. When cracks appear, they are degreased and secured with reinforced tape.
- Be sure to disinfect the soil and replace it if necessary. All remnants of plants and unnecessary equipment are removed, and the sides of the beds are cleaned. The greenhouse must be completely emptied.
- In the absence of heating, it is necessary to regularly remove snow to prevent deformation of the frame.
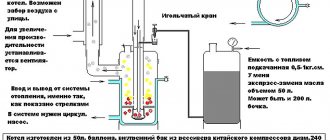
The most economical greenhouse heating. Heating options and methods
Experienced gardeners share their inventions and experience in using commercially available devices for heating a film greenhouse. The most common of them include the following:
- stove heating;
- water heating from a boiler;
- use of a gas gun;
- IR heaters and convectors;
- heating the soil using cables or water pipes.
The possibility of using one or another method of heating a greenhouse depends on having access to an appropriate source of thermal energy. For example, when creating a water heating system for a greenhouse with walls made of polycarbonate or film, access to a central water supply is required. The type of fuel for operating the boiler can be any: gas, electric, liquid or solid fuel.
Each of the above methods of heating a greenhouse has its own advantages and disadvantages. The use of gas guns is considered quite effective and resource-saving, gas consumption is minimal. When choosing guns, the area of the rectangular space of the greenhouse and the required power are taken into account.
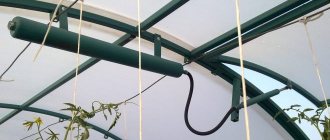
If we consider electric as the main source of energy, it is best to purchase an infrared heater. Such a system effectively increases the temperature of the air space in the room, without drying out the air and the plants themselves.
In addition to IR heaters, infrared films are used to heat the soil. For plant growth and maturation, soil heating is most important. The film is easy to install with your own hands; it is placed under the ground, thereby heating the soil and the air above it. The disadvantage is the need for electrical wiring.
The stove device is considered an economical way to heat a greenhouse. The disadvantage of this option is the need to manually maintain the desired temperature in the oven. In addition, stoves dry the air space of greenhouses.
Tips for choosing building materials
Most often, cellular polycarbonate is used to make greenhouses.
Cellular polycarbonate sheets
Such sheets are durable and transmit about 90% of light. The material practically does not transmit ultraviolet radiation. Sheets can have the following structure:
Structure of cellular polycarbonate
Instructions on how to choose the right polycarbonate for a greenhouse:
- First of all, you need to select the thickness of the sheets. The parameter should be selected based on wind load, bending and number of posts. For outdoor use, the minimum material thickness is 8 mm.
- Sheets of thinner thickness are cheaper, but you won’t be able to save money. If you use thin polycarbonate, you will need to make more frequent lathing steps, which entails additional costs.
For different purposes, material of different thicknesses should be used:
- 4 mm sheets are used for the construction of canopies and small greenhouses;
- 6 mm thick polycarbonate can be used to make small greenhouses;
- thickness 8 mm is suitable for medium-sized greenhouses;
- using 10 mm sheets you can perform continuous processing of large vertical bases;
- material with a thickness of 16 mm makes it possible to process roofs over large spans and is used in large complexes.
During the selection process, it is worth considering that the optimal density for installing a greenhouse is 800 g/m2. Density is the weight of the material per 1 m2 of sheet. The value affects strength. It can also be analyzed by visual inspection: if the material is packaged, then it should be placed evenly, and there should be no waves or bends on the sheets. If the foot is deformed, then it is better not to use the material.
Before purchasing, you need to study the inscriptions on the film. Sellers often offer lightweight and budget-friendly polycarbonate under the brands of global manufacturers. The labeling must be appropriate.
Recommendations to help you purchase quality material:
You can find a lot of low-quality polycarbonate on sale. It is recommended to give preference to well-known brands. Lightweight polycarbonate can be used in countries with warm climates
The material can hardly withstand temperature changes and has a short service life. It is worth paying attention to production standards. If the packaging says that the material has a thickness of 4 mm, but in fact the thickness is 3.5 mm, then you should not buy such a product. The weight of ordinary sheets is 10 kg. High-quality sheets have markings on the base that indicate the application of a special film to protect against sunlight.
When bent, high-quality material should not crack.
Experts advise checking documents for polycarbonate. The packaging must be of high quality. The sheets are placed in plastic film. There should be no unevenness on the polyethylene.